







You can create a data migration task to migrate data from an OceanBase database to a tenant of the same type in OceanBase Database. Through schema migration, full migration, and incremental synchronization, it seamlessly migrates the existing business data and incremental data from the source database to the target database.
Notice
If a data migration task remains inactive for an extended period (with a status of Failed, Paused, or Completed), it may become unrecoverable due to factors such as the retention period for incremental logs. To reclaim resources, the system proactively releases tasks that have been inactive for more than 7 days. It is recommended that you configure alerts for your tasks and promptly handle any related exceptions.
Prerequisites
You have created the corresponding schema in the target OceanBase database.
You have created clusters and tenants in both the source and target OceanBase databases. For more information, see Create an instance and Create a tenant.
You have created a dedicated database user for data migration in OceanBase Database and granted it the required permissions. For more information, see Data migration user privileges.
Limitations
Only users with the project role of Project Owner, Project Admin, or Data Services Admin can create a new data migration task.
Limitations on the source database
Do not perform DDL operations that modify database or table schemas during schema migration or full migration. Otherwise, the data migration task may be interrupted.
Currently, data migration supports OceanBase Database (including MySQL and Oracle compatible modes) V2.x, V3.x, and V4.x.
The data migration service only supports migrating objects whose database, table, and column names are ASCII-compliant and do not contain special characters (including .|"'`()=;/& and line breaks).
The data migration service does not support case-sensitive mode. If a database or table with the same name but different case exists at the target, the precheck will report an error.
When the target is a database, the data migration service does not support triggers (Triggers) at the target. If triggers exist, data migration may fail.
Considerations
If the source character set is UTF-8, it is recommended to use a character set compatible with the source at the target (for example, UTF-8, UTF-16, etc.) to avoid issues such as garbled characters at the target due to character set incompatibility.
Clock desynchronization between nodes, or between the client terminal and the server, may cause inaccurate latency reporting during incremental synchronization.
For example, if a clock is earlier than standard time, the reported latency may be negative. If a clock is later than standard time, it may cause a positive latency.
If DDL synchronization is disabled, you must restart the data migration task if you modify a unique index at the target. Otherwise, data inconsistency may occur.
Verify whether the migration precision for column types such as DECIMAL, FLOAT, and DATETIME meets your expectations. If the precision of the target field type is less than that of the source field type, truncation may occur, leading to data inconsistency between the source and target.
In a data migration task where the source is an OceanBase database and DDL synchronization is enabled, if a rename (RENAME) operation occurs on a source database table, it is recommended to restart the task to prevent data loss during incremental synchronization.
Data migration between MySQL-compatible modes of OceanBase Database may result in data inconsistency if the table structures at the source and target are not identical. Known scenarios include the following:
When manually creating a table structure, if it falls outside the supported scope of the data migration service, implicit conversion issues may arise, causing inconsistent column types between the source and target.
If the data length at the target is shorter than at the source, data truncation may occur, leading to data inconsistency between the source and target.
If you configure only Incremental Synchronization when creating a new data migration task, the service requires the local incremental logs of the source database to be retained for more than 48 hours.
If you configure Full Migration + Incremental Synchronization when creating a new data migration task, the service requires the local incremental logs of the source database to be retained for at least 7 days. Otherwise, the data migration task may fail due to inability to obtain incremental logs, potentially leading to data inconsistency between the source and target.
If performing incremental synchronization with an OceanBase database as the source and the database table objects contain UDT columns, the incremental synchronization task may fail due to unsupported UDT columns.
Supported source and target instance types
Cloud Vendor |
Source |
destination |
|---|---|---|
| AWS | OceanBase MySQL Compatible(Transactional) | OceanBase MySQL Compatible(Transactional) |
| AWS | OceanBase MySQL Compatible(Transactional) | OceanBase MySQL Compatible(Analytical) |
| AWS | OceanBase MySQL Compatible(Transactional) | OceanBase MySQL Compatible(Self-managed database) |
| AWS | OceanBase MySQL Compatible(Self-managed database) | OceanBase MySQL Compatible(Transactional) |
| AWS | OceanBase MySQL Compatible(Self-managed database) | OceanBase MySQL Compatible(Analytical) |
| AWS | OceanBase Oracle Compatible(Transactional) | OceanBase Oracle Compatible(Transactional) |
| AWS | OceanBase Oracle Compatible(Transactional) | OceanBase Oracle Compatible(Self-managed database) |
| AWS | OceanBase Oracle Compatible(Self-managed database) | OceanBase Oracle Compatible(Transactional) |
| Google Cloud | OceanBase MySQL Compatible(Transactional) | OceanBase MySQL Compatible(Transactional) |
| Google Cloud | OceanBase MySQL Compatible(Transactional) | OceanBase MySQL Compatible(Analytical) |
| Google Cloud | OceanBase MySQL Compatible(Transactional) | OceanBase MySQL Compatible(Self-managed database) |
| Google Cloud | OceanBase MySQL Compatible(Self-managed database) | OceanBase MySQL Compatible(Transactional) |
| Google Cloud | OceanBase MySQL Compatible(Self-managed database) | OceanBase MySQL Compatible(Analytical) |
| Google Cloud | OceanBase Oracle Compatible(Transactional) | OceanBase Oracle Compatible(Transactional) |
| Google Cloud | OceanBase Oracle Compatible(Transactional) | OceanBase Oracle Compatible(Self-managed database) |
| Google Cloud | OceanBase Oracle Compatible(Self-managed database) | OceanBase Oracle Compatible(Transactional) |
| Alibaba Cloud | OceanBase MySQL Compatible(Transactional) | OceanBase MySQL Compatible(Transactional) |
| Alibaba Cloud | OceanBase MySQL Compatible(Transactional) | OceanBase MySQL Compatible(Self-managed database) |
| Alibaba Cloud | OceanBase MySQL Compatible(Self-managed database) | OceanBase MySQL Compatible(Transactional) |
| Alibaba Cloud | OceanBase MySQL Compatible(Self-managed database) | OceanBase MySQL Compatible(Analytical) |
| Alibaba Cloud | OceanBase Oracle Compatible(Transactional) | OceanBase Oracle Compatible(Transactional) |
| Alibaba Cloud | OceanBase Oracle Compatible(Transactional) | OceanBase Oracle Compatible(Self-managed database) |
| Alibaba Cloud | OceanBase Oracle Compatible(Self-managed database) | OceanBase Oracle Compatible(Transactional) |
Procedure
Create a data migration task.
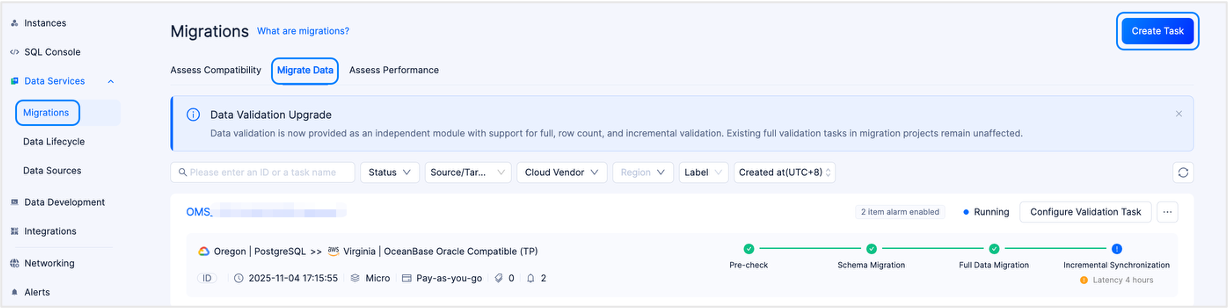
Log in to the OceanBase Cloud console.
In the left-side navigation pane, click Data Services > Data Migration.
On the Data Migration page, click the Data Migration tab.
On the Data Migration tab, click Create Task in the upper-right corner.
In the Edit Task Name text box, enter a custom name for the migration task.
We recommend that you use a combination of Chinese characters, numbers, and letters. The name must not contain spaces and must be no longer than 64 characters long.
On the Configure Source & Target page, configure the parameters.
In the Source section, configure the parameters.
To reference an existing data source, click Quick Fill next to Source and select the target data source from the drop-down list. After selection, the configurations for the source area will be automatically populated. If you want to save the current configuration as a new data source, click the Save icon in the upper-right corner of the Source section.
You can also click Manage Data Source in the Quick Fill drop-down list to go to the Data Source page to view and manage data sources. This page provides unified management for different types of data sources. For more information, see the documentation in the Data sources module.
ParameterDescriptionCloud Provider Currently supports Alibaba Cloud, AWS, and Google Cloud. Database Type Select OceanBase MySQL Compatible or OceanBase Oracle Compatible as the source based on your actual situation. Instance Type Currently supports Dedicated (Transactional) and Self-managed Database. Region Select the region where the source database is located. Connection Type Includes Endpoint and Public IP. - If you select Endpoint, add the account ID displayed on the page to the allowlist of your Endpoint service to allow connections from this account's endpoint to the Endpoint service. For more information, see Select private network connection.
- If you select Public IP, add the data source IP address displayed on the page to the allowlist of the OceanBase database instance to ensure connectivity. For more information, see Select public network connection.
Note
This parameter is displayed only when the instance type is a self-managed database. After you select the regions for the source and destination, the page will display the data source IP address that needs to be added to the allowlist.
Connection Information This parameter is displayed only when the instance type is a self-managed database. - When Connection Type is set to Endpoint, enter the name of the Endpoint service.
- When Connection Type is set to Public IP, enter the IP address and port number of the database host.
Instance The ID or name of the instance where the OceanBase database is located. You can view the ID or name of the target instance on the Instances page. Note
For Alibaba Cloud as the cloud provider, cross-account authorization for Alibaba Cloud root account instances is also supported. For details, see Alibaba Cloud Account Authorization.
Tenant The ID or name of the OceanBase database tenant. You can expand the target instance on the Instances page to view the ID or name of the target tenant under that instance. Database Account The username of the OceanBase database user used for data migration. Password The password of the database user. When the instance type is Self-managed Database, if you need to perform schema migration and incremental synchronization, configure the parameters in the Advanced Settings section.

If you need to select Schema Migration or Incremental Synchronization in the Select Type & Objects step, enable the sys Tenant Account and configure the following parameters.
ParameterDescriptionSys Account The name of the sys user. This user is mainly used to read incremental logs and database object structure information from OceanBase databases. Please create it under the sys tenant of the business cluster. Password The password of the sys user. If you need to select Incremental Synchronization in the Select Type & Objects step, enable OBLogProxy and fill in the OBLogProxy connection information.
Notice
Incremental synchronization is supported only when both the sys tenant account and OBLogProxy are enabled.
OBLogProxy connection information is an incremental log proxy service for OceanBase Database. It provides access and management capabilities for real-time incremental projects as a service, facilitating application access to incremental logs of OceanBase Database. It also addresses the need to subscribe to incremental logs when network isolation is in place. The format is
OBLogProxy IP:OBLogProxy Port.
In the Target section, configure the parameters.
If you need to reference a created and saved data source, click Quick Fill on the right side of Target and select the target data source from the drop-down list. After selection, the configurations in the target area will be automatically populated. If you want to save the current configuration as a new data source, click the Save icon in the upper-right corner of the Target area.
You can also click Manage Data Source in the Quick Fill drop-down list to go to the Data Source page, where you can view and manage data sources. This page provides unified management for different types of data sources. For more information, see Data sources.
ParameterDescriptionCloud Provider Currently supports Alibaba Cloud, AWS, and Google Cloud. You can choose the same cloud provider as the source or migrate data across cloud providers. Note
The cross-cloud provider migration feature is not currently available by default. To use this feature, contact OceanBase Cloud Technical Support.
Database Type Select the target database type OceanBase MySQL Compatible or OceanBase Oracle Compatible based on the source database type. Instance Type - If the source is OceanBase MySQL Compatible > Cluster Instance (Transactional), then the target OceanBase MySQL Compatible supports Cluster Instance (Transactional), Cluster Instance (Analytical), and Self-managed Database.
Cluster Instance (Transactional) stands for Online Transaction Processing (OLTP).
Cluster Instance (Analytical) stands for Online Analytical Processing (OLAP). - If the source is OceanBase MySQL Compatible > Self-managed Database, then the target OceanBase MySQL Compatible supports Cluster Instance (Transactional) and Cluster Instance (Analytical).
- If the source is OceanBase Oracle Compatible > Cluster Instance (Transactional), then the target OceanBase Oracle Compatible supports Cluster Instance (Transactional) and Self-managed Database.
- If the source is OceanBase Oracle Compatible > Self-managed Database, then the target supports Cluster Instance (Transactional).
Region Select the region where the target database is located. Connection Type Includes Endpoint and Public IP. For Alibaba Cloud, AWS, and Google Cloud, you can also select Peering Connection. - If you select Endpoint, add the account ID displayed on the page to the allowlist of your Endpoint Service to allow connections from this account's endpoint to the Endpoint Service. For more information, see Select Private Network Connection.
- If you select Public IP, add the data source IP address displayed on the page to the allowlist of the OceanBase database instance to ensure connectivity. For more information, see Select Public Network Connection.
Note
This parameter is only displayed when the instance type is Self-Built Database. After you select the regions for the source and target, the page will display the data source IP address that needs to be added to the allowlist.
- If you select Peering Connection, choose an available peering connection from the drop-down list. Add the IP address displayed on the page to the OceanBase Database instance's inbound security group rules or allowlist to ensure connectivity. For more information, see AWS peering connection, Alibaba Cloud peering connection, and Google Cloud peering connection.
Peering Connection ID This parameter is displayed only when Instance Type is set to Self-managed Database and Connection Type is set to Peering Connection. Select an available peering connection from the drop-down list. The list displays only connections that match the current cloud provider and region and are in the Connected state. It also displays the corresponding VPC ID and CIDR block. If no connection is available, click Create to open a new tab and create a data service peering connection. Connection Information This parameter is only displayed when the instance type is Self-Built Database. - When you select Connection Type as Endpoint, enter the name of the Endpoint Service.
- When you select Connection Type as Public IP, enter the IP address and port number of the database host.
- When Connection Type is set to Peering Connection, enter the private IP address or hostname and port number of the database host.
Instance The ID or name of the instance where the OceanBase database resides. You can view the ID or name of the target instance on the Instances page. Tenant The ID or name of the tenant in the OceanBase database. You can expand the target instance on the Instances page to view the ID or name of the target tenant. Database Account The username of the OceanBase database user used for data migration. Password The password of the database user. When the instance type is Self-managed Database, if you need to perform schema migration and incremental synchronization, configure the parameters in the Advanced Settings section.
If you need to select Schema Migration or Incremental Synchronization in the Select Type & Objects step, enable the sys Tenant Account and configure the following parameters.
ParameterDescriptionSys Account The name of the sys user. This user is mainly used to read incremental logs and database object structure information from OceanBase Database. Please create this user in the sys tenant of the business cluster. Password The password for the sys user. If you need to select Incremental Synchronization in the Select Type & Objects step, enable OBLogProxy and fill in the OBLogProxy connection information.
Note
Incremental synchronization is supported only when both the sys tenant account and OBLogProxy are enabled.
OBLogProxy connection information is an incremental log proxy service for OceanBase Database. It provides access and management capabilities for real-time incremental projects as a service, facilitating application access to incremental logs of OceanBase Database. It also addresses the need to subscribe to incremental logs in cases of network isolation. The format is
OBLogProxy IP:OBLogProxy Port.
- If the source is OceanBase MySQL Compatible > Cluster Instance (Transactional), then the target OceanBase MySQL Compatible supports Cluster Instance (Transactional), Cluster Instance (Analytical), and Self-managed Database.
Click Test and Continue.
On the Select Type & Objects page, configure the parameters.
In the Sync Topology section, select One-way Sync.
Data migration supports One-way Sync and Two-way Sync. This topic describes one-way synchronization. For details about two-way synchronization, see Configure a two-way synchronization task.
Note
Two-way synchronization is not currently supported when the target is an OceanBase analytical instance.
In the Migration Type section, select the migration type for the current data migration task.
The Migration Type includes Schema Migration, Full Migration, and Incremental Synchronization.
ParameterDescriptionSchema Migration Schema migration requires defining character set mappings yourself. Data migration only copies the source database's data (schema) to the target database without affecting the source data (schema). Schema migration from OceanBase Database MySQL-compatible mode to OceanBase Database MySQL-compatible mode supports automatically creating databases that do not exist at the target. Full Migration After a full migration task starts, the data migration service migrates the existing data from the source database tables to the corresponding tables in the target database. Incremental Synchronization After an incremental synchronization task starts, data migration synchronizes changed data (inserts, modifications, or deletions) from the source database to the corresponding tables in the target database. Incremental Synchronization includes DML Synchronization and DDL Synchronization, which you can configure as needed. For details, see Configure DML/DDL synchronization. In the Select Migration Objects section, configure the method for selecting migration objects.
You can select migration objects using either Specify Objects or Match by Rule.

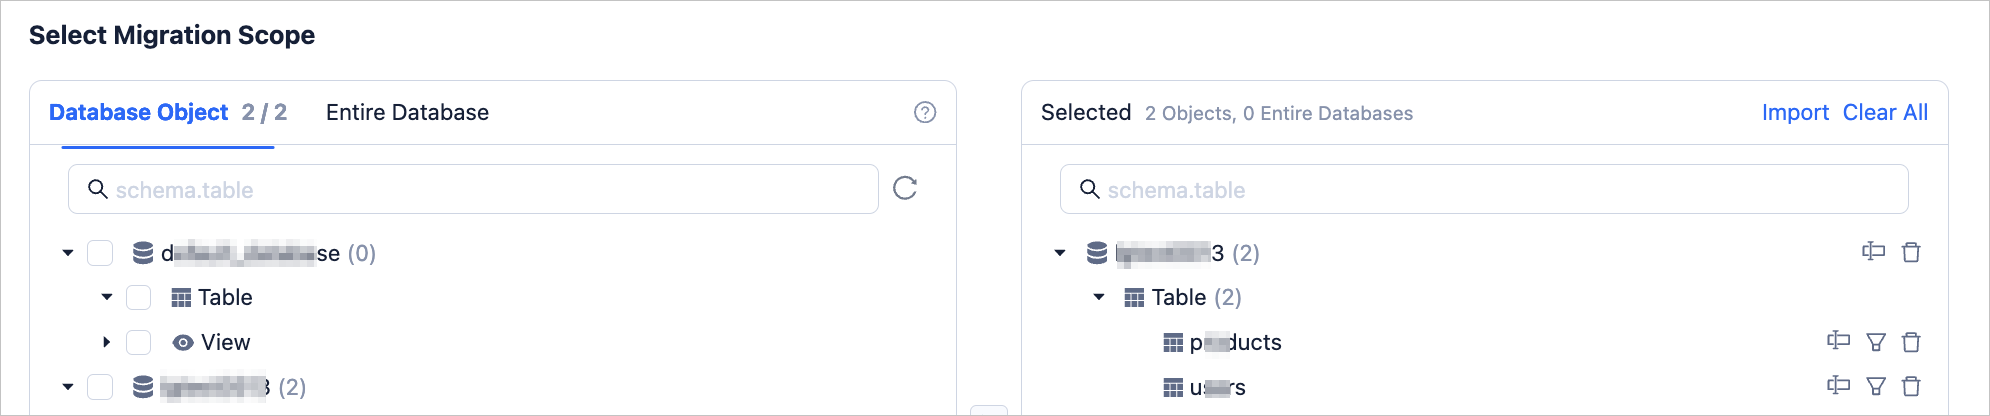
In the Select Migration Scope section, select the objects to migrate.
When you select Specify Objects, data migration supports Table-level and Database-level. Database table migration supports selecting one or more tables or views within a database as migration objects, while full database migration supports selecting an entire database as the migration object. If you select database table migration for a database, that database cannot be migrated as a full database. If you select full database migration for a database, that database cannot be migrated as a database table.
After selecting Table-level or Database-level, select the objects you want to migrate on the left and click > to add them to the list on the right.
Data migration supports importing objects via text, and allows you to rename target objects, set row filters, view column information, and remove single or all migration objects.
Note
If you select Full Database Migration:
The list on the right only displays database names; it does not support displaying specific objects.
If you select the migration type Incremental Synchronization - DDL Synchronization, new tables added at the source can be synchronized to the target.
OperationDescriptionImport Objects In the list on the right side of the selected area, click Import Object in the upper-right corner. For more information, see Import migration objects. Rename Data migration supports renaming migration objects. For more information, see Rename a database or table. Row filter Data migration supports filtering rows based on WHEREconditions. For more information, see Filter data by SQL condition. You can also view the column information of migration objects in the View Column section.Remove/Clear All During data mapping, you can remove one or more temporarily selected objects to the target. - Remove a single migration object
In the right-side list of the selection area, click the Remove icon next to the target object to remove it. - Remove all migration objects
In the right-side list of the selection area, click Clear All in the upper-right corner. In the dialog box, click OK to remove all migration objects.
Select Match by Rule. For more information, see Configure database-to-database matching rules.
Click Next. On the Migration Options page, configure the parameters.
Full migration
The following parameters are displayed only if you have selected One-way Sync > Full Migration in the Select Type & Objects step.
ParameterDescriptionRead Concurrency Configuration This parameter specifies the number of concurrent reads from the source during full migration. The maximum value is 512. A high concurrency value may cause excessive load on the source and affect business operations. Write Concurrency Configuration This parameter specifies the number of concurrent writes to the target during full migration. The maximum value is 512. A high concurrency value may cause excessive load on the target and affect business operations. Limit Full Migration Rate You can decide whether to enable the full migration rate limit based on your actual needs. If enabled, set the source read RPS (the maximum number of rows that can be read from the source per second during full migration), source read BPS (the maximum amount of traffic that can be read from the source per second during full migration), target write RPS (the maximum number of rows that can be written to the target per second during full migration), and target write BPS (the maximum amount of traffic that can be written to the target per second during full migration). Note
The RPS and BPS values specified here are only for throttling. The actual achievable performance during full migration is subject to factors such as the source, target, and instance specifications.
Processing Strategy When Target Table Has Records Valid values: Stop Migration and Ignore. - If you select Stop Migration, an error is returned when full migration starts if the target table contains data. In this case, you must handle the data in the target table before you can continue the migration.
Notice
If you click Resume after an error occurs, data migration ignores this configuration option and continues migrating table data. Proceed with caution.
- If you select Ignore, when the target table contains data, if the original data conflicts with the data to be written, data migration logs the conflicting data and retains the original data unchanged during data writing.
Allow Post-indexing The post-indexing feature can shorten the duration of full migration. You can specify whether to allow indexes to be created after full data migration is completed. For considerations on selecting post-indexing, see the description below the table. Notice
This option is available only if you have selected both Schema Migration and Full Migration on the Select Migration Type page.
- Only non-unique key indexes support post-creation.
If post-indexing is allowed, we recommend that you adjust the following business tenant parameters using the command-line client tool based on the hardware conditions of your OceanBase database and the current business traffic.
// File memory buffer size limit ALTER SYSTEM SET _temporary_file_io_area_size = '10' tenant = 'xxx'; // Disable throttling for OceanBase Database V4.x ALTER SYSTEM SET sys_bkgd_net_percentage = 100;- If you select Stop Migration, an error is returned when full migration starts if the target table contains data. In this case, you must handle the data in the target table before you can continue the migration.
Incremental synchronization
The following parameters are displayed only if you have selected One-way Sync > Incremental Synchronization in the Select Type & Objects step.
ParameterDescriptionWrite Concurrency Configuration This parameter specifies the number of concurrent writes to the target during incremental synchronization. The maximum value is 512. A high concurrency value may cause excessive load on the target and affect business operations. Limit Incremental Migration Rate You can decide whether to enable the incremental synchronization rate limit based on your actual needs. If enabled, set the target write RPS (the maximum number of data rows that can be synchronized to the target per second during incremental synchronization) and target write BPS (the maximum amount of traffic that can be synchronized to the target per second during incremental synchronization). Note
The RPS and BPS values specified here are only for throttling. The actual achievable performance during incremental synchronization is subject to factors such as the source, target, and instance specifications.
Incremental Synchronization Start Timestamp - If Full Migration was selected as the migration type, this parameter is not displayed.
- If Full Migration was not selected but Incremental Synchronization was selected, specify a point in time after which data should be migrated. The default is the current system time. For more information, see Set an incremental synchronization timestamp.
Advanced options
These parameters are displayed only if the target OceanBase database is V4.3.0 or later, and DDL Synchronization is selected for Schema Migration or Incremental Synchronization in the Select Type & Objects step.

The storage types for table objects on the target side include Default, Row Storage, Columnar Storage, and Hybrid Row-Column Storage. This configuration determines the storage type for table objects during schema migration or incremental synchronization.
Note
The Default option adapts to other options based on the target-side parameter configuration. It writes the corresponding schema for table objects during schema migration or newly added table objects from incremental DDL according to the set storage type.
Click Next to have the system perform a precheck on the data migration task.
In the Pre-check phase, data migration checks whether the database user's read/write permissions, network connectivity, and other requirements are met. The data migration task can only be started after all check items pass. If the precheck reports an error:
You can troubleshoot and resolve the issue, then re-execute the precheck until it succeeds.
You can also click Skip in the Actions column for the failed precheck item. A dialog box will pop up explaining the specific impact of skipping this operation. After confirming you can skip it, click OK in the dialog box.
After the precheck succeeds, click Purchase to go to the Purchase Data Migration Instance page for purchase.
After a successful purchase, you can start the data migration task. For purchase details, see Purchase a data migration instance. If you do not need to purchase a data migration instance immediately, click Save to go to the data migration task details page, where you can manually purchase it later as needed.
You can click Configure Validation Task in the upper-right corner of the data migration details page to compare data differences between the source and target databases. For details, see Create a data verification task.
The data migration service supports modifying migration objects during the execution of a data migration task. For details, see View and modify migration objects. After a data migration task is started, it is executed sequentially according to the selected migration type. For details, refer to the "View migration details" section in View the details of a data migration task.