If you select endpoint as the connection type when you create a data source or data migration task with Amazon Web Services (AWS) as the cloud vendor, you must configure an AWS endpoint. This topic describes how to configure it.
Prerequisites
You have created a database instance of the corresponding type and obtained its connection address in your virtual private cloud (VPC). For example, for a MySQL database instance, the connection address is usually a single address-port pair in the format of address:port. For a Kafka instance, multiple address-port pairs in the format of broker_address1:broker_port1, broker_address2:broker_port2, and so on, are possible.
You have created an Amazon MSK cluster and associated it with a secret. For more information, see Set up SASL/SCRAM authentication for an Amazon MSK cluster.
If the load balancing service or virtual server associated with the endpoint service has enabled security group, add the private IP address of the OceanBase Cloud data source to the corresponding security group. For more information, see Private IP address segments.
Terms
PrivateLink: a scalable and highly available technology that supports secure connections between your VPC and supported AWS services. You can create your VPC endpoint service (supported by AWS PrivateLink) and allow other services to connect to your service.
Target group: the target group for the network load balancer, used to route incoming requests to one or more registered targets.
Network load balancer: a load balancer that routes user requests to your service by using the protocol and port specified during target group creation.
Endpoint service: your own application or service in your VPC. Other AWS principals can create endpoints in their own VPCs to connect to your endpoint service. If you need to use AWS PrivateLink, you must create a VPC endpoint for your service in your VPC.
Obtain the IP address of an instance
MySQL database instance types include Aurora MySQL, RDS MySQL, and self-managed MySQL.
Oracle database instance types include RDS Oracle and self-managed Oracle.
OceanBase Database instance types include Dedicated (Transactional), Dedicated (Analytical), and self-managed OceanBase. This topic describes only the procedure for obtaining the IP address of a self-managed database instance. You must obtain the IP address based on the actual situation.
Kafka instance types include cloud instance Kafka and self-managed Kafka.
PostgreSQL database instances types include Aurora PostgreSQL, RDS PostgreSQL, and self-managed PostgreSQL.
TiDB database instance types include only self-managed TiDB.
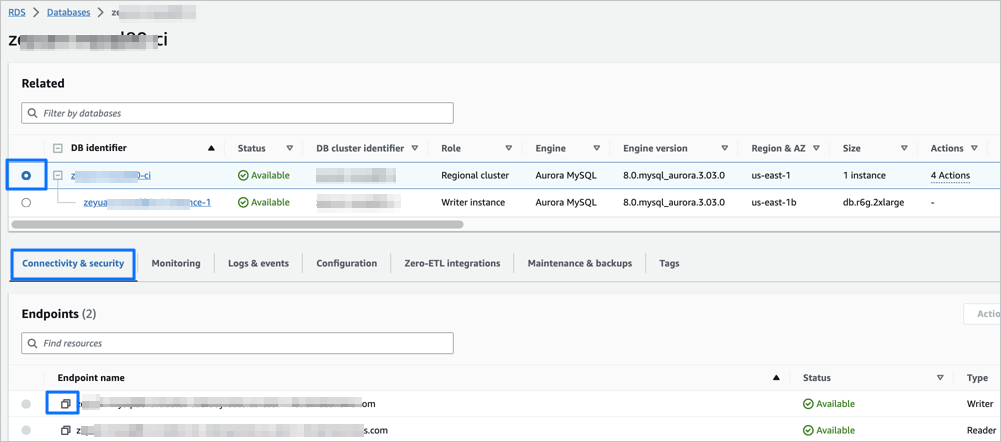
Obtain the IP address of an Aurora MySQL/PostgreSQL instance
Log in to the Amazon RDS/PostgreSQL console and go to the Databases page.
Click the name of the target Aurora MySQL/PostgreSQL instance. On the Connectivity & security tab, copy the value of Endpoint name.
If the Aurora MySQL/PostgreSQL instance allows access from the Internet, run the following command on any device with Internet access to obtain the IP address of the instance:
// Replace the domain name example.example-region.rds.amazonaws.com with the endpoint name you copied in the previous step.
nslookup <example.example-region.rds.amazonaws.com>
A sample return result is as follows:
// ...
Name: example.example-region.rds.amazonaws.com
Address: xxx.xxx.xxx.1
//...
Go to the Network Interfaces page. In the search box, enter the public IP address you obtained in the previous step to obtain the corresponding Primary private IPv4 address.

Copy the obtained Primary private IPv4 address. This address will be used in the Create a target group step.
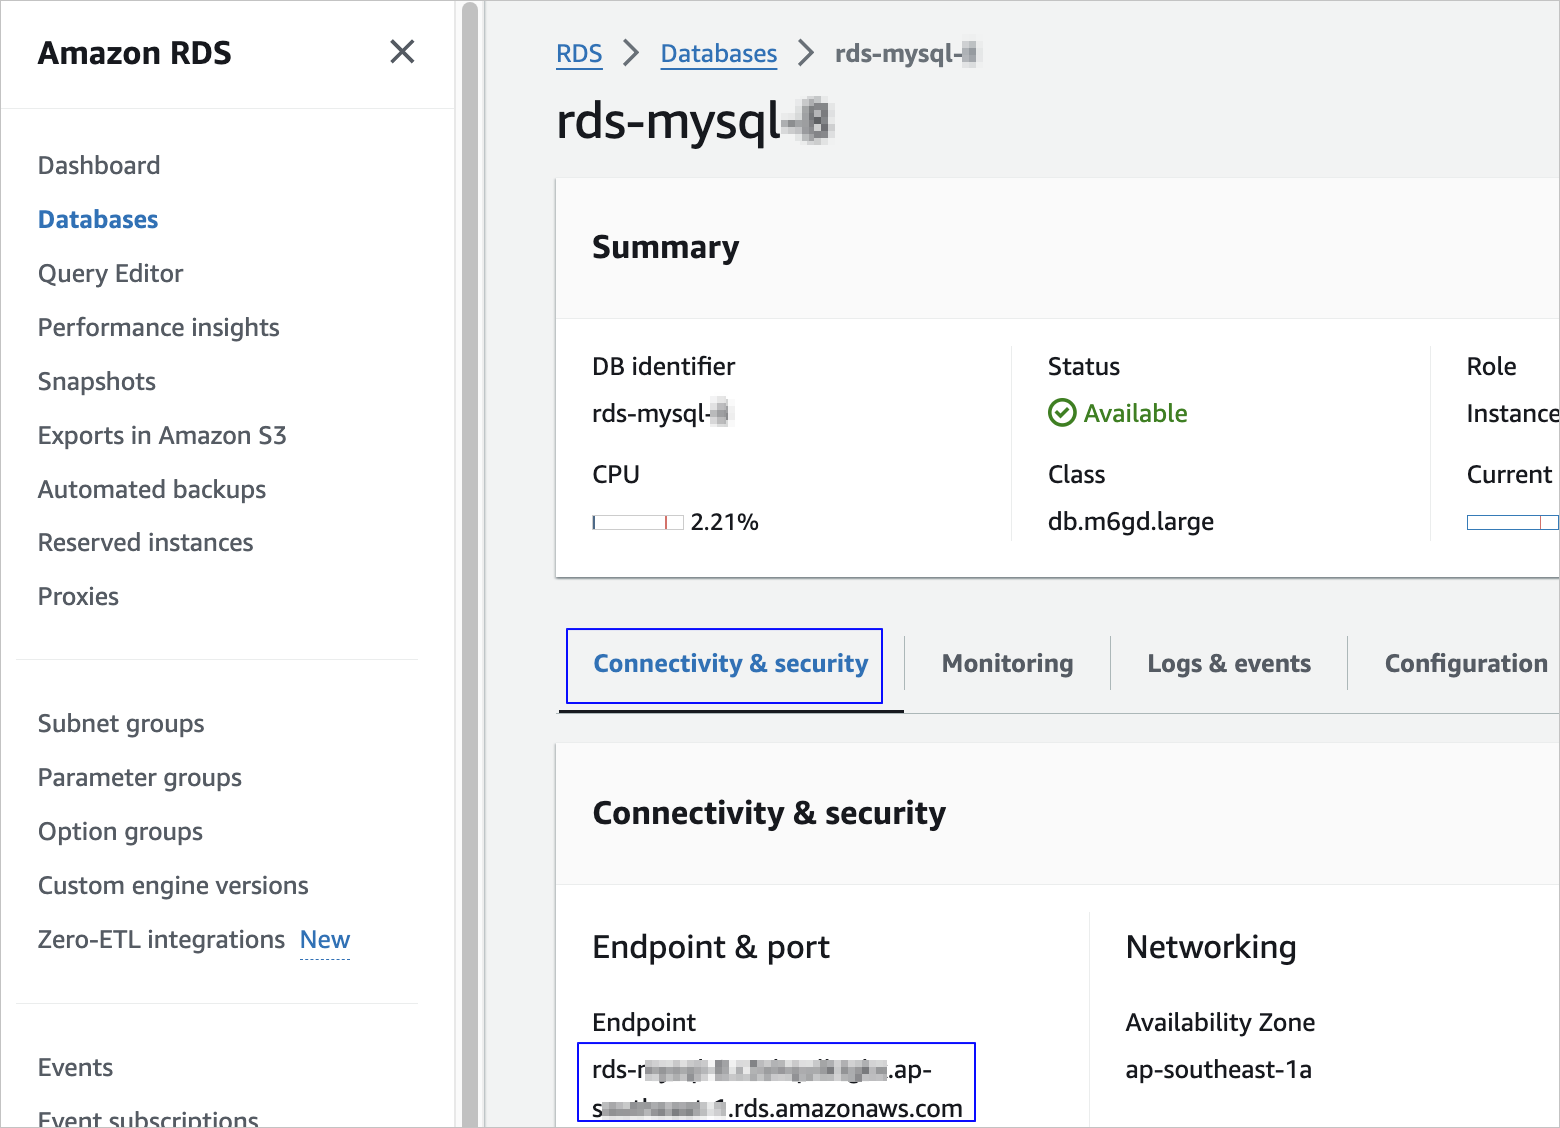
Obtain the IP address of an RDS for MySQL/Oracle/PostgreSQL instance
Log in to the Amazon RDS console and go to the Databases page.
Click the name of the target RDS for MySQL/Oracle/PostgreSQL instance. On the Connectivity & security tab, copy the value of Endpoint.
If the RDS for MySQL/Oracle/PostgreSQL instance allows access from the Internet, run the following command on any device with Internet access to obtain the IP address of the instance:
// Replace the domain name example.example-region.rds.amazonaws.com with the endpoint name you copied in the previous step.
nslookup <example.example-region.rds.amazonaws.com>
A sample return result is as follows:
// ...
Name: example.example-region.rds.amazonaws.com
Address: xxx.xxx.xxx.1
//...
Go to the Network Interfaces page. In the search box, enter the public IP address you obtained in the previous step to obtain the corresponding Primary private IPv4 address.
Copy the obtained Primary private IPv4 address. This address will be used in the Create a target group step.
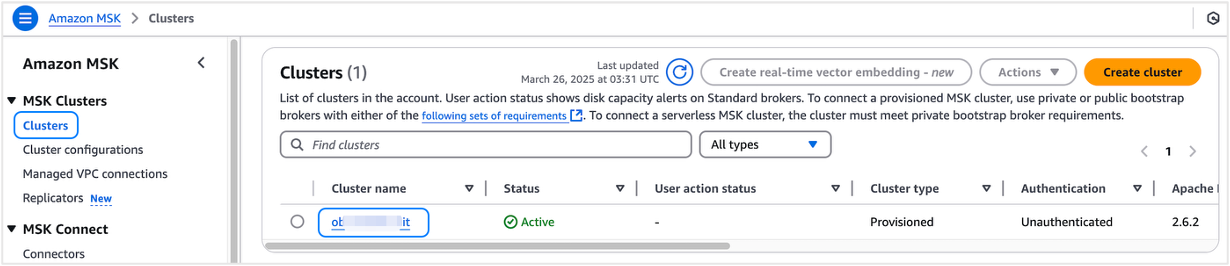
Obtain the Kafka connection information and configure Nginx
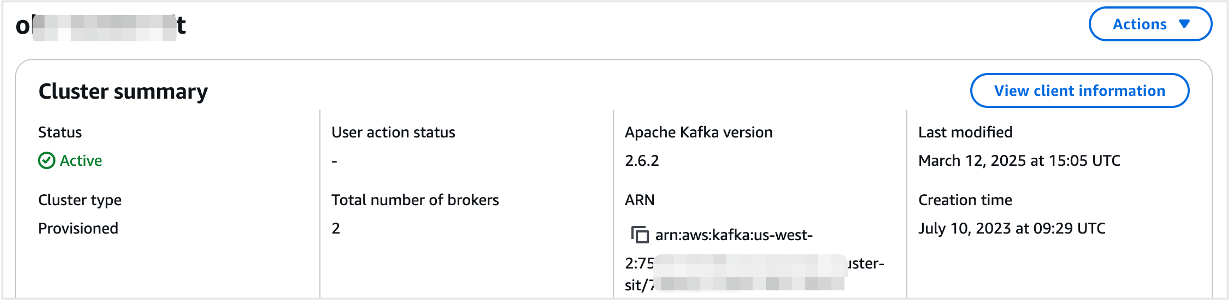
Log in to the Amazon MSK console.
On the Clusters page, click the name of the target cluster to go to the cluster details page.
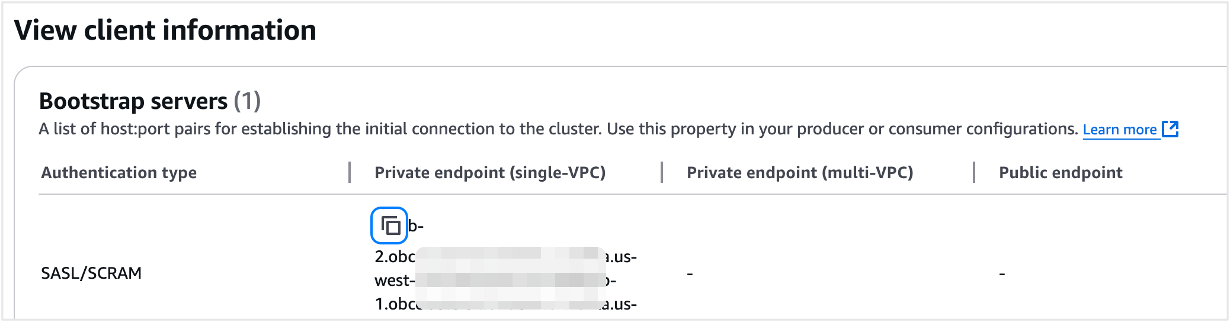
In the upper-right corner of the Cluster Overview section, click View Client Information.
On the View Client Information page, click the Copy icon next to the SASL/SCRAM private endpoint to obtain the Kafka connection information.
Use EC2 Instance Connect to connect to the instance.
Run the following command to install Nginx.
amazon-linux-extras install nginx1
yum install nginx-mod-stream
Modify the
/etc/nginx/nginx.confconfiguration file.load_module '/usr/lib64/nginx/modules/ngx_stream_module.so'; user nginx; worker_processes auto; error_log /var/log/nginx/error.log warn; pid /var/run/nginx.pid; events { worker_connections 1024; } stream { # Each server corresponds to a Kafka Bootstrap Server connection endpoint. server { listen 19092; proxy_pass b-2.omskafkaxxxx.vqn998.c11.kafka.us-east-1.amazonaws.com:9096; proxy_timeout 60s; } server { listen 19093; proxy_pass b-1.omskafkaxxxx.vqn998.c11.kafka.us-east-1.amazonaws.com:9096; proxy_timeout 60s; } }Notice
Nginx must support
ngx_stream_module.We recommend that you set
proxy_timeoutto 60 seconds or more.
Run the following command to start Nginx after the configuration is updated.
systemctl enable nginx
systemctl start nginx
Obtain the IP address of a self-managed MySQL/Oracle/OceanBase/PostgreSQL/TiDB Database instance
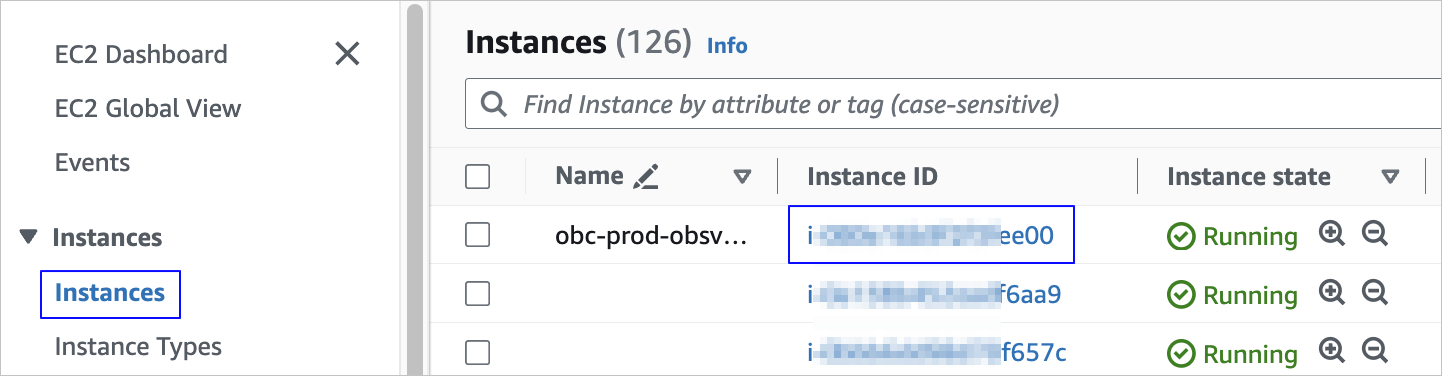
Log in to the Amazon Elastic Compute Cloud (EC2) console and go to the Instances page.
On the Instances page, click the ID of the self-managed database instance you created.
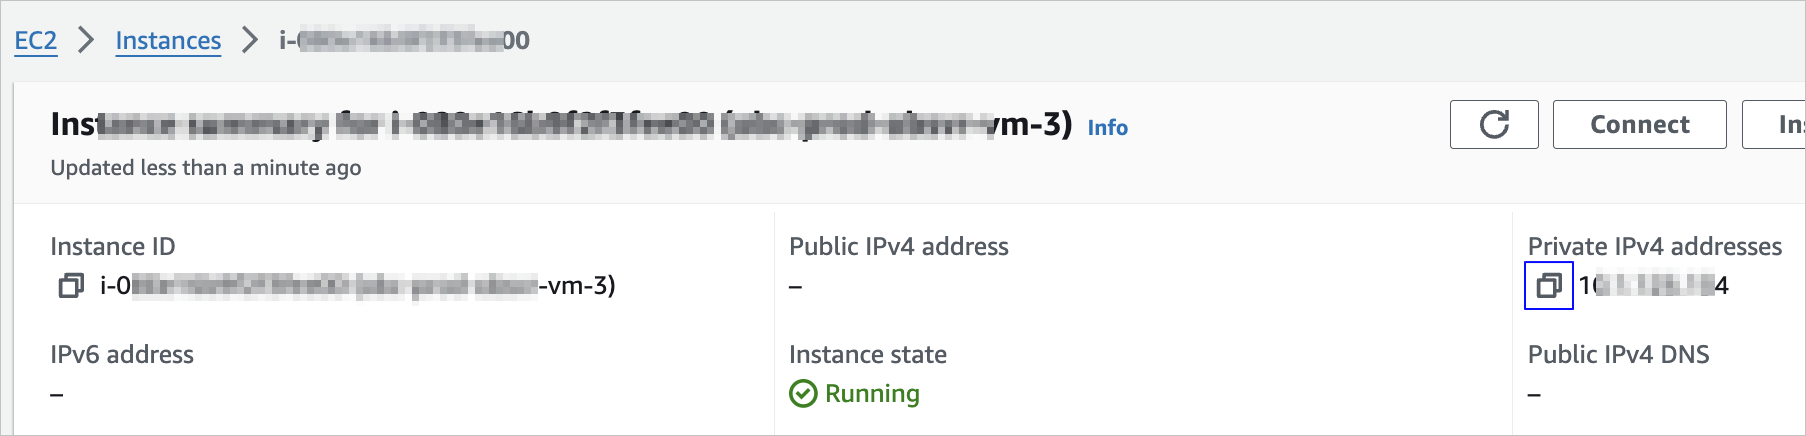
On the instance details page, copy the obtained Private IPv4 address. This address will be used in the Create a target group step.
Create a target group
Log in to the AWS console and go to the Target groups page.
Click Create target group in the upper-right corner.
On the Specify group details page, complete the configurations.
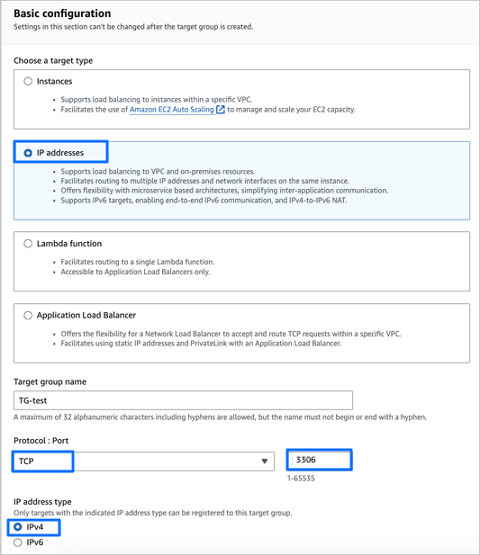 ParameterDescription
Choose a target type Select IP addresses. Target group name Define a name for the target group based on the naming conventions. Protocol Select TCP. Port Enter the corresponding port number. Select the corresponding Nginx port for a Kafka instance. IP address type Select IPv4. Click Next.
On the Register targets page, complete the configurations in the IP addresses section.
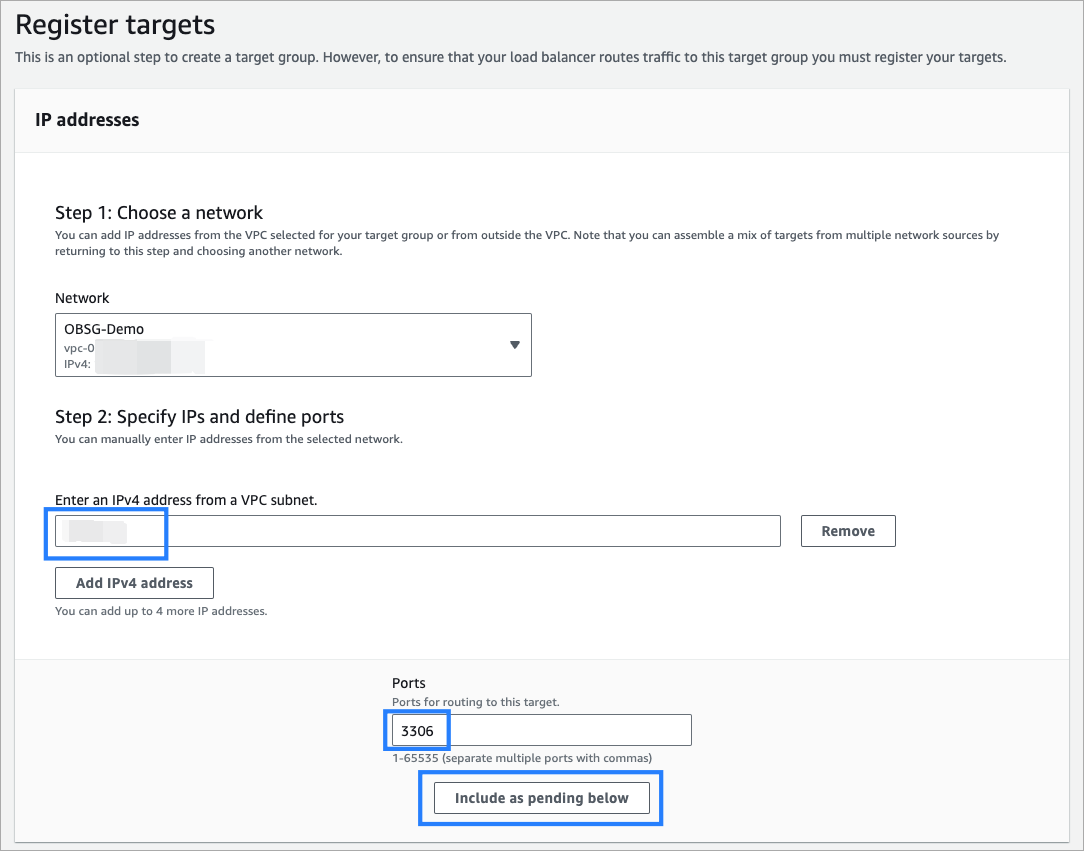 ParameterDescription
Choose a network Select the VPC where the target MySQL database instance resides from the Network drop-down list. Specify IPs and define ports In the Enter an IPv4 address from a VPC subnet text box, enter the IP address of the database instance. Port Enter the corresponding port number. Select the corresponding Nginx port for a Kafka instance. Click Include as pending below.
In the Review targets section of the Register targets page, confirm the configurations and click Create target group.
Create a network load balancer
Open the page where you can create a network load balancer.
For more information, see Create a network load balancer.
On the Create Network Load Balancer page, complete the configurations.
Note that the following parameters must be configured according to the settings listed below. Other parameters do not have specific requirements.
In the Basic configuration section, select Internal for Scheme and IPv4 for IP address type.

In the Network mapping section, select the VPC to which the MySQL database instance belongs from the VPC drop-down list. For Mappings, normally you can select all availability zones, but you can also select at least one availability zone and one subnet based on your needs.
In the Security groups section, you can select a security group to be associated with your network load balancer. However, we recommend that you do not select any security groups. For more information about security groups, see Security groups for your Network Load Balancer.
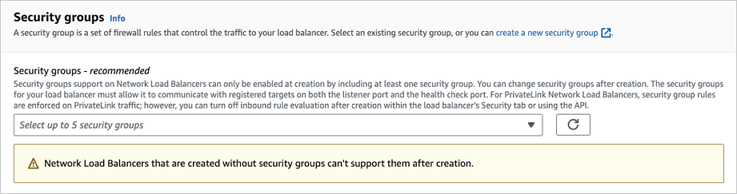
Note
If you have associated a security group with your network load balancer, you must add a rule to allow access to the port after association.
When you create a network load balancer for a Kafka instance, do not select any security groups.
In the Listeners and routing section, complete the configurations based on the following figure and table.
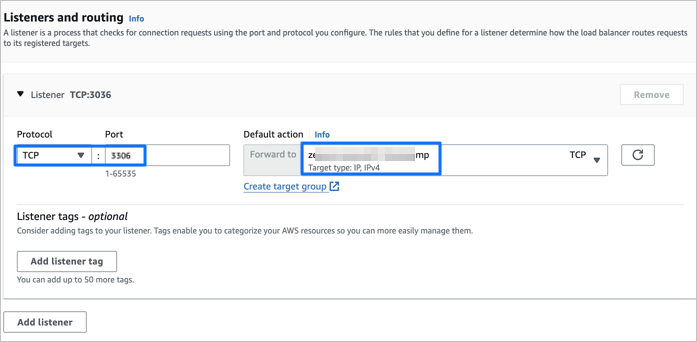 ParameterDescription
Protocol The protocol for the listener. Select TCP here. Port Enter the corresponding port number. Default action Select the target group created in the Create a target group step.
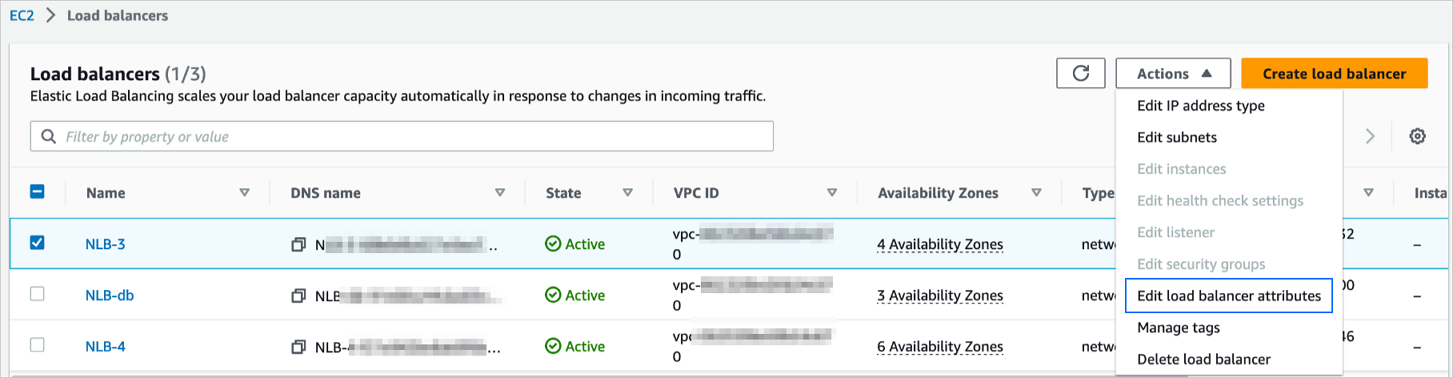
After the network load balancer is created, navigate back to the Load balancers page and select the created network load balancer.
Choose Actions > Edit Load Balancer Attributes in the upper-right corner.
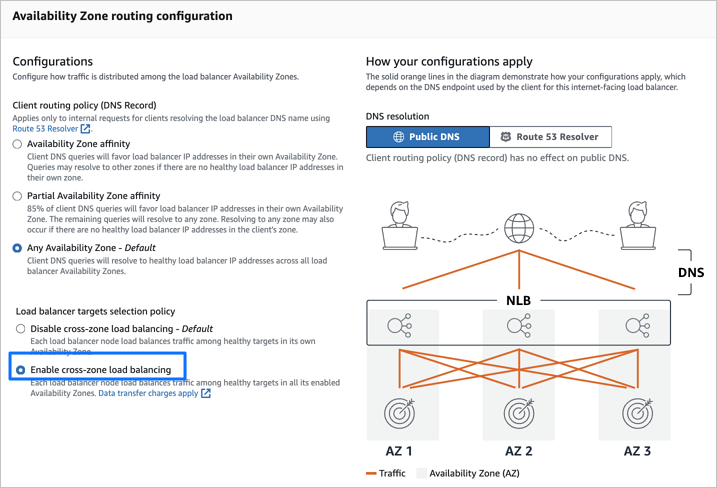
In the Load balancer targets selection policy section under Availability Zone routing configuration on the Edit load balancer attributes page, select Enable cross-zone load balancing, then click Save changes.
Create an endpoint service
Log in to the AWS console and go to the Endpoint services page.
Click Create endpoint service in the upper-right corner.
On the Create VPC endpoint service page, complete the configurations.
ParameterDescriptionProperty name Define a name for the endpoint service. Load balancer type Select Network. Available load balancers Select the network load balancer created in the Create a network load balancer step.
Note
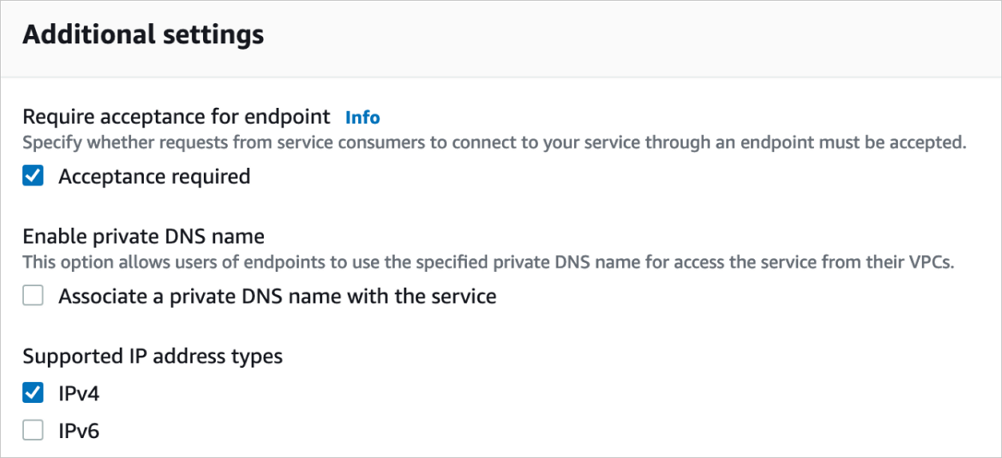
If the page shows no available load balancers, wait until the state of the created load balancer changes to Active, then refresh the page.In the Additional settings section, complete the configurations.
 ParameterDescription
Require acceptance for endpoint (optional) Specifies whether a user request needs secondary processing. - If you select Acceptance required, when data migration tries to connect to PrivateLink for the first time, you will be prompted to accept the endpoint connection request in the AWS console first.
- If you do not select Acceptance required, you will not receive such a prompt.
Enable private DNS name Do not select this option here. Supported IP address types Select IPv4. Click Create.
Allow access to the created endpoint service.
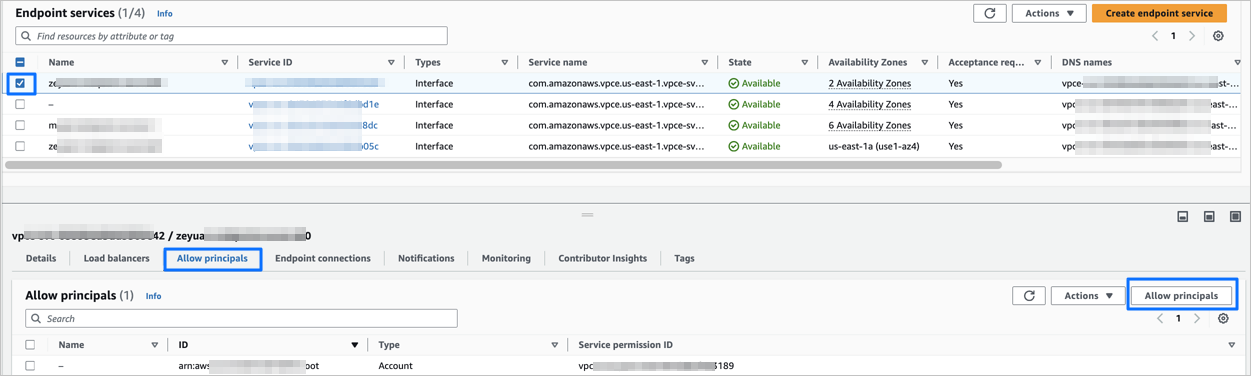
On the Endpoint services page, select the endpoint service you created.
Click the Allow principals tab.
On the Allow principals tab, click Allow principals in the upper-right corner.
Obtain the account to be authorized for data source or data migration task.
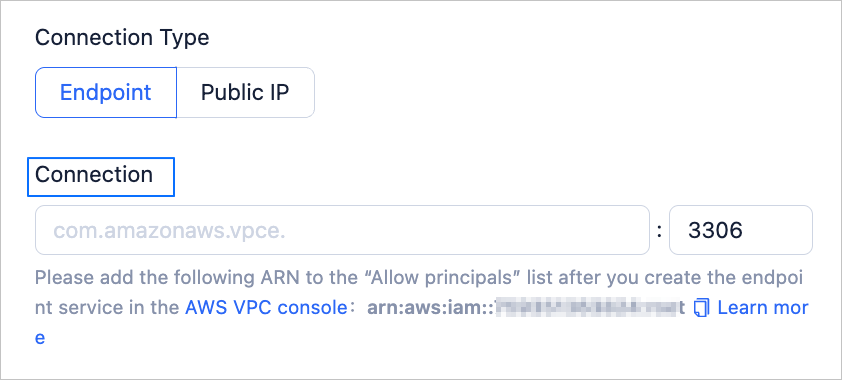
To obtain the account, log in to the OceanBase Cloud console, select Endpoint for Connection Type on the page for creating a data source or data migration task, then copy the account in the
arn:aws:iam::aws-account-id:<type>/<id>format as prompted. For more information about how to create a data source, see Create a data source. For more information about how to create a task, see the corresponding migration task creation topic under Migrate data.
In the Principals to add section of the Allow principals page, enter the account to be authorized, then click Allow principals.
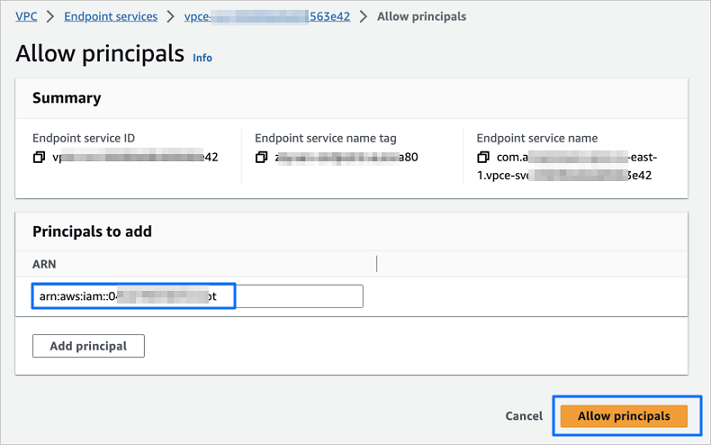
After the authorization, the created endpoint service is visible to the account.
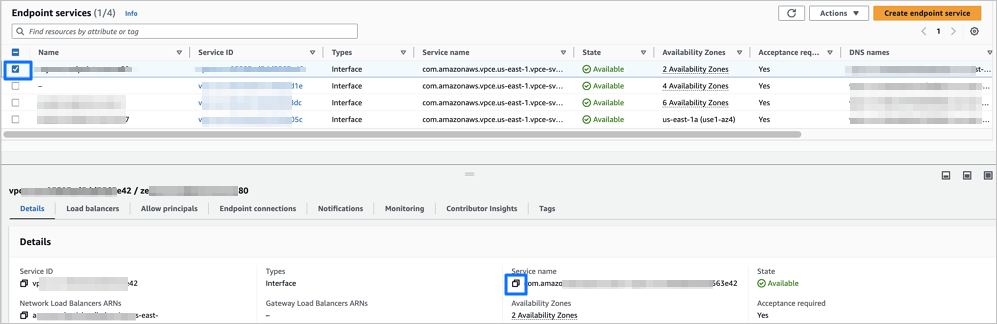
Use an endpoint service
After you create an endpoint service, copy the endpoint service name, then enter it in Connection if you select Endpoint for Connection Type when you create a data source or data migration task with AWS as the cloud vendor in the OceanBase Cloud console. For more information about how to create a data source, see Create a data source. For more information about how to create a data migration task, see the corresponding topic under Migrate data.
To copy the endpoint service name, perform the following steps:
Log in to the AWS console and go to the Endpoint services page.
Select the target endpoint service.
In the Details section, click the copy icon next to Service name.