


This topic describes how to archive data by submitting a data archiving ticket.
Background information
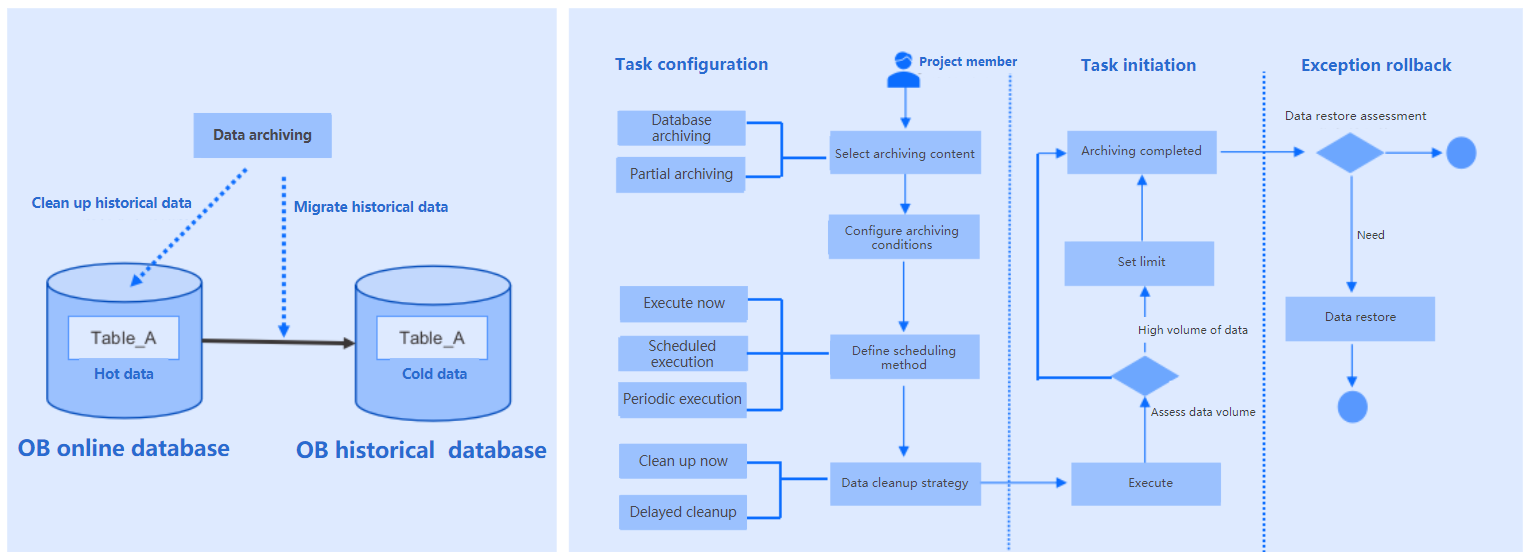
OceanBase Cloud allows you to archive table data from the source database to the target database at specified time intervals. This feature helps improve query performance and ensure smooth business operations as the online data increases.
The example in this topic describes how to create a data archiving task in OceanBase Cloud to archive the employee table from the test1 database to the load_test database.
Note
All data used in this example is for reference only. You can replace the data as needed.
Principle
Prerequisites
You have the database account and password to log in to the SQL console.
The table to be archived has a primary key.
Create a data archiving task
Log in to the SQL console and enter the SQL window.
In the SQL window, execute the following SQL statements to create a table named employee.

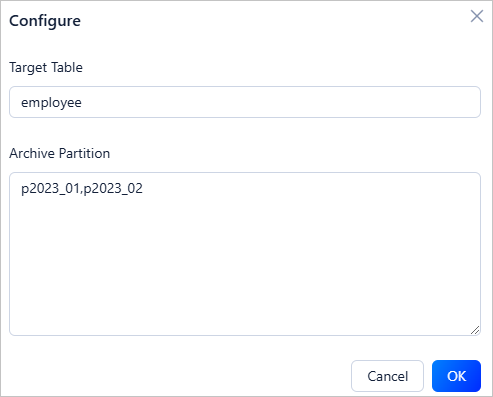
CREATE TABLE `employee` (
`emp_no` int(120) NOT NULL COMMENT 'employee number',
 `birthday` date DEFAULT NULL COMMENT 'employee birthday',
 `name` varchar(120) DEFAULT NULL COMMENT 'employee name',
 `time` date NOT NULL COMMENT 'time' COMMENT 'create time',
 PRIMARY KEY (`time`)
) partition by range columns(time) (
 partition p2023_01
 values
  less than ('2023-01-01'),
  partition p2023_02
values
  less than ('2023-02-01')
)
Click Data Services > Data Lifecycle > Data Archiving. On the Data Lifecycle page, click Create Job > Data Archiving.
On the Create Data Archiving Job page, configure the following parameters.
ParameterDescriptionSource Data Source The data source to which the source table belongs. Target Data Source The data source to which the table to be archived belongs. Source Database The database to which the source table belongs. Target Database The database to which the table to be archived belongs. Archiving Scope - Partial Archiving: specifies to archive only tables that meet filter conditions in the source database.
- You can configure filter conditions by using constants or referencing variables defined in Custom Variable. For example, in
time<'${create_time}',create_timeis the name of a variable configured in Custom Variable, andtimeis a field in the table to be archived. - You can click More Settings > Configure and specify the partitions to be archived.
- You can configure filter conditions by using constants or referencing variables defined in Custom Variable. For example, in
- Full Database Archiving: specifies to archive all tables in the source database.
Custom Variable You can define variables and set time offsets to filter rows to be archived. Execution Mode The execution mode of the task. Valid values: Immediate Execution, Scheduled Execution, and Periodic Execution. Task Settings - Execution Timeout: You can specify the timeout duration for the task. If the task is not completed within the specified duration, it will be suspended and wait for the next scheduling.
- Row Limit: limits the total number of data rows operated per second.
- Data Volume Limit: limits the total size of data operated per second.
- Clean Up Archived Data in Source: specifies whether to clean up archived data in the source database.
- Insert Strategy: specifies whether to ignore or update duplicate data during data archiving.
- Data Retrieval Strategy: specifies the way to retrieve target records. Full table scan is stable, suitable for scenarios where a large proportion of the data is to be retrieved. Condition matching is fast and can avoid unnecessary scans and is suitable for scenarios where only a small proportion of the data is to be retrieved.
Target Table Structure Synchronization You can select this option to compare the schemas of the source and target tables. If you do not select this option, the source table is skipped when its schema is inconsistent with the target table schema. Remarks Optional. Additional information about the task, which cannot exceed 200 characters in length. - Partial Archiving: specifies to archive only tables that meet filter conditions in the source database.
After you click Preview SQL, review the archiving SQL statements and specify a job name. Then, click Submit to complete the data archiving task creation.
After the task is created, you can view the task information in the Data Archiving list.
View a data archiving task
View task information
In the data archiving list, click Details in the Actions column of the target task.
On the Job Information tab that appears, view the task type, source database, target database, variable settings, archiving scope, and execution mode.
View task execution records
In the task details panel, click the Execution Records tab to view the task status, execution details, and task logs.
View operation records
In the task details panel, click the Operation Records tab to view the task status.
Import data archiving tasks
After migrating an instance from ApsaraDB for OceanBase to OceanBase Cloud, you can import the data archiving tasks of the migrated instance to OceanBase Cloud.
Step 1: Export data archiving tasks from ApsaraDB for OceanBase
Click Instances in the left navigation bar of the ApsaraDB for OceanBase console.
Click Cut to Cloud Market under Actions for the instance.

Click Processing data research and development tasks under Actions after the instance is switched.

On the Processing data research and development tasks page, click View and Export All to export scheduled tasks to local.

Step 2: Import data archiving tasks to OceanBase Cloud
Log in to the OceanBase Cloud console, click Data Services > Data Lifecycle , and click ... > Import Job on the Lifecycle page.

Upload the downloaded data archiving configuration file to the import job page.