


This topic uses a two-way synchronization task from a MySQL database to an OceanBase database MySQL-compatible tenant as an example to introduce the relevant descriptions and operational steps for two-way synchronization.
Background information
What is two-way synchronization
Two-way synchronization supports configuring forward and reverse migration tasks for the same data source during the incremental data synchronization phase, enabling data to be synchronized between the source and target. Through an anti-circular replication mechanism, it can prevent data that has already been synchronized in one direction from being repeatedly synchronized by the opposite task.
Note
Two-way synchronization does not mean that you can write simultaneously on both ends. If you write the same data (same primary key or unique key) at both ends simultaneously, you need to define a data conflict handling strategy (overwrite or ignore) in the configuration of the two-way synchronization task. We recommend that you avoid writing the same data at both ends simultaneously in your business.
Migration types that support two-way synchronization
Migrations supports two-way data synchronization between MySQL databases and OceanBase database MySQL-compatible tenants, Oracle databases and OceanBase database Oracle-compatible tenants, as well as between OceanBase databases. For more information on limits and considerations, see the documentation for the corresponding type of data migration task.
Migrate Oracle Database to OceanBase Database Oracle-Compatible Tenant
Migrate OceanBase Database Oracle-Compatible Tenant to Oracle Database
Authorize statements for MySQL data source
When performing two-way synchronization between MySQL databases and OceanBase databases, grant the CREATE DATABASE and CREATE TABLE privileges to the database account under the MySQL data source for the current task. Data migration requires creating transaction databases and transaction tables to enable two-way synchronization to prevent circular replication. Otherwise, the two-way synchronization task may fail.
Grant global database creation privileges
GRANT CREATE ON *.* TO '<user_name>';Allow the user to create tables in the oms database
GRANT CREATE ON oms.* TO '<user_name>';
Create schema and authorize statements for Oracle data source
When performing two-way synchronization between Oracle databases and OceanBase databases, create a schema named OMS for the Oracle data source of the current task, and grant the CREATE TABLE privilege to the database account under the data source in the OMS schema. Otherwise, the two-way synchronization task may fail.
Create OMS user
CREATE USER OMS IDENTIFIED BY <YOUR_PASSWORD>; // YOUR_PASSWORD is the actual user password
ALTER USER OMS QUOTA unlimited ON <USERS>; // USERS is the actual user tablespace
ALTER USER OMS QUOTA unlimited ON <YOUR_USERNAME> // YOUR_USERNAME is the actual data source username
Grant permissions
GRANT CREATE ANY TABLE TO <YOUR_USERNAME>;
GRANT INSERT ANY TABLE TO <YOUR_USERNAME>;
GRANT UPDATE ANY TABLE TO <YOUR_USERNAME>;
GRANT DELETE ANY TABLE TO <YOUR_USERNAME>;
GRANT SELECT ANY TABLE TO <YOUR_USERNAME>;
Considerations
Two-way synchronization tasks provide services by configuring forward and reverse tasks to form a two-way synchronization task.
Type |
Description |
|---|---|
| Forward Task |
|
| Reverse Task |
|
| Other considerations |
|
About data conflict
To ensure the consistency of two-way synchronized data, please confirm that business operations on data with the same primary key or non-null unique key are only executed at one end of the two-way synchronization. If updates are made at both ends simultaneously, data conflicts may occur, mainly including the following scenarios.
Unique key conflict during INSERT
If the business performs INSERT operations with the same unique key at both ends almost simultaneously, when synchronized to the target end, the data INSERT will fail due to unique constraint violations. You can decide whether to ignore conflicting data or overwrite target data through task configuration.
Unique key conflict during UPDATE
If the data to be updated by UPDATE already exists at the target end, the source data will be used to overwrite and update the target data.
If the data to be updated by UPDATE does not exist at the target end, the data update will fail.
If the data to be updated by UPDATE causes a primary key or unique key conflict at the target end after the update, the data update will fail.
Data conflict during DELETE
If the corresponding record does not exist during DELETE, the DELETE operation fails.
Procedure
Configure forward task
Configure the data migration task to the Select Type & Objects step, and select Sync Topology as Two-way Sync.
For more information on configuring data migration tasks, see the documentation for the corresponding type of data migration task.
In the Migration Type section, select the migration type for the current data migration task.
When the synchronization topology is two-way synchronization, the supported migration types include Schema Migration, Full Migration, and Incremental Synchronization.
ParameterDescriptionSchema Migration Schema migration requires you to define the character set mapping relationship. Migrations will only copy the data (schema) of the source database to the target database and will not affect the source data (schema). Full Migration After the full migration task starts, the data migration service will migrate the stock data of the source database tables to the corresponding tables in the target database. Incremental Synchronization After the incremental synchronization task starts, data migration will synchronize the changed data (ADD, ALTER, or DELETE) from the source database to the corresponding tables in the target database. Incremental Synchronization includes DML Synchronization and DDL Synchronization, which you can customize according to your needs. For more information, see Custom Configuration of DML/DDL. In the Select Migration Objects area, configure the method for selecting migration objects.
You can select migration objects through two methods: Specify Objects and Match by Rule.
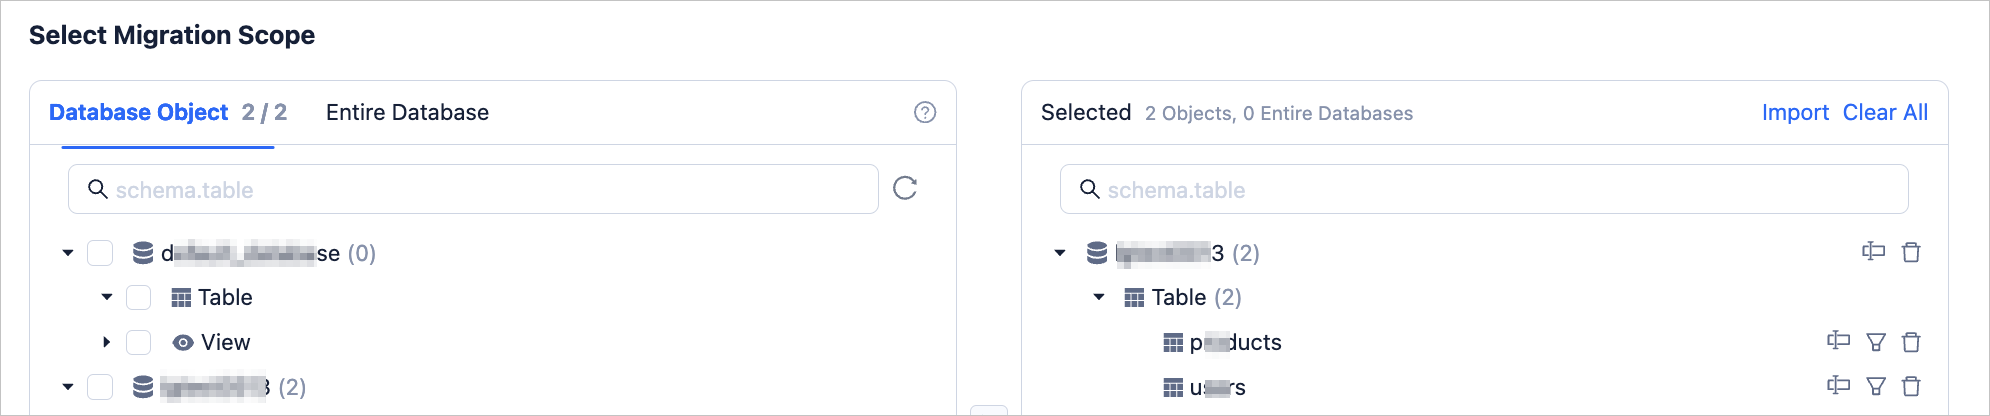
In the Select Migration Scope area, select the objects to be migrated.
When selecting Specify Objects, data migration supports Database Object and Entire Database. Table migration supports selecting tables and views from one or multiple databases as migration objects, while database migration supports selecting the entire database as the migration object. If a database has selected table migration, it no longer supports database migration. If a database has selected database migration, it no longer supports table migration.
After selecting the Database Object or Entire Database method, select the objects to be migrated on the left side, click > to add them to the list on the right side.
Data migration supports importing objects through text, and supports renaming target objects, setting row filters, viewing column information, and removing single or all migration objects.
Note
When you select Database-level:
The right-side list only displays database names and does not support displaying specific objects.
If you have selected Incremental Synchronization-DDL Synchronization migration type, newly added tables at the source end support synchronization to the target end.
OperationDescriptionImport Objects In the selection area on the right side of the list, click Import in the upper right corner. For more information, see Import Migration Objects. Rename Data migration supports renaming migration objects. For more information, see Database Table Renaming. Row Filter Data migration supports row filtering through WHEREconditions. For more information, see SQL Condition Data Filtering. You can also view the column information of migration objects in the View Columns area.Remove/Clear All Data migration supports removing single or multiple objects temporarily selected to the target end during data mapping. - Remove a single migration object
In the selection area on the right side of the list, click the Remove icon after the target object to remove that migration object. - Remove all migration objects
In the selection area on the right side of the list, click Clear All in the upper right corner. In the dialog box, click OK to remove all migration objects.
If you select Match by Rule, For more information, see Configure database-to-database matching rules.
Click Next. On the Migration Options page, configure the parameters.
Full Migration
The following parameters will only be displayed if you select Full Migration on the Select Type & Objects page.
ParameterDescriptionRead Concurrency This parameter specifies the number of concurrent threads for reading data from the source during full migration. The maximum number of concurrent threads is 512. A high number of concurrent threads may cause high pressure on the source and affect business operations. Write Concurrency This parameter specifies the number of concurrent threads for writing data to the target during full migration. The maximum number of concurrent threads is 512. A high number of concurrent threads may cause high pressure on the target and affect business operations. Rate Limiting for Full Migration You can decide whether to limit the full migration rate based on your needs. If you enable this option, you must also set the source read RPS (maximum number of rows that can be read from the source per second during full migration), source read BPS (maximum amount of traffic that can be read from the source per second during full migration), target write RPS (maximum number of rows that can be written to the target per second during full migration), and target write BPS (maximum amount of data that can be written to the target per second during full migration). Note
The RPS and BPS values specified here are only for throttling and limiting capabilities. The actual performance of full migration is limited by factors such as the source, target, and instance specifications.
Handle Non-empty Tables in Target Database This parameter specifies the strategy for handling records in target table objects. Valid values: Stop Migration and Ignore. - If you select Stop Migration, data migration will report an error when target table objects contain data, indicating that migration is not allowed. Please handle the data in the target database before resuming migration.
Notice
If you click Restore after an error occurs, data migration will ignore this setting and continue to migrate table data. Proceed with caution.
- If you select Ignore, when target table objects contain data, data migration will adopt the strategy of recording conflicting data in logs and retaining the original data.
Post-Indexing This parameter specifies whether to allow index creation to be postponed after full migration is completed. If you select this option, note the following items. Notice
Before you select this option, make sure that you have selected both Schema Migration and Full Migration on the Select Migration Type page.
- Only non-unique key indexes support index creation after migration.
- When the concurrency is configured to be greater than or equal to 8, index intermediate result set compression is enabled, which may incur additional CPU overhead.
When you enable index postponement, we recommend that you adjust the following business tenant parameters through the command-line client tool based on the hardware conditions of the OceanBase Database and the current business traffic situation.
// File memory buffer limit ALTER SYSTEM SET _temporary_file_io_area_size = '10' tenant = 'xxx'; // Turn off flow control for OceanBase database V4.x ALTER SYSTEM SET sys_bkgd_net_percentage = 100;- If you select Stop Migration, data migration will report an error when target table objects contain data, indicating that migration is not allowed. Please handle the data in the target database before resuming migration.
Incremental Synchronization
The following parameters will only be displayed if you select Two-way Sync > Incremental Synchronization on the Select Type & Objects page.
ParameterDescriptionWrite Concurrency Specifies target data write concurrency during incremental synchronization. The maximum limit is 512. Excessive concurrency may overload the target system and impact business operations. Rate Limiting for Incremental Migration Enable the incremental migration rate limit based on your needs. If enabled, set the RPS (maximum data limit that can be migrated to the target per second during full migration) and BPS (maxim data limit that can be migrated to the target per second during full migration). Notice
The RPS and BPS settings here only serve as rate limiting. The actual performance of full migration is limited by factors such as the source, target, and instance specification.
Incremental Synchronization Start Timestamp - If Full Migration has been selected when choosing the migration type, this parameter will not be displayed.
- If Full Migration has not been selected when choosing the migration type, but Incremental Synchronization has been selected, please specify here the data to be migrated after a certain timestamp. The default is the current system time. For more information, see Set an incremental synchronization timestamp.
Handle Data Conflicts Includes Ignore Errors and Keep Original Data on Target and **Ignore Conflicts and Overwrite Target Data with Source Data. For more information, see the "About data conflict" section above. Schedule Advancement of Binlog Timestamp If you enable this feature, you need to configure the frequency. The supported frequency range is 1~60 seconds.
After configuration, during the incremental synchronization phase, data migration will periodically execute theCREATE DATABASE IF NOT EXISTS testcommand in the MySQL source database according to the frequency you configured, in order to advance the Binlog timestamp.Note
This parameter is only displayed when migrating data from a MySQL database to an OceanBase database MySQL-compatible tenant.
Advanced Options
This section is displayed only if the target OceanBase Database is V4.3.0 or later, and Schema Migration or Incremental Synchronization > DDL Synchronization was selected on the Select Type & Objects page.
When the target OceanBase Database version is 4.3.0 or later, and you have selected Select Type & Objects, then Schema Migration or Incremental Synchronization > DDL Synchronization, this section becomes available.
The storage types for target table objects include Default, Row Storage, Column Storage, and Hybrid Row-Column Storage. This configuration determines the storage type of target table objects during schema migration or incremental synchronization.
Note
The Default option adapts to other options based on target parameter settings, and structures of schema migration table objects or new table objects created by incremental DDL will follow the configured storage type.
Click Next, and the system will perform a pre-check on the data migration task.
During the precheck, the data migration service checks the read and write privileges of the database user and the network connection of the database. A data migration task can be started only after it passes all check items. If an error is returned during the precheck, you can perform the following operations:
You can identify and troubleshoot the problem and then perform the precheck again.
You can also click Skip in the Actions column of a failed precheck item. In the dialog box that appears, you can view the prompt for the consequences of the operation and click OK.
After the pre-check succeeds, click Purchase to go to the Purchase Data Migration Instance page.
After the purchase succeeds, you can start the forward task. For more information about how to purchase a data migration instance, see Purchase a data migration instance. If you do not need to start the task at this time, click Save. You can operate only on the Tasks page later as needed.
Configure reverse tasks
Return to the Tasks page. When the forward task is in the Monitoring state of the incremental synchronization phase and the task status is Running, click Configure after the reverse task.
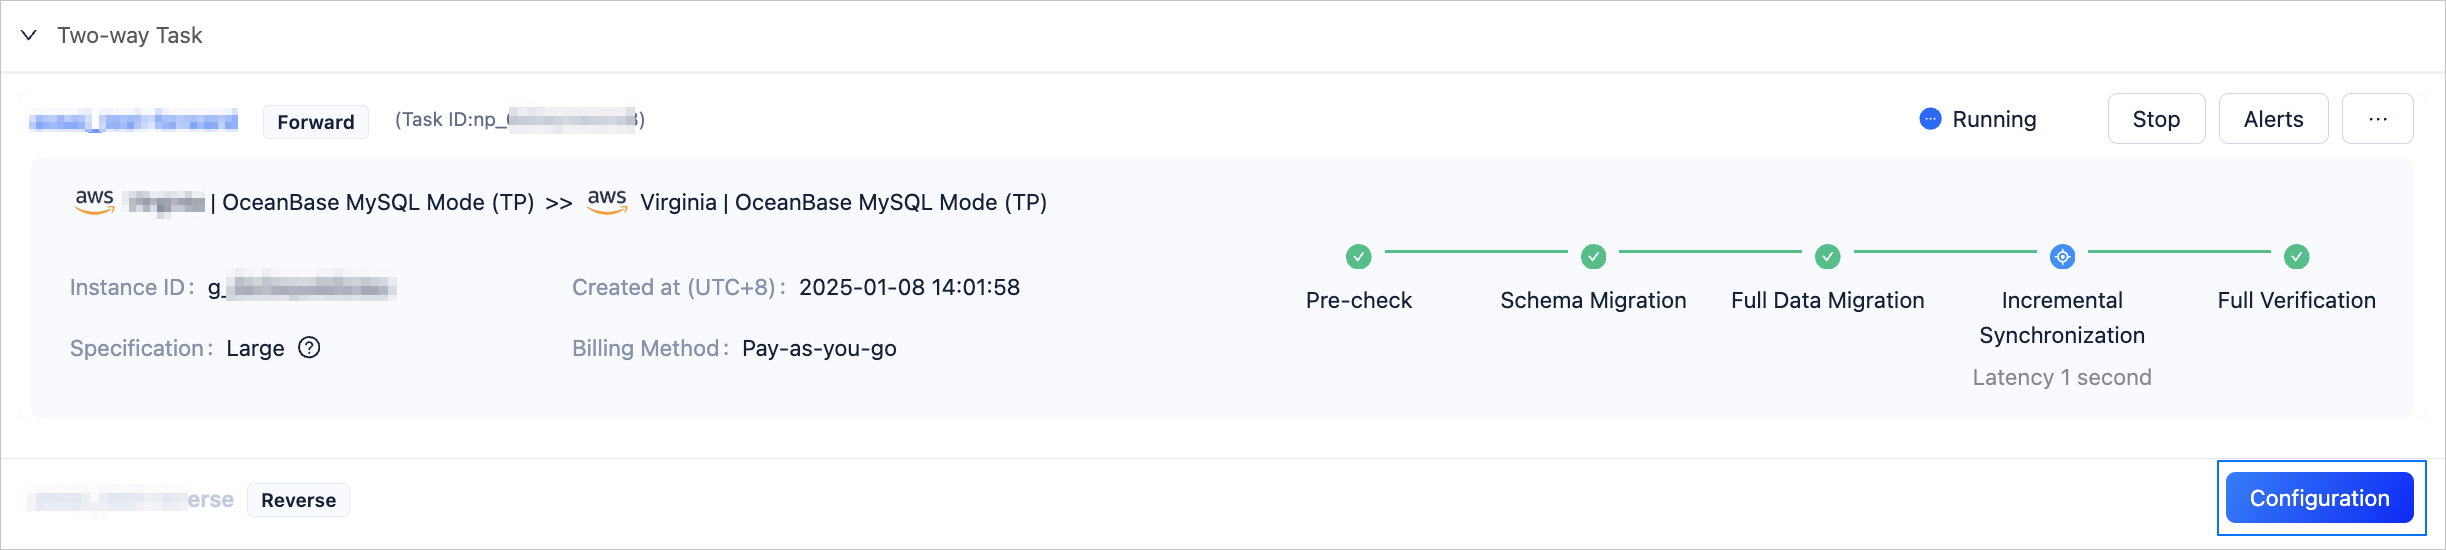
On the Configure Reverse Migration page, configure the parameters.
 ParameterDescription
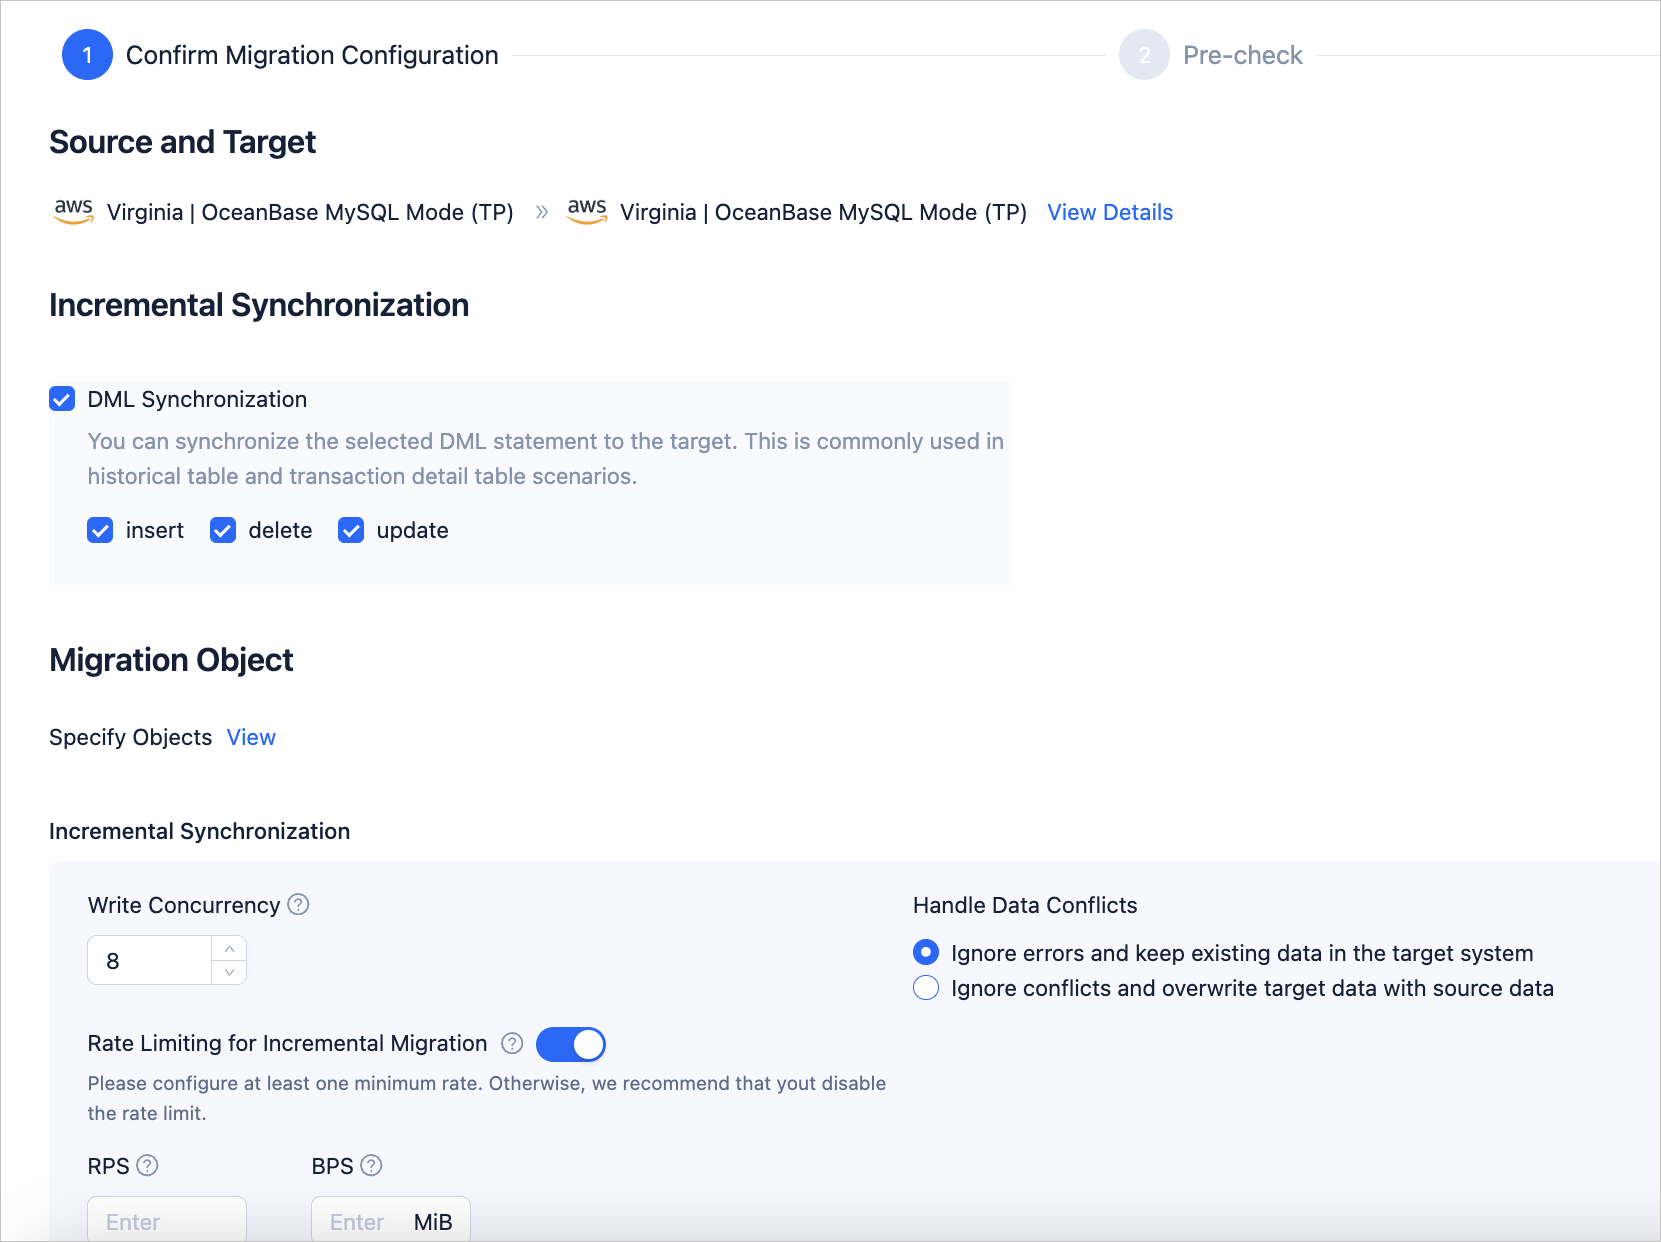
Source and Target Displays the source and target of data migration. Click View Details to view detailed information such as the cloud vendor, database type, instance type, and region of the source and target. Incremental Synchronization The incremental synchronization of the reverse task only supports configuring DML Synchronization. Please select according to your needs. Migration Objects - The method of selecting migration objects for the reverse task is consistent with the forward task. Click View to query the migrated objects in the View Objects dialog box.
- Incremental Synchronization related configurations:
- Write Concurrency
This parameter is used to configure the number of concurrent writes to the target during the incremental synchronization phase, with a maximum limit of 512. Too high concurrency may cause excessive pressure on the target and affect business. - Rate Limiting for Incremental Migration
You can decide whether to enable incremental synchronization rate limiting based on actual needs. If enabled, please set RPS (the maximum limit of data rows that can be synchronized to the target per second during the incremental synchronization phase) and BPS (the maximum limit of data volume that can be synchronized to the target per second during the incremental synchronization phase).Note
The RPS and BPS set here are only for rate limiting capabilities. The actual performance that incremental synchronization can achieve is limited by factors such as the source, target, and instance specification configuration, etc.
- Handle Data Conflicts
Includes Ignore Errors and Keep Original Data on Target and **Ignore Conflicts and Overwrite Target Data with Source Data. For more information, see the "About data conflict" section above.
- Write Concurrency
Click Next, and the system will perform a pre-check on the reverse task.
During the precheck, the data migration service checks the read and write privileges of the database user and the network connection of the database. A data migration task can be started only after it passes all check items. If an error is returned during the precheck, you can perform the following operations:
You can identify and troubleshoot the problem and then perform the precheck again.
You can also click Skip in the Actions column of a failed precheck item. In the dialog box that appears, you can view the prompt for the consequences of the operation and click OK.
After the pre-check succeeds, click Purchase to go to the Purchase Data Migration Instance page.
After the purchase succeeds, you can start the reverse task. For more information about how to purchase a data migration instance, see Purchase a data migration instance. If you do not need to start the task at this time, click Save. You can operate only on the Tasks page later as needed.