


This topic describes how to use OceanBase Connector/J to build an application that connects to OceanBase Cloud and performs basic operations such as creating tables, inserting data, and querying data.
 Download the java-oceanbase-jdbc sample project
  Connect to OceanBase Cloud using OceanBase Connector/J (Oracle compatible mode)
Prerequisites
You have registered an account with OceanBase Cloud, created an instance and an Oracle-compatible tenant. For more information, see Create an instance and Create a tenant.
You have installed JDK 1.8 and Maven.
You have installed Eclipse.
Note
The code examples in this topic are run in Eclipse IDE for Java Developers 2022-03. You can also use other tools that you prefer.
Procedure
Note
The following steps are for compiling and running the project in the Windows environment by using Eclipse IDE for Java Developers 2022-03. If you use other operating systems or compilers, the steps may be slightly different.
- Import the
java-oceanbase-jdbcproject into Eclipse. - Obtain the URL of the OceanBase Cloud database.
- Modify the database connection information in the
java-oceanbase-jdbcproject. - Run the
java-oceanbase-jdbcproject.
Step 1: Import the java-oceanbase-jdbc project into Eclipse
Start Eclipse and choose Import from the File menu.

In the import window, choose Maven > Existing Maven Projects, and click Next.

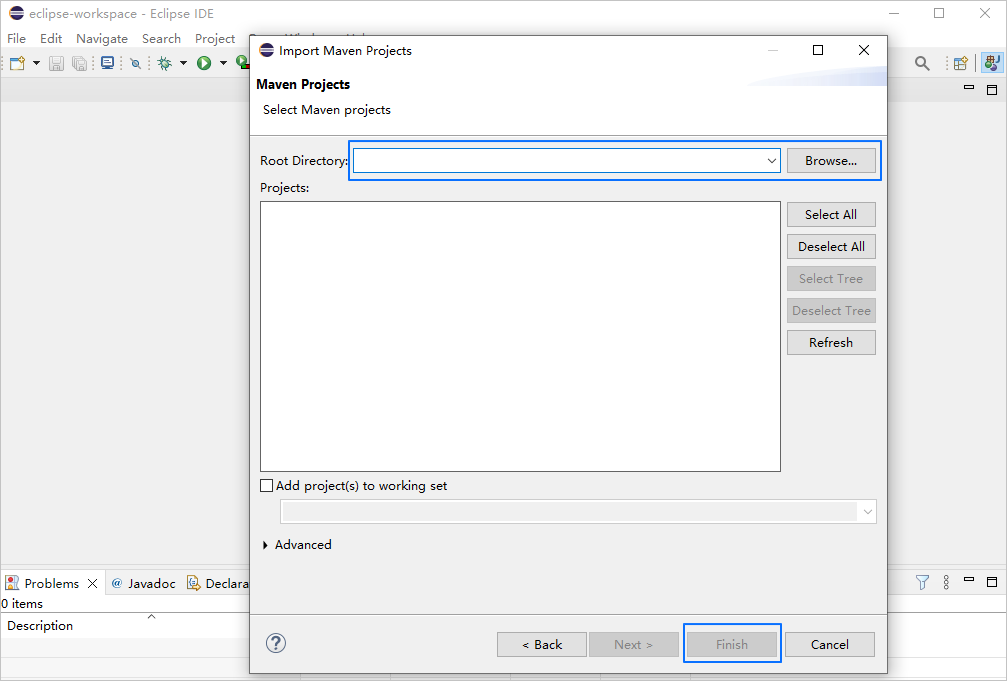
In the next page, click Browse to select the root directory of the Maven project, and then click Finish.
Eclipse automatically detects the
pom.xmlfile in the project and displays all Maven projects in the Package Explorer. On the left side of the Eclipse window, you can see the Package Explorer icon. If it is not displayed, choose Window > Show View > Package Explorer.Note
When you import a Maven project into Eclipse, it automatically detects the
pom.xmlfile in the project, downloads the required dependency libraries based on the described dependencies in the file, and adds them to the project.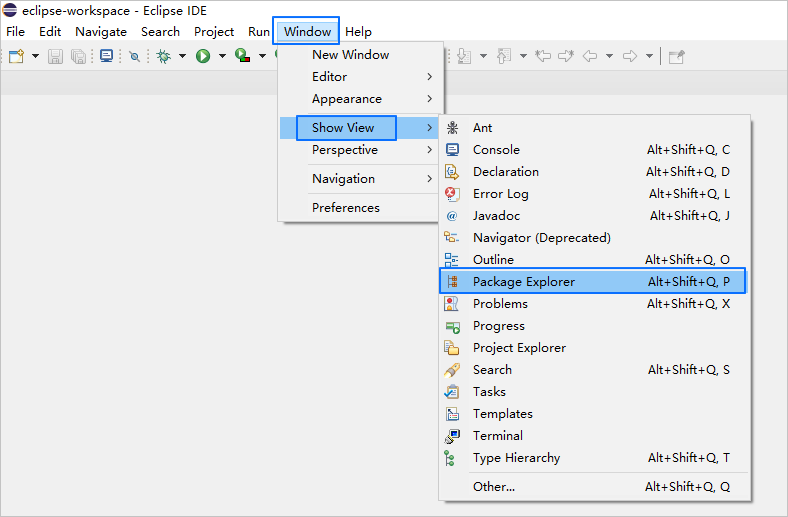
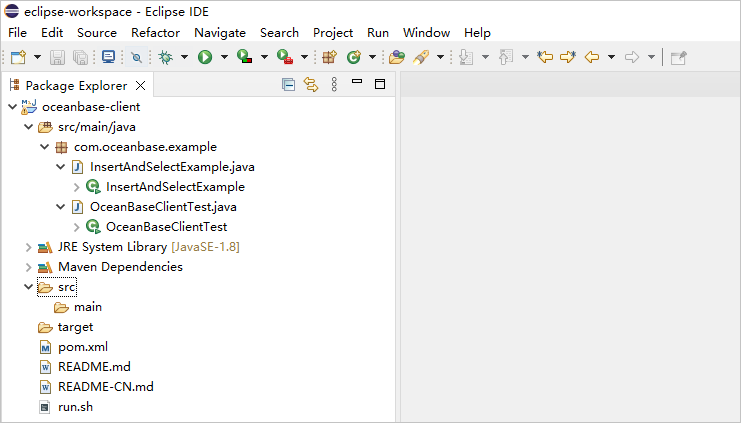
View the project.
Step 2: Obtain the URL of the OceanBase Cloud database
Log in to the OceanBase Cloud console. In the instance list, expand the information of the target instance and select Connect > Get Connection String under the target tenant.
For more information, see Get connection string.
Fill in the URL with the information of the created OceanBase Cloud database.
The URL for connecting to the Oracle compatible mode of the OceanBase Cloud database is as follows:
jdbc:oceanbase://$host:$port/$schema_name?user=$user_name&password=$passwordParameter description:
$host: the URL of the OceanBase Cloud database, for example,t********.********.oceanbase.cloud.$port: the port of the OceanBase Cloud database. The default value is 1521.$schema_name: the name of the schema to be accessed.$user_name: the account for accessing the database.$password: the password of the account.
For more information about the URL parameters, see Database URL.
Step 3: Modify the database connection information in the java-oceanbase-jdbc project
Modify the database connection information in the InsertAndSelectExample.java file based on the information obtained in Step 2: Obtain the URL of the OceanBase Cloud database.
Example:
- The URL of the OceanBase Cloud database is
t5******.********.oceanbase.cloud. - The port is 1521.
- The name of the schema to be accessed is
sys. - The tenant account is oracle001.
- The password is
******.
Sample code:
String url = "jdbc:oceanbase://t5******.********.oceanbase.cloud:1521/sys";
String user = "oracle001";
String password = "******";
Step 4: Run the java-oceanbase-jdbc project
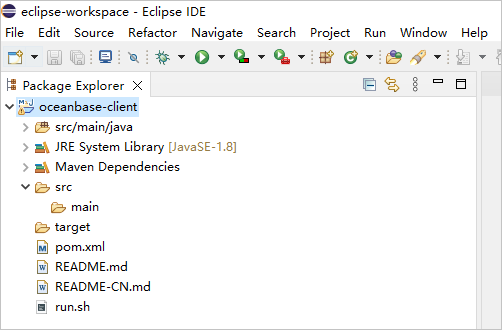
View the project structure in Package Explorer.
Find the Main class in the project, right-click the class, choose Run As > Run Configurations..., and then open the Run Configurations page.
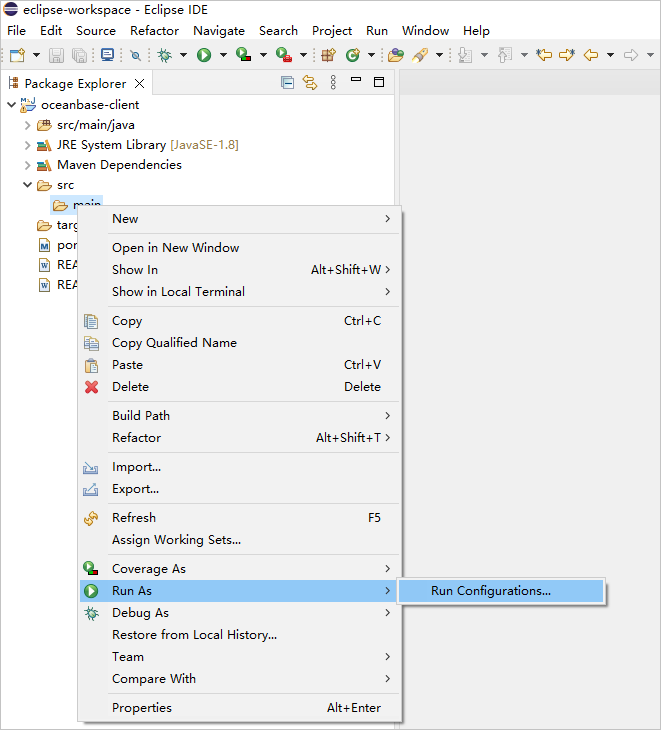
On the Run Configurations page, select
com.oceanbase.example.InsertAndSelectExamplein the Main class field of the Java Application > New_configuration page.
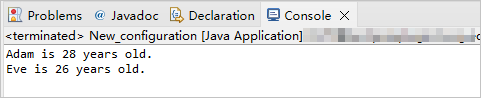
View the log information and output results of the project in the console of Eclipse.
Project code
Click java-oceanbase-jdbc to download the project code, which is a compressed file named java-oceanbase-jdbc.zip.
After decompressing the file, you will find a folder named java-oceanbase-jdbc. The directory structure is as follows:
.
|-- README-CN.md
|-- README.md
|-- pom.xml
|-- run.sh
`-- src
    `-- main
        `-- java
            `-- com
                `-- oceanbase
                    `-- example
                        |-- InsertAndSelectExample.java
                        `-- OceanBaseClientTest.java
File description:
README-CN.md: This file is the project description document, mainly for Chinese users.README.md: This file is also the project description document, but it is written in English and mainly for English users.pom.xml: This file is the configuration file of the Maven project, which defines the project's dependencies, plugins, and build rules.run.sh: This file is a Shell script used to automatically compile and run Java applications.src: This directory contains the source code and resource files of the project, which is the main directory of the project.main: This directory is a Java source code directory, containing the main code of the project.java: This directory is the root directory of Java source code.com: This directory is the root directory of Java packages.oceanbase: This directory is a subpackage under thecompackage, indicating that the project is related to OceanBase Cloud.example: This directory is a subpackage under theoceanbasepackage, indicating that the project is an example program that demonstrates how to connect to and operate on OceanBase Cloud using the OceanBase JDBC driver.InsertAndSelectExample.java: This file is part of the example program and contains an example classInsertAndSelectExamplethat demonstrates how to insert and query data.OceanBaseClientTest.java: This file is also part of the example program and contains an example classOceanBaseClientTestthat demonstrates how to connect to the database, execute SQL statements, and query data.
Introduction to the pom.xml file
The pom.xml file is the configuration file of a Maven project. It defines the dependencies, plugins, and build rules of the project. Maven is a Java project management tool that can automatically download dependencies, compile, and package projects.
The pom.xml file in this topic includes the following parts:
The file declaration statement.
This statement declares that the file is an XML file using XML version
1.0and character encodingUTF-8.Sample code:
<?xml version="1.0" encoding="UTF-8"?>The POM namespace and model version.
- The
xmlnsattribute specifies the POM namespace ashttp://maven.apache.org/POM/4.0.0. - The
xmlns:xsiattribute specifies the XML namespace ashttp://www.w3.org/2001/XMLSchema-instance. - The
xsi:schemaLocationattribute specifies the POM namespace ashttp://maven.apache.org/POM/4.0.0and the location of the POM XSD file ashttp://maven.apache.org/xsd/maven-4.0.0.xsd. - The
<modelVersion>element specifies the POM model version used by the POM file as4.0.0.
Sample code:
<project xmlns="http://maven.apache.org/POM/4.0.0" xmlns:xsi="http://www.w3.org/2001/XMLSchema-instance" xsi:schemaLocation="http://maven.apache.org/POM/4.0.0 http://maven.apache.org/xsd/maven-4.0.0.xsd"> <modelVersion>4.0.0</modelVersion> <!-- Other configurations --> </project>- The
Basic information configuration.
- The
<groupId>element specifies the project identifier ascom.oceanbase.example. - The
<artifactId>element specifies the project dependency asoceanbase-client. - The
<version>element specifies the project version as1.0-SNAPSHOT. - The
<name>element specifies the project name asob-example-oceanbase-client.
Sample code:
<groupId>com.oceanbase.example</groupId> <artifactId>oceanbase-client</artifactId> <version>1.0-SNAPSHOT</version> <name>ob-example-oceanbase-client</name>- The
The
<properties>element defines the properties of the project source file.- The
<project.build.sourceEncoding>element specifies the encoding of the project source file asUTF-8. - The
<maven.compiler.source>element specifies the Java source code version used by the Maven compiler as1.8. - The
<maven.compiler.target>element specifies the Java bytecode version generated by the Maven compiler as1.8. - The
<exec.mainClass>element specifies an example programcom.oceanbase.example.InsertAndSelectExamplein the project.
Sample code:
<properties> <project.build.sourceEncoding>UTF-8</project.build.sourceEncoding> <maven.compiler.source>1.8</maven.compiler.source> <maven.compiler.target>1.8</maven.compiler.target> <exec.mainClass>com.oceanbase.example.InsertAndSelectExample</exec.mainClass> </properties>- The
The
<dependencies>element defines the components that the project depends on.Note
This section of code defines that the project depends on OceanBase Connector/J V2.4.2. For more information about other versions, see OceanBase JDBC driver.
- The
<dependency>element defines a dependency. - The
<groupId>element specifies the organization of the dependency ascom.oceanbase. - The
<artifactId>element specifies the name of the dependency asoceanbase-client. - The
<version>element specifies the version of the dependency as2.4.2.
Sample code:
<dependencies> <dependency> <groupId>com.oceanbase</groupId> <artifactId>oceanbase-client</artifactId> <version>2.4.2</version> </dependency> </dependencies>- The
Introduction to the code in InsertAndSelectExample.java
The InsertAndSelectExample.java file is part of the sample program and contains the InsertAndSelectExample class, which demonstrates how to insert and query data.
The code in the InsertAndSelectExample.java file mainly includes the following parts:
Define the package and import the
java.sqlinterface.Declare the package name of the current file as
com.oceanbase.example.Import the following interfaces and classes from the
java.sqlpackage:Connectioninterface: represents a connection to the database.DriverManagerclass: provides a set of static methods for managing JDBC driver registration and obtaining database connections. The most commonly used method isgetConnection(), which is used to create a connection to the database.PreparedStatementinterface: represents a precompiled SQL statement.ResultSetinterface: represents a query result set.SQLExceptionexception class: represents various exceptions that occur when using JDBC to connect to the database, such as connection failure or failed SQL command execution.Statementinterface: represents a statement in the database.
Code:
package com.oceanbase.example;

import java.sql.Connection;
import java.sql.DriverManager;
import java.sql.PreparedStatement;
import java.sql.ResultSet;
import java.sql.SQLException;
import java.sql.Statement;
Define the class name and
mainmethod.Define the class name as
InsertAndSelectExample, which must be consistent with the file name.Define the
mainmethod aspublic static void, indicating that it is a public static method that accepts a string arrayargsas a parameter. Usethrows ClassNotFoundException, SQLExceptionto indicate that this method may throwClassNotFoundExceptionandSQLExceptionexceptions, which need to be handled at the method call site.Code:
public class InsertAndSelectExample {

    public static void main(String[] args) throws ClassNotFoundException, SQLException {
        // to do:
        // 3.connect to your database
        // 4.create a table
        // 5.insert records
        // 6.fetch all records
        // 7.release all resources
    }
}
Connect to the database and obtain the database connection object.
Define the URL string and additional connection properties required to connect to OceanBase Cloud:
jdbc:oceanbase: indicates that the OceanBase JDBC driver is used to connect to the database.host:port: indicates the address and port number of the OceanBase Cloud database.opt1=val1&opt2=val2...: additional connection properties, i.e., URL parameters. For more information about URL parameters, see Database URL.schema_name: indicates the name of the schema to connect to.String user = "user_name": defines the username required to log in to the database.String password = "******": defines the password required to log in to the database.
Obtain the database connection object:
- Load the driver program class named
com.oceanbase.jdbc.Driverby calling theforNamemethod of theClassclass. - Obtain the
Connectionobjectconnby calling thegetConnectionmethod of theDriverManagerclass.
Code:
String url = "jdbc:oceanbase://host:port/schema_name?[opt1=val1&opt2=val2...]";
String user = "user_name";
String password = "******";
Class.forName("com.oceanbase.jdbc.Driver");
Connection conn = DriverManager.getConnection(url, user, password);
Create a table.
Create a table named
personwith two fields,nameandage. If the table already exists, drop it before creating it. The steps are as follows:- Create a
Statementobject namedstmtto send SQL statements to the database. - Call the
executemethod of thestmtobject and pass the SQL statementdrop table personto drop thepersontable. Since it is uncertain whether thepersontable exists, use thetry-catchstructure to capture exceptions to prevent the program from crashing when the table does not exist. - Call the
executemethod of thestmtobject again and pass the SQL statementcreate table person (name varchar(50), age int)to create thepersontable with two fields,nameandage, where thenamefield is of typevarchar(50)and theagefield is of typeint.
Code:
Statement stmt = conn.createStatement(); try {stmt.execute("drop table person");} catch (Exception ignore) {} stmt.execute("create table person (name varchar(50), age int)");- Create a
Insert data into the table.
Use the
PreparedStatementinterface to insert two data records into thepersontable in the database. The steps are as follows:- Create a
PreparedStatementobject namedpsto execute SQL statements. The SQL statement isinsert into person values(?, ?), where?is a placeholder indicating that specific values need to be filled in. - Call the
setString()method to set the first placeholder (the first question mark) toAdam. - Call the
setInt()method to set the second placeholder (the second question mark) to28. - Execute an update operation to insert the data into the database.
- Call the
setString()method again to set the first placeholder to "Eve". - Call the
setInt()method again to set the second placeholder to26. - Execute an update operation again to insert the second data record into the database.
Code:
PreparedStatement ps = conn.prepareStatement("insert into person values(?, ?)"); ps.setString(1, "Adam"); ps.setInt(2, 28); ps.executeUpdate(); ps.setString(1, "Eve"); ps.setInt(2, 26); ps.executeUpdate();- Create a
Retrieve all records.
Query all data from the
persontable and output the results to the console. The steps are as follows:- Create a
PreparedStatementobject namedpsto execute SQL statements. The SQL statement isselect * from person, which queries all data from thepersontable. Set the cursor of the result set to move forward by calling thesetFetchDirection()method and set the result set to read-only by calling thesetConcurrency()method. - Execute a query operation and save the query results in the
ResultSetobject, which is namedrs. - Traverse the
ResultSetobject by using awhileloop. Call thers.next()method to move the cursor to the next data row. If data exists, it returnstrue. In the loop, call thers.getString(1)method to obtain the value of the first column (i.e., thenamecolumn in thepersontable), call thers.getInt(2)method to obtain the value of the second column (i.e., theagecolumn), and output these values to the console in the formatname is age years old.. - After the loop ends, close the
ResultSetandPreparedStatementobjects.
Code:
ps = conn.prepareStatement("select * from person", ResultSet.TYPE_FORWARD_ONLY, ResultSet.CONCUR_READ_ONLY); ResultSet rs = ps.executeQuery(); while (rs.next()) { System.out.println(rs.getString(1) + " is " + rs.getInt(2) + " years old."); }- Create a
Release database resources.
Close the
PreparedStatement,Statement, andConnectionobjects to release the associated database resources and avoid resource consumption and performance issues.Code:
ps.close();
stmt.close();
conn.close();
Complete code
<?xml version="1.0" encoding="UTF-8"?>

<project xmlns="http://maven.apache.org/POM/4.0.0" xmlns:xsi="http://www.w3.org/2001/XMLSchema-instance"
         xsi:schemaLocation="http://maven.apache.org/POM/4.0.0 http://maven.apache.org/xsd/maven-4.0.0.xsd">
  <modelVersion>4.0.0</modelVersion>

  <groupId>com.oceanbase.example</groupId>
  <artifactId>oceanbase-client</artifactId>
  <version>1.0-SNAPSHOT</version>

  <name>ob-example-oceanbase-client</name>

  <properties>
    <project.build.sourceEncoding>UTF-8</project.build.sourceEncoding>
    <maven.compiler.source>1.8</maven.compiler.source>
    <maven.compiler.target>1.8</maven.compiler.target>
    <exec.mainClass>com.oceanbase.example.InsertAndSelectExample</exec.mainClass>
  </properties>

  <dependencies>
    <dependency>
      <groupId>com.oceanbase</groupId>
      <artifactId>oceanbase-client</artifactId>
      <version>2.4.2</version>
    </dependency>
  </dependencies>

</project>
package com.oceanbase.example;

import java.sql.Connection;
import java.sql.DriverManager;
import java.sql.PreparedStatement;
import java.sql.ResultSet;
import java.sql.SQLException;
import java.sql.Statement;

public class InsertAndSelectExample {

    public static void main(String[] args) throws ClassNotFoundException, SQLException {

        String url = "jdbc:oceanbase://host:port/schema_name?[opt1=val1&opt2=val2...]";
        String user = "user_name";
        String password = "******";
        Class.forName("com.oceanbase.jdbc.Driver");
        Connection conn = DriverManager.getConnection(url, user, password);

        Statement stmt = conn.createStatement();
        try {
            stmt.execute("drop table person");
        } catch (Exception ignore) {
        }
        stmt.execute("create table person (name varchar2(50), age int)");

        PreparedStatement ps = conn.prepareStatement("insert into person values(?, ?)");
        ps.setString(1, "Adam");
        ps.setInt(2, 28);
        ps.executeUpdate();
        ps.setString(1, "Eve");
        ps.setInt(2, 26);
        ps.executeUpdate();

        ps = conn.prepareStatement("select * from person", ResultSet.TYPE_FORWARD_ONLY, ResultSet.CONCUR_READ_ONLY);
        ResultSet rs = ps.executeQuery();
        while (rs.next()) {
            System.out.println(rs.getString(1) + " is " + rs.getInt(2) + " years old.");
        }

        ps.close();
        stmt.close();
        conn.close();
    }

}
References
For more information about OceanBase Connector/J, see OceanBase JDBC driver.