


This topic describes best practices for deploying highly available databases using the cross-cloud one-primary-multi-standby architecture. This architecture offers higher disaster recovery redundancy compared to a primary-standby architecture with only one standby database, ensuring that other standby databases are available even if one standby database fails. This is suitable for critical business systems with high business continuity requirements. For more information about cross-cloud primary-standby databases, see High availability through cross-cloud primary-standby databases (1:1).
Note
The feature is available only to allowlisted customers. Contact technical support for more information if you need it.
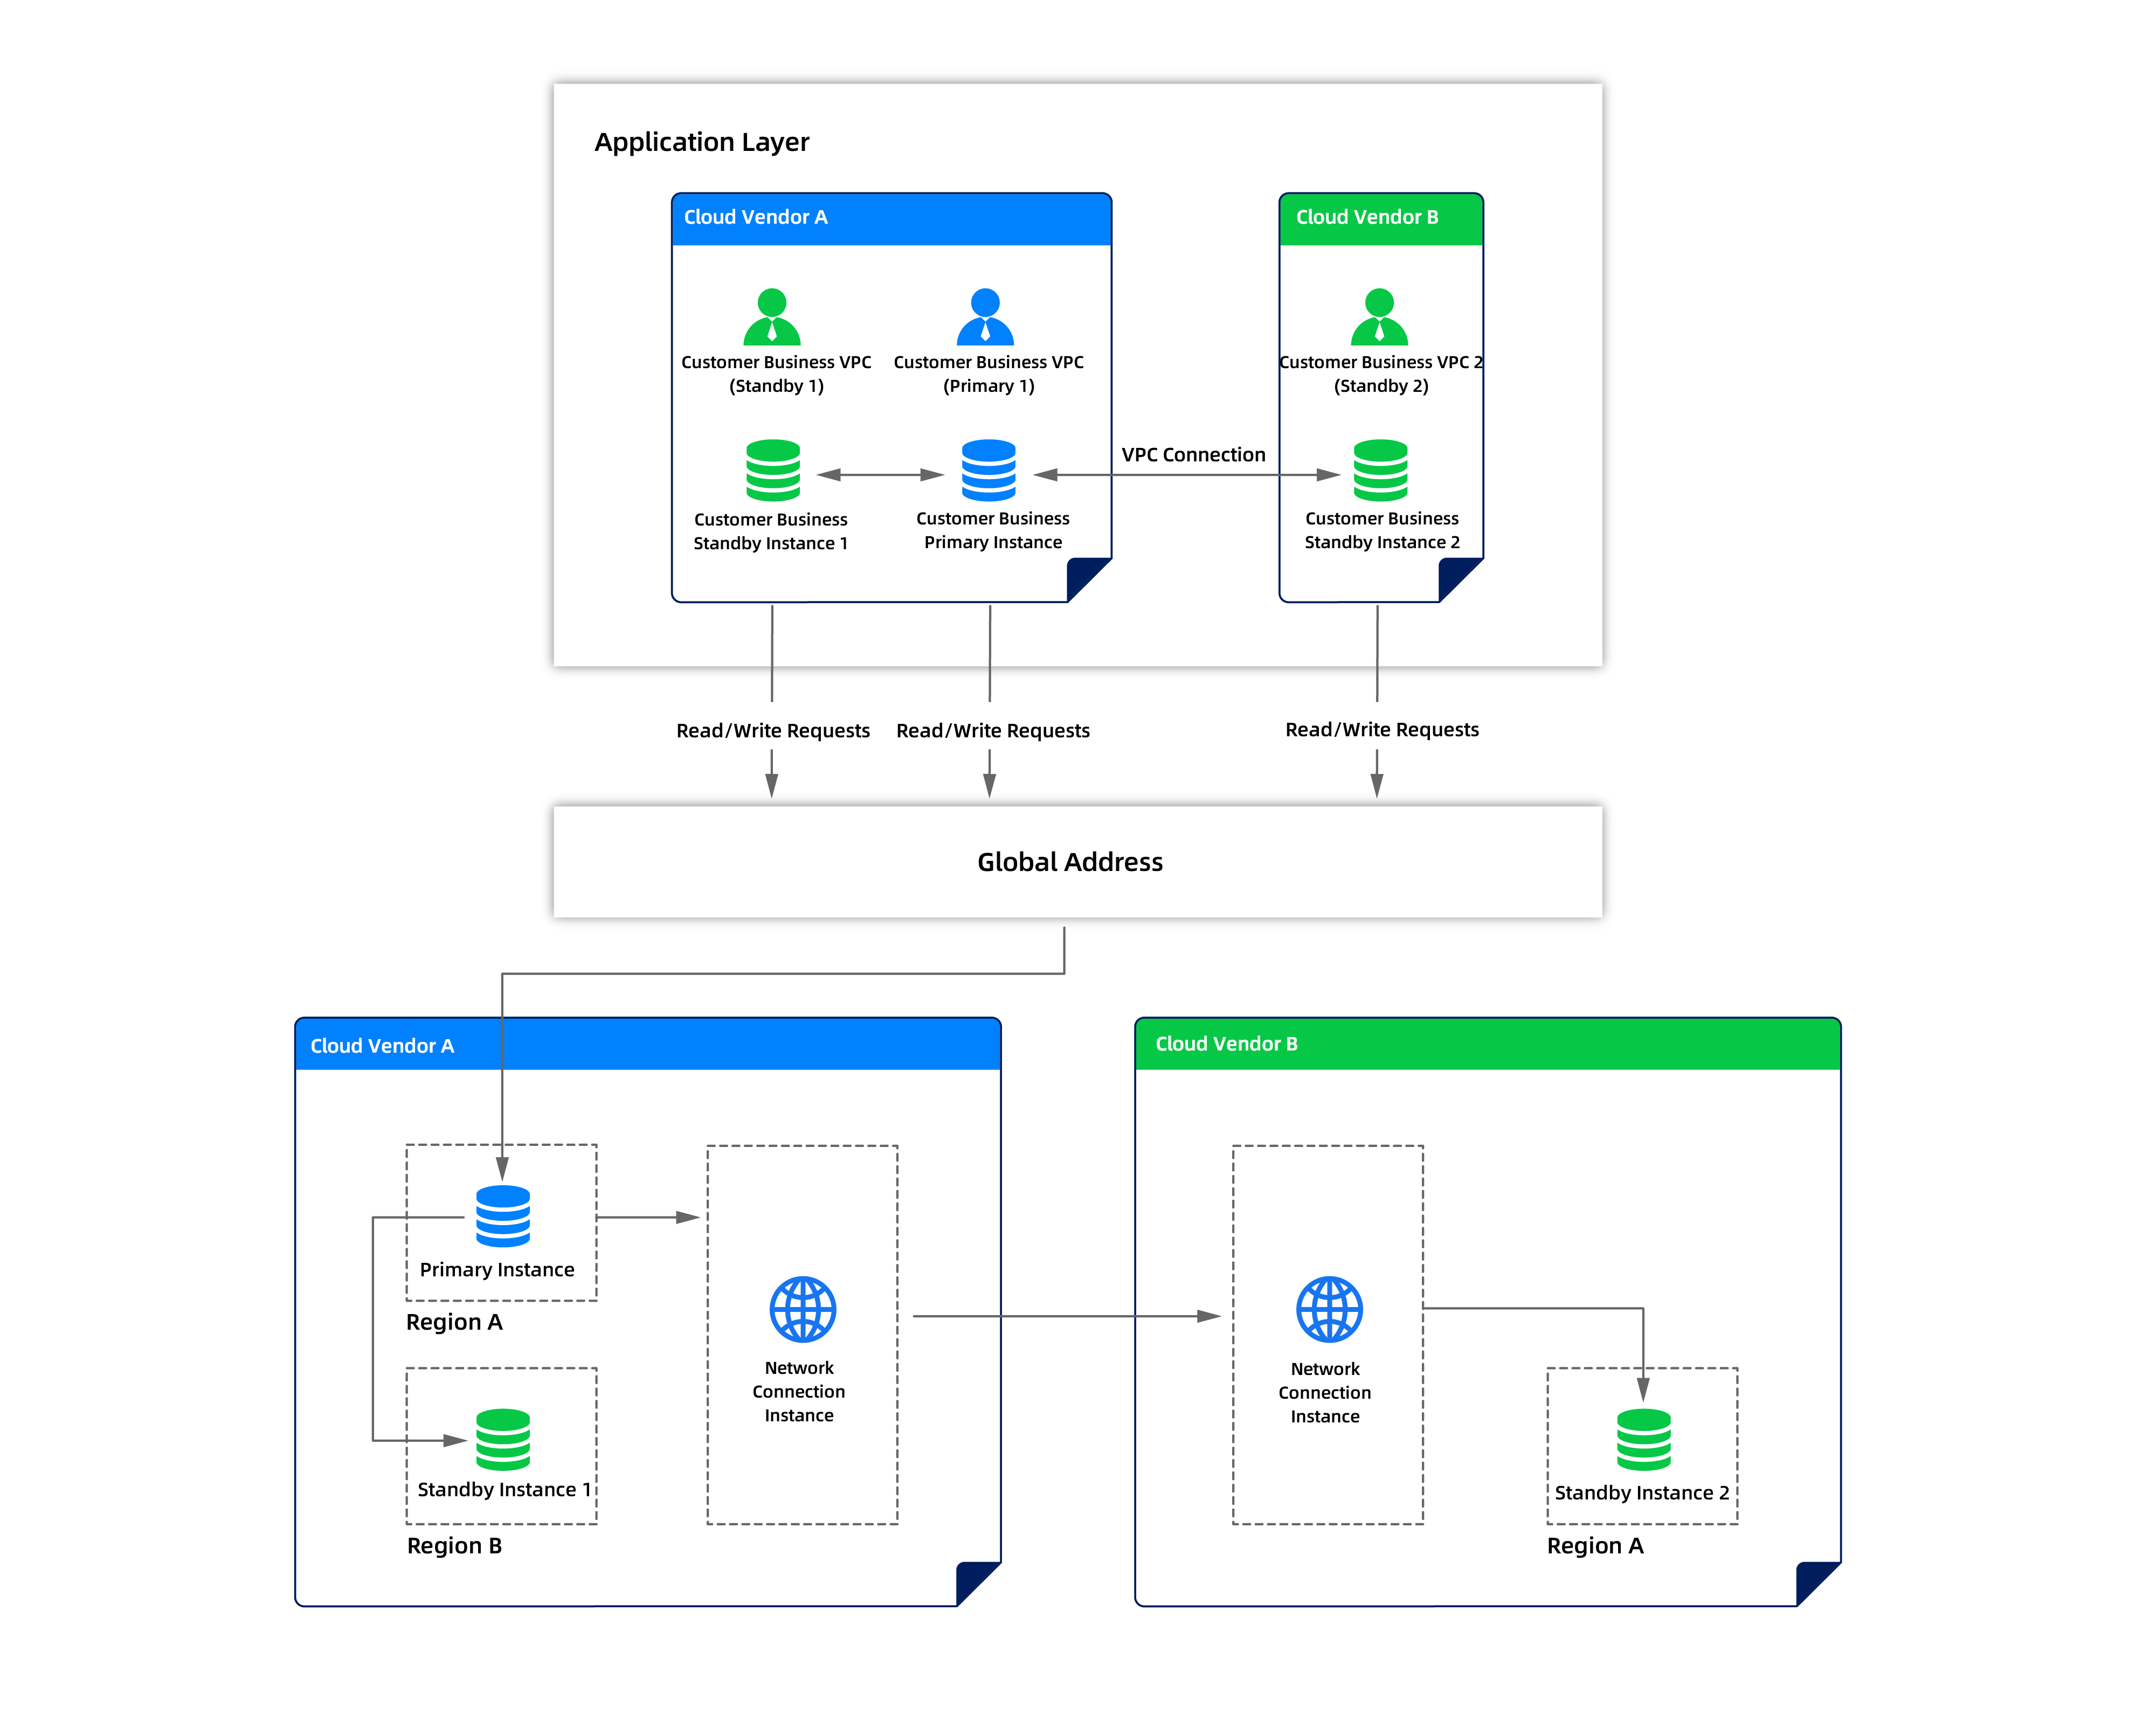
Architecture diagram of the cross-cloud one-primary-multi-standby architecture:
Typical scenario
The core transaction system of a large e-commerce platform requires 7×24-hour uninterrupted operation, with extremely high requirements for data consistency and business continuity. The platform has deployed a primary database instance on Alibaba Cloud to handle core business such as order processing, payment transactions, and inventory management.
Business challenges:
A failure of a single cloud vendor could lead to a complete business system interruption, resulting in significant economic losses.
The platform must comply with regulations in multiple regions, requiring data to be deployed in different regions.
The disaster recovery switch time must be extremely short, with RTO (Recovery Time Objective) controlled to the second level.
Higher disaster recovery redundancy is needed. Even if one standby instance fails, there should be other standby instances available.
Solution:
The company adopts the cross-cloud primary-standby architecture, deploying three standby instances on a second cloud vendor, such as Huawei Cloud, in different availability zones. The primary instance synchronizes data in real time to the three standby instances through direct network connection, ensuring strong data consistency.
When the primary instance fails, the system selects the standby instance with the most complete data synchronization, the smallest delay, and the highest availability as the new primary instance, achieving a second-level switch to ensure business continuity.
Prerequisites
Currently, only flagship edition instances and transactional instances support cross-cloud primary-standby databases.
The primary and standby instances are deployed in the Shared Nothing Architecture.
The standby instance must have the same instance type, billing method, database version, and deployment mode as the primary instance.
The database version must be V4.2.5.4 or later. You can create up to three standby instances.
You have the project owner or project admin role in the account that you use to log in to OceanBase Cloud.
Procedure
Create a primary instance
Create an Alibaba Cloud primary instance in the OceanBase Cloud console. Make sure that the database version is V4.2.5.4 or later.
Log in to the OceanBase Cloud console. If you are creating an instance for the first time, click Create Instance as prompted.
In the left-side navigation pane, click Instances.
In the upper-right corner of the page that appears, click Create Instance.
Set the instance type to Transactional.
Select Alibaba Cloud as the cloud vendor and select a region.
Configure the instance parameters.
ParameterDescriptionInstance Name The name of the instance, which must be 2 to 64 characters in length and can contain only Chinese characters, digits, letters, underscores (_), and hyphens (-). Storage Architecture Shared Nothing (Only this architecture is supported for cross-cloud primary-standby instances). Version V4.2.5.4 or later (required if you want to create multiple standby instances). Deployment Mode Select single-IDC, dual-IDC, or multi-IDC deployment. Zone The zone where the instance is located. You can click View Network Latency to select a zone with lower network latency. We recommend that you select a zone close to your business application to reduce network latency. Compute The compute specification. Different cloud vendors support different compute specifications. Storage Disk Type Select the storage disk type of ESSD PL0 or ESSD PL1. Storage The storage size. You can select a storage size based on the compute specification. Specify the number of instances you want to create in the Quantity section.
Note
The database version must be V4.2.5.4 or later to create multiple standby instances (up to 3).
- In the Summary section, review the configurations and click Create Instance to complete the purchase.
After the creation is completed, you can navigate back to the Instances page to view the creation progress.
For more information, see Create an instance.
Create a standby instance
Log in to the OceanBase Cloud console.
In the left-side navigation pane, click Instances.
In the instance list, find the target primary instance (Alibaba Cloud primary instance), click the icon next to the instance name, and select Create Standby Instance.
In the dialog box that appears, select the project for the standby instance and click Create Standby Instance.
Configure the instance parameters.
ParameterDescriptionInstance Type Select Transactional. Cloud Vendor Select a second cloud vendor, such as Huawei Cloud. Region To reduce network latency and improve access speed, we recommend that you select a region close to your business. Instance Name You can customize the name of the standby instance, which must be 2 to 64 characters in length and can contain only Chinese characters, digits, English letters, underscores, and hyphens. Version The database version must be V4.2.5.4 or later (if you need to create multiple standby instances). Deployment Mode The same as that of the primary instance. Zone You can click View Network Latency to view the network latency in different regions and select a suitable zone. We recommend that you deploy multiple standby instances in different zones to achieve higher disaster recovery redundancy. Compute The same as that of the primary instance, or adjusted based on your business requirements. The minimum node specification of a standby instance must be at least 0.33 times that of the primary instance. Storage The same as that of the primary instance, or larger than that of the primary instance. Primary-Standby Instance Network Sync Method Supports direct network connection and log archiving. For more information, see below. Configure the synchronization method between the primary and standby instances:
Direct Network Connection: Strong real-time performance with low latency (in seconds), suitable for scenarios that require high data synchronization real-time performance.
Log Archiving: Slightly higher latency (in minutes), suitable for scenarios that require lower network transmission costs.
Note
In the one-primary-multi-standby architecture, all standby instances must adopt the same synchronization method. If there are existing standby instances, select the same synchronization method as the existing standby instances. Once set, this setting cannot be changed.
Specify the number of instances you want to create in the Quantity section.
In the Summary section, review the configurations and click Create Instance to complete the purchase.
After the creation is completed, you can navigate back to the Instances page to view the creation progress.
Return to the instance list and confirm that the standby instance is created. In the instance list, you can view the association between the primary instance and the standby instance.
(Optional) If you need to create multiple standby instances, repeat steps 3 to 9 to create the second and third standby instances for the same primary instance to implement the one-primary-multi-standby architecture.
Note
- All standby instances must use the same synchronization method.
- We recommend that you deploy multiple standby instances in different zones to avoid single-point failures.
- We recommend that you use a unified naming rule for easy management and maintenance in the future.
- Currently, you can create up to three standby instances for one primary instance.
Create a tenant and import data
Create a tenant and import business data in the primary instance. All standby instances will automatically synchronize data from the primary instance.
Data synchronization:
After a standby instance is created, it automatically starts to synchronize data from the primary instance.
All standby instances directly synchronize data from the primary instance. There is no cascading synchronization between standby instances.
Data synchronization is real-time. In direct network connection mode, the synchronization latency is usually in seconds. In log archiving mode, the synchronization latency is usually in minutes.
Create a tenant in the primary instance. For more information, see Create a tenant.
Import business data to the tenant. For more information, see Data migration.
Make sure that private IP addresses are created for all tenants. For more information, see Obtain the connection string.
Verify the data synchronization status:
Go to the overview page of the tenant of the standby instance and view the data synchronization status and latency in the Topology Diagram section.
We recommend that you configure the global endpoint after data synchronization is completed.
In direct network connection mode, we recommend that you control the synchronization latency within 10 seconds. In log archiving mode, we recommend that you control the synchronization latency within 5 minutes.
Configure a global endpoint
A global endpoint is a key configuration for achieving seamless business switching. With a global endpoint, business applications do not need to modify their connection addresses. Requests will be routed to the current primary instance.
Prerequisites: Private IP addresses have been created for all tenants in the primary and standby instances. For more information, see Obtain the connection string.
Best practices:
In the one-primary-multi-standby architecture, configure a global endpoint for each standby instance.
Use meaningful global endpoint prefixes for easy identification and management.
Prepare the private IP addresses of the primary and standby tenants before configuring the global endpoint.
Log in to the OceanBase Cloud console.
In the left-side navigation pane, click Instances.
In the instance list, find the primary instance, click the arrow on the left side of the instance to expand its tenant information, and then click the name of the target tenant to go to the Overview page of the tenant.
In the Topology Diagram section, click Get Endpoint next to Global Endpoint.
In the dialog box that appears, enter the global endpoint prefix, the private IP address of the primary tenant, and the private IP address of the standby tenant.
Endpoint Prefix: A custom prefix consisting of lowercase letters, numbers, and hyphens (-). The prefix must start with a letter and end with a number or letter. The prefix must be unique and between 10 and 40 characters in length.
Primary Tenant Private IP: In the overview page of the tenant of the primary instance, click Topology Diagram and then click Get Connection String next to Private Endpoint to copy the private IP.
Standby Tenant Private IP: In the overview page of the tenant of the first standby instance, click Topology Diagram and then click Get Connection String next to Private Endpoint to copy the private IP.
Click OK to complete the global endpoint configuration for the first standby instance.
Verify whether the global endpoint is configured. In the Topology Diagram of the overview page of the tenant, you can view the configured global endpoint.
(Optional) Repeat steps 3 to 7 to configure global endpoints for other standby instances.
Note
- Each global endpoint must have a unique prefix.
- We recommend that you configure global endpoints for all standby instances to ensure that any standby instance can serve as the new primary instance.
- After the global endpoint is configured, we recommend that you test the connection to ensure that the configuration is correct.
Failover
When a primary instance fails or a planned failover is required, you can switch a standby instance to the primary instance. In the one-primary-multi-standby architecture, you need to manually select the optimal standby instance as the new primary instance.
Prerequisites:
At least one standby instance is running.
All tenants in the primary and standby instances have been configured with private IP addresses.
All tenants in the primary and standby instances have been configured with global endpoints for the primary and standby instances.
You have project admin and instance admin permissions.
Recommendations for selecting a standby instance:
We recommend that you select the optimal standby instance based on the following factors in order of priority:
Geographic location: Consider network latency and the principle of proximity to the business application. Select a standby instance that is closer to the business application.
Resource status: Evaluate the CPU, memory, and storage resource usage of the standby instance to ensure that it has sufficient resources to handle the business load.
Switching time:
Direct network connection: The failover is usually completed within 3-5 minutes.
Log archiving: The failover may require waiting for data synchronization to complete, which may take 1-5 minutes.
Procedure:
Log in to the OceanBase Cloud console.
In the left-side navigation pane, click Instances.
In the instance list, find the target standby instance and click the icon in the Actions column.
How to select a standby instance:
You can view the data synchronization status, delay, and resource usage of the standby instance in the overview page of the tenant.
We recommend that you select a standby instance that has the most complete data synchronization, the smallest delay, and sufficient resources.
In the dialog box that appears, select Initiate Failover.
Confirm the failover information and click OK to complete the failover.
Note
- After the failover, the selected standby instance becomes the new primary instance, and the primary-standby relationships between the original primary instance and all standby instances are removed.
- After the failover, the other standby instances establish synchronization relationships with the new primary instance and continue to serve as standby instances of the new primary instance.
- You must update the connection address of the business application to connect to the new primary instance.
Post-failover actions:
After the failover, the other standby instances establish synchronization relationships with the new primary instance to maintain the one-primary-multi-standby architecture.
We recommend that you regularly check the data synchronization status between the new primary instance and the other standby instances to ensure normal synchronization.
For more information, see Failover.