


If you choose to use an endpoint for a data source whose cloud vendor is Azure, you must configure the endpoint first. This topic describes how to configure an endpoint to obtain the connection information.
Azure Database for MySQL
Create an Azure Database for MySQL
Log in to the Azure Database for MySQL servers page, and click + Create.
On the Select Azure Database for MySQL deployment option page, select Flexible server > Advanced Create.
On the Flexible server > Basics page, configure the following parameters.
ParameterDescriptionSubscription Select the target Azure subscription from the drop-down list. Resource group Select the target resource group from the drop-down list. Server name Enter a server name. The name must be 3 to 63 characters in length, and can contain lowercase letters, numbers, and hyphens (-). Region/MySQL version/Workload type/Compute + storage/Availability zone Select the options as needed. High availability Select whether to enable high availability as needed. Authentication Select MySQL authentication only. Administrator login/Password/Confirm password Enter the administrator login name, password, and confirm password as needed. Click Next: Networking. On the Flexible server > Networking page, configure the following parameters.
ParameterDescriptionConnectivity method Select Public access (allowed IP addresses) and Private endpoint. Public access/Firewall rules Configure public access and firewall rules as needed. Private endpoints You can create one in subsequent steps. Click Next: Security. On the Flexible Server > Security page, use the default configurations, and click Next: Tags.
On the Flexible Server > Tags page, create tags as needed. Click Next: Review + create.
On the Flexible Server > Review + create page, review the configurations and click Create.
After the server is created, go to the details page. In the left-side navigation pane, click Settings > Server parameters and set
require_secure_transporttoOFF.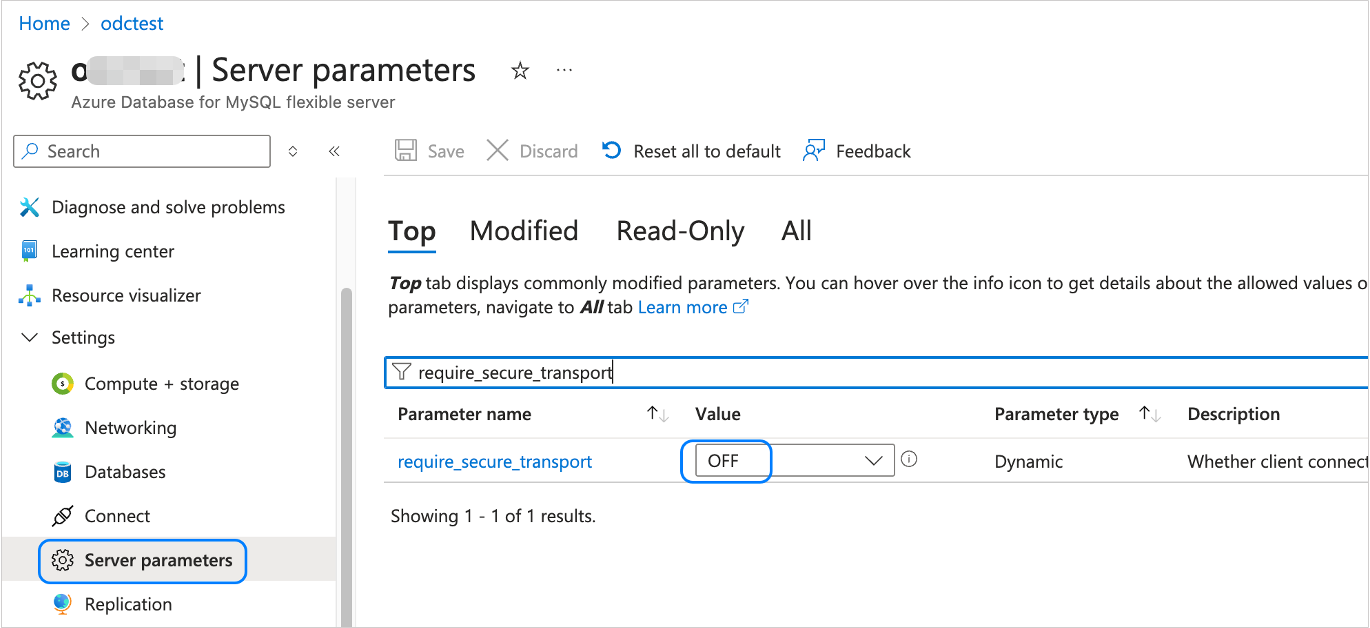
Create a virtual network.
a. Go to the Virtual Network page and click Create.
b. On the Create virtual network > Basics page, configure the parameters.
c. Click Review + create.
d. On the Create virtual network > Review + create page, review the configurations and click Create.

Create or add a private endpoint for Azure Database for MySQL
Create a private endpoint
On the Private Endpoints page, click + Create.
On the Create a private endpoint > Basics page, configure the following parameters.
ParameterDescriptionSubscription Select the target Azure subscription from the drop-down list. Resource group Select the target resource group from the drop-down list. Name Enter a name for the private endpoint. The name must start with a letter or a number, end with a letter, a number, or an underscore (), and can only contain letters, numbers, underscores (), periods (.), or hyphens (-). Network interface name Enter a name for the network interface. The name must start with a letter or a number, end with a letter, a number, or an underscore (), and can only contain letters, numbers, underscores (), periods (.), or hyphens (-). Region Select the target region. Click Next: Resource. On the Create a private endpoint > Resource page, configure the parameters as needed. The target resource cannot be changed and remains at the default value.
Click Next: Virtual Network. On the Create a private endpoint > Virtual Network page, select the virtual network and subnet as needed.
Click Next: DNS. On the Create a private endpoint > DNS page, set Integrate with private DNS zone to No.
Click Next: Tags. On the Create a private endpoint > Tags page, create tags as needed.
Click Next: Review + create. On the Create a private endpoint > Review + create page, review the configurations and click Create.
Add a private endpoint to an existing Azure Database for MySQL
On the Azure Database for MySQL servers page, click the name of the target server to go to the Overview page.
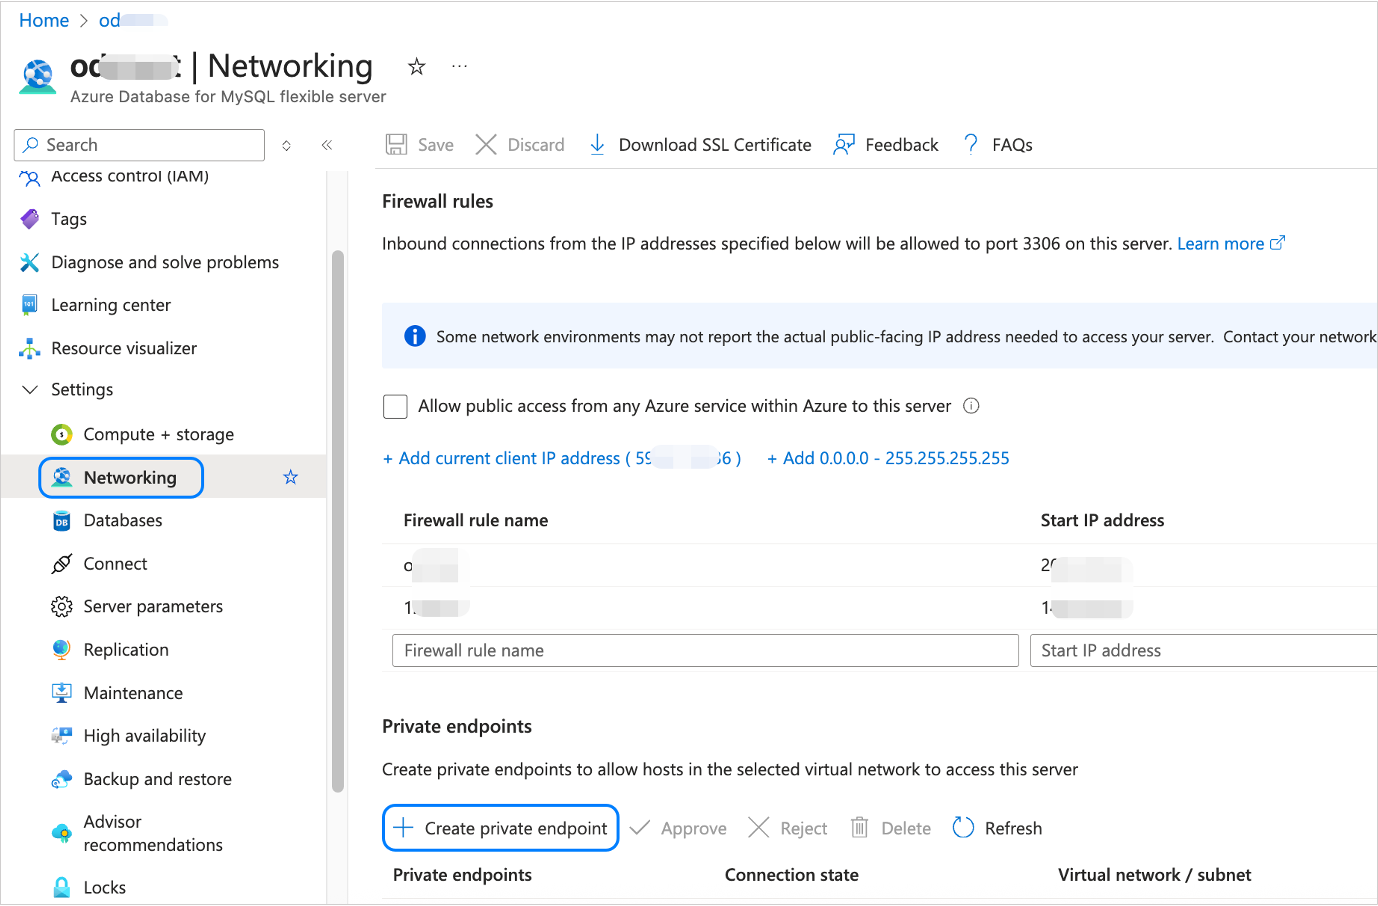
In the left-side navigation pane, click Settings > Networking.
In the Private endpoints section, click + Create private endpoint.
On the Create a private endpoint > Basics page, customize the Name and Network Interface Name fields.
Click Next: Resource. On the Create a private endpoint > Resource page, the target resource cannot be changed and remains at the default value.
Do not configure any parameters on the subsequent pages. Click Next repeatedly until you reach the Create a private endpoint > Review + create page.
Review the configurations and click Create.
Use a private endpoint
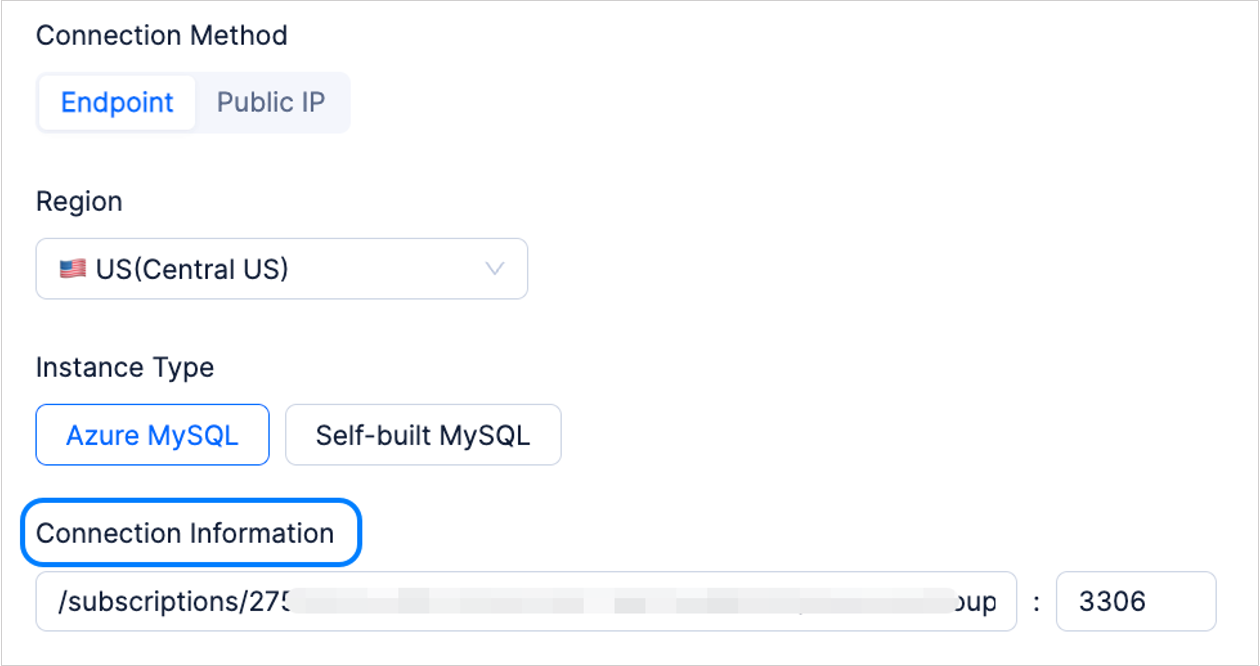
After you create or add a private endpoint for the Azure Database for MySQL, you need to copy the Resource ID and paste it into the Azure > Endpoint > Connection Information section on the Create Data Source page. For more information, see Create a data source.
To copy the resource ID, perform the following steps:
Log in to the Azure Database for MySQL servers page.
Click the name of the target server to go to the Overview page.
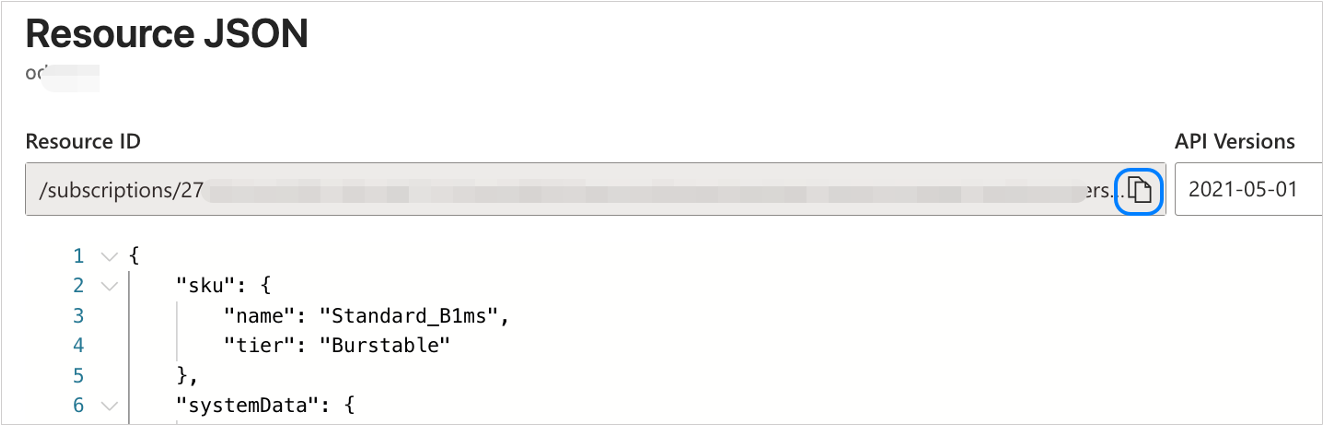
In the Overview section, click JSON View in the upper-right corner.

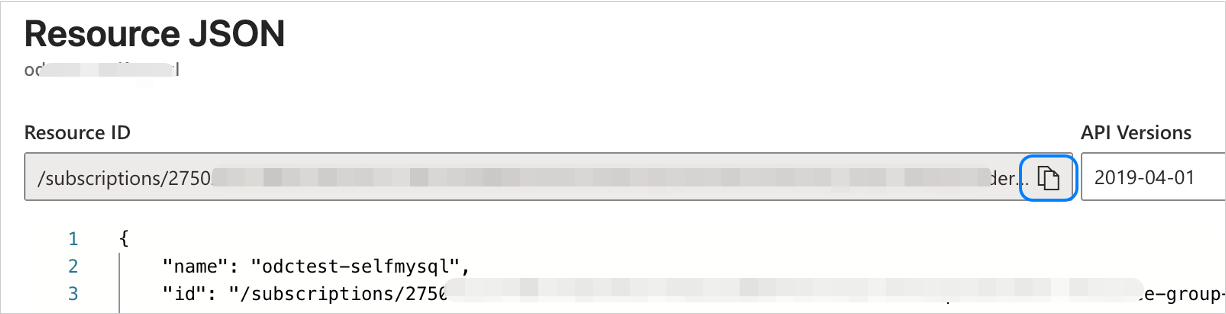
On the Resource JSON page, click the copy icon next to Resource ID.
If the connection test of the data source fails and you are prompted to go to the Azure console to accept the received connection request, perform the following steps:
Log in to the Azure Database for MySQL servers page.
Click the name of the target server to go to the Overview page.
In the left-side navigation pane, click Settings > Networking.
In the Private endpoints section, select the target private endpoint and click Approve.
After the private endpoint connection is approved, go back to the Create Data Source page and retest the approved.
Self-managed MySQL/Oracle database
Create a load balancer
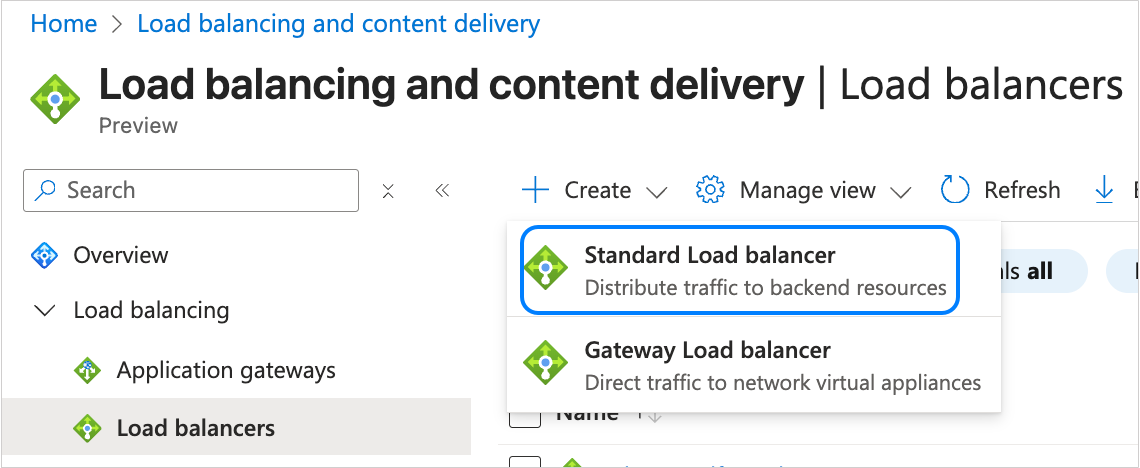
Log in to the Azure portal page, and click + Create > Standard Load balancer.
On the Create load balancer > Basics page, configure the following parameters.
ParameterDescriptionSubscription Select the target Azure subscription from the drop-down list. Resource group Select the target resource group from the drop-down list. Name Enter a name for the load balancer. The name must start with a letter or a number and end with a letter, number, or underscore (), and can only contain letters, numbers, underscores (), dots (.), or hyphens (-). Region Select the region as needed. SKU Select Standard. Type Select Internal. Tier Select Regional. Click Next: Frontend IP configuration. On the Create load balancer > Frontend IP configuration page, click + Add a frontend IP configuration.
In the AAdd frontend IP configuration dialog box, configure the following parameters and click Save.
ParameterDescriptionName Enter a frontend IP configuration name. The name must start with a letter or a number and end with a letter, number, or underscore (), and can only contain letters, numbers, underscores (), dots (.), or hyphens (-). IP version Select IPv4. Virtual network Select the virtual network where the self-managed database is located. Subnet Select the correct subnet from the drop-down list. Assignment Select Dynamic. Availability zone Select No Zones. Click Next: Backend pools. On the Create load balancer > Backend pools page, click + Add a backend pool.
On the Add backend pool page, configure the following parameters and click Save.
ParameterDescriptionName Enter a backend pool name. The name must start with a letter or a number and end with a letter, number, or underscore (), and can only contain letters, numbers, underscores (), dots (.), or hyphens (-). Virtual network Select the virtual network where the self-managed database is located. Backend pool configuration Select NIC. Do not configure any parameters on the subsequent pages. Click Next repeatedly until you go to the Create load balancer > Review + create page.
Review the configurations and click Create.
Create a private link service
Go to the Private Link services page and click + Create.
On the Create private link service > Basics page, configure the following parameters.
ParameterDescriptionSubscription Select the target Azure subscription from the drop-down list. Resource group Select the target resource group from the drop-down list. Name Enter a name for the private link service. The name must start with a letter or number and end with a letter, number, or underscore (). It can contain letters, numbers, underscores (), periods (.), or hyphens (-), and must be 2 to 64 characters in length. Region Select a region as needed. Click Next: Outbound settings. On the Create private link service > Outbound settings page, configure the following parameters.
ParameterDescriptionLoad balancer Select the created load balancer from the drop-down list. Load balancer frontend IP address Select the frontend IP address of the load balancer from the drop-down list. Source NAT subnet Select the subnet to allocate NAT IP addresses from the drop-down list. Enable TCP proxy V2 Select whether to enable TCP Proxy V2 as needed. Private IP address settings Select Allocation as Dynamic. Do not configure any parameters on the subsequent pages. Click Next repeatedly until you go to the Create private link service > Review + create page.
Review the configurations and click Create.
Use a private link service
After you create a private link service, you need to copy the Resource ID and paste it into the Azure > Endpoint > Connection Information section on the Create Data Source page. For more information, see Create a data source.

To copy the resource ID, perform the following steps:
Log in to the Private Link services page.
Click the name of the target private link service to go to the Overview page.
In the Overview section, click JSON View in the upper-right corner.

On the Resource JSON page, click the copy icon next to Resource ID.
If the test connection of the data source fails and you are prompted to go to the Azure console to accept the received connection request, perform the following steps:
Log in to the Private Link services page.
Click the name of the target private link service to go to the Overview page.
In the left-side navigation pane, click Settings > Private endpoint connections.
Select the target private endpoint and click Approve.
In the Approve dialog box, click Yes.
After the private endpoint connection is approved, go back to the Create Data Source page and retest the approved.