


If you select endpoint as the connection type when you create a data source or data migration task with Google Cloud as the cloud vendor, you must configure a Google Cloud endpoint. This topic describes how to configure it.
Prerequisites
You have created a database instance of the corresponding type and obtained its connection address in your virtual private cloud (VPC). For example, for a MySQL database instance, the connection address is usually a single address-port pair in the format of
address:port. For a Kafka instance, multiple address-port pairs in the format ofbroker_address1:broker_port1,broker_address2:broker_port2, and so on, are possible.If the load balancing service or virtual server associated with the endpoint service has enabled security group, add the private IP address of the OceanBase Cloud data source to the corresponding security group. For more information, see Private IP address segments.
Configure a private network connection for the Cloud SQL instance
Google Cloud Platform (GCP) Cloud SQL for MySQL/PostgreSQL supports two private network connection modes: Private Service Connect (PSC) and Private Services Access (PSA). You can log in to the GCP console and go to the Cloud SQL instance list page. Then, check the value of Internal connection method of the target Cloud SQL instance to determine whether it uses PSC or PSA.
If you use Private Service Connect, you can only use the Endpoint connection type when you create a data migration task. After you create a Cloud SQL instance, obtain the service connection information, then enter it in Connection Information if you select Endpoint for Connection Type when you create a data source or data migration task with Google Cloud as the cloud vendor in the OceanBase Cloud console. For more information, see Connect to an instance using Private Service Connect.
When Private Service Connect is used, you also need to perform the following steps to add an authorized project. For more information, see Edit an instance with Private Service Connect enabled.
Log in to the OceanBase Cloud console.
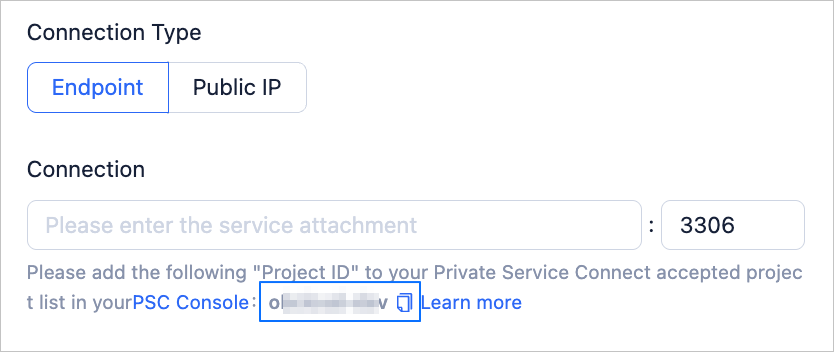
On the page for creating a data source or data migration task, copy the project ID displayed below Connection after you select Google Cloud for Cloud Vendor and Endpoint for Connection Type.
In the gcloud CLI, run the following command to add an authorized project to the Cloud SQL instance that uses Private Service Connect:
gcloud sql instances patch <INSTANCE_NAME> \ --project=<PROJECT_ID> \ --allowed-psc-projects=ALLOWED_PROJECTSParameterDescriptionINSTANCE_NAME The name of the Cloud SQL instance to which Private Service Connect endpoints in VPC networks can connect. PROJECT_ID The ID or project number of the Google Cloud project that contains the instance to which Private Service Connect endpoints in VPC networks can connect. ALLOWED_PROJECTS The project ID copied in Step 2. This project will replace the one that has been configured to use Private Service Connect. If a project is not included in this list, you cannot use it to create an instance and enable Private Service Connect for it. For example,
omstest-mysql-pscis the name of the Cloud SQL instance,oms-dev-112233is your own project ID, andoms_project_idis the project ID copied from the page for creating a data source or data migration task.gcloud sql instances patch omstest-sit-cloudsql-psc \ Instance name --project=oms-dev-112233 --allowed-psc-projects='oms-dev','oms_project_id'
If private services access is used, configure the settings as follows. When you create a Cloud SQL instance that uses private services access, you need to configure a private IP address and a public IP address in the Customize your instance > Connections section. You also need to associate the private IP address with your own VPC network.
Create a forwarding instance
Here is an example of using gcloud commands of GCP to create a forwarding instance, an instance group, and a health check. You must modify the parameter values based on the actual situation.
## Create an instance.
gcloud compute instances create <instance_name> \
    --project=<project_id> \
    --zone=<zone_id> \
    --machine-type=c2d-standard-2 \
    --network-interface=network-tier=STANDARD,stack-type=IPV4_ONLY,subnet=<subnet_name> \
    --maintenance-policy=MIGRATE \
    --provisioning-model=STANDARD \
    --tags=lb-health-check \
    --scopes=https://www.googleapis.com/auth/devstorage.read_only,https://www.googleapis.com/auth/logging.write,https://www.googleapis.com/auth/monitoring.write,https://www.googleapis.com/auth/service.management.readonly,https://www.googleapis.com/auth/servicecontrol,https://www.googleapis.com/auth/sqlservice.admin,https://www.googleapis.com/auth/trace.append \
    --create-disk=auto-delete=yes,boot=yes,device-name=<instance_name>,image=projects/rocky-linux-cloud/global/images/rocky-linux-8-optimized-gcp-v20240717,mode=rw,size=20,type=pd-balanced \
    --labels=use=rdtest,product=oms,env=devsit

# Create an instance group and add the instance created earlier to the instance group.
gcloud compute instance-groups unmanaged create <instance_group_name> \
    --project=<project_id> \
    --zone=<zone_id> \
&& \
gcloud compute instance-groups unmanaged add-instances <instance_group_name> \
    --project=<project_id> \
    --zone=<zone_id> \
    --instances=<instance_name>

# Create a health check.
gcloud compute health-checks create tcp <health_check_name> \
  --project=<project_id> \
  --port=3306 \
  --proxy-header=NONE \
  --region=us-west1 \
  --no-enable-logging \
  --check-interval=5 \
  --timeout=5 \
  --unhealthy-threshold=2 \
  --healthy-threshold=2
Parameter |
Description |
|---|---|
| instance_name | The name of the Google Cloud VM instance. |
| project_id | The ID of the Google Cloud project. |
| zone_id | The zone of the instance or instance group on Google Cloud. |
| subnet_name | The name of the subnet, which must be on the network specified when you create the Cloud SQL instance. |
| instance_group_name | The name of the instance group on Google Cloud. |
| health_check_name | The name of the health check created on Google Cloud. |
Log in to the forwarding instance and install cloud-sql-auth-plugin
Here is an example of logging in to the forwarding instance and installing cloud-sql-auth-plugin. You must modify the parameter values based on the actual situation.
Log in to the VM instance and run the following commands:
curl -o cloud-sql-proxy https://storage.googleapis.com/cloud-sql-connectors/cloud-sql-proxy/v2.11.3/cloud-sql-proxy.linux.amd64
chmod +x cloud-sql-proxy
Go to the gcloud CLI and run the following command:
gcloud sql instances describe <mysql_instance_name> --format='value(connectionName)'For example, if the Cloud SQL instance is named
cloud_mysql_test, the command is as follows:gcloud sql instances describe cloud_mysql_test --format='value(connectionName)'The return result is as follows:
xxx@xxx: ~ (oms-dev) $ gcloud sql instances describe cloud_mysql_test --format='value (connectionName) '
oms-dev:us-west1:cloud_mysql_test
Log in to the VM instance and run the following command:
./cloud-sql-proxy --address 0.0.0.0 --port 3306 --private-ip oms-dev:us-west1:cloud_mysql_test > out.txt &Run the following command for verification:
sudo yum install -y telnet
[xxx@xxx ~]$ telnet 127.0.0.1 3306
Trying 127.0.0.1...
Connected to 127.0.0.1.
Escape character is '^]'.
Q
8.0.31-google+  lt7gQs+F#i]F&;W_,:mysql_native_password
Create a Private Service Connect service attachment
Create a load balancer
Log in to the Google Cloud console, go to the Load balancing page, then click + CREATE LOAD BALANCER.

On the Create a load balancer page, complete the following configurations:
Select Network Load Balancer for Type of load balancer and click Next.
Select Passthrough load balancer for Proxy or passthrough and click Next.
Select Internal for Public facing or internal and click Next.
Click CONFIGURE.
On the Create Internal passthrough Network Load Balancer page, configure the parameters.
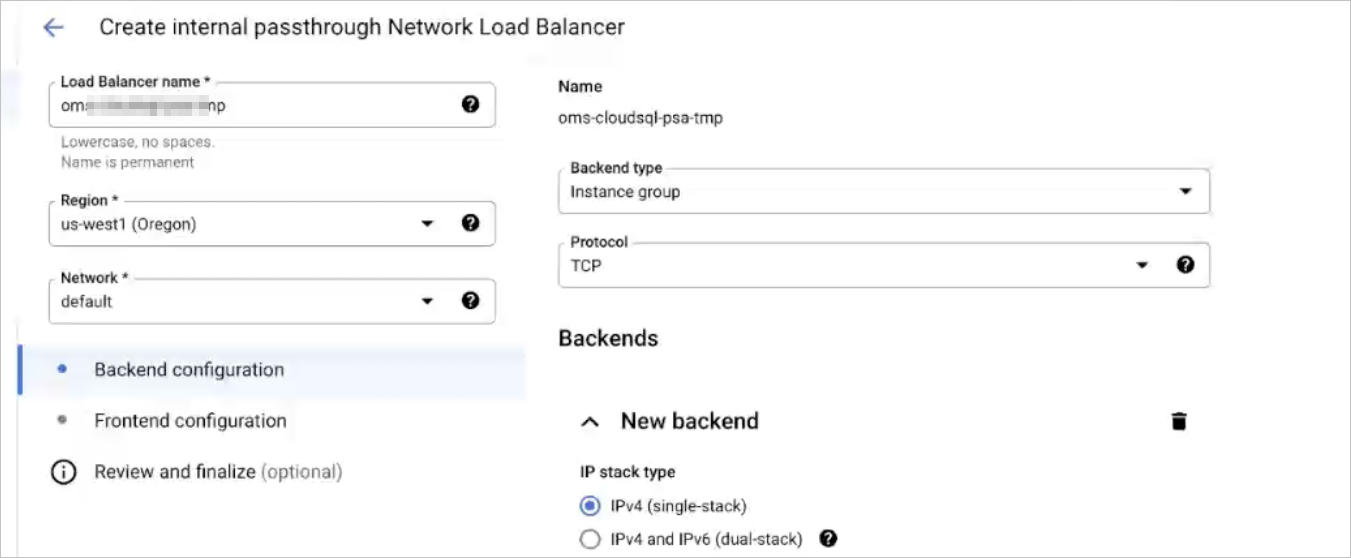
Click CREATE.
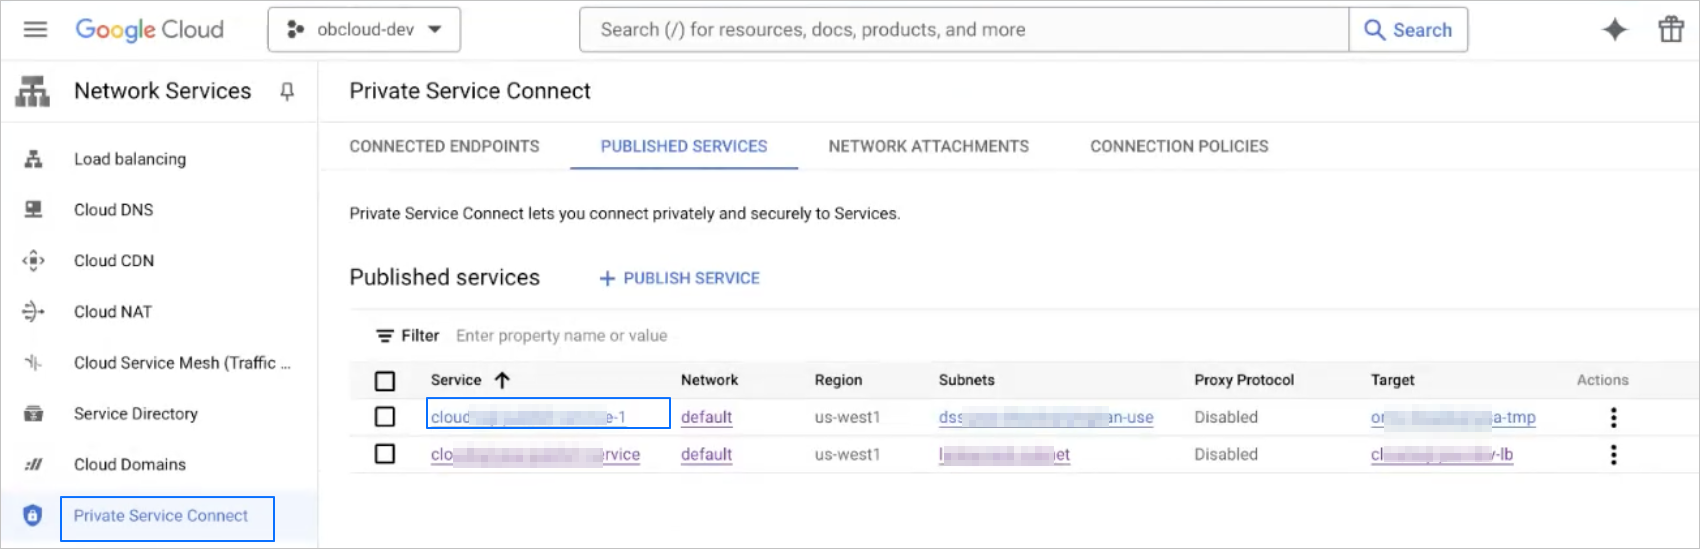
Publish a service
Log in to the Google Cloud console, go to the PUBLISHED SERVICES page, then click + PUBLISH SERVICE.
On the Publish Service page, configure the parameters.
Select Internal passthrough Network Load Balancer for Load Balancer Type.
Select the created load balancer from the Internal load balancer drop-down list.
Enter the service name in Service name.
Select the created subnet from the Subnets drop-down list and click OK. To create a new subnet, click RESERVE NEW SUBNET.
Notice
Make sure that the subnet of the published service can access the backend services.
In the Accepted projects section, click + ADD ACCEPTED PROJECT and enter the name of the authorized project.
Here, the project name is the one that you need to copy from below the Connection section on the page for creating a data source or data migration task in the Data Services module of the OceanBase Cloud console.
Click ADD SERVICE.
Obtain the service attachment
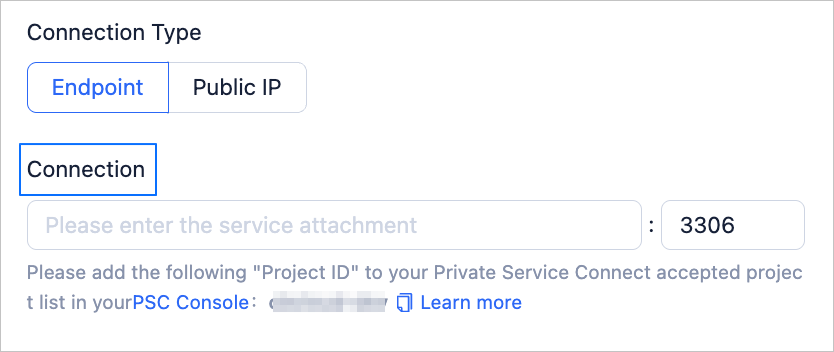
After you publish a service, copy its service attachment, then enter it in Connection if you select Endpoint for Connection Type when you create a data source or data migration task with Google Cloud as the cloud vendor in the OceanBase Cloud console. For more information about how to create a data source, see Create a data source. For more information about how to create a data migration task, see Migrate data from a MySQL database to a MySQL-compatible tenant of OceanBase Database.
Perform the following steps to copy the service attachment:
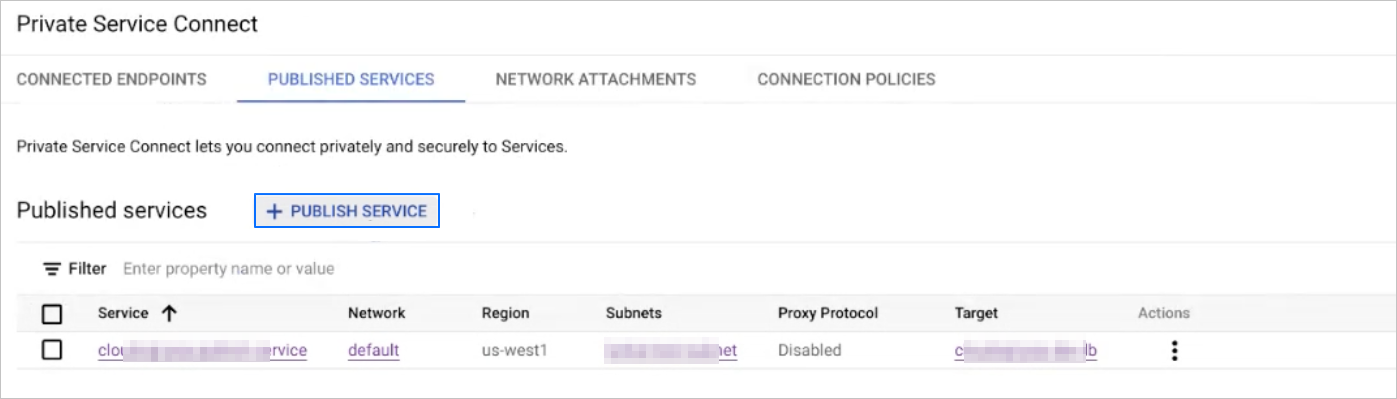
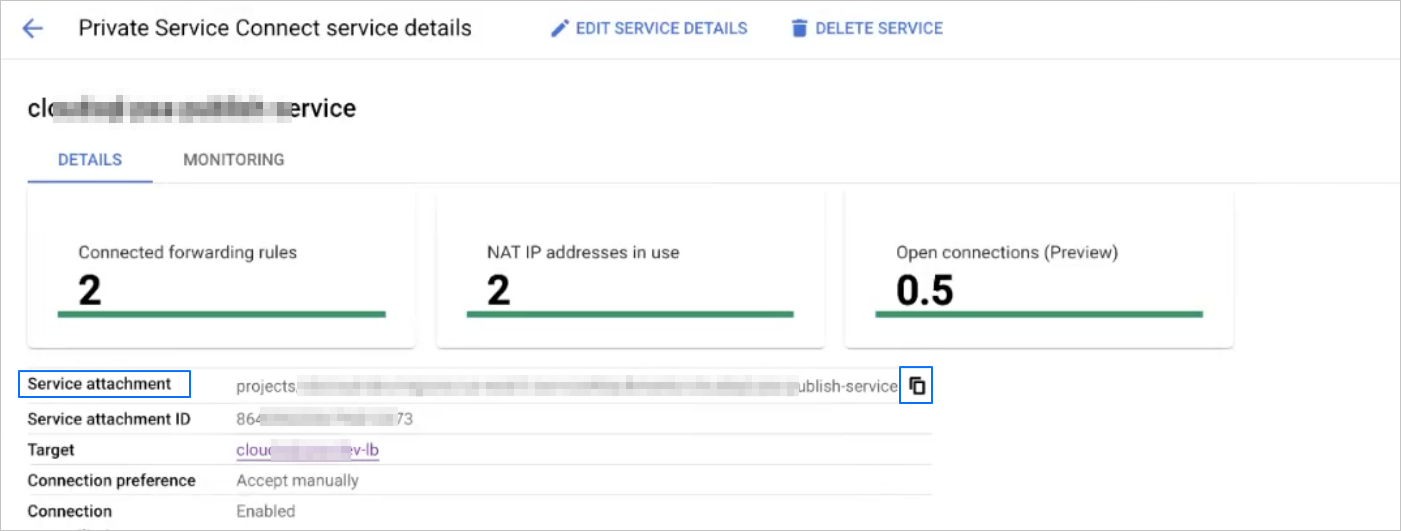
On the Published services page, click the name of the target service.
On the Private Service Connect service details page, click the copy icon next to Service attachment.
Configure a private connection for a Kafka instance
Obtain the list of Kafka nodes
Run the following command in the Google Cloud CLI to obtain the Kafka cluster information.
gcloud managed-kafka clusters describe <cluster name> --location us-west1In the execution result, the
bootstrapAddressindicates the Bootstrap connection address, and thesubnetindicates the subnet where the cluster is located.Create an instance that can connect to Kafka, and the subnet must be consistent with the GCP subnet.
## Create an instance
gcloud compute instances create <instance name> \
    --project=<project ID> \
    --zone=<zone ID> \
    --machine-type=c2d-standard-2 \
    --network-interface=network-tier=STANDARD,stack-type=IPV4_ONLY,subnet=<subnet name> \
    --maintenance-policy=MIGRATE \
    --provisioning-model=STANDARD \
    --tags=lb-health-check \
    --scopes=https://www.googleapis.com/auth/devstorage.read_only,https://www.googleapis.com/auth/logging.write,https://www.googleapis.com/auth/monitoring.write,https://www.googleapis.com/auth/service.management.readonly,https://www.googleapis.com/auth/servicecontrol,https://www.googleapis.com/auth/sqlservice.admin,https://www.googleapis.com/auth/trace.append \
    --create-disk=auto-delete=yes,boot=yes,device-name=<instance name>,image=projects/rocky-linux-cloud/global/images/rocky-linux-8-optimized-gcp-v20240717,mode=rw,size=20,type=pd-balanced \
    --labels=use=rdtest,product=oms,env=devsit

# Create an instance group and add the above-created instance to the instance group.
gcloud compute instance-groups unmanaged create <instance group name> \
    --project=<project ID> \
    --zone=<zone ID> \
&& \
gcloud compute instance-groups unmanaged add-instances <instance group name> \
    --project=<project ID> \
    --zone=<zone ID> \
    --instances=<instance name>
Log in to the instance and run the following command.
sudo -i
yum install -y wget java-1.8.0-openjdk

wget -O kafka_2.13-3.7.2.tgz  https://downloads.apache.org/kafka/3.7.2/kafka_2.13-3.7.2.tgz
tar xfz kafka_2.13-3.7.2.tgz
export KAFKA_HOME=$(pwd)/kafka_2.13-3.7.2
export PATH=$PATH:$KAFKA_HOME/bin
Authorize access to obtain the SASL authentication information and save the authentication file as
client.propertieson the instance.Log in to the IAM page of the Google Cloud console and find a target service account (service_account) for generating the SASL password.
Obtain the key JSON configuration for the target service account (download and save it when generating the key).
Generate the SASL password.
For example, if the name of the key JSON configuration file is
my_service_account.json, run the following command in the instance to obtain a base64-encoded password and generate it topassword.txt.base64 -w 0 < my_service_account.json > password.txtRun the following command in the instance to grant the target service account the permission to access the Kafka service on GCP.
gcloud projects add-iam-policy-binding $PROJECT_ID \
--member serviceAccount: $SERVICE_ACCOUNT_EMAIL \
--role roles/managedkafka.client
Use the
SASL_PLAINmethod to test the connection by entering the data source in the data source service and save the file asclient.properties.security.protocol=SASL_SSL sasl.mechanism=PLAIN sasl.jaas.config=org.apache.kafka.common.security.plain.PlainLoginModule required \ username="oms-xxxx.iam.gserviceaccount.com" \ password="ewogICxxxxFwaXMuY29tIgp9Cg==";
Run the following command to obtain the address of the broker node.
# Enter the Bootstrap connection address obtained from the previous query after --bootstrap-server.
kafka-configs.sh --bootstrap-server bootstrap.xxxx-test-oms.us-west1.managedkafka.oms-dev-41xxxx02.cloud.goog:9092 --describe --all --entity-type brokers --command-config client.properties | grep advertised.listeners | awk -F'EXTERNAL://|,' '{print $2}'
For example,
broker-0.bootstrap.xxxx-test-oms.us-west1.managedkafka.oms-dev-41xxxx02.cloud.goog:9092.
Configure Nginx
Configure Nginx based on the list of Broker nodes obtained.
# If Nginx fails to start, you need to set as follows:
sudo setenforce 0

load_module '/usr/lib64/nginx/modules/ngx_stream_module.so';
user  nginx;
worker_processes  auto;

error_log  /var/log/nginx/error.log warn;
pid        /var/run/nginx.pid;


events {
    worker_connections  1024;
}

stream {
    # Each Server corresponds to a Kafka Bootstrap Server connection endpoint.
    # The port specified after listen is the Nginx port, which can be different from the port specified in proxy_pass.
    server {
        listen 19092;
        proxy_pass bootstrap.<region_id>.managedkafka.<project_id>.cloud.goog:9092;
        proxy_timeout 60s;
    }

    server {
        listen 19093;
        proxy_pass broker-0.<region_id>.managedkafka.<project_id>.cloud.goog:9092;
        proxy_timeout 60s;
    }

    server {
        listen 19094;
        proxy_pass broker-1.<region_id>.managedkafka.<project_id>.cloud.goog:9092;
        proxy_timeout 60s;
    }

    server {
        listen 19095;
        proxy_pass broker-2.<region_id>.managedkafka.<project_id>.cloud.goog:9092;
        proxy_timeout 60s;
    }
}
Notice
Nginx must support the
ngx_stream_modulemodule.We recommend that you set
proxy_timeoutto 60 seconds or more.
Create a health check
gcloud compute health-checks create tcp <health_check_name> \
  --project=<project_id> \
  --port=<any_Nginx_forwarding_port> \
  --proxy-header=NONE \
  --region=<region_id> \
  --no-enable-logging \
  --check-interval=5 \
  --timeout=5 \
  --unhealthy-threshold=2 \
  --healthy-threshold=2
Create a PSC service attachment
Create a load balancer
Go to Load Balancing and click + CREATE LOAD BALANCER.
On the Create a load balancer page, specify the following parameters.
Set Type of load balancer to Network Load Balancer and click Next.
Set Proxy or passthrough to Passthrough load balancer and click Next.
Set Public facing or internal to Internal and click Next.
Click CONFIGURE.
On the Create Internal passthrough Network Load Balancer page, configure the parameters.
Click CREATE.
Create a publish service
Go to PUBLISH SERVICES and click + PUBLISH SERVICE.
On the Publish Service page, configure the parameters.
Set Load Balancer Type to Internal passthrough Network Load Balancer.
Select the created load balancer from the Internal load balancer drop-down list.
Enter a custom name in the Service name field.
Select a created subnet from the Subnets drop-down list and click OK. If you need to create a new subnet, click RESERVE NEW SUBNET.
Notice
Make sure that the publish service subnet can access your backend service.
In the Accepted projects section, click + ADD ACCEPTED PROJECT and enter the authorized project name.
Copy the project name displayed below the Connection section on the page for creating a data source or data migration task and paster it here.
Click ADD SERVICE.
Obtain a service attachment
After you create a publish service, you need to copy Service attachment and enter it in the Google Cloud > Endpoint > Connection field on the page where you create a data source or a data migration task. For more information, see Migrate data from a MySQL database to the MySQL compatible mode of OceanBase Database.
To copy a service attachment, perform the following steps:
On the Published services page, click the name of the target service.
On the Private Service Connect service details page, click the copy icon next to Service attachment to obtain a service connection.