This topic describes how to bind cloud vendor accounts and authorize access to KMS for data encryption in OceanBase Cloud.
Background information
OceanBase Cloud enables you to enhance data security by encrypting instance data using customer-managed keys from supported cloud vendors. To do this, you must bind your cloud vendor account and grant the necessary permissions.
Limitations
- The account authorization feature is supported only in OceanBase Database V4.3.5 and later.
- Supported cloud vendors include Huawei Cloud, AWS, and Alibaba Cloud (via the official channel).
Authorize accounts
Create a cross-account access role for OceanBase Cloud.
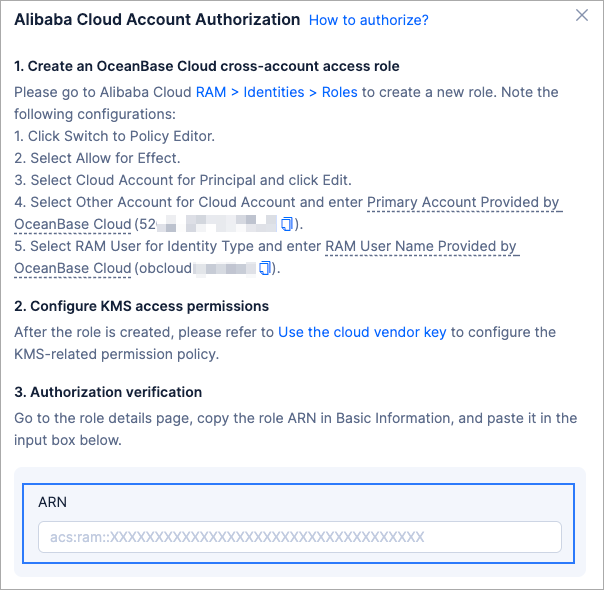
Go to RAM > Identities > Roles in the Alibaba Cloud console and create a new role. Use the following settings:
Click Switch to Policy Editor.
Set Effect to Allow.
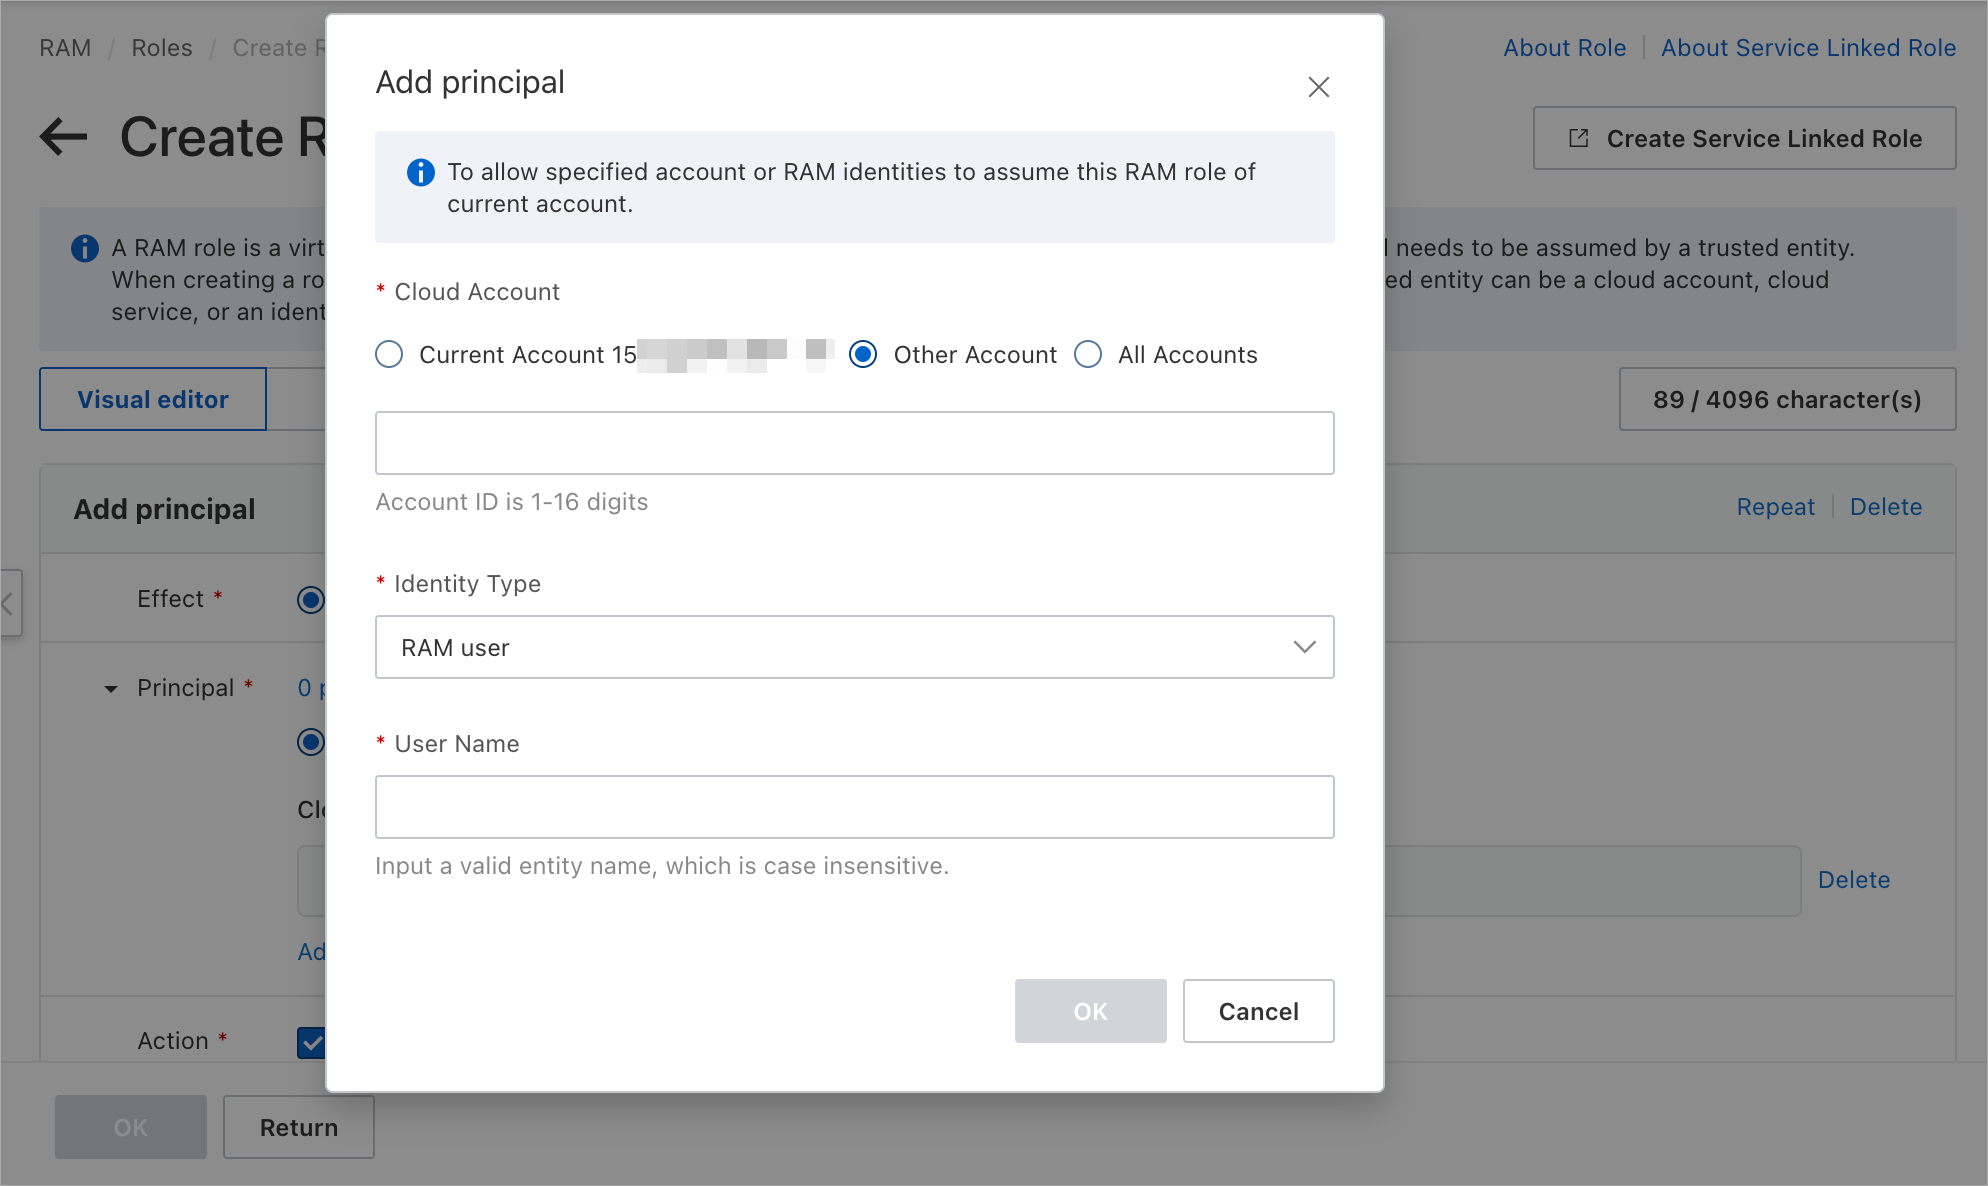
Set Principal to Cloud Account, and then click Edit.
In the Add principal dialog, set Cloud Account to Other Account, and then enter the main account ID provided by OceanBase Cloud (automatically generated per instance).
For Identity Type, select RAM user and enter the RAM username provided by OceanBase Cloud (also auto-generated).
Note
You can find the OceanBase Cloud account ID and RAM username under Security > Transparent Data Encryption (TDE) > View Alibaba Cloud Account Authorization.

Configure KMS permissions.
Note
If this is your first time configuring permissions, you need to create a custom policy. You can skip this step if a suitable policy already exists.
Create a custom KMS policy:
In the RAM console, go to Permissions > Policies.
Click Create Policy.
Under the Visual editor tab, complete the following configurations:
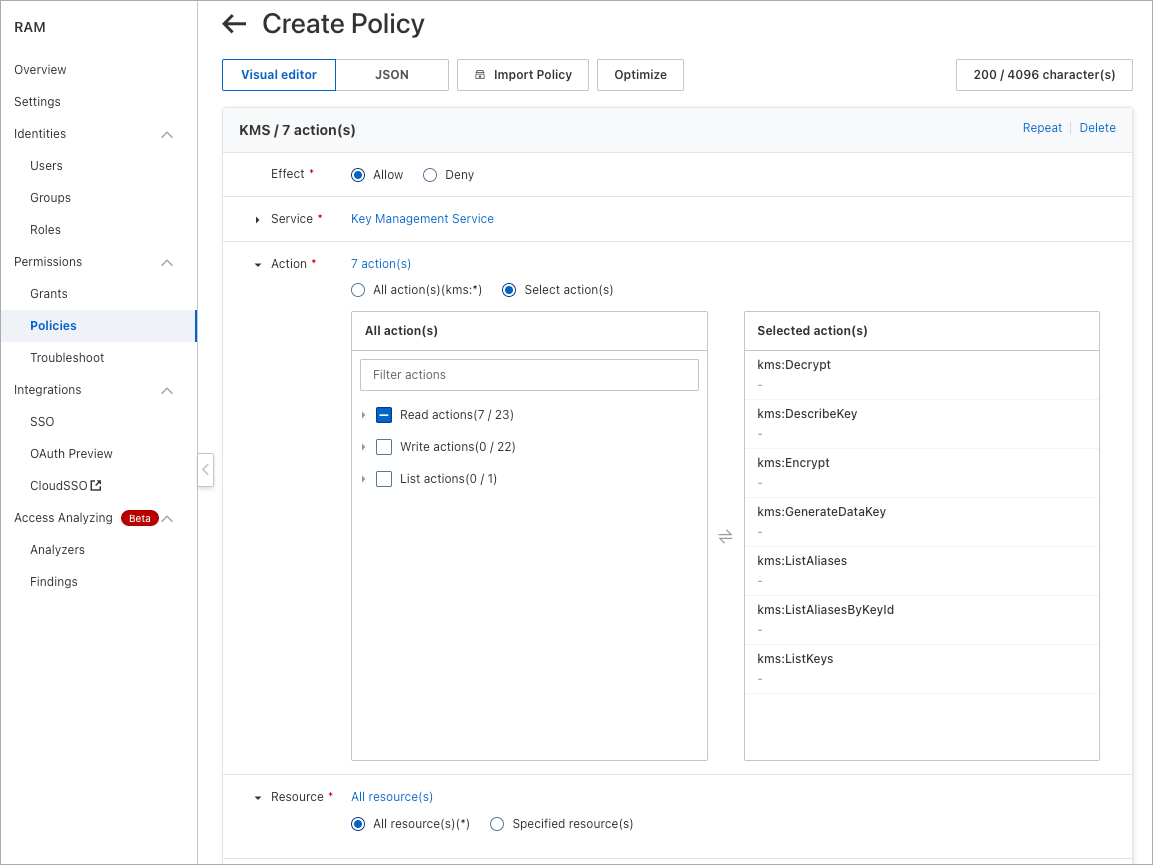 OptionDescription
Effect Select Allow. Service Enter the key word KMS in the search box to search for and select Key Management Service. Action Choose Select action(s) and select the following options: - kms:ListKeys
- kms:ListAliases
- kms:ListAliasesByKeyId
- kms:DescribeKey
- kms:Encrypt
- kms:Decrypt
- kms:GenerateDataKey
Resource Select All resource(s) by default. If you prefer to allow access only to specific KMS keys, select Specified Resources. Click OK to complete creation.
Attach the policy to the RAM role:
In the RAM console, go to Identities > Roles.
Click the role you created earlier to view its details.
Click Grant Permission, and complete the following configurations.
OptionDescriptionResource Scope Automatically filled; no need to change. Policy Select the custom policy created earlier. The authorization is completed.
Obtain the ARN information from the RAM console.
Verify authorization.
Log in to the OceanBase Cloud console.
In the left-side navigation pane, click Instances, then click your target instance to navigate to the Overview page of the instance.
In the left-side navigation pane, click Security.
On the Security page, click the Transparent Data Encryption (TDE) tab.
Click View Alibaba Cloud Account Authorization.
Enter the ARN information obtained from the RAM console and click Complete.
Create a cross-account user and agency for OceanBase Cloud.
In the Huawei Cloud console, go to Identity and Access Management > Agencies and create a new agency. Use the following settings:
Set Agency Type to Account.
For Delegated Account, enter the main account ID provided by OceanBase Cloud (automatically generated per instance).
Note
You can find the OceanBase Cloud account ID under Security > Transparent Data Encryption (TDE) > View Huawei Cloud Account Authorization.
Configure KMS permissions.
Note
If this is your first time configuring permissions, you need to create a custom policy. You can skip this step if a suitable policy already exists.
Create a custom policy:
In the IAM console, go to Permissions > Policies/Roles.
Click Create Custom Policy in the upper right corner of the page.
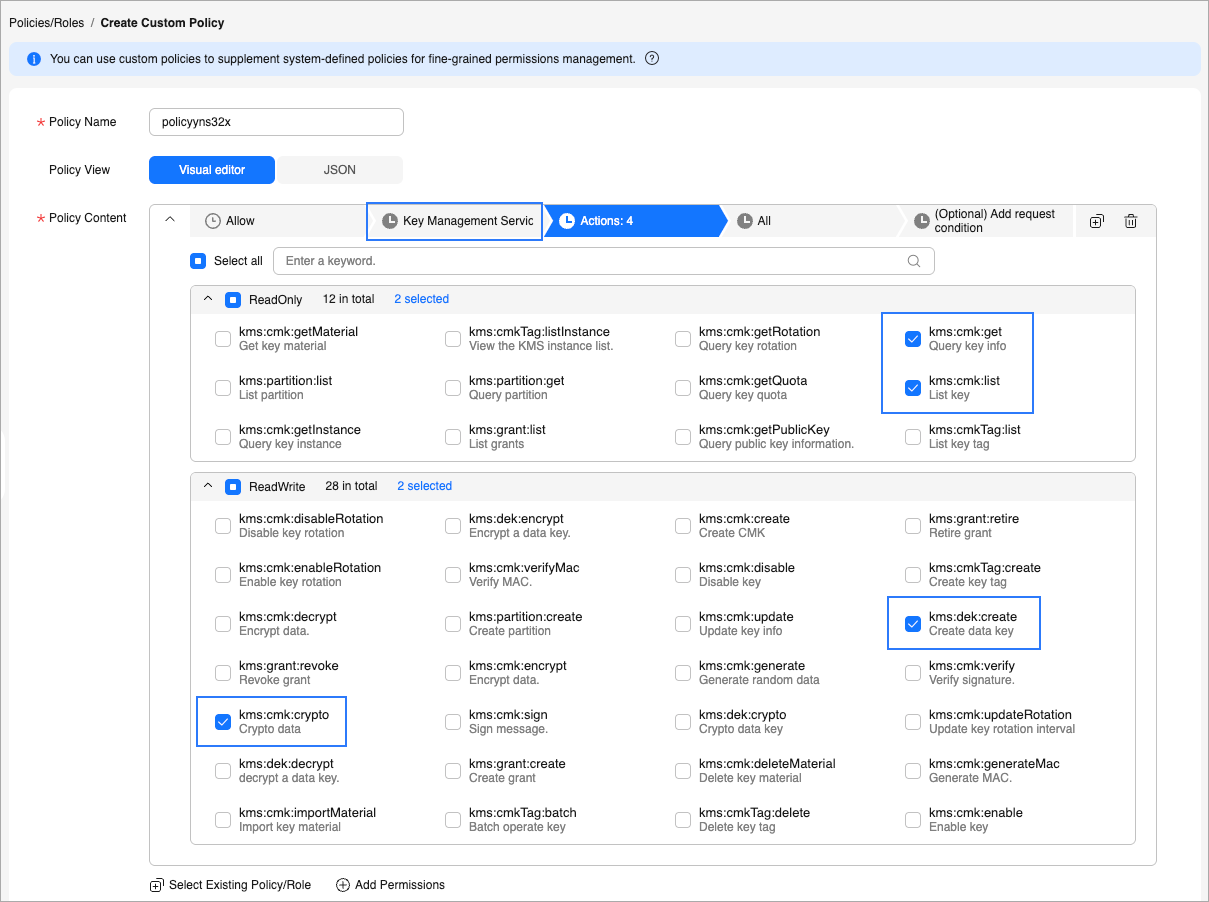
After enter a name for the policy, under the Visual editor tab, complete the following settings:
 OptionDescription
Effect Select Allow. Select service Search for and select Key Management Service. Actions Select the following: - kms:cmk:get
- kms:cmk:list
- kms:dek:create
- kms:dek:encrypt
- kms:dek:decrypt
Resources Select All by default. If you prefer to allow access only to specific KMS keys, select Specific. Click OK to complete creation.
Attach the policy to the agency.
In the IAM console, go to Agencies.
Find the agency you created, and click Authorize in the Actions column.
Select the custom policy you created and click Next.
Set the minimum authorization scope and click OK.
Obtain the URN information from the IAM console.
Verify authorization.
Log in to the OceanBase Cloud console.
In the left-side navigation pane, click Instances, then click your target instance to navigate to the Overview page of the instance.
In the left-side navigation pane, click Security.
On the Security page, click the Transparent Data Encryption (TDE) tab.
Click View HUawei Cloud Account Authorization.
Enter the URN information obtained from the IAM console and click Complete.
Log in to the Identity and Access Management (IAM) console.
Configure KMS permissions.
Note
If this is your first time configuring permissions, you need to create a custom policy. You can skip this step if a suitable policy already exists.
Create a custom KMS policy:
Go to Access management > Policies, and click Create policy in the upper right corner of the page.
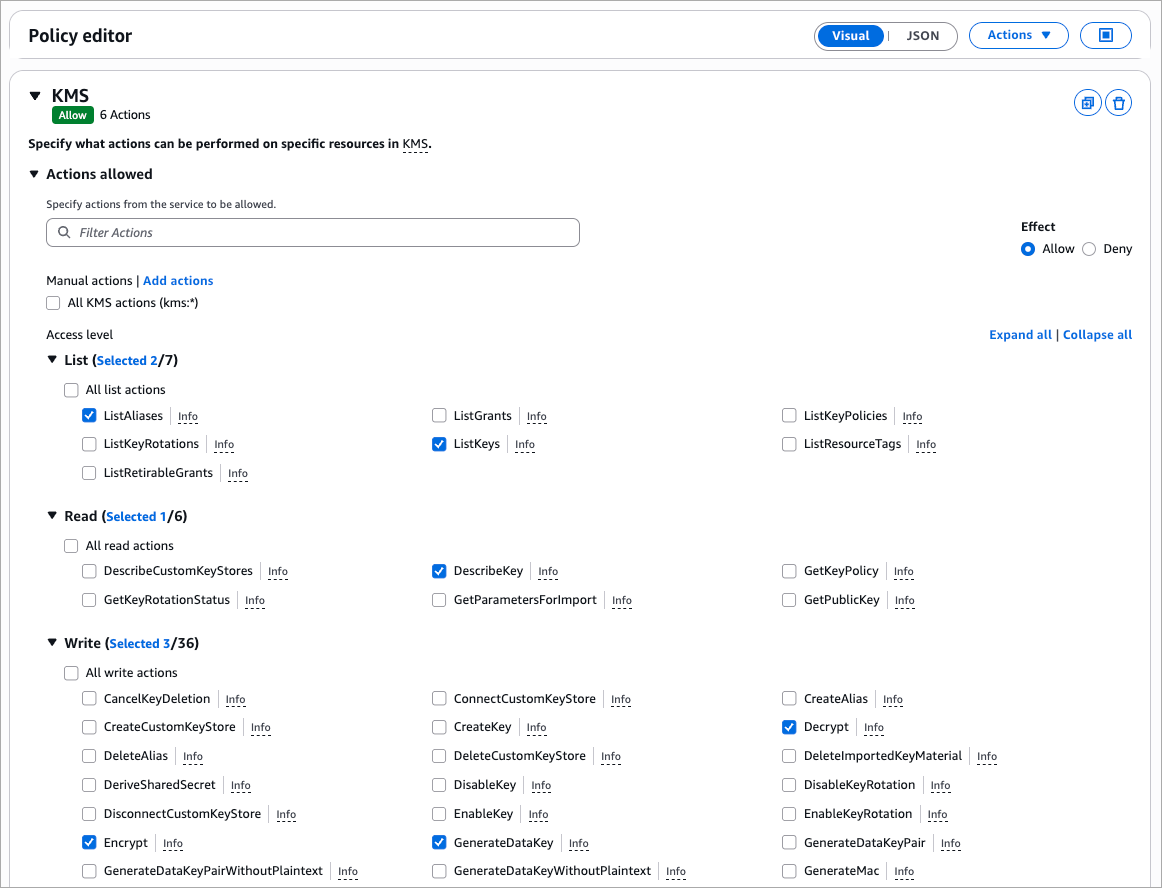
Under the Visual tab, complete the following settings.
 OptionDescription
Select a service Search for and choose KMS. Actions allowed Select the following under Access level: - ListAliases
- ListKeys
- DescribeKey
- GenerateDataKey
- Decrypt
- Encrypt
Resources Select All by default. If you prefer to allow access only to specific KMS keys, select Specific. Click Next to review the permissions, and then click Create policy to complete creation.
Create an IAM role and attach the policy:
In the IAM console, go to Access management > Roles, then click Create role.
Under Trusted entity type, select Custom trust policy, and then enter the following JSON. Replace the
Principalwith the IAM user ARN provided by OceanBase Cloud.Note
You can find the IAM user ARN under Security > Transparent Data Encryption (TDE) > View AWS Account Authorization.
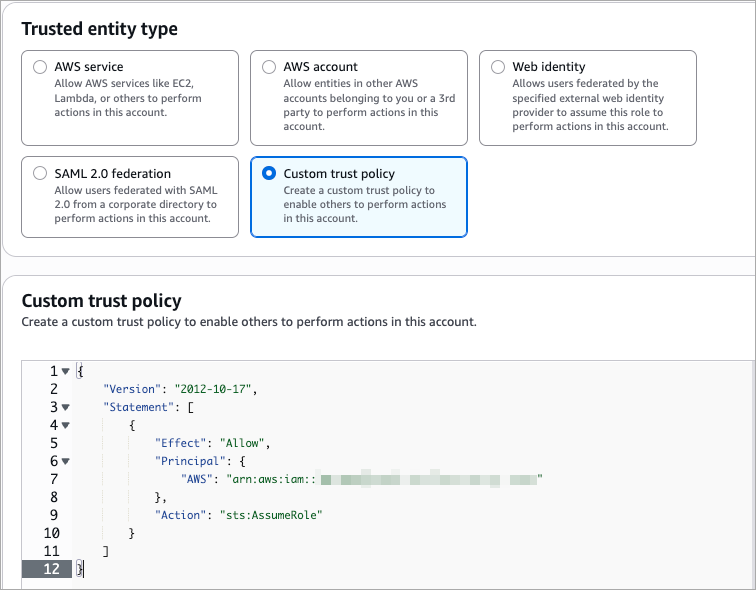
{
   "Version":"2012-10-17"
   "Statement":[
   {
      "Effect":"Allow",
      "Principal":{****}, // Replace with OceanBase Cloud IAM user ARN
      "Action":"sts:AssumeRole"
   }]
}
Click Next, and then under Add permissions, attach the custom policy you created earlier.
Click Next. Then complete information in Role details, review, and click Create role.
Obtain the ARN information from AWS IAM console.
Verify authorization.
Log in to the OceanBase Cloud console.
In the left-side navigation pane, click Instances, then click your target instance to navigate to the Overview page of the instance.
In the left-side navigation pane, click Security.
On the Security page, click the Transparent Data Encryption (TDE) tab.
Click View AWS Account Authorization.
Enter the ARN information obtained from AWS IAM console and click Complete.
Prerequisites
- You have enabled the KMS API service. If not, please access Cloud Key Management Service (KMS) API.
Procedure
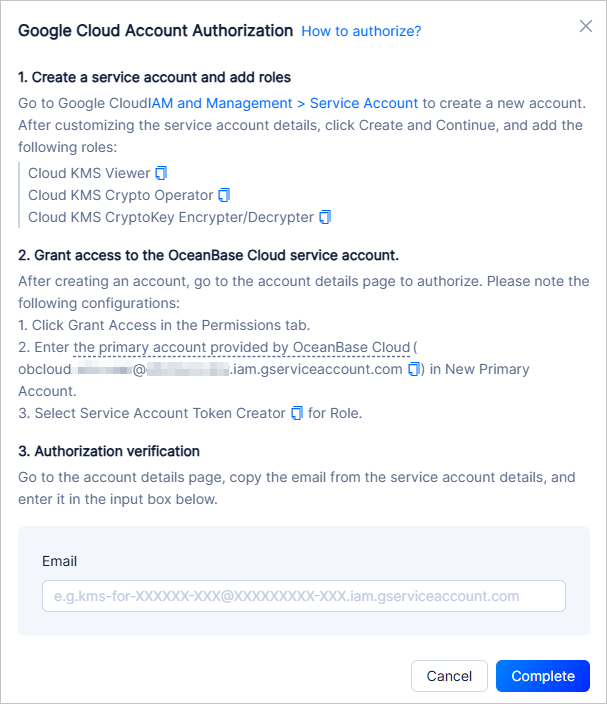
Create a service account.
In the Google Cloud Platform, go to IAM & Admin > Service Accounts.
Click Create service account.
On the Create service account page, enter the service account name and click Create and continue.
Grant the created account the following GCP predefined roles. For detailed role descriptions, see Permissions and roles.
- Cloud KMS Viewer
- Cloud KMS Crypto Operator
- Cloud KMS CryptoKey Encrypter/Decrypter
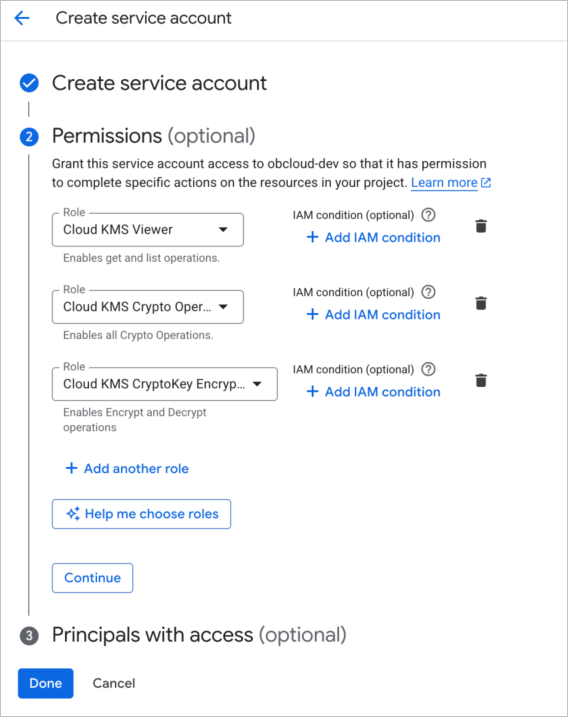
Click Done.
Grant permissions to the OceanBase Cloud service account.
Click the name of the created account to go to the service account management page.
Click Principals with access.
On the View by principals tab, click Grant access.
Enter the following information on the grant access page:
Add principals: Enter the OceanBase Cloud service account information.
Note
You can view the OceanBase Cloud service account information in Security > Transparent Data Encryption (TDE) > View Google Cloud Account Authorization.
Assign roles: Search for token, and then select Service Account Token Creator.
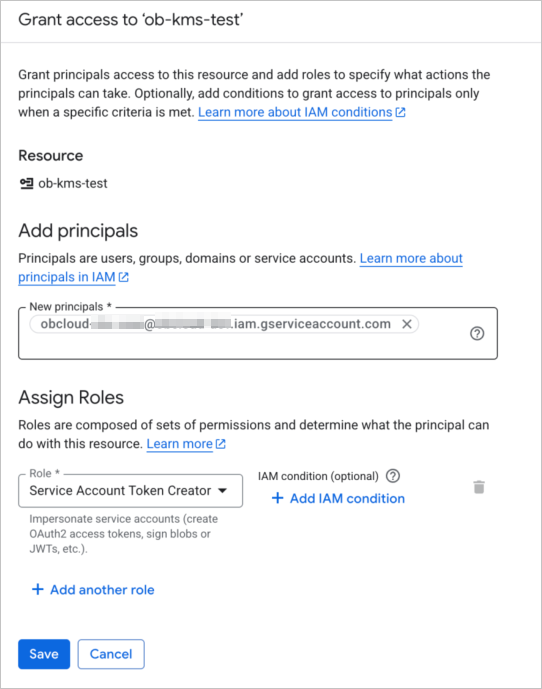
Click Save.
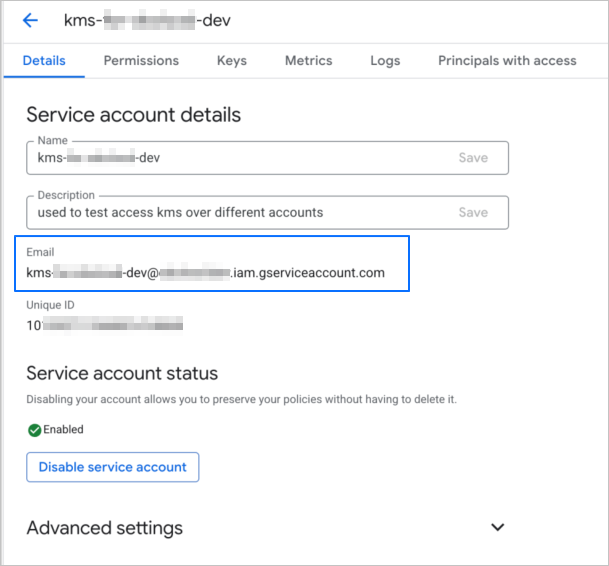
After the role is created, obtain the email address in the service account details.
Verify authorization.
Log in to the OceanBase Cloud console.
In the left-side navigation pane, click Instances, then click your target instance to navigate to the Overview page of the instance.
In the left-side navigation pane, click Security.
On the Security page, click the Transparent Data Encryption (TDE) tab.
Click View Google Cloud Account Authorization.
Enter the URN information obtained from the IAM console and click Complete.