


This topic describes how to create a table in the SQL window.
Overview
You can create a table in the following 7 steps:
Specify the basic information.
Set columns.
Set the index.
Set constraints.
Set partitioning rules.
Confirm the SQL statement.
Complete the table creation.
In the following example, a table named employee is created within the database odc_test in the SQL window. The table contains the emp_no, birthday, name, and gender columns.
Note
The data used throughout this topic are for demonstration purpose only. You can replace them with actual data as needed.
Prerequisites
A super account has been created in the OceanBase Cloud console for connecting to the analytical database.
You have permission to manage accounts under the analytical cluster instance.
You have created or joined a workspace.
Procedure
Step 1: Specify the basic information
Log in to the OceanBase Cloud console and enter the workspace. Click + next to Table to create a table.

In the Basic Information section, specify Table Name and Description.
Note
- In the MySQL compatible mode, you also need to specify Default Character Set and Default Sorting Rule.
- After you specify the basic information and switch to the Column section, the basic information is submitted.
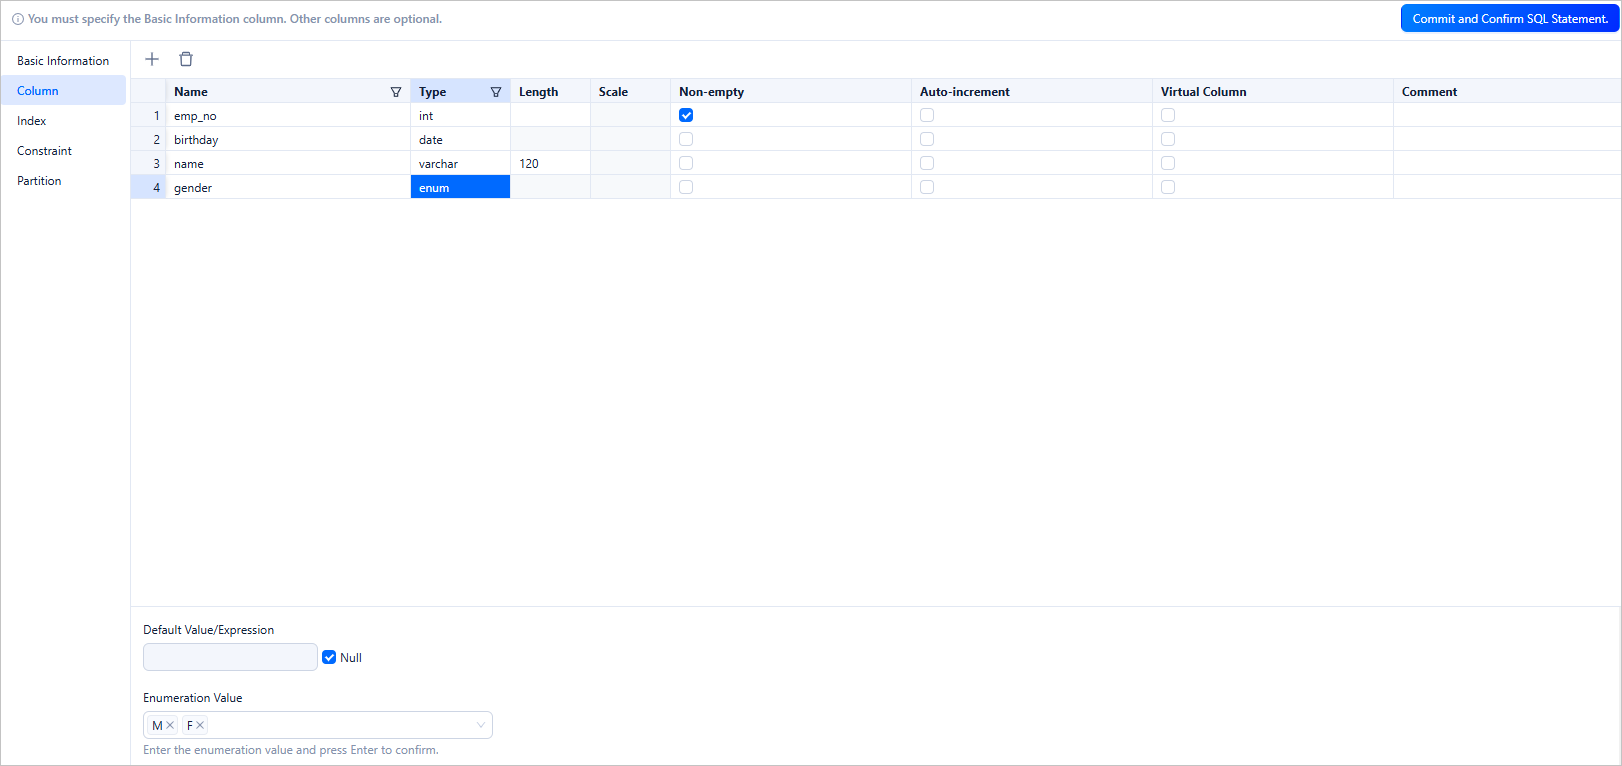
Step 2: Set columns
The following figure shows the information that you need to specify when you add a column.

Note
- After you copy a row, you can paste the row by using the Command + V or Ctrl + V shortcut keys.
- The auxiliary editing section at the bottom of the page displays additional information about the selected column.
- Settings in the Basic Information and Column sections are required. Settings in other configuration sections are optional. After you specify settings in the Basic Information and Column sections, you can click Commit and Confirm SQL Statement to create a table.
Step 3: Set indexes
If a table contains a large amount of data, you can use indexes to accelerate data queries. An index is a data structure that pre-sorts the values of one or more columns in a table. By using indexes, you can directly locate records that meet the conditions.
The following figure shows the information that you need to specify when you set the index.
Step 4: Set constraints
Constraints are used to specify data rules for a table. A data operation that violates the constraints will be terminated.

SQL window supports the following four table constraints:
Primary Key Constraint: defines a primary key to uniquely identify each row of data in the table. A primary key constraint can be a field or a group of fields. You can set only one primary key constraint for a table, and you cannot edit the constraint after it is configured.
Unique Constraint: ensures that the data in a field or a group of fields is unique in the table. You can set multiple unique constraints in one table.
Foreign Key Constraint: associates one or more columns in two tables. A foreign key constraint is used to maintain the data consistency and integrity between associated tables. After you complete the setting of foreign key constraints, you cannot create new constraints or edit existing constraints.
Check Constraintsv: checks the data in the database based on the configured check rules when you edit the data. Data modification is allowed only after the check is passed.
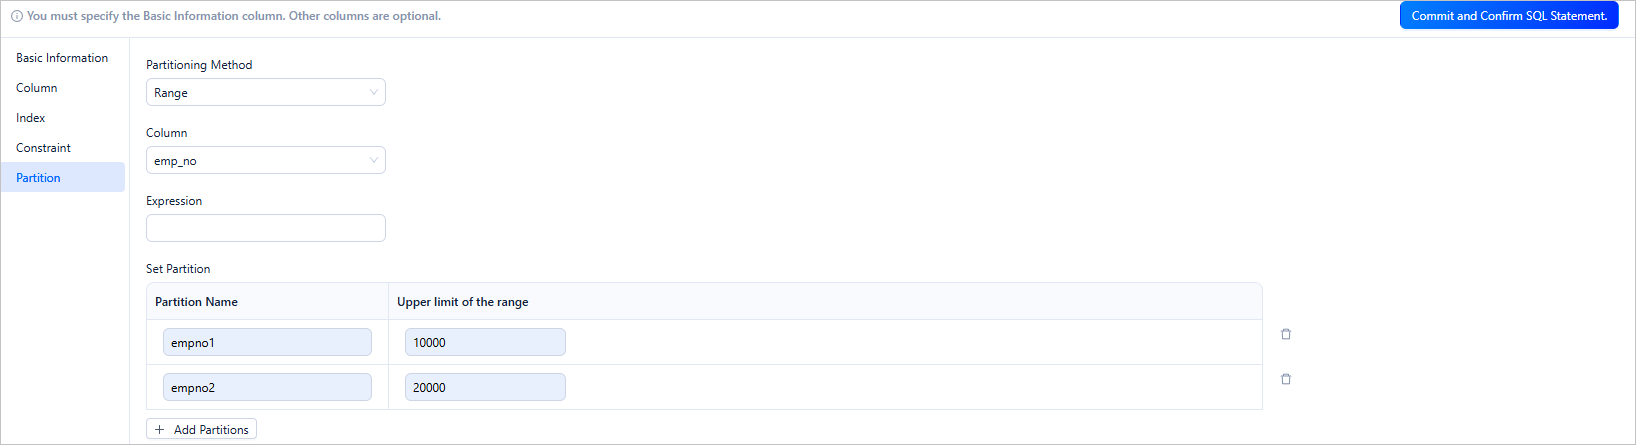
Step 5: Set partitioning rules

You can partition a table that contains a large amount of data. After a table is partitioned, data in the table is stored in multiple tablespaces. The database does not scan the entire table for a query.
In the MySQL compatible mode, OceanBase Cloud supports the following six partitioning methods: Key, Hash, Range, Range Columns, List, and List Columns.
In the Oracle compatible mode, OceanBase Cloud supports the following three partitioning methods: List, Range, and Hash.
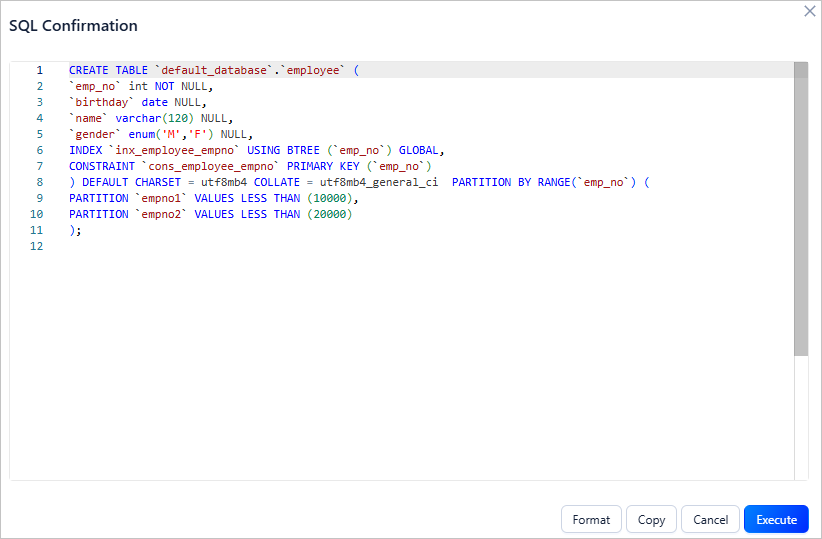
Step 6: Confirm the SQL statement
After you click Submit, you can view the statement on the SQL Confirmation page. To view lengthy clauses, click SQL Check and Format in the lower-right corner of the page.
Syntax:
CREATE TABLE table_name (column_name column_type, column_name column_type,.......);
Parameter |
Description |
|---|---|
| CREATE TABLE | The key word that indicates the creation ofa table with a specified name. You must have the privileges to create tables. |
| table_name | The name of the table. The table name must conform to the identifier naming rules. |
| column_name column_type | The name and data type of the column in the table. To create multiple columns, separate the tuple with commas (,). |
Step 7: Complete the table creation
Click Execute. After the table is created, the employee table appears in the table list in the left-side navigation pane.
You can use the SELECT statement to query data in the new table.
Syntax:
SELECT
 column_name,
 column_name
FROM
 table_name [WHERE Clause] [LIMIT N] [ OFFSET M]
Parameters
Parameter |
Description |
|---|---|
| SELECT | The key word that indicates the name of the statement. You can use the SELECT statement to read one or more records. |
| column_name | The name of the column to be queried. You can use an asterisk (*) to query all columns |
| WHERE | The key word of the condition clause. |
| LIMIT | The number of records to be returned. |
| OFFSET | The data offset from which the SELECT statement starts to query. The default offset is 0. |
Example:
SELECT `emp_no`, `birthdate`, `name`, `gender` FROM `employee`;
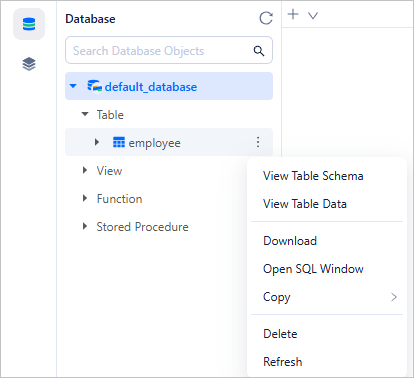
To manage a table, right-click the table name in the list of databases on the left, and select the required operation from the context menu, which provides the following options: View Table Structure, View Table Data, Download, Open SQL Window, Copy, Delete, and Refresh. For more information, see Introduction to common functions.
Option |
Description |
|---|---|
| View Table Schema | Click this option to go to the Attribute tab. On this tab, you can view comprehensive information of the table such as the basic information, columns, indexes, constraints, and DDL statements. |
| View Table Data | Click this option to go to the Data tab to view the data in the table. |
| Download | Download the SQL file for the table object. |
| Copy | Click this option to copy the table name, SELECT statement, INSERT statement, UPDATE statement, or DELETE statement. |
| Delete | Click this option to delete the table. |
| Refresh | Click this option to refresh the structure tree after you perform management actions on the table, so that the structure tree displays the latest information. |