







This topic describes how to migrate data from a MySQL-compatible tenant to an Oracle-compatible tenant of OceanBase Database, and vice versa.
Notice
If a data migration task remains inactive for a long time (with the task status of Failed, Stopped, or Completed), it may be unrecoverable due to limitations such as the retention period of incremental logs. To optimize resource usage, data migration will automatically release tasks that have been inactive for more than 7 days. We recommend that you configure alerts for your tasks and promptly address any exceptions related to them.
Prerequisites
You have created the corresponding schema in the target OceanBase Database.
You have created instances and tenants for both the source and target OceanBase Databases. For more information, see Create an instance and Create a tenant.
You have created a database user for data migration in OceanBase Database and granted the required privileges to the user. For more information, see Privileges required for data migration.
Limitations
Only users with the Project Owner, Project Admin, or Data Services Admin role can create data migration tasks.
Limitations on the source database
Do not perform DDL operations that change the schema of a database or table during schema migration or full migration. Otherwise, the data migration task may fail.
Data migration is supported for OceanBase Database (MySQL and Oracle compatible modes) V2.x, V3.x, and V4.x.
Data migration is supported only for databases, tables, and columns with ASCII-compliant names that do not contain special characters (.,|"'`()=;/& and line breaks).
If the target is a database, triggers are not supported. If triggers exist, the data migration task may fail.
Considerations
If the source character set is UTF-8, we recommend that you use a character set compatible with the source character set (such as UTF-8 or UTF-16) for the target to avoid garbled characters or other issues caused by incompatible character sets.
If the clocks of the nodes or between the client and the server are not synchronized, the incremental synchronization delay may be inaccurate.
For example, if the clock is earlier than the standard time, the delay may be negative. If the clock is later than the standard time, the delay may be positive.
If DDL synchronization is not enabled, you must restart the data migration task after you modify the unique index of the target database. Otherwise, data inconsistency may occur.
Verify whether the precision of the DECIMAL, FLOAT, and DATETIME column types is migrated as expected. If the precision of the target column type is less than that of the source column type, truncation may occur, resulting in data inconsistency between the source and target.
If you migrate data from an OceanBase Database instance and DDL synchronization is enabled, we recommend that you restart the data migration task after you rename a database table in the source database. Otherwise, data may be lost during incremental synchronization.
If a table object exists in the source or target database, and the table object names in the source or target database are case-insensitive, data synchronization may fail to meet your expectations.
Case sensitivity
When you synchronize data from a MySQL tenant to an Oracle tenant of an OceanBase Database instance, the names of tables and columns in the target database are converted to uppercase.
When you synchronize data from an Oracle tenant to a MySQL tenant of an OceanBase Database instance, the names of tables and columns in the target database are converted to lowercase.
If you create a data migration task and enable only Incremental Synchronization, the data migration task requires that the local incremental logs of the source database are retained for more than 48 hours.
If you create a data migration task and enable both Full Migration and Incremental Synchronization, the data migration task requires that the local incremental logs of the source database are retained for at least 7 days. Otherwise, the data migration task may fail to obtain the incremental logs and fail. In this case, data inconsistency may occur between the source and target.
If you migrate data from a MySQL-compatible tenant of an OceanBase Database instance to an Oracle-compatible tenant of another OceanBase Database instance, data loss may occur if a unique constraint column allows NULL values. In this case, when multiple NULL values are synchronized from the MySQL-compatible tenant to the Oracle-compatible tenant, only the first NULL value is inserted. The remaining NULL values are discarded because they conflict with the unique constraint column.
If you perform incremental synchronization with OceanBase Database as the source and the database table objects contain UDT columns, the incremental synchronization task may fail due to unsupported UDT columns.
Supported source and target instance types
Cloud vendor |
Source |
Target |
|---|---|---|
| AWS | OceanBase MySQL Compatible (Transactional) | OceanBase Oracle Compatible (Transactional) |
| Google Cloud | OceanBase MySQL Compatible (Transactional) | OceanBase Oracle Compatible (Transactional) |
| Huawei Cloud | OceanBase MySQL Compatible (Transactional) | OceanBase Oracle Compatible (Transactional) |
| Alibaba Cloud | OceanBase MySQL Compatible (Transactional) | OceanBase Oracle Compatible (Transactional) |
| AWS | OceanBase Oracle Compatible (Transactional) | OceanBase MySQL Compatible (Transactional) |
| Google Cloud | OceanBase Oracle Compatible (Transactional) | OceanBase MySQL Compatible (Transactional) |
| Huawei Cloud | OceanBase Oracle Compatible (Transactional) | OceanBase MySQL Compatible (Transactional) |
| Alibaba Cloud | OceanBase Oracle Compatible (Transactional) | OceanBase MySQL Compatible (Transactional) |
Data Type Mapping
Data type mapping from OB_MySQL to OB_Oracle
OB_MySQL |
OB_Oracle |
|---|---|
| INT | NUMBER(10,0) |
| TINYINT | NUMBER(3,0) |
| SMALLINT | NUMBER(5,0) |
| DECIMAL(p,s) | NUMBER(p,s) |
| NUMERIC(p,s) | NUMBER(p,s) |
| FLOAT(10,2) | BINARY_FLOAT |
| DOUBLE(10,2) | BINARY_DOUBLE |
| BIT(1) | BIT(n) |
| BIT(64) | RAW(1) |
| RAW(n/8+1) | RAW(9) |
| MEDIUMINT | NUMBER(7,0) |
| BIGINT | NUMBER(19,0) |
| TIMESTAMP | TIMESTAMP |
| TIME | TIMESTAMP(0) |
| TIME(n) | TIMESTAMP(n) |
| DATE | DATE |
| DATETIME | TIMESTAMP |
| YEAR | NUMBER(4) |
| VARCHAR(n) | VARCHAR2(n) n=information_schema. CHARACTER_OCTET_LENGTH |
| CHAR(n) | CHAR(n) n=information_schema. CHARACTER_OCTET_LENGTH |
| BINARY(n) | RAW(n) |
| VARBINARY(n) | (n <= 2000) RAW(n) (n > 2000) BLOB |
| TINYBLOB/BLOB/MEDIUMBLOB/LONGBLOB | BLOB |
| TINYTEXT/TEXT/MEDIUMTEXT/LONGTEXT | CLOB |
| ENUM/SET | VARCHAR2(32767) |
| JSON | For versions prior to V4.1.0: CLOB For V4.1.0 and later versions: JSON |
Data type mapping from OB_Oracle to OB_MySQL
The following table shows the data type mapping based on OceanBase Database V4.2.0 in Oracle compatible mode.
OB_Oracle |
OB_MySQL |
|---|---|
| CHAR(n CHAR) | VARCHAR(n) |
| CHAR(n BYTE) | CHAR(n) |
| NCHAR(n) | VARCHAR(n) |
| VARCHAR2(n) | VARCHAR(n) |
| NVARCHAR2(n) | VARCHAR(n) |
| NVARCHAR2(n BYTE) | VARCHAR(n) |
| NUMBER(n) | NUMERIC(n) |
| NUMBER(p, s) | DECIMAL(p, s)/NUMERIC(p, s) |
| RAW | VARBINARY |
| CLOB | LONGTEXT |
| BLOB | LONGBLOB |
| FLOAT(n) | DOUBLE (n) |
| BINARY_FLOAT | DOUBLE |
| BINARY_DOUBLE | DOUBLE |
| DATE | DATETIME |
| TIMESTAMP | DATETIME(n) |
| TIMESTAMP WITH TIME ZONE | VARCHAR(50) |
| TIMESTAMP WITH LOCAL TIME ZONE | TIMESTAMP |
| INTERVAL YEAR(p) TO MONTH | VARCHAR(50) |
| INTERVAL DAY(p) TO SECOND | VARCHAR(50) |
| ROWID | CHAR(18) |
| UROWID(n) | VARCHAR(18) |
| JSON | JSON |
Procedure
Create a data migration task.
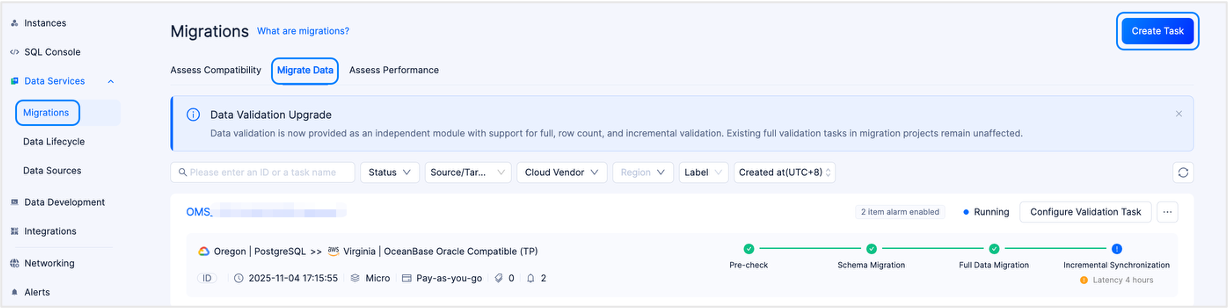
Log in to the OceanBase Cloud console.
In the left-side navigation pane, click Data Services > Migrations.
On the Migrations page, click the Migrate Data tab.
On the Migrate Data tab, click Create Task in the upper-right corner.
In the task name field, enter a custom migration task name.
We recommend that you use a combination of Chinese characters, numbers, and English letters. The name cannot contain spaces and must be less than 64 characters in length.
On the Configure Source & Target page, configure the parameters.
In the Source Profile section, configure the parameters.
If you want to reference the configurations of an existing data source, click Quick Fill next to Source Profile and select the required data source from the drop-down list. Then, the parameters in the Source Profile section are automatically populated. If you need to save the current configuration as a new data source, click on the Save icon located on the right side of the Quick Fill.
You can also click Quick Fill > Manage Data Sources, enter Data Sources page to check and manage data sources. You can manage different types of data sources on the Data Sources page. For more information, see Data Source.
ParameterDescriptionCloud Vendor At present, supported cloud vendors are AWS, Huawei Cloud, Google Cloud, and Alibaba Cloud. Region Select the region where the source database is located. Database Type The type of the source. Select OceanBase MySQL Compatible or OceanBase Oracle Compatible based on the actual situation. Instance Type Dedicated (Transactional) instances are supported at present. Instance The ID or name of the OceanBase database instance. You can view the ID or name of the target instance on the Instances page. Note
If the cloud vendor is Alibaba Cloud, you can also select an Alibaba Cloud primary account instance for cross-account authorization. For more information, see Authorize an Alibaba Cloud account.
Tenant The ID or name of the OceanBase database tenant. You can view the ID or name of the target tenant by expanding the target instance on the Instances page. Account The username of the OceanBase database user for data migration. Password The password of the database account. In the Target Profile section, configure the parameters.
If you want to reference the configurations of an existing data source, click Quick Fill next to Target Profile and select the required data source from the drop-down list. Then, the parameters in the Target Profile section are automatically populated. If you need to save the current configuration as a new data source, click on the Save icon located on the right side of the Quick Fill.
You can also click Quick Fill > Manage Data Sources, enter Data Sources page to check and manage data sources. You can manage different types of data sources on the Data Sources page. For more information, see Data Source.
ParameterDescriptionCloud Vendor Currently, AWS, Huawei Cloud, Google Cloud, and Alibaba Cloud are supported. You can choose the same cloud vendor as the source, or perform cross-cloud data migration. Note
Cross-cloud data migration is disabled by default. If you need to use this feature, please contact OceanBase Cloud technical support.
Region Select the region where the target database is located. Database Type Select the target database type. Valid values: OceanBase MySQL Compatible and OceanBase Oracle Compatible. Instance Type Currently, only Dedicated (Transactional) is supported. Instance The ID or name of the OceanBase instance. You can view the ID or name of the target instance on the Instances page. Tenant The ID or name of the OceanBase tenant. You can view the ID or name of the target tenant by expanding the target instance on the Instances page. Account The username of the OceanBase database user for data migration. Password The password of the database account.
Click Test Connection and Continue.
On the Select Type & Objects page, configure the parameters.
Select One-way Sync for Sync Topology.
Notice
Currently, data migration between different compatibility modes of OceanBase Database only supports one-way synchronization.
In the Migration Type section, select the migration type for the data migration task.
Options of Migration Type are Schema Migration, Full Migration, and Incremental Synchronization.
Migration typeDescriptionSchema migration st define the mapping between the character sets. The data migration service only copies schemas from the source database to the target database without affecting the schemas in the source. Full migration After the full migration task begins, the data migration service will transfer the existing data from the source database tables to the corresponding tables in the target database. Incremental synchronization After the incremental synchronization task begins, the data migration service will synchronize the changes (inserts, updates, or deletes) from the source database to the corresponding tables in the target database. Incremental Synchronization includes DML Synchronization and DDL Synchronization. You can select based on your needs. For more information on synchronizing DDL, see Custom DML/DDL configurations. In the Select Migration Objects section, specify your way to select migration objects.
You can select migration objects in two ways: Specify Objects and Match by Rule.
In the Select Migration Scope section, select migration objects.
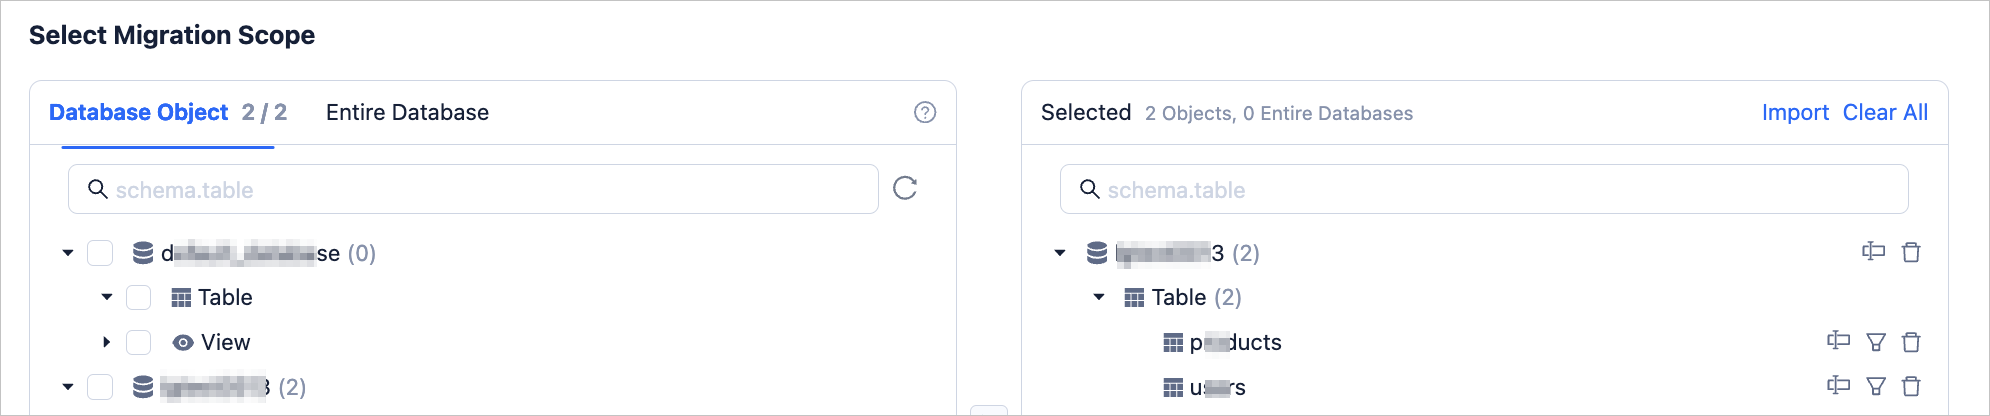
If you select Specify Objects, data migration supports Table-level and Database-level. Table-level migration allows you to select one or more tables or views from one or more databases as migration objects. Database-level migration allows you to select an entire database as a migration object. If you select table-level migration for a database, database-level migration is no longer supported for that database. Conversely, if you select database-level migration for a database, table-level migration is no longer supported for that database.
After selecting Table-level or Database-level, select the objects to be migrated in the left pane and click > to add them to the right pane.
The data migration service allows you to rename objects, set row filters, and remove a single migration object or all migration objects.
Note
Take note of the following items when you select Database-level:
The right-side pane displays only the database name and does not list all objects in the database.
If you have selected DDL Synchronization-Synchronize DDL, newly added tables in the source database can also be synchronized to the target database.
OperationDescriptionImport Objects In the list on the right side of the selection area, click Import in the upper right corner. For more information, see Import migration objects. Rename an object The data migration service allows you to rename a migration object. For more information, see Rename a migration object. Set row filters The data migration service allows you to filter rows by using WHEREconditions. For more information, see Use SQL conditions to filter data. You can also view column information about the migration objects in the View Columns section.Remove one or all objects The data migration service allows you to remove one or all migration objects during data mapping. - Remove a single migration object
In the right-side pane, hover the pointer over the object that you want to remove, and then click Remove. - Remove all migration objects
In the right-side pane, click Clear All. In the dialog box that appears, click OK to remove all migration objects.
If you select Match by Rule, for more information, see Configure database-to-database matching rules.
Click Next. On the Migration Options page, configure the parameters.
Full migration
The following parameters will be displayed only if Full Migration is selected on the Select Type & Objects page.
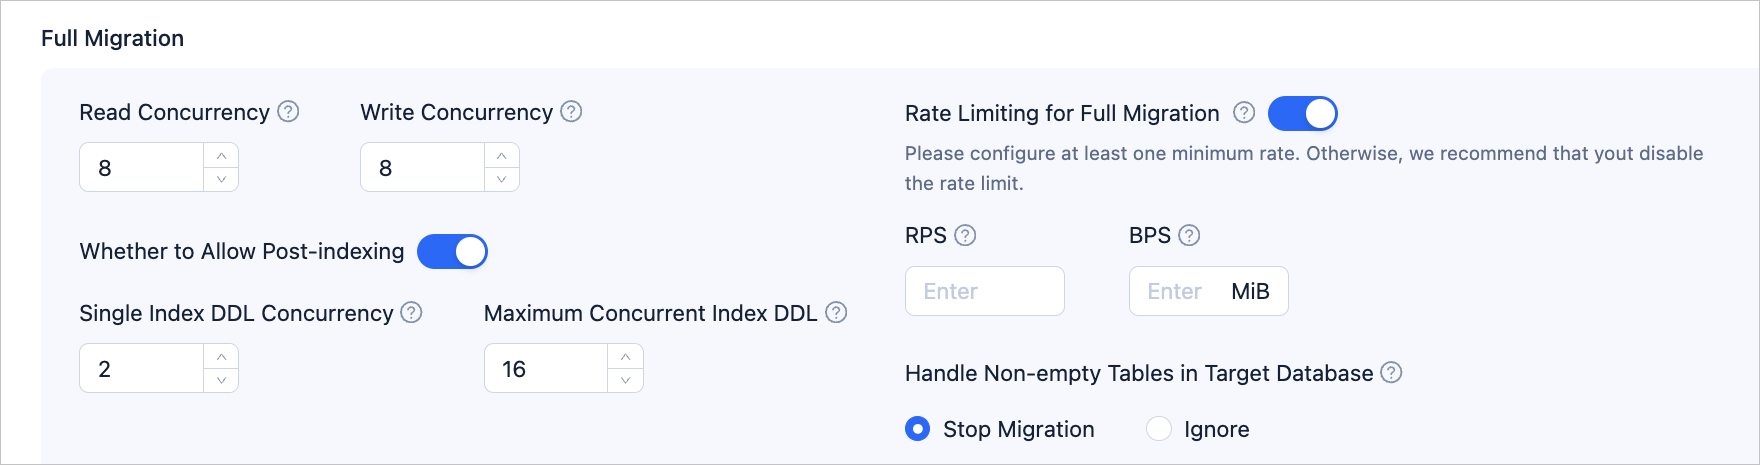 ParameterDescription
Read Concurrency This parameter specifies the number of concurrent threads for reading data from the source during full migration. The maximum number of concurrent threads is 512. A high number of concurrent threads may cause high pressure on the source and affect business operations. Write Concurrency This parameter specifies the number of concurrent threads for writing data to the target during full migration. The maximum number of concurrent threads is 512. A high number of concurrent threads may cause high pressure on the target and affect business operations. Rate Limiting for Full Migration You can decide whether to limit the full migration rate based on your needs. If you enable this option, you must also set the RPS (maximum number of data rows that can be migrated to the target per second during full migration) and BPS (maximum amount of data that can be migrated to the target per second during full migration). Note
The RPS and BPS values specified here are only for throttling and limiting capabilities. The actual performance of full migration is limited by factors such as the source, target, and instance specifications.
Handle Non-empty Tables in Target Database This parameter specifies the strategy for handling records in target table objects. Valid values: Stop Migration and Ignore. - If you select Stop Migration, data migration will report an error when target table objects contain data, indicating that migration is not allowed. Please handle the data in the target database before resuming migration.
Notice
If you click Restore after an error occurs, data migration will ignore this setting and continue to migrate table data. Proceed with caution.
- If you select Ignore, when target table objects contain data, data migration will adopt the strategy of recording conflicting data in logs and retaining the original data.
Post-Indexing This parameter specifies whether to allow index creation to be postponed after full migration is completed. If you select this option, note the following items. Notice
Before you select this option, make sure that you have selected both Schema Migration and Full Migration on the Select Migration Type page.
- Only non-unique key indexes support index creation after migration.
When post index is allowed, we recommend that you adjust the following business tenant parameters based on the hardware conditions of the OceanBase Database and the current business traffic using a command-line client tool.
// File memory buffer size ALTER SYSTEM SET _temporary_file_io_area_size = '10' tenant = 'xxx'; // Disable throttling in OceanBase Database V4.x ALTER SYSTEM SET sys_bkgd_net_percentage = 100;- If you select Stop Migration, data migration will report an error when target table objects contain data, indicating that migration is not allowed. Please handle the data in the target database before resuming migration.
Incremental synchronization
On the Select Type and Objects page, select One-way Sync > Incremental Synchronization to display the following parameters.
 ParameterDescription
Write Concurrency Specifies target data write concurrency during incremental synchronization. The maximum limit is 512. Excessive concurrency may overload the target system and impact business operations. Rate Limiting for Incremental Migration Enable the incremental migration rate limit based on your needs. If enabled, set the RPS (maximum data limit that can be migrated to the target per second during full migration) and BPS (maxim data limit that can be migrated to the target per second during full migration). Notice
The RPS and BPS settings here only serve as rate limiting. The actual performance of full migration is limited by factors such as the source, target, and instance specification.
Incremental Synchronization Start Timestamp - If Full Migration has been selected when choosing the migration type, this parameter will not be displayed.
- If Full Migration has not been selected when choosing the migration type, but Incremental Synchronization has been selected, please specify here the data to be migrated after a certain timestamp. The default is the current system time. For more information, see Set an incremental synchronization timestamp.
Advanced options
This section is displayed only if the target OceanBase Database is V4.3.0 or later, and Schema Migration or Incremental Synchronization > DDL Synchronization was selected on the Choose Type and Objects page.

The storage types for target table objects include Default, Row Storage, Column Storage, and Hybrid Row-Column Storage. This configuration determines the storage type of target table objects during schema migration or incremental synchronization.
Note
The Default option adapts to other options based on target parameter settings, and structures of schema migration table objects or new table objects created by incremental DDL will follow the configured storage type.
Click Next to proceed to the pre-check stage for the data migration task.
During the precheck, the Migrations checks the read and write privileges of the database user and the network connection of the database. A data migration task can be started only after it passes all check items. If an error is returned during the precheck, you can perform the following operations:
You can identify and troubleshoot the problem and then perform the precheck again.
You can also click Skip in the Actions column of a failed precheck item. In the dialog box that appears, you can view the prompt for the consequences of the operation and click OK.
After the pre-check succeeds, click Purchase to go to the Purchase Data Migration Instance page.
After the purchase is successful, you can start the data migration task. For more information about how to purchase a data migration instance, see Purchase a data migration instance. If you do not need to purchase a data migration instance at this time, click Save to go to the details page of the data migration task. You can manually purchase a data migration instance later as needed.
You can click Configure validation Task in the upper-right corner of the details page to compare the data differences between the source and target databases. For more information, see Create a data validation task.
The data migration service allows you to modify the migration objects when the task is running. For more information, see View and modify migration objects. After the data migration task is started, it is executed based on the selected migration types. For more information, see the "View migration details" section in View details of a data migration task.