







This topic describes how to use the data migration service to migrate data from OceanBase Database (including MySQL and Oracle compatibility modes) to RocketMQ.
Notice
If a data migration task remains inactive for an extended period (with a status of Failed, Paused, or Completed), it may become unrecoverable due to factors such as the retention period for incremental logs. The data migration service will proactively release tasks that have been inactive for more than 7 days to reclaim related resources. It is recommended that you configure alerts for your tasks and promptly handle any task-related exceptions.
Background information
RocketMQ is a distributed messaging middleware featuring high throughput, low latency, high availability, and high reliability. It is widely used in business scenarios such as trading, payment, order processing, logistics, notification, log collection, and data synchronization. Its core capability is to provide asynchronous message communication between different systems. The producer writes business events or data changes to RocketMQ, and the consumer subscribes to and consumes messages from RocketMQ based on its own processing capacity, thereby achieving system decoupling, asynchronous processing, traffic throttling, and an event-driven architecture.
In data integration and real-time data synchronization scenarios, RocketMQ often serves as the downstream messaging system, carrying change data from databases, business systems, or log systems. The Data Migration Service supports real-time data synchronization between OceanBase Database in two compatibility modes and RocketMQ data sources, for consumption by downstream business systems, real-time computing systems, data processing services, or heterogeneous storage systems.
If you use a self-managed RocketMQ instance, refer to the following network connection workflow to understand the migration process over a private network.
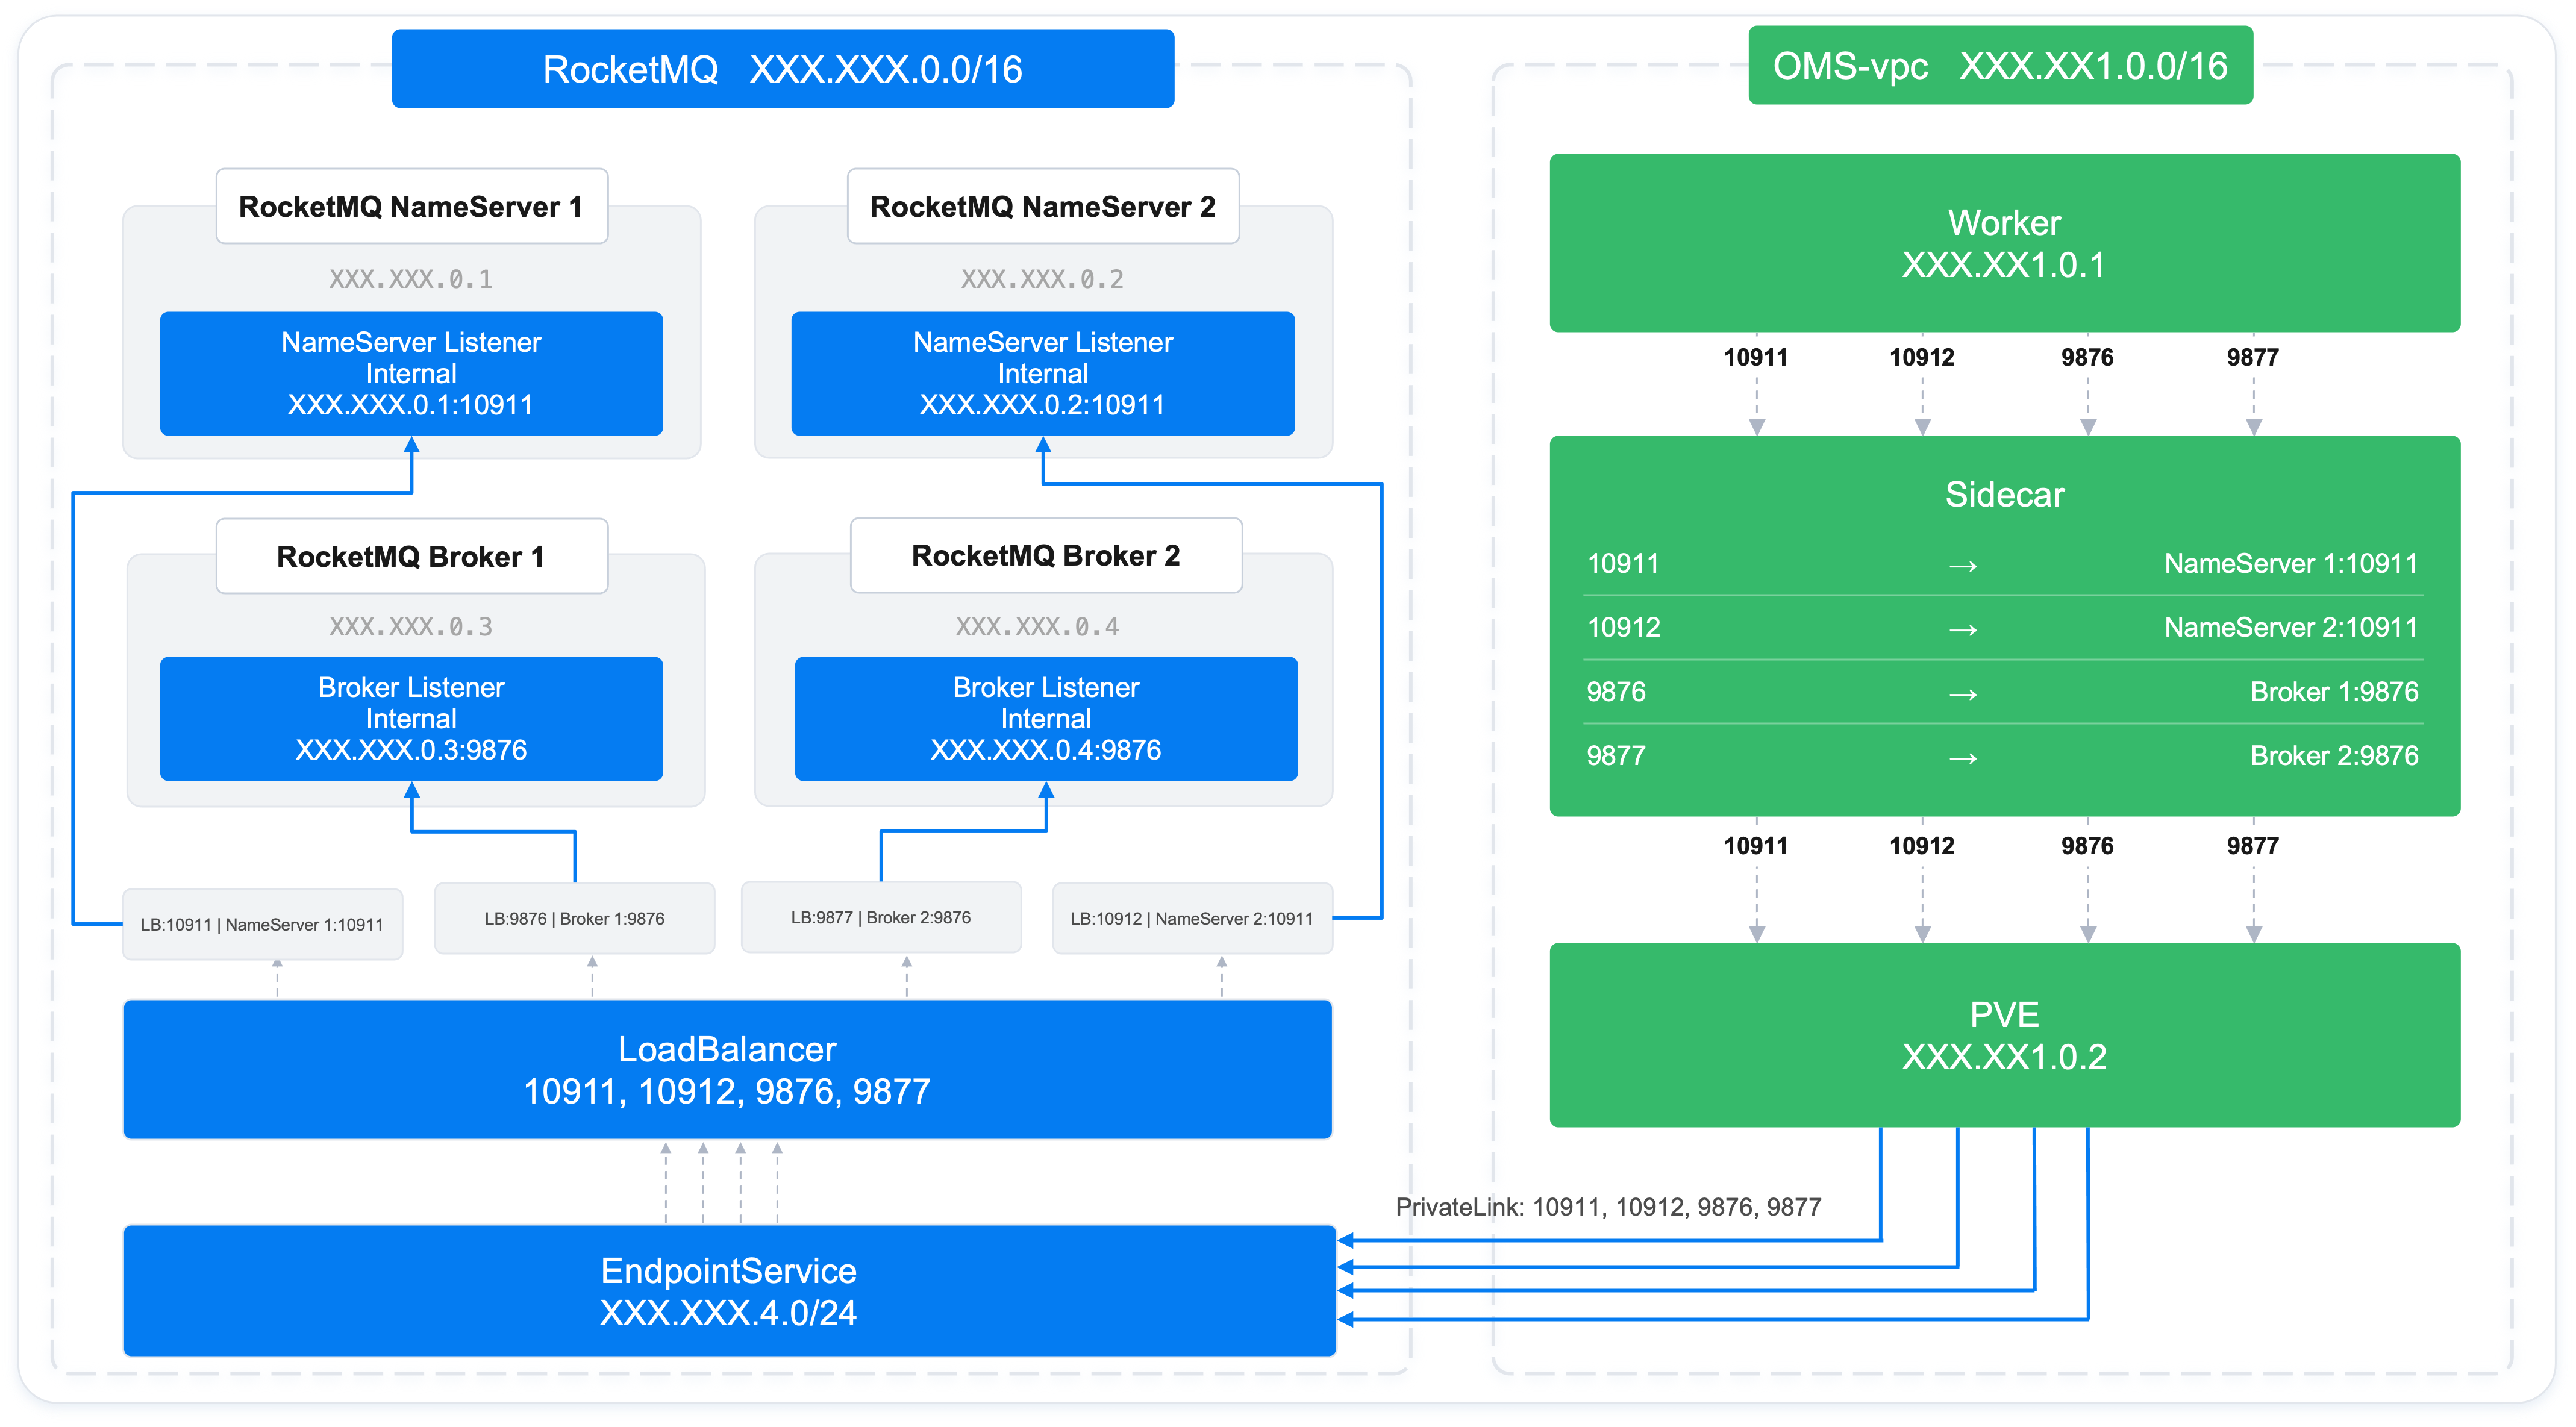
Prerequisites
You have created a cluster and a tenant in the source OceanBase Database. For details, see Create an instance and Create a tenant.
You have created database users dedicated to data migration for both the source and target and granted them the relevant permissions. For details, see User privileges.
Limitations
Only users with the project role of Project Owner, Project Admin, or Data Services Admin can create new data migration tasks.
Currently, data transmission supports RocketMQ instance versions V4.x and V5.x, including both commercial and community editions.
The Data Migration Service only supports migrating objects whose database, table, and column names contain ASCII characters and do not include special characters, such as periods, vertical bars, double quotation marks, single quotation marks, backticks, parentheses, equal signs, semicolons, forward slashes, ampersands, or line breaks.
The names of tables to be migrated and the column names within them must not contain Chinese characters.
The Data Migration Service only supports migrating physical tables; other objects are not supported.
During data migration, data transmission supports dropping a table and then creating a new one. That is, you can perform a DROP TABLE operation on a table already being synchronized, followed by a CREATE TABLE. Data transmission does not support creating a new table by renaming an existing one. That is, operations like RENAME TABLE a TO a_tmp are not supported.
Currently, only regular message topics are supported.
Considerations
Clock desynchronization between nodes, or between the client terminal and the server, may cause inaccurate latency reporting during incremental synchronization.
For example, if a clock is earlier than standard time, the reported latency may be negative. If a clock is behind, it may cause a positive latency.
In a data migration task where the source is an OceanBase Database with DDL synchronization enabled, if a rename (RENAME) operation occurs on a table in the source database, it is recommended that you restart the task to avoid data loss during incremental synchronization.
When OceanBase Database is version V4.0.0 to V4.3.x (excluding V4.2.5 BP1) and incremental synchronization is selected, configure the STORED attribute for generated columns. Otherwise, the incremental logs will not contain information for the generated columns, which may cause data anomalies during incremental synchronization.
When an updated row contains a LOB column:
If the LOB column is among the updated columns, do not rely on its value before the UPDATE or DELETE operation.
Currently, data types stored in LOB columns include JSON, GIS, XML, UDT (user-defined types), and various TEXT types such as LONGTEXT and MEDIUMTEXT.
If the LOB column is not among the updated columns, its value is NULL both before and after the UPDATE or DELETE operation.
When a task is resumed from a checkpoint after an unexpected interruption, some duplicate data (from within the last minute) may exist in the RocketMQ instance. Therefore, downstream systems must be capable of deduplication.
If you configure only Incremental Synchronization when creating a data migration task, the local incremental logs in the source database must be retained for more than 48 hours.
If you configure both Full Migration and Incremental Synchronization when creating a data migration task, the local incremental logs in the source database must be retained for at least 7 days. Otherwise, the data migration task may fail or cause data inconsistency between the source and target databases due to the inability to obtain incremental logs.
If you perform incremental synchronization with OceanBase Database as the source and the database table objects contain UDT columns, the incremental synchronization task may fail due to unsupported UDT columns.
Supported source and target instance types
In the following table, the instance types supported by OceanBase MySQL Compatible and OceanBase Oracle Compatible include Cluster Instance (Transactional) and Self-managed Database.
Cloud Vendor |
Source |
Destination |
|---|---|---|
| AWS | OceanBase MySQL Compatible | Self-managed RocketMQ on AWS |
| AWS | OceanBase Oracle Compatible | Self-managed RocketMQ on AWS |
| Alibaba Cloud | OceanBase MySQL Compatible | Cloud Instance RocketMQ |
| Alibaba Cloud | OceanBase MySQL Compatible | Self-managed RocketMQ |
| Alibaba Cloud | OceanBase Oracle Compatible | Cloud Instance RocketMQ |
| Alibaba Cloud | OceanBase Oracle Compatible | Self-managed RocketMQ |
Procedure
Create a data migration task.
Log in to the OceanBase Cloud console.
In the left-side navigation pane, click Data Services > Data Migration.
On the Data Migration page, click the Data Migration tab.
On the Data Migration tab, click Create Task in the upper-right corner.
In the Edit Task Name text box, enter a custom name for the migration task.
We recommend using letters and numbers. The name must not contain spaces and cannot exceed 64 characters.
On the Configure Source & Target page, configure the parameters.
In the Source section, configure the parameters.
If you need to reference an existing data source, click Quick Fill next to Source and select the target data source from the drop-down list. After selection, the configurations for the source section will be automatically populated. If you want to save the current configuration as a new data source, click the Save icon in the upper-right corner of the Source section.
You can also click Manage Data Source in the Quick Fill drop-down list to go to the Data Source page, where you can view and manage data sources. This page provides unified management for different types of data sources. For more information, see the documentation in the Data sources module.
ParameterDescriptionCloud Provider Currently supports AWS and Alibaba Cloud. Region Select the region where the source database is located. Database Type Select the source database type as OceanBase MySQL Compatible or OceanBase Oracle Compatible based on your actual situation. Instance Type Select Cluster Instance (Transactional) or Self-managed Database. Instance The ID or name of the instance where the OceanBase database is located. You can view the ID or name of the target instance on the Cluster List page. Note
When the cloud provider is Alibaba Cloud, you can also select instances of an Alibaba Cloud root account for cross-account authorization. For details, see Alibaba Cloud Account Authorization.
Tenant The ID or name of the tenant in the OceanBase database. You can expand the target instance on the Instances page to view the ID or name of the target tenant. Account The username of the OceanBase database user used for data migration. Password The password of the database user. When the source is an Self-managed Database instance type, if you need to perform schema migration and incremental synchronization, configure the parameters in the Advanced Settings section.
If you need to select Schema Migration or Incremental Synchronization on the Select Type & Objects page, enable the sys tenant account and configure the following parameters.
ParameterDescriptionsys Account The name of the sys user. This user is mainly used to read incremental logs and database object structure information from the OceanBase database. Please create it under the sys tenant of the business cluster. Password The password of the sys user. If you need to select Incremental Synchronization on the Select Type & Objects page, enable the incremental log proxy service and fill in the OBLogProxy Connection Information.
Notice
Incremental synchronization is supported only when both the sys tenant account and the incremental log proxy service are enabled.
OBLogProxy connection information refers to the incremental log proxy service of OceanBase Database, which provides access and management capabilities for real-time incremental projects in the form of a service, facilitating applications' access to incremental logs of OceanBase Database. It also addresses the need for subscribing to incremental logs when network isolation is in place. The format is
OBLogProxy IP:OBLogProxy Port.
In the Target section, configure the parameters.
If you need to reference an existing data source, click Quick Fill on the right side of Target and select the target data source from the drop-down list. After selection, the configurations in the target section will be automatically populated. If you want to save the current configuration as a new data source, click the Save icon in the upper-right corner of the Target area.
You can also click Manage Data Source in the Quick Fill drop-down list to go to the Data Source page, where you can view and manage data sources. This page provides unified management for different types of data sources. For more information, see the Data sources section.
ParameterDescriptionCloud Provider Currently supports AWS and Alibaba Cloud. Region Select the region where the target instance is located. Database Type Select RocketMQ as the target. Instance Type Select Cloud instance or Self-managed RocketMQ based on the support of the selected cloud provider. Connection Type Includes Private Network and Public IP. - If you select Private Network as the connection method, you must first add the account ID displayed on the page to the allowlist of your endpoint service to allow connections from this account's endpoint to the endpoint service. For more information, see the Select Private Network Connection section.
When Cloud Vendor is set to AWS, if you selected Require Enable for the Require Acceptance to Use Endpoint parameter when creating the endpoint service, the data migration service will prompt you to enter the AWS console to Accept Endpoint Connection Request upon first connecting through a private link. - If you select Public IP as the connection method, you must first add the data source IP address displayed on the page to the allowlist of the RocketMQ instance to ensure connectivity. For more information, see the Select Public Network Connection section.
Note
The data source IP address to be added to the allowlist is displayed only after you select the regions for both the source and target.
Connection Information - When Connection Type is set to Private Network, enter the Namesrv configuration and broker configuration, including the endpoint service node and RocketMQ access point.
- When Connection Type is set to Public IP, enter the RocketMQ access point.
For detailed instructions, see the RocketMQ data source section in Create Data Source.If the security authentication configuration for the RocketMQ data source is not completed, the data migration task using this data source as the source or target may fail. You can enable ACL security authentication by configuring it as follows.
ParameterDescriptionAccessKey The AccessKey ID created in the cloud console, used for authentication. SecretKey The AccessKey Secret created in the cloud console, used for authentication. - If you select Private Network as the connection method, you must first add the account ID displayed on the page to the allowlist of your endpoint service to allow connections from this account's endpoint to the endpoint service. For more information, see the Select Private Network Connection section.
Click Test and Continue.
On the Select Type & Objects page, configure the parameters.
In the Migration Type section, select the migration type for the current data migration task.
ParameterDescriptionFull Migration After a full migration task starts, the data migration service migrates the existing data from the source database tables to the corresponding topics in the target database. Incremental Synchronization After an incremental synchronization task starts, data migration synchronizes the changed data (newly added, modified, or deleted) from the source database to the corresponding topics in the target database. Currently, only DML Synchronization is supported. You can configure it according to your needs. For more information, see Configure DML/DDL synchronization. In the Select Migration Objects section, configure the method for selecting migration objects.
You can select migration objects using two methods: Specify Objects and Match by Rule.

In the Select Migration Scope section, select the objects to migrate.
When Specify Objects is selected, data migration supports Table-level and Database-level. Database table migration supports selecting one or more tables from a database as migration objects, while full database migration supports selecting an entire database as migration objects. If a database is selected for database table migration, it cannot be selected for full database migration. If a database is selected for full database migration, it cannot be selected for database table migration.
When migrating data from OceanBase Database to RocketMQ, multi-table to multi-topic migration is supported.
Select the objects to migrate on the left side of the selection area.
Click >.
In the Topic Name dialog box of the Map Objects to Topic pop-up window, manually enter or search to select a specific topic.
Click OK.
Data migration supports importing objects via text and allows you to perform operations on target objects, such as changing the topic, setting row filters, and removing single or all objects. The structure of target objects is Topic > Database > Table.
OperationDescriptionImport Objects In the list on the right side of the selection area, click Import Object in the upper-right corner. For more information, see Import migration objects. Change Topic Data migration supports changing the topic of target objects. For more information, see Change topic. Settings Data migration supports using WHEREconditions for row filtering, and you can select sharding columns and columns to synchronize. In the Settings dialog box, you can perform the following operations.- In the text box of the Row Filters section, enter a
WHEREcondition to filter rows. For more information, see Filter data by SQL condition. - In the Sharding Columns drop-down list, select the target sharding column. You can select multiple fields as sharding columns. This parameter is optional.
When selecting a sharding column, if there are no special circumstances, the primary key is recommended by default. If there is uneven load on the primary key, select a unique identifier column with relatively balanced load as the sharding column to avoid potential performance issues. The main purposes of sharding columns are as follows:- Load balancing: When concurrent writes are possible at the target, use sharding columns to assign specific threads for sending messages.
- Orderliness: To address potential out-of-order issues caused by concurrent writes, data migration ensures that messages are received in order when their sharding column values are the same. Here, order refers to the execution order of DML operations on a column.
- In the Select Columns section, select the columns to synchronize. For more information, see Column filtering.
Remove/Clear All Data migration supports removing one or more temporarily selected objects to the target during data mapping. - Remove a single migration object
In the list on the right side of the selection area, click the Remove icon next to the target object to remove it. - Remove all migration objects
In the list on the right side of the selection area, click Clear All in the upper-right corner. In the dialog box, click OK to remove all migration objects.
Select Match by Rule. For more information, see Configure matching rules between databases and message queues.
Click Next. On the Migration Options page, configure the parameters.
Full migration
The following parameters are displayed only if you have selected Full Migration in the Select Type & Objects step.
ParameterDescriptionRead Concurrency Configuration This parameter specifies the number of concurrent reads from the source during full migration. The maximum limit is 512. A high concurrency value may cause excessive load on the source and affect business operations. Write Concurrency Configuration This parameter specifies the number of concurrent writes to the target during full migration. The maximum limit is 512. A high concurrency value may cause excessive load on the target and affect business operations. Limit Full Migration Rate You can decide whether to enable the full migration rate limit based on your actual needs. If enabled, set the Source Read RPS (the maximum number of rows that can be read from the source per second during full migration), Source Read BPS (the maximum amount of traffic that can be read from the source per second during full migration), Target Write RPS (the maximum number of rows that can be written to the target per second during full migration), and Target Write BPS (the maximum amount of traffic that can be written to the target per second during full migration). Note
The RPS and BPS settings here are only for rate limiting. The actual achievable performance during full migration is subject to factors such as the source, target, and instance specifications.
Incremental synchronization
The following parameters are displayed only if you have selected Incremental Synchronization in the Select Type & Objects step.
ParameterDescriptionWrite Concurrency Configuration This parameter specifies the number of concurrent writes to the target during incremental synchronization. The maximum limit is 512. A high concurrency value may cause excessive load on the target and affect business operations. Limit Incremental Migration Rate You can decide whether to enable the incremental synchronization rate limit based on your actual needs. If enabled, set the Target Write RPS (the maximum number of data rows that can be synchronized to the target per second during incremental synchronization) and Target Write BPS (the maximum amount of traffic that can be synchronized to the target per second during incremental synchronization). Note
The RPS and BPS settings here are only for rate limiting. The actual achievable performance during incremental synchronization is subject to factors such as the source, target, and instance specifications.
Incremental Synchronization Start Timestamp - If Full Migration was selected as the migration type, this parameter is not displayed.
- If Full Migration was not selected but Incremental Synchronization was selected, specify a point in time after which data should be migrated. The default is the current system time. For more information, see Set an incremental synchronization timestamp.
Advanced options
ParameterDescriptionSerialization Method Controls the message format for migrating data to RocketMQ. Currently supported formats include Default, Canal, DataWorks (V2.0), SharePlex, DefaultExtendColumnType, Debezium, DebeziumFlatten, and DebeziumSmt. For more information, see Data format description. Note
- Currently, only the MySQL-compatible mode of OceanBase Database supports Debezium, DebeziumFlatten, and DebeziumSmt.
- When DataWorks is selected, DDL synchronization does not support
COMMENT ON TABLEorALTER TABLE…TRUNCATE PARTITION.
Partitioning Rule The rule for synchronizing source data to RocketMQ. Currently, only Hash is supported. Hash indicates that a specific hash algorithm is used to determine the RocketMQ queue (MessageQueue) based on the primary key value or sharding column value. Business System Identifier (Optional) This parameter is displayed only when you select Serialization Method as DataWorks. It identifies the source business system of the data for your subsequent custom processing. The length of this identifier must be 1 to 20 characters.
Click Next to have the system perform a precheck on the data migration task.
During the Pre-check step, data migration checks the connection to the target RocketMQ. If the precheck reports an error:
You can troubleshoot and resolve the issue, then re-execute the precheck until it succeeds.
You can also click Skip in the Actions column for the failed precheck item. A dialog box appears, explaining the specific impact of skipping this operation. After confirming you can skip it, click OK in the dialog box.
After the precheck succeeds, click Purchase to go to the Purchase Data Migration Instance page for purchase.
After a successful purchase, you can start the data migration task. For purchase details, see Purchase a data migration instance. If you do not need to purchase a data migration instance immediately, click Save to go to the data migration task details page, where you can manually purchase it later as needed.
The data migration service supports modifying migration objects during the execution of a data migration task. For details, see View and modify migration objects. After a data migration task is started, it is executed sequentially according to the selected migration type. For details, see the content in the "View migration details" section of View details of a data migration task.