


OceanBase Developer Center (ODC) allows you to create a table on a GUI. This topic describes how to create a table in the ODC console.
Background information
Logical tables
ODC V4.3.2 and later allow you to configure a logical database and a logical table for one or more physical databases, in order to query and manage huge database and table shards. For more information, see the Manage logical databases section in the Project collaboration management topic.
Note
If you do not have the logical database permissions, you can click the corresponding button on the Projects or Tickets tab to apply for the permissions.
Logical table expression rules
| Rule type | Rule name | Example |
| Simple rules | Create tables whose names contain numbers that increment in numerical order | db.test_[0-7]: Creates eight tables whose names contain numbers that increment in numerical order. |
| Create tables whose names contain numbers that have the same number of digits and increment in numerical order |
|
|
| Create tables whose names contain numbers that increment in numerical order with a specified step | db.test_[0-8:2]: Creates five tables named db.test_0, db.test_2, db.test_4, db.test_6, and db.test_8. The step is 2. |
|
| Create tables whose names contain numbers that have the same number of digits and increment in numerical order with a specified step | db.test_[00-07:3]: Creates three tables named db.test_00, db.test_03, and db.test_06. The step is 3. |
|
| Create tables whose names contain incrementing numbers in the middle part | db.test_[00-31]_t: Creates tables whose names contain numbers from 00 to 31 in the middle part. |
|
| Multi-level rules | Create tables whose names contain numbers that represent months and dates | db.test_[01-12]_[01-31]: Creates tables whose names contain numbers that represent the first to 31st days in 12 months. The total number of the tables to be created is 12 × 31. |
| Create tables whose names contain numbers that represent months and dates incrementing with specified steps | db.test_[01-12:2]_[01-31:2]: Creates tables whose names contain numbers that represent odd dates in odd months. The total number of tables to be created is 6 × 16. |
|
| Rules for databases and tables | Create tables that have the same name | db_[00-31].test: Creates tables named test in databases numbered from 00 to 31. |
| Create tables and evenly distribute the tables to specified databases | db_[00-31].test[0000-1023]: Creates 1,024 tables and evenly distributes the tables to databases numbered from 00 to 31. |
|
| Enumeration rules | Create tables based on a simple enumeration | db.test_[1,3,6,8,9]: Creates five tables in the specified database. |
| Create tables based on a complex enumeration | db.test_[1,3,6,8,9] or db.test_[2,4,5,7,10]: Creates tables by using multiple expressions and evenly distributes the tables to specified databases. |
|
| Enumeration rules for databases | Create the same tables in specified databases | db_[00-31].test_[[00-31]]: Creates tables named test_[00-31] in each of the databases numbered from 00 to 31. |
| Create tables based on enumeration rules in specified databases | db_01.test_[1,2,4,6,7],db_02.test_[2,3,5,7,9],db_03.test_[1,4,6,7,9]: Creates five tables with specified names in the three databases. |
|
| Create different numbers of tables in different databases | db_01.test_[1-7],db_02.test_[10-15]: Creates seven tables in database db_01 and six tables in database db_02. |
Create an internal table

The procedure comprises seven steps:
Specify the basic information.
Set columns.
Set indexes.
Set constraints.
Set partitioning rules.
Verify the SQL statement.
Complete the table creation.
Create an external table
An external table is a logical table object. Its data is stored in an external storage system instead of the database. For more information about external tables, see Overview.
ODC V4.3.3 and later allow you to create an external table by executing SQL statements in the SQL window, and to map an external file to a database managed by ODC by specifying the file path. You can view the existing external tables in the resource tree of the SQL window. For more information, see Create an external table.
You can use the CREATE EXTERNAL TABLE statement to create an external table.
Notice
- External tables are read-only. You can query an external table, but cannot perform DML operations on external tables.
- You need to specify the
secure_file_privvariable before you create an external table in ODC by using a local file. To specify the variable, you can connect to OceanBase Database only by using a local Unix socket. ODC does not support this connection method, and you must use obclient to configure the connection. For more information, see secure_file_priv.
- Create an external file.
- Create an external table in the SQL window of ODC by executing SQL statements.
- View the external table in the resource tree.
Procedure
Create an internal table
The following example describes how to create a table named employee in the odc_test database in the SQL window. The table contains the emp_no, birthday, name, and gender columns.
Note
All data in this example is for reference only. You can replace the data as needed.
Step 1: Specify the basic information
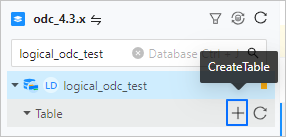
Log in to the ODC console and go to the SQL window. You can click Table in the left-side navigation pane to view tables. To create a table, click the plus sign (+) next to Table in the left-side navigation pane.
On the CreateTable tab that appears, set the Table Name, Storage Mode, and Description parameters in the Basic Information section.
Note
- In MySQL mode, you also need to set the Default Character Set and Default Collation parameters.
- After you specify the basic information and go to the "Set columns" step, the basic information is submitted.
- Only OceanBase Database V4.3.0 and later support configuring columnar storage.
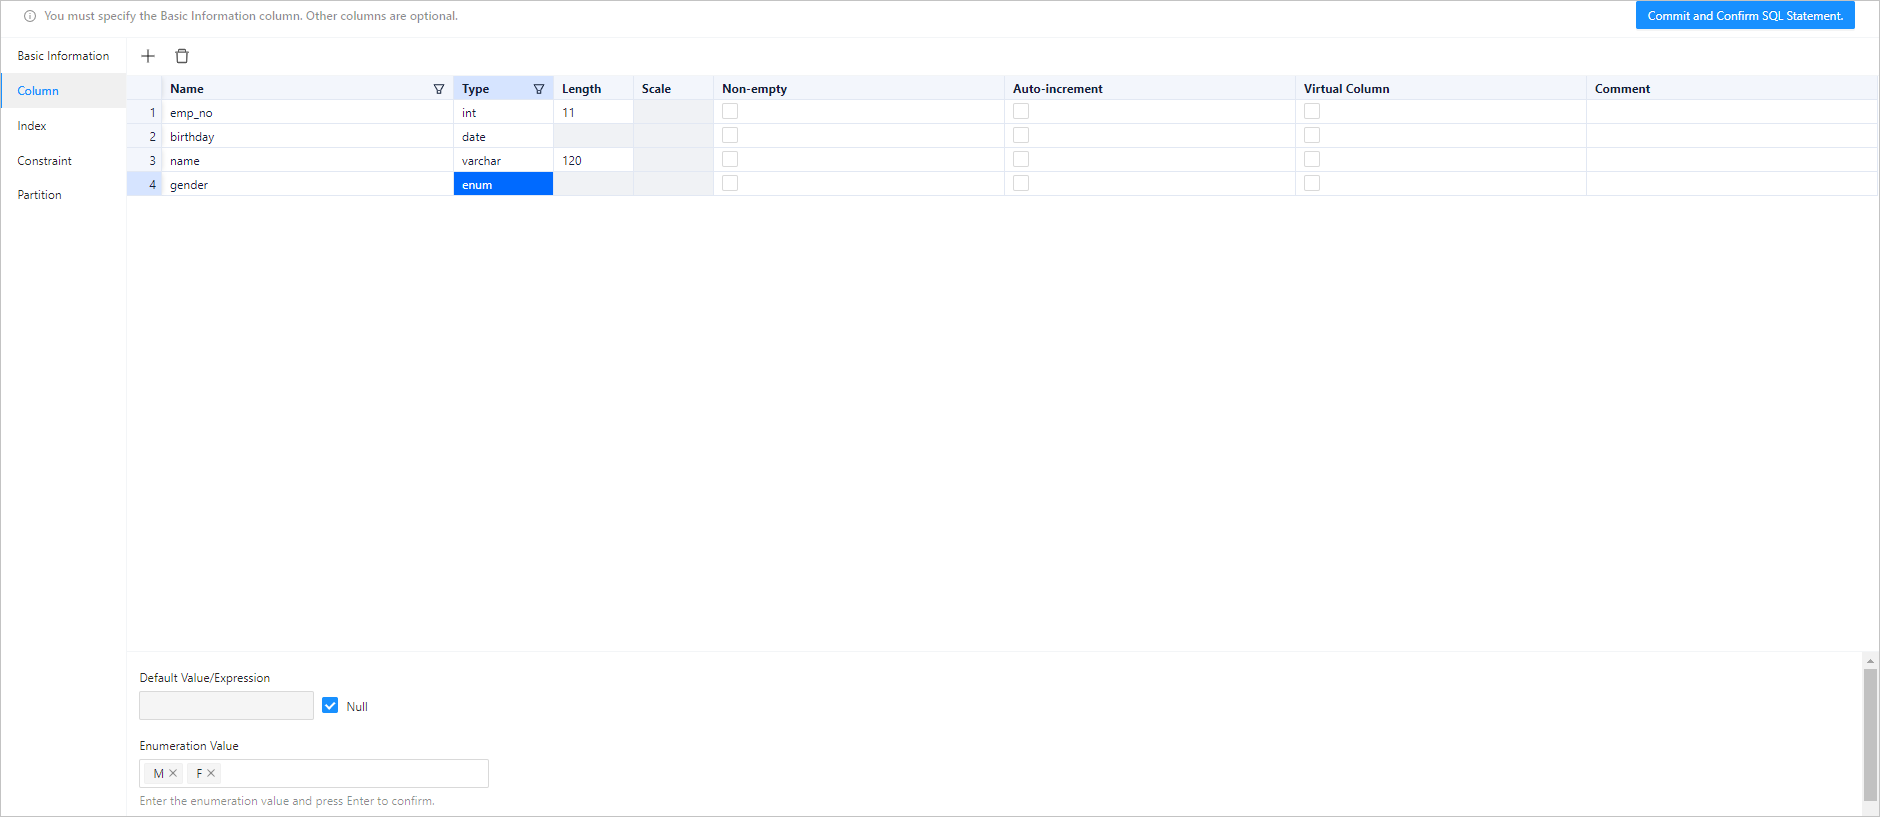
Step 2: Set columns
Note
In ODC V4.2.3 and later, you can create a table that contains columns of spatial data types in the MySQL mode of OceanBase Database or in MySQL Database.
The following figure shows the information that you need to specify when you add a column.
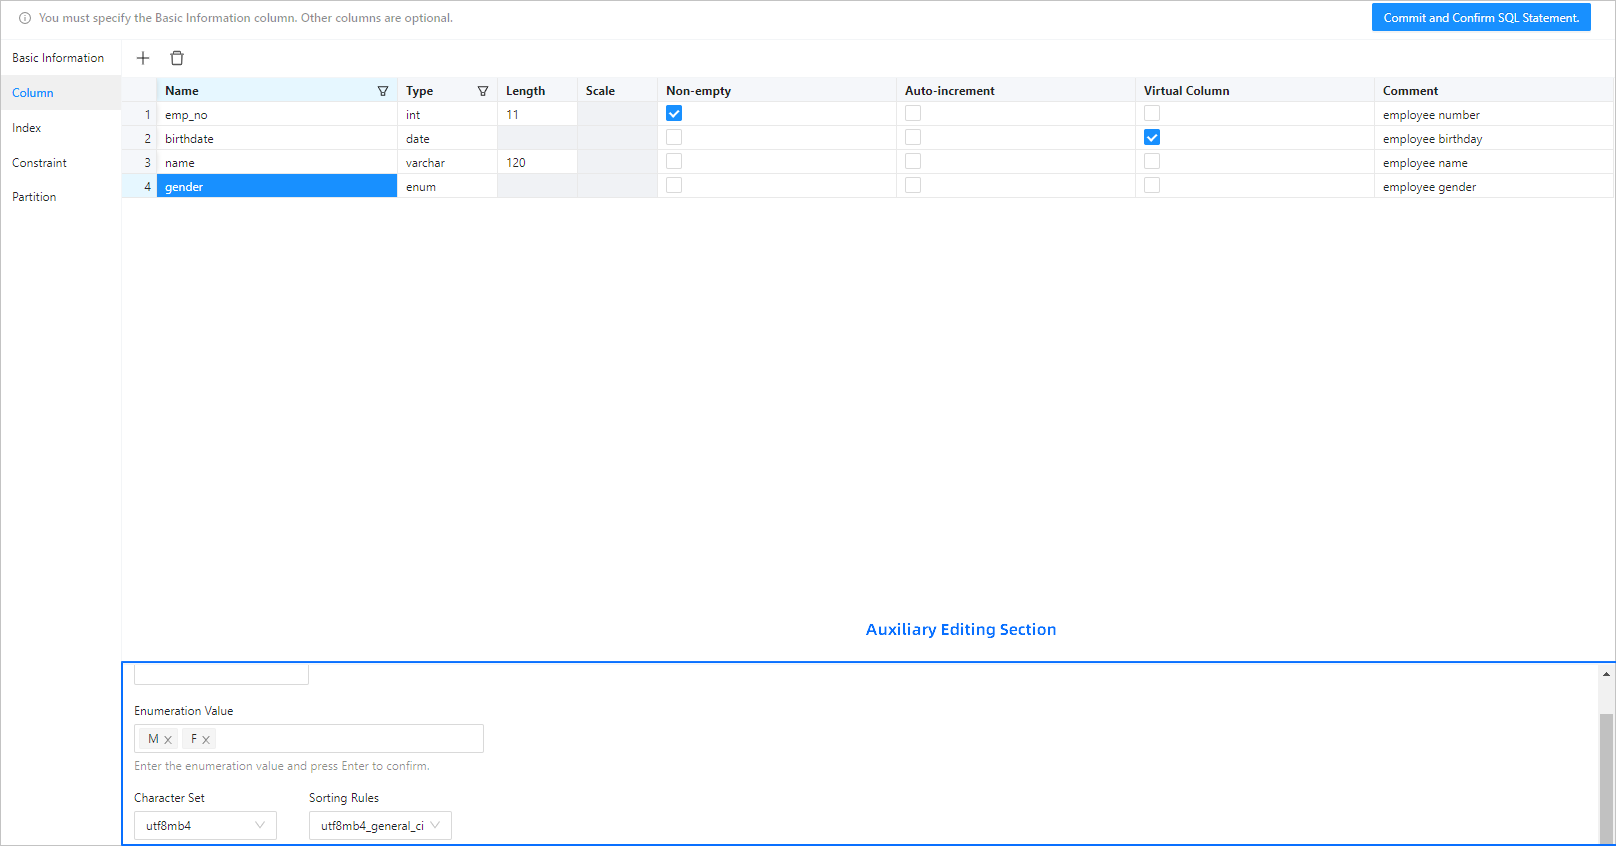
Note
- After you copy a row, you can paste the row by using the Command+V or Ctrl+V shortcut keys.
- The auxiliary editing section at the bottom of the page displays additional information about the selected column.
- The basic information and column settings are required. The settings in other configuration steps are optional. After you specify the basic information and column settings, you can submit the settings and confirm the SQL statement to create the table.
Step 3: Set indexes
If a table contains a large amount of data, you can use indexes to accelerate data queries. An index is a data structure that pre-sorts the values of one or more columns in a table. By using indexes, you can directly locate records that meet the conditions.
The following figure shows the information that you need to specify when you set an index.

Step 4: Set constraints
Constraints are used to specify data rules for a table. A data operation that violates the constraints is terminated.

ODC supports the following four types of table constraints:
PRIMARY KEY constraint: Defines a primary key to uniquely identify each row of data in the table. A PRIMARY KEY constraint can be a field or a group of fields. You can set only one PRIMARY KEY constraint for a table, and you cannot modify the PRIMARY KEY constraint after you configure the constraint.
UNIQUE constraint: Ensures that the data in a field or a group of fields is unique in the table. You can set multiple UNIQUE constraints in one table.
FOREIGN KEY constraint: Associates one or more columns in two tables. A FOREIGN KEY constraint is used to maintain the data consistency and integrity between associated tables. After you complete the setting of FOREIGN KEY constraints, you cannot create new constraints or modify existing constraints.
CHECK constraints: Checks the data in the database based on the configured check rules when you edit the data. Data modification is allowed only after the check is passed.
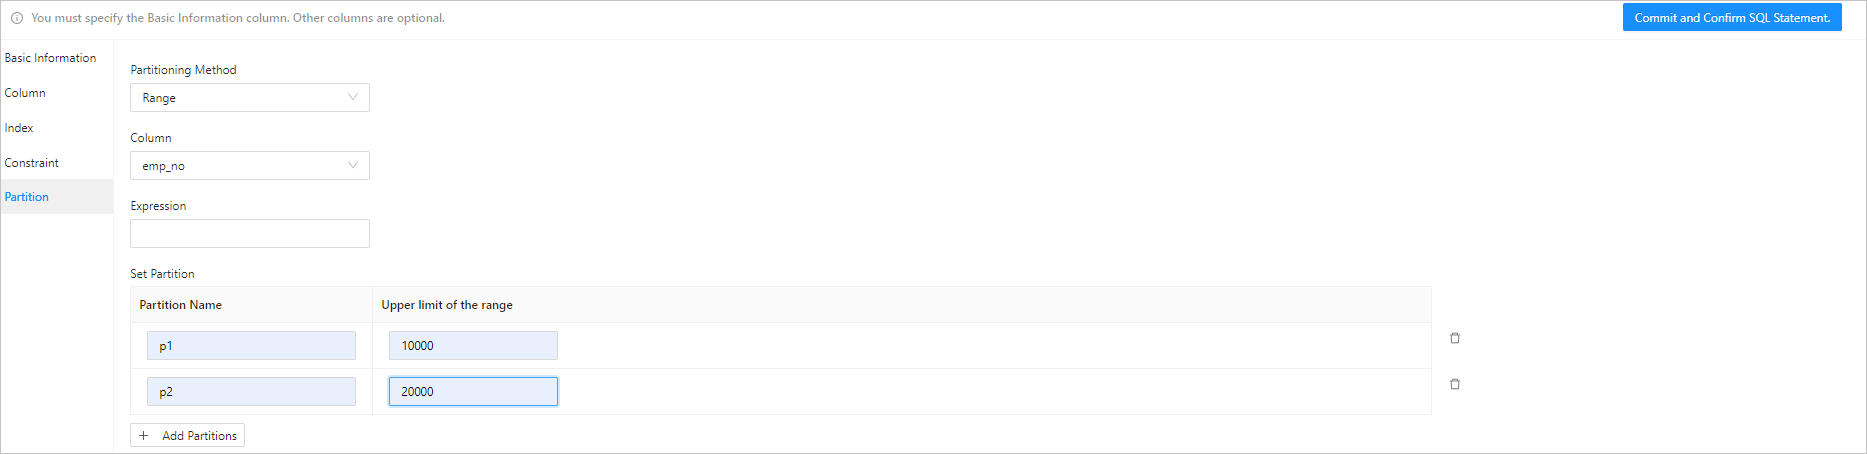
Step 5: Set partitioning rules
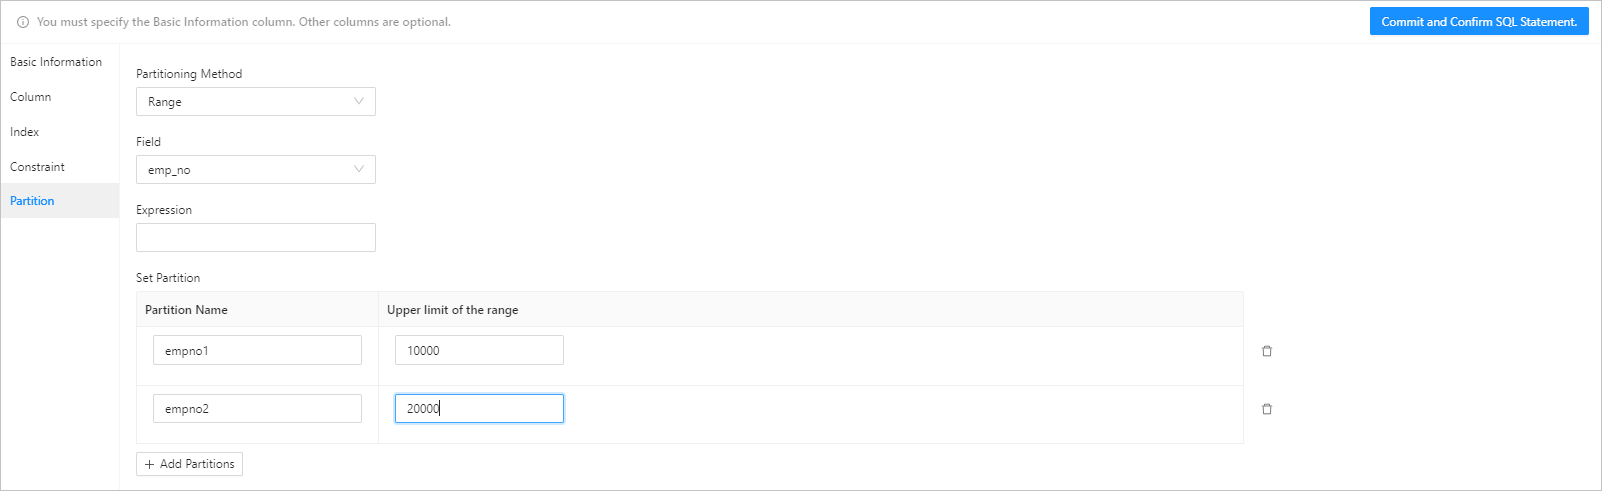
You can partition a table that contains a large amount of data. After a table is partitioned, data in the table is stored in multiple tablespaces. The database does not scan the entire table for a query. In ODC V4.3.3 and later, you can view subpartitions.
In MySQL mode, OceanBase Database supports the following partitioning methods: KEY, HASH, RANGE, RANGE COLUMNS, LIST, and LIST COLUMNS.
In Oracle mode, OceanBase Database supports the following three partitioning methods: LIST, RANGE, and HASH.
Step 6: Confirm the SQL statement
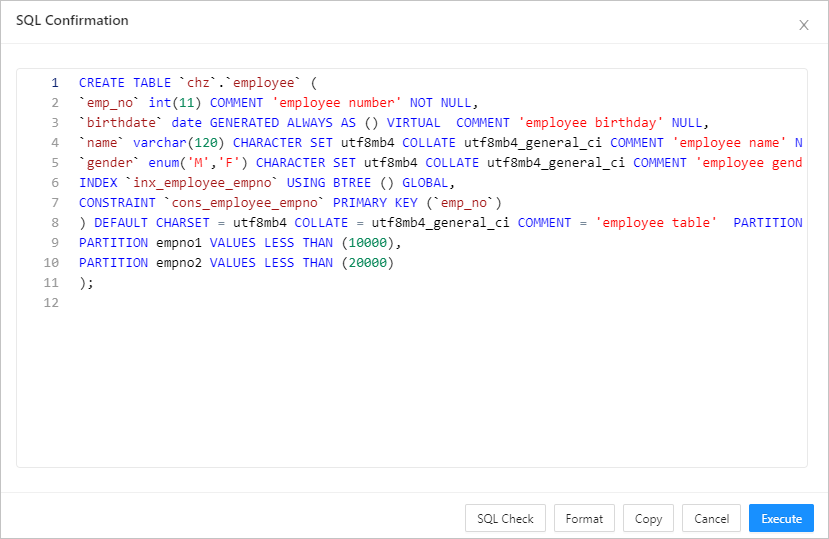
After you click Submit, you can view, check, and format the statement on the SQL Confirmation page.
The syntax is as follows:
CREATE TABLE table_name (column_name column_type, column_name column_type,.......);
The following table describes the parameters.
Parameter |
Description |
|---|---|
| CREATE TABLE | The statement that creates a table with a specified name. You must have the privilege to create tables. |
| table_name | The name of the table. The table name must conform to the identifier naming rules. |
| column_name column_type | The name and data type of each column in the table. Separate the tuples of multiple columns with commas (,). |
Step 7: Complete the table creation
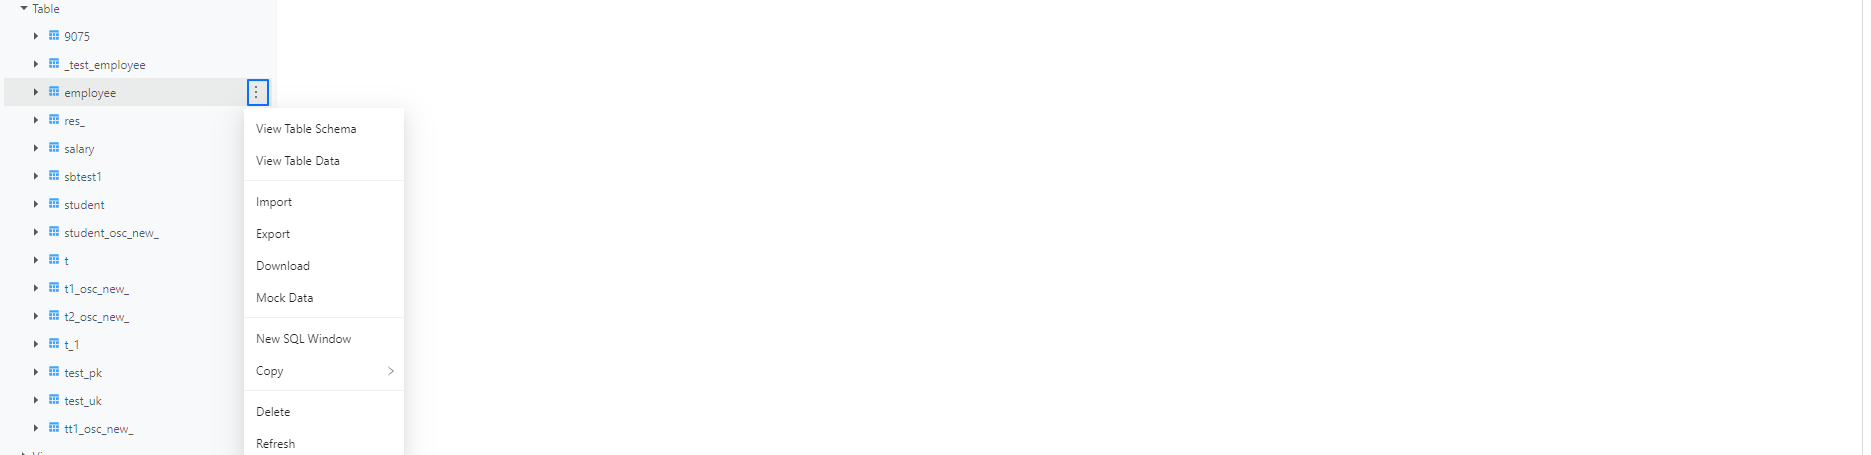
Click Execute. After the table is created, the employee table appears in the table list in the left-side navigation pane.
Note
You can click the More icon next to a table name in the table list in the left-side navigation pane, and select View Table Schema, View Table Data, Import, Export, Download, Mock Data, New SQL Window, Copy, Delete, or Refresh from the context menu to manage or operate the table.
You can use the SELECT statement to query data in the new table.
The syntax is as follows:
SELECT
 column_name,
 column_name
FROM
 table_name [WHERE Clause] [LIMIT N] [ OFFSET M]
The following table describes the parameters.
Parameter |
Description |
|---|---|
| SELECT | The keyword that indicates the name of the statement. You can use the SELECT statement to read one or more records. |
| column_name | The name of the column to be queried. An asterisk (*) is usually used to query all columns in a table. |
| WHERE | The keyword of the condition clause. |
| LIMIT | The number of records to be returned. |
| OFFSET | The data offset from which the SELECT statement starts to query. The default offset is 0. |
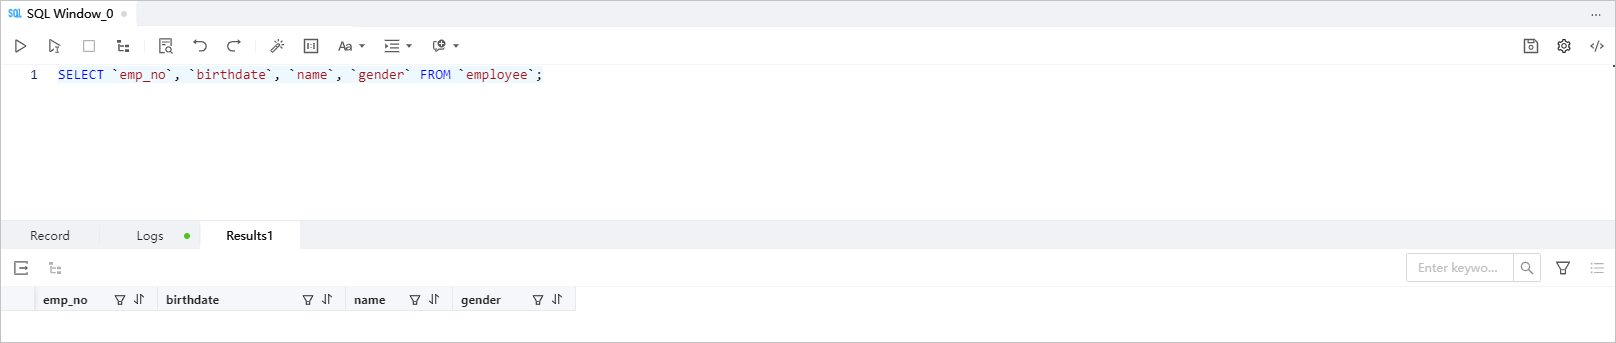
Here is an example:
SELECT `emp_no`, `birthdate`, `name`, `gender` FROM `employee`;
Step 1: Specify the basic information
Log in to the ODC console and go to the SQL window. You can click Table in the left-side navigation pane to view tables. To create a table, click the plus sign (+) next to Table in the left-side navigation pane.
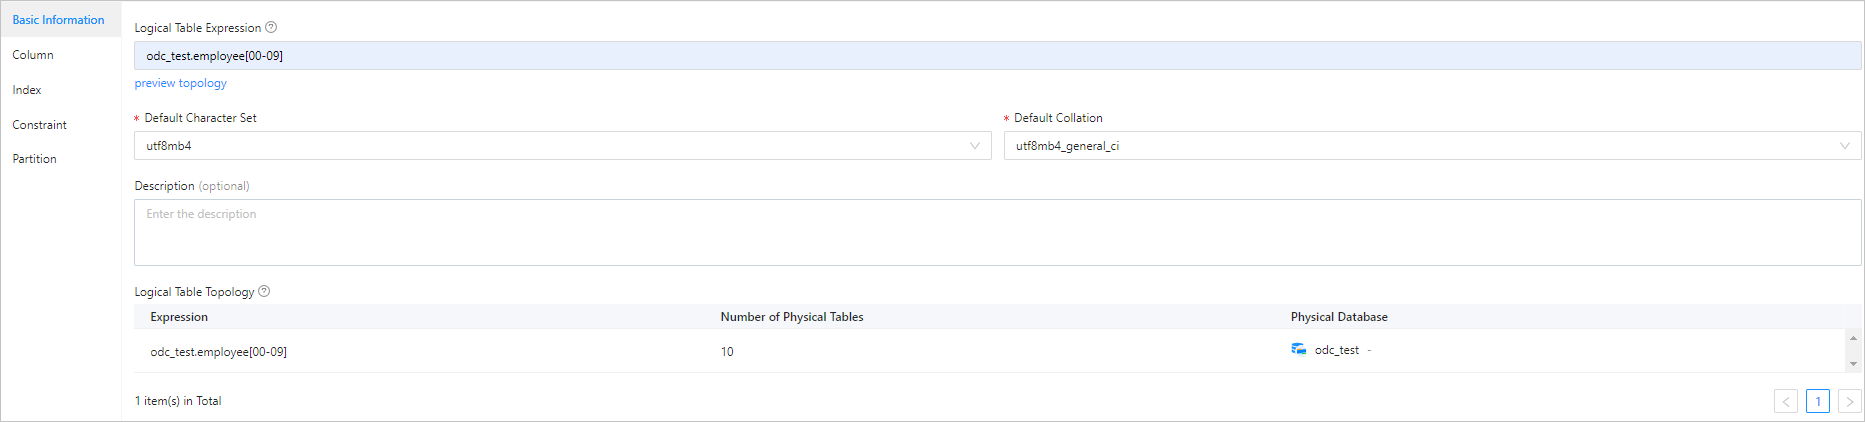
On the CreateTable tab that appears, set the parameters such as Logical Table Expression and Description in the Basic Information section.
Notice
- The logical table expression must contain the database name. In the
odc_test.employee[00-09]expression, for example,odc_testindicates the database name,employeeindicates the table name, and[00-09]indicates to create 10 tables. - The default name of the generated logical table consists of the non-number strings shared by the retrieved physical tables. For example, if the names of the retrieved physical tables are
db.test_0,db.test_1,db.test_2, anddb.test_3, the generated logical table is namedtest, and its expression isdb.test_[0-3]. For more information, see the description of logical table expression rules.
- The logical table expression must contain the database name. In the
Step 2: Set columns
The following figure shows the information that you need to specify when you add a column.
Note
- After you copy a row, you can paste the row by using the Command+V or Ctrl+V shortcut keys.
- The auxiliary editing section at the bottom of the page displays additional information about the selected column.
- The basic information and column settings are required. The settings in other configuration steps are optional. After you specify the basic information and column settings, you can submit the settings and confirm the SQL statement to create the table.
Step 3: Set indexes
If a table contains a large amount of data, you can use indexes to accelerate data queries. An index is a data structure that pre-sorts the values of one or more columns in a table. By using indexes, you can directly locate records that meet the conditions.
The following figure shows the information that you need to specify when you set an index.
Step 4: Set constraints
Constraints are used to specify data rules for a table. A data operation that violates the constraints is terminated.

ODC supports the following four types of table constraints:
PRIMARY KEY constraint: Defines a primary key to uniquely identify each row of data in the table. A PRIMARY KEY constraint can be a field or a group of fields. You can set only one PRIMARY KEY constraint for a table, and you cannot modify the PRIMARY KEY constraint after you configure the constraint.
UNIQUE constraint: Ensures that the data in a field or a group of fields is unique in the table. You can set multiple UNIQUE constraints in one table.
FOREIGN KEY constraint: Associates one or more columns in two tables. A FOREIGN KEY constraint is used to maintain the data consistency and integrity between associated tables. After you complete the setting of FOREIGN KEY constraints, you cannot create new constraints or modify existing constraints.
CHECK constraints: Checks the data in the database based on the configured check rules when you edit the data. Data modification is allowed only after the check is passed.
Step 5: Set partitioning rules

You can partition a table that contains a large amount of data. After a table is partitioned, data in the table is stored in multiple tablespaces. The database does not scan the entire table for a query.
In MySQL mode, OceanBase Database supports the following partitioning methods: KEY, HASH, RANGE, RANGE COLUMNS, LIST, and LIST COLUMNS.
In Oracle mode, OceanBase Database supports the following three partitioning methods: LIST, RANGE, and HASH.
Step 6: Confirm the SQL statement
After you click Submit, you can view and format the statement on the SQL Confirmation page.
The syntax is as follows:
CREATE TABLE table_name (column_name column_type, column_name column_type,.......);
The following table describes the parameters.
Parameter |
Description |
|---|---|
| CREATE TABLE | The statement that creates a table with a specified name. You must have the privilege to create tables. |
| table_name | The name of the table. The table name must conform to the identifier naming rules. |
| column_name column_type | The name and data type of each column in the table. Separate the tuples of multiple columns with commas (,). |
Step 7: Complete the table creation
Click Execute. After the table is created, the employee table appears in the table list in the left-side navigation pane.
Create an external table
The example in this section describes how to create an external table named employee in the odc_test database managed by ODC in the SQL window by mapping the specified file in Alibaba Cloud Object Storage Service (OSS) to the odc_test database.
Create an external file.
Create a directory named
external tableon the OSS console.
Upload the
employee.csvfile to theexternal tabledirectory.
Copy the path of the
employeetable, such ashttps://ob*********.oss-cn-shanghai.aliyuncs.com/doc/img/odc/433/external%20table/employee.csv.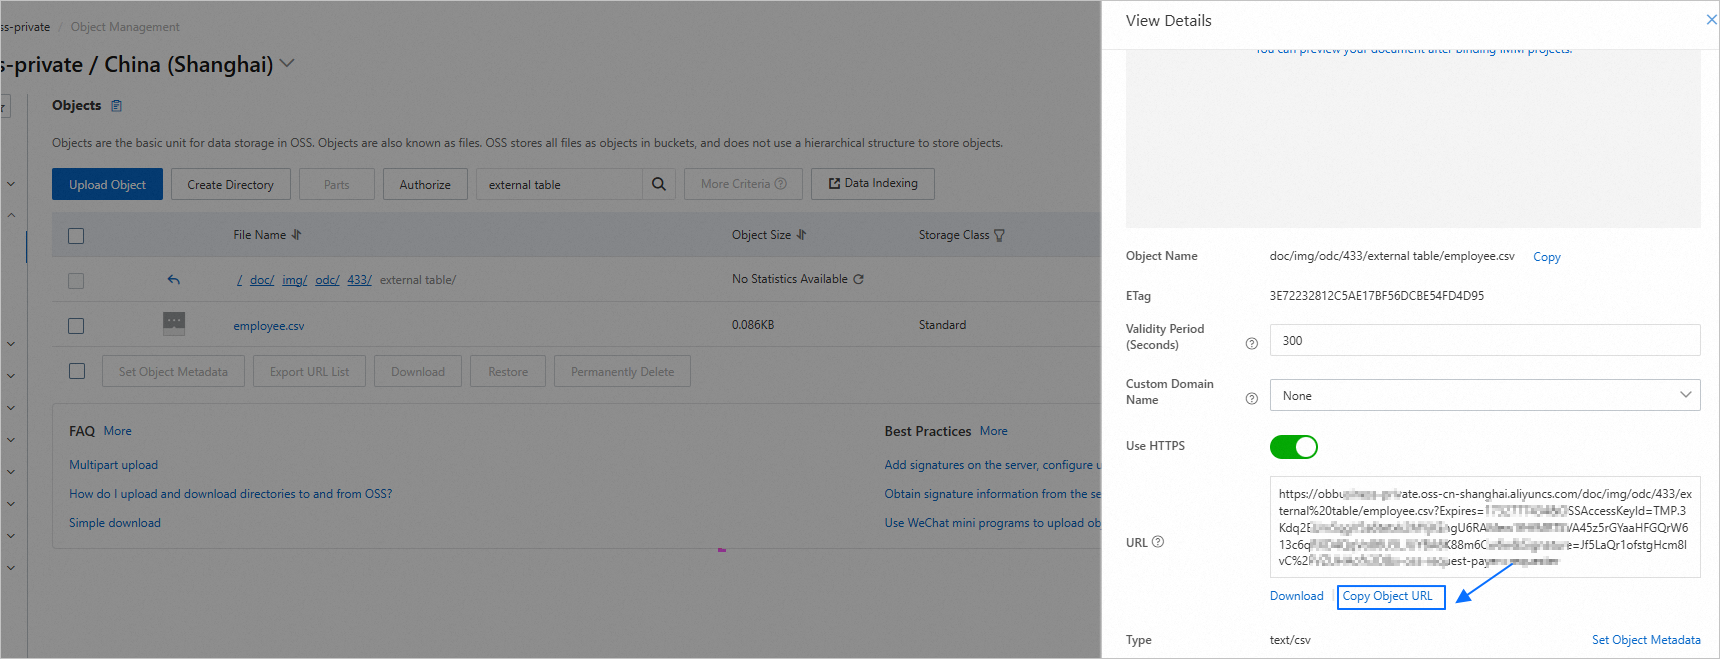
In the SQL window of ODC, execute the following SQL statement to create an external table named
employee.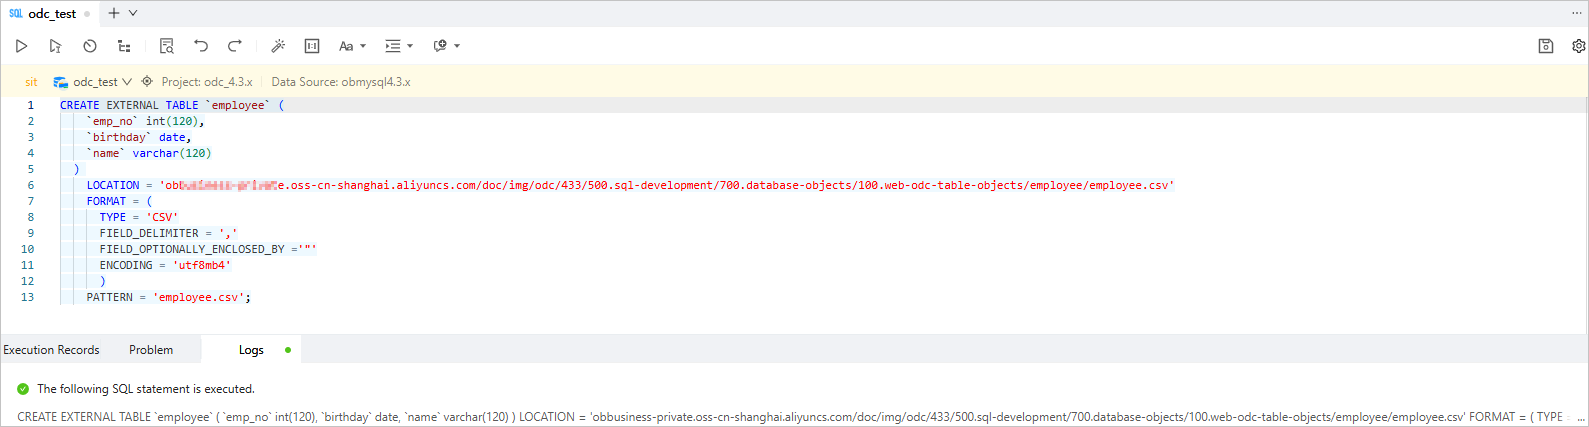
CREATE EXTERNAL TABLE `employee` (
   `emp_no` int(120),
   `birthday` date,
   `name` varchar(120)
)
   LOCATION = 'ob*********.oss-cn-shanghai.aliyuncs.com/doc/img/odc/433/500.sql-development/700.database-objects/100.web-odc-table-objects/employee/employee.csv'
   FORMAT = (
      TYPE = 'CSV'
      FIELD_DELIMITER = ','
      FIELD_OPTIONALLY_ENCLOSED_BY ='"'
      ENCODING = 'utf8mb4'
      )
   PATTERN = 'employee.csv';
The
LOCATIONoption specifies the path for storing the external table.Local location format:
LOCATION = '[file://] local_file_path'. When you use the local location format, you must set the system variablesecure_file_privto specify an accessible path. For more information, see secure_file_priv.Remote location format:
LOCATION = '{oss|cos|S3}://$ACCESS_ID:$ACCESS_KEY@$HOST/remote_file_path'. In this format,$ACCESS_ID,$ACCESS_KEY, and$HOSTare required for accessing Alibaba Cloud OSS, Tencent Cloud Object Storage (COS), or Amazon Simple Storage Service (S3).
The
FORMAT = ( TYPE = 'CSV'... )option specifies the format of a CSV external file. The parameters are described as follows:TYPE: the type of the external file.LINE_DELIMITER: the line delimiter for the CSV file. The default value is'\n'.FIELD_DELIMITER: the field delimiter for the CSV file. The default value is'\t'.ESCAPE: the escape character for the CSV file, which can be only 1 byte in length. The default value is'\'.FIELD_OPTIONALLY_ENCLOSED_BY: the characters that enclose the field values in the CSV file. By default, this parameter is left empty.ENCODING: the character set encoding used by the file. For more information about all character sets supported in MySQL mode, see Character sets. If this parameter is not specified, the default valueUTF8MB4takes effect.NULL_IF: the strings to be treated asNULLvalues. By default, this parameter is left empty.SKIP_HEADER: specifies to skip the file header, and specifies the number of lines to skip.SKIP_BLANK_LINES: specifies whether to skip blank lines. The default value isFALSE, which specifies not to skip blank lines.TRIM_SPACE: specifies whether to remove leading and trailing spaces from fields in the file. The default value isFALSE, which specifies not to remove leading and trailing spaces from fields in the file.EMPTY_FIELD_AS_NULL: specifies whether to treat empty strings asNULLvalues. The default value isFALSE, which specifies not to treat empty strings asNULLvalues.
The
PATTERNoption specifies a regular pattern string for filtering files in theLOCATIONdirectory. For each file in the directory specified byLOCATION, if the file path matches the pattern string, the external table accesses the file. Otherwise, the external table skips the file. By default, if this parameter is not specified, all files in the directory specified byLOCATIONare accessible. The external table stores the list of files that match the string specified byPATTERNin the system table of the database. During a scan, the external table accesses external files based on this list.
In the left-side navigation pane, view the
employeetable in the external table directory.