


Background information
OceanBase Developer Center (ODC) allows you to import schemas and data of database objects in batches.
You can create import tasks in ODC to import both schemas and data, only data, or only schemas of database objects.
Import schemas and data: You can import both the definition statements and data of database objects.
Import only data: You can import only the data of table or view objects.
Import only schemas: You can import only definition statements of database objects.
Import formats
ODC supports importing ZIP (batch import and single-table import), SQL (batch import), and CSV (single-table import) files.
A ZIP file here is a compressed package that is suffixed with .zip. In the Create Import Task panel, select ZIP Files for Import Format, and then select CSV Format or SQL Format for Data Format, which specifies the data format of the package.
SQL files supported for batch data import are suffixed with .sql and contain statements that can be directly executed in the database. These statements include SELECT, INSERT, UPDATE, DELETE, CREATE, and DROP.
CSV files supported for single table import are data files that are suffixed with .csv or .txt. These files support custom delimiters.
Considerations
The maximum size of files imported in one batch in Web ODC cannot exceed 2 GB after compression. To import data of a larger size, use the data import tool OBLOADER.
At most five concurrent import tasks are supported. Subsequent tasks need to wait in the queue.
By default, files related to import tasks are retained for 14 days.
In OceanBase V4.0.0 and earlier versions, configuring the sys tenant account and password in the data source can improve import speed. ODC can calculate the optimal parallel import strategy based on partition locations, and OceanBase V4.0.0 and earlier versions require querying and determining partition locations through the sys tenant.
For OceanBase versions after V4.0.0, it is not necessary to configure the sys tenant account and password in the data source. ODC supports querying and determining partition locations through the views of the business tenant.
Create an import task
Import schemas and data of an OceanBase database
Example: Import the schemas and data of the employee and salary tables on the local disk to the odc_test database.
Parameter |
Example value |
|---|---|
| Data source | mysql4.2.0 |
| Database name | odc_test |
| Table name | employee and salary |
On the Tickets tab, choose Data Import > Create New.

In the task panel that appears, select the format of the file to be imported.
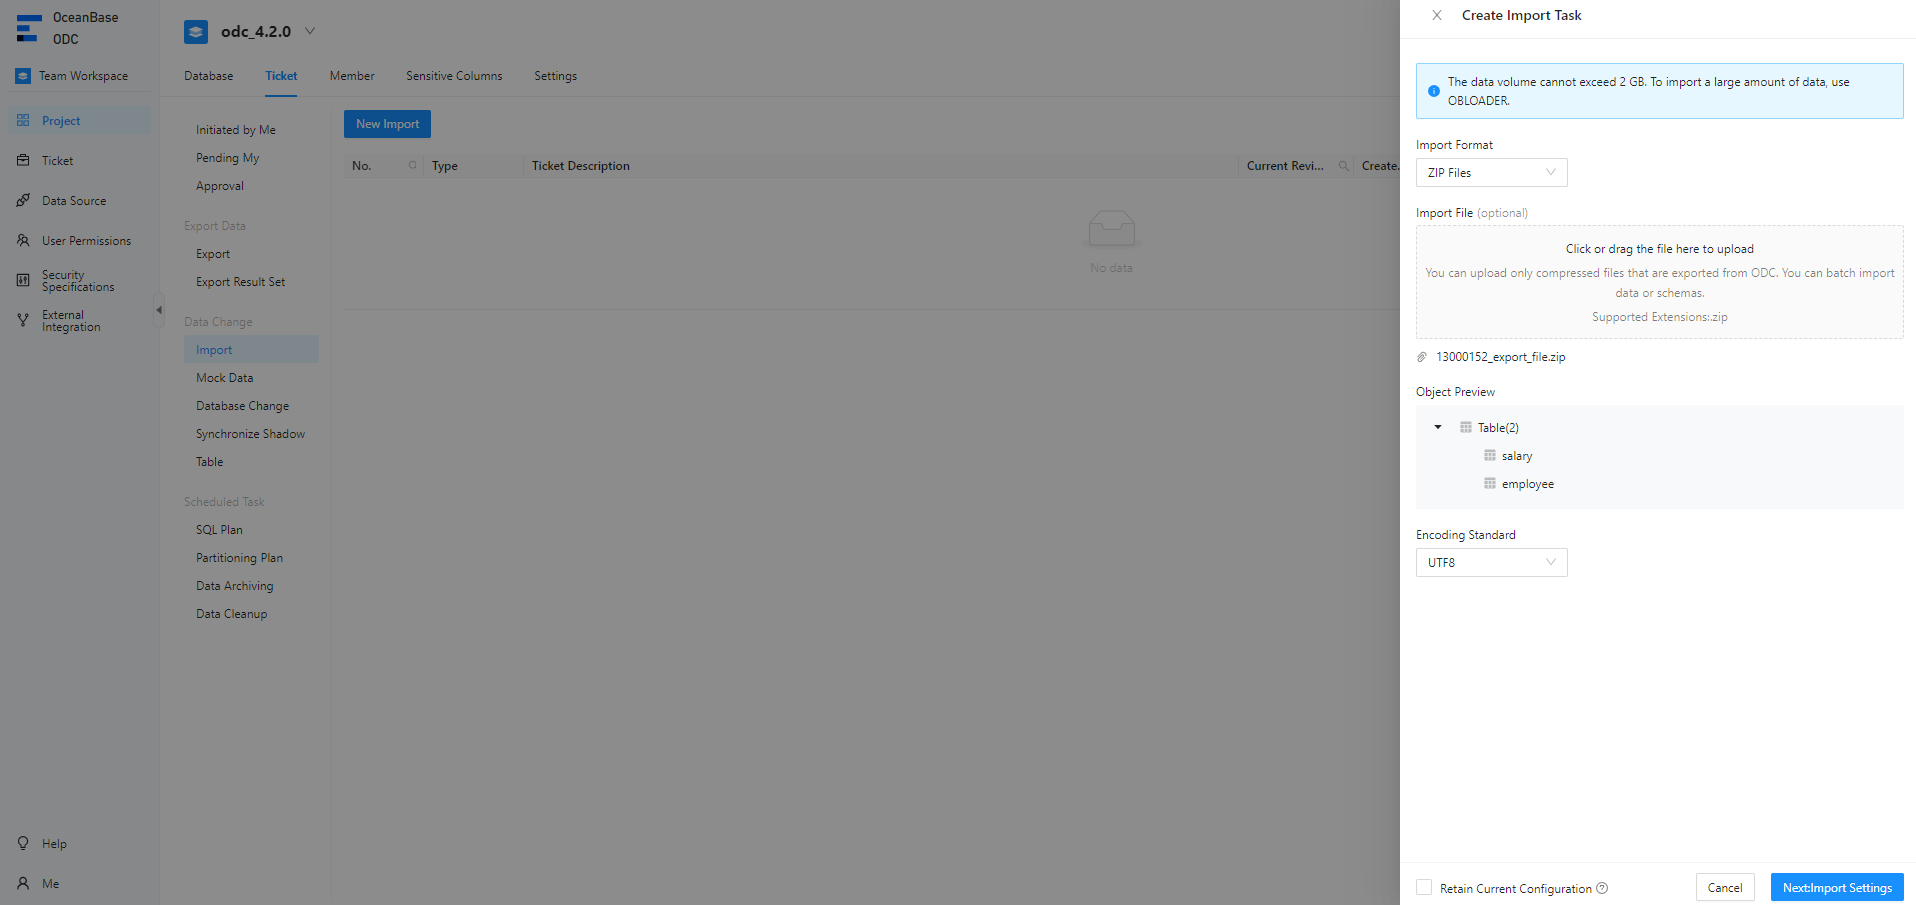
Note
- In ODC V4.2.3 and later, you can import schemas and data of a MySQL database.
- At present, ODC supports importing CSV, SQL, and ZIP files in batches.
- If you select CSV Files for Import Format, header fields of the first row can be skipped during the import.
- If you select ZIP Files for Import Format, you can import a single table or multiple tables and skip existing schemas.
Upload the file to be imported.
Click the file pool to go to the file explorer and select the file to be imported. You can also directly drag the file to the file pool to upload it. The format of the uploaded file must be the same as the value you specified for Import Format. Upload a file suffixed with
.zipif you have selected ZIP Files for Import Format, upload a file suffixed with.sqlif you have selected SQL Files for Import Format, and upload a file suffixed with.csvif you have selected CSV Files for Import Format.Specify File Encoding.
ODC supports the following encoding standards: ASCII, ISO-8859-1, GB2312, GBK, GB18030, Unicode (UTF-8), Unicode (UTF-16), Unicode (UTF-32), and BIG5.
Go to the Import Settings panel.
Click Next: Import Settings to complete file import settings.
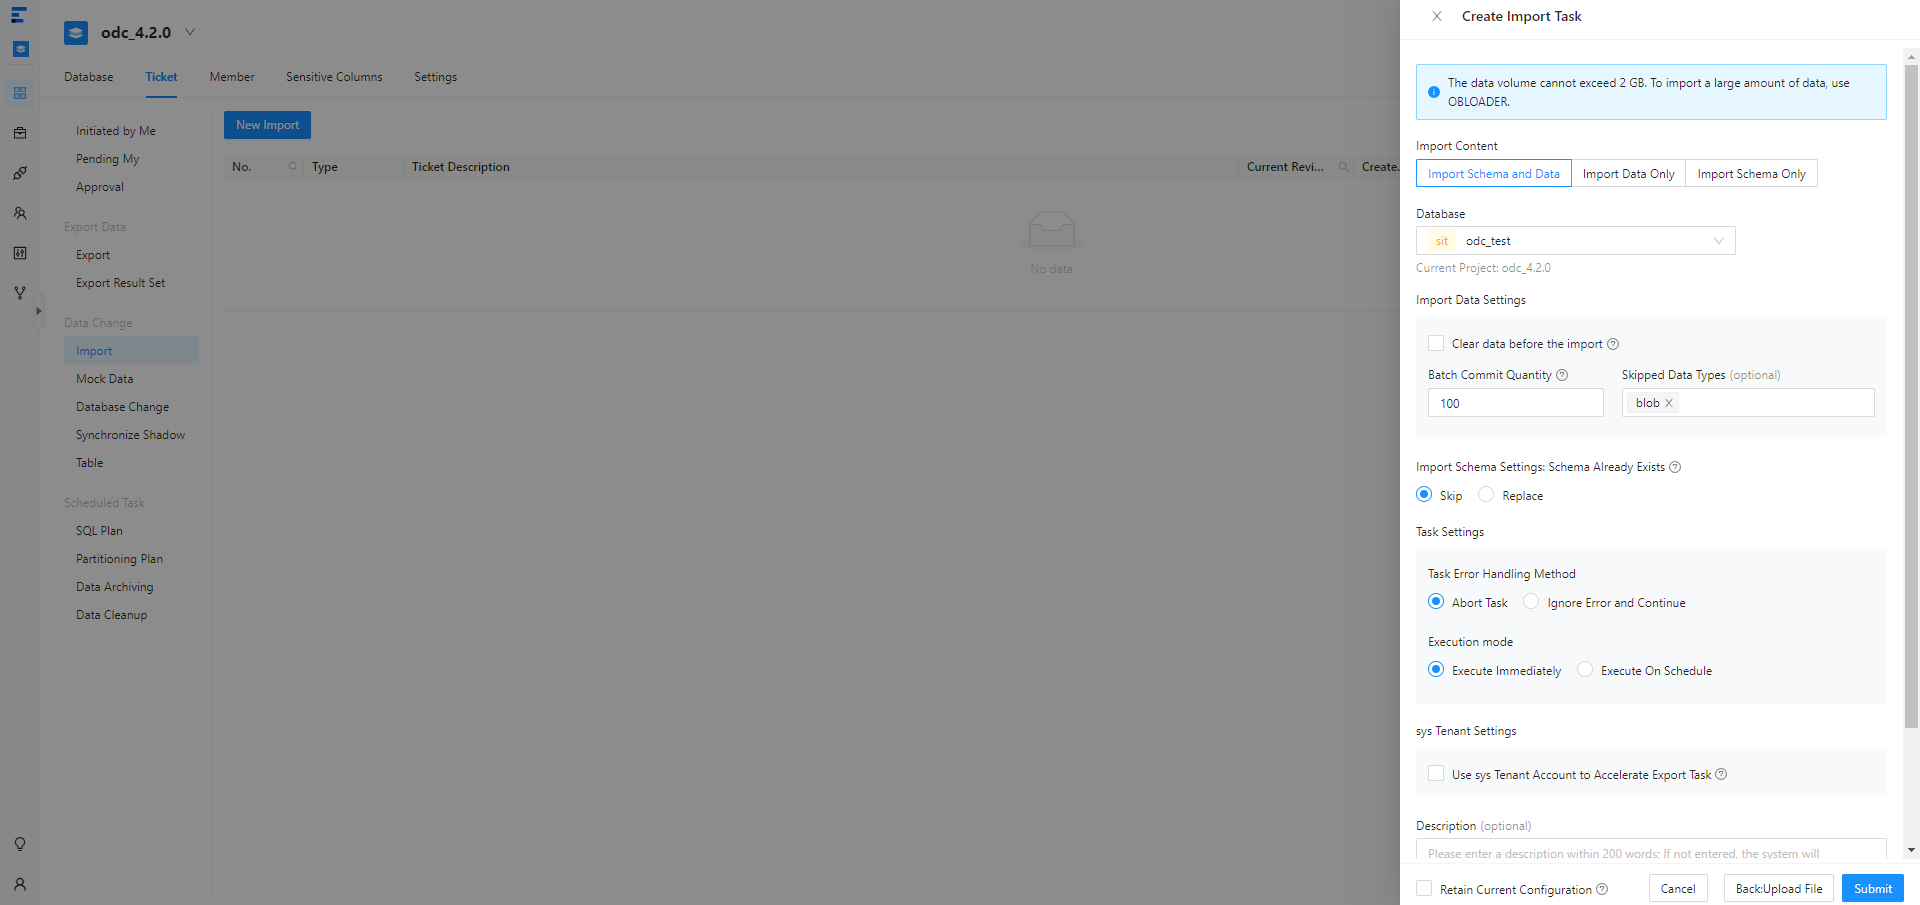
Specify Import Content.
Note
- You must specify this parameter when you select ZIP Files for Import Format.
- At present, ODC supports three import modes: Import Data Only, Import Schema Only, and Import Data and Schema. The Import Schema Only mode specifies to import the definition statement of the target object.
Select the database.
Select the database to which the data object is to be imported. The name of the data source for the database to which the task belongs is also displayed.
Complete the settings in the Import Data Settings section.
If you select ZIP Files for Import Format and Import Data Only or Import Schema and Data for Import Content, you must configure data import settings. You need to specify the following fields:
Clear Data Before Import: If you select this option, the original data in the destination object is cleared during data import.
Batch Commit Quantity: You can click Advanced next to Import Data Settings to specify this field. After you specify this field, a
COMMITstatement is executed when the number of exported data rows reaches the specified quantity.Skipped Data Type (Optional): You can specify the data types to be skipped during data import. The data types that can be skipped are different in MySQL and Oracle modes. You can select multiple data types.
Specify the Import Schema Settings field.
You cannot specify this field if you select Import Data Only for Import Content. This field involves operations on schemas that already exist. If you select Skip, the system skips the schema definition statement in the file to be imported and directly imports the data. The original data in the object is retained. If you select Replace, the system executes the schema definition statement in the file to be imported to re-create an object and replace the original one. Data in the original object is cleared.
Specify the error handling method and execution mode.
ODC supports two error handling methods: Abort Task and Ignore Error and Continue. You need to select the handling method as required.
Select Execute Now or Scheduled Execution.
Choose whether to retain the current settings.
You can select Retain Current Configuration in the lower-left corner to save the current data file and schema file settings.
Generate the import task.
After you specify all preceding information, you can click Submit in the lower-right corner of the panel to create an import task.
View the import task.
After the task is generated, the Tickets tab automatically appears, where you can view the task information.
Import schemas and data of a MySQL database
Note
In ODC V4.2.3 and later, you can import schemas and data of a MySQL database.
Example: Import the schemas and data of the employee and salary tables on the local disk to the odc_test database.
Parameter |
Example value |
|---|---|
| Data source | mysql4.2.2 |
| Database name | odc_mysql |
| Table name | employee and student |
On the Tickets tab, choose Data Import > Create New.

In the task panel that appears, select the format of the file to be imported.
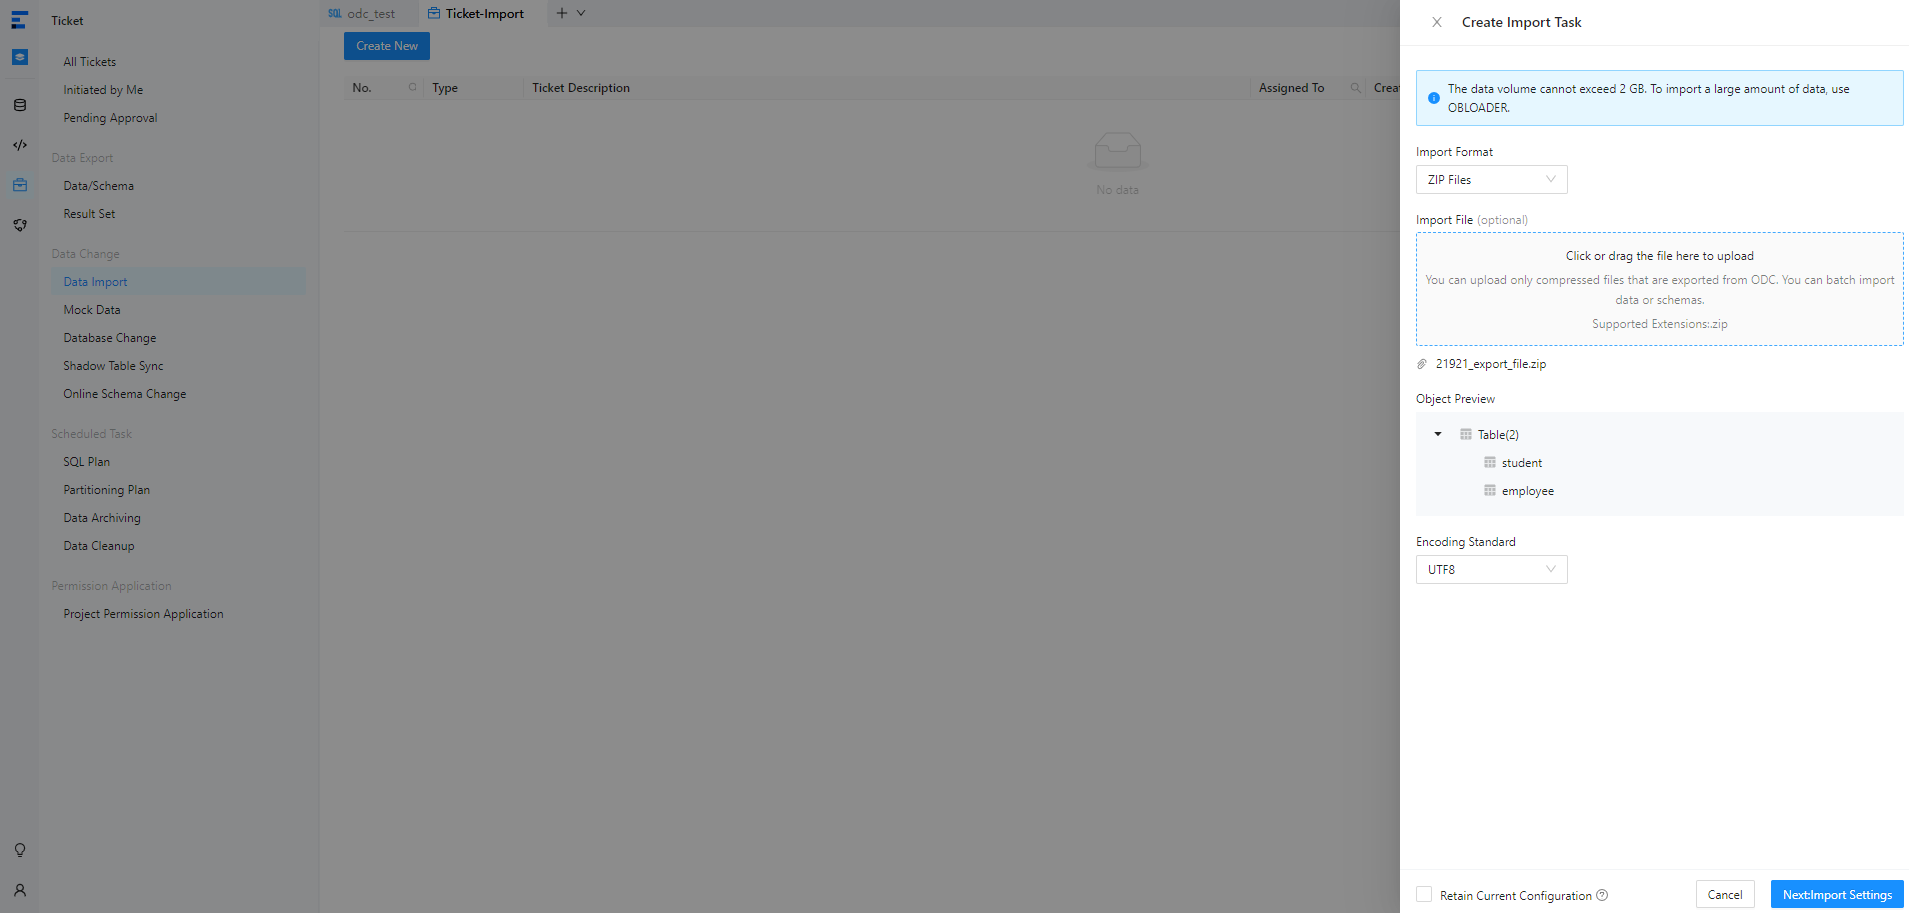
Note
- At present, ODC supports importing CSV, SQL, and ZIP files in batches.
- If you select CSV Files for Import Format, header fields of the first row can be skipped during the import.
- If you select ZIP Files for Import Format, you can import a single table or multiple tables and skip existing schemas.
Upload the file to be imported.
Click the file pool to go to the file explorer and select the file to be imported. You can also directly drag the file to the file pool to upload it. The format of the uploaded file must be the same as the value you specified for Import Format. Upload a file suffixed with
.zipif you have selected ZIP Files for Import Format, upload a file suffixed with.sqlif you have selected SQL Files for Import Format, and upload a file suffixed with.csvif you have selected CSV Files for Import Format.Specify File Encoding.
ODC supports the following encoding standards: ASCII, ISO-8859-1, GB2312, GBK, GB18030, Unicode (UTF-8), Unicode (UTF-16), Unicode (UTF-32), and BIG5.
Go to the Import Settings panel.
Click Next: Import Settings to complete file import settings.
Specify Import Content.

Note
- You must specify this parameter when you select ZIP Files for Import Format.
- At present, ODC supports three import modes: Import Data Only, Import Schema Only, and Import Data and Schema. The Import Schema Only mode specifies to import the definition statement of the target object.
Select the database.
Select the database to which the data object is to be imported. The name of the data source for the database to which the task belongs is also displayed.
Complete the settings in the Import Data Settings section.
If you select ZIP Files for Import Format and Import Data Only or Import Schema and Data for Import Content, you must configure data import settings. You need to specify the following fields:
Clear Data Before Import: If you select this option, the original data in the destination object is cleared during data import.
Batch Commit Quantity: You can click Advanced next to Import Data Settings to specify this field. After you specify this field, a
COMMITstatement is executed when the number of exported data rows reaches the specified quantity.
Specify the Import Schema Settings field.
You cannot specify this field if you select Import Data Only for Import Content. This field involves operations on schemas that already exist. If you select Skip, the system skips the schema definition statement in the file to be imported and directly imports the data. The original data in the object is retained. If you select Replace, the system executes the schema definition statement in the file to be imported to re-create an object and replace the original one. Data in the original object is cleared.
Specify the error handling method and execution mode.
ODC supports two error handling methods: Abort Task and Ignore Error and Continue. You need to select the handling method as required.
Select Execute Now or Scheduled Execution.
Choose whether to retain the current settings.
You can select Retain Current Configuration in the lower-left corner to save the current data file and schema file settings.
Generate the import task.
After you specify all preceding information, you can click Submit in the lower-right corner of the panel to create an import task.
View the import task.
After the task is generated, the Tickets tab automatically appears, where you can view the task information.
Import schemas and data of an Oracle database
Note
In ODC V4.2.4 and later, you can import schemas and data of an Oracle database.
Example: Import the schemas and data of the employee and student tables on the local disk to the ODC_TEST database.
Parameter |
Example value |
|---|---|
| Data source | oracle424 |
| Database name | ODC_TEST |
| Table name | employee and student |
On the Tickets tab, choose Data Import > Create New.
In the task panel that appears, select the format of the file to be imported.
Note
- At present, ODC supports importing CSV, SQL, and ZIP files in batches.
- If you select CSV Files for Import Format, header fields of the first row can be skipped during the import.
- If you select ZIP Files for Import Format, you can import a single table or multiple tables and skip existing schemas.
Upload the file to be imported.
Click the file pool to go to the file explorer and select the file to be imported. You can also directly drag the file to the file pool to upload it. The format of the uploaded file must be the same as the value you specified for Import Format. Upload a file suffixed with
.zipif you have selected ZIP Files for Import Format, upload a file suffixed with.sqlif you have selected SQL Files for Import Format, and upload a file suffixed with.csvif you have selected CSV Files for Import Format.Specify File Encoding.
ODC supports the following encoding standards: ASCII, ISO-8859-1, GB2312, GBK, GB18030, Unicode (UTF-8), Unicode (UTF-16), Unicode (UTF-32), and BIG5.
Go to the Import Settings panel.
Click Next: Import Settings to complete file import settings.
Specify Import Content.
Note
- You must specify this parameter when you select ZIP Files for Import Format.
- At present, ODC supports three import modes: Import Data Only, Import Schema Only, and Import Data and Schema. The Import Schema Only mode specifies to import the definition statement of the target object.
Select the database.
Select the database to which the data object is to be imported. The name of the data source for the database to which the task belongs is also displayed.
Complete the settings in the Import Data Settings section.
If you select ZIP Files for Import Format and Import Data Only or Import Schema and Data for Import Content, you must configure data import settings. You need to specify the following fields:
Clear Data Before Import: If you select this option, the original data in the destination object is cleared during data import.
Batch Commit Quantity: You can click Advanced next to Import Data Settings to specify this field. After you specify this field, a
COMMITstatement is executed when the number of exported data rows reaches the specified quantity.Skipped Data Types (Optional): You can specify to skip the BLOB and CLOB types during data import.
Specify the Import Schema Settings field.
You cannot specify this field if you select Import Data Only for Import Content. This field involves operations on schemas that already exist. If you select Skip, the system skips the schema definition statement in the file to be imported and directly imports the data. The original data in the object is retained. If you select Replace, the system executes the schema definition statement in the file to be imported to re-create an object and replace the original one. Data in the original object is cleared.
Specify the error handling method and execution mode.
ODC supports two error handling methods: Abort Task and Ignore Error and Continue. You need to select the handling method as required.
Select Execute Now or Scheduled Execution.
Choose whether to retain the current settings.
You can select Retain Current Configuration in the lower-left corner to save the current data file and schema file settings.
Generate the import task.
After you specify all preceding information, you can click Submit in the lower-right corner of the panel to create an import task.
View the import task.
After the task is generated, the Tickets tab automatically appears, where you can view the task information.
View an import task
Task list
Note
- The task list displays tasks of the last 48 hours.
- At most three concurrent import tasks are supported. Subsequent tasks need to wait in the queue.
After an import task is generated, the Tickets tab automatically appears, where you can view the status, information, and logs of the task.
The following table describes the information displayed in the import task list.
Parameter |
Description |
|---|---|
| No. | The ID of the import task. |
| Type | The type of the task specified when you created the task. |
| Ticket Description | The description entered when the task was initiated. |
| Current Reviewer | The approver. You can click the Search icon to search for or filter tasks by a specific reviewer. |
| Created By | The user who created the import task. You can click the search icon to search for or filter tasks by a specific creator. |
| Created At | The date and time when the task was generated. |
| Status | The current status of the task. ODC provides different management actions for tasks in different states. |
| Actions | Click View to go to the Task Details panel to view the task information and task logs. |
Task information
In the import task list shown in the preceding figure, click View in the Actions column of a task to view information about the task.
In the Task Details panel, click the Task Information tab to view the basic task information, file import information, and object information.
ItemDescriptionBasic task information The execution status, ID, database, type, risk level, execution method, creator, and creation time of the task are displayed. File import information The import format, file to be imported, file encoding standard, data format, and error handling method specified when the import task was created are displayed. Object information The information about the import objects is displayed in the following columns: Object Name, Object Type, Actual Processing Quantity, and Data Processing Status.
Task process
In the Task Details panel of the target task, click the Task Process tab to view the initiation, approval, and execution information of the task.
Task logs
In the Task Details panel of the target task, click the Task Logs tab to view all logs and alert logs of the task.
Tab |
Description |
|---|---|
| All Logs | Displays the complete information of all task logs, including INFO, ERROR, and WARN logs. |
| Alert Logs | Displays the ERROR and WARN logs of the task. When a task fails, you can view the error message in the alert logs. |
In addition, the toolbar provides the following icons:
Icon |
Description |
|---|---|
| Search | Click this icon to search for logs. |
| Download | Click this icon to download logs. |
| Copy | Click this icon to copy logs. |