


This topic describes how to create a data source in OceanBase Developer Center (ODC).
Background information
ODC allows you to connect to data sources to edit and manage the database objects and resources of connected data sources. ODC can connect to OceanBase Database and OceanBase Cloud in MySQL and Oracle modes on Apsara Stack and Alibaba Cloud, and OB Sharding MySQL. ODC can also connect to MySQL, Oracle, Doris, and PostgreSQL databases, as well as object storage services, such as Alibaba Cloud Object Storage Service (OSS), Tencent Cloud Object Storage (COS), Huawei Cloud Object Storage Service (OBS), and Amazon Simple Storage Service (S3).
Prerequisites
For information about the functional limitations and version requirements on data sources, see Limitations.
You have deployed Web ODC.
You have logged in to Web ODC and entered the data source management page.
You have obtained the connection information or connection string of the data source instance. The connection string of a MySQL tenant of OceanBase Database is in the following format:
mysql -h host name -P port number -u database username@tenant name # cluster name -D default database -p 'database password'
-hxxx.x.x.x -P8080 -uodc@mysql_tenant#odc_cluster -Dodc -p'******'
Procedure
Create a single data source
Note
- In ODC V4.2.2 and later, you can create an OceanBase data source to manage the data in OceanBase Database from ODC. For information about the limitations on features of OceanBase data sources, see Limitations.
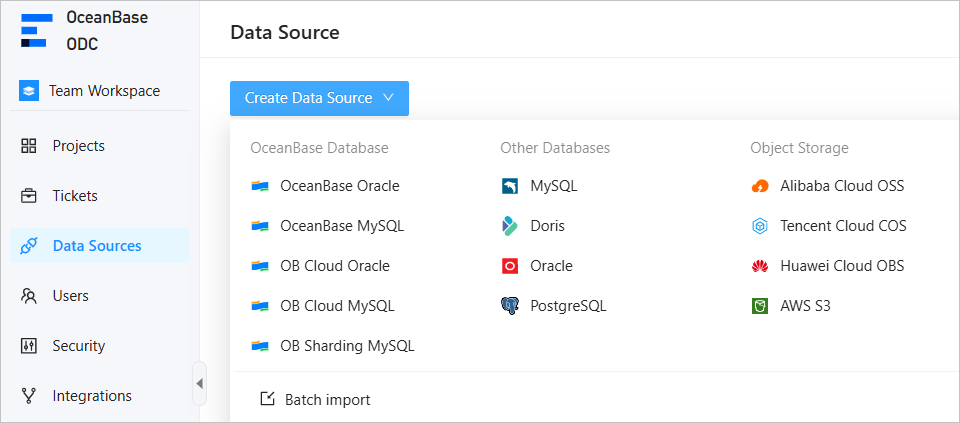
- ODC supports the following OceanBase data source types:
- OceanBase MySQL or OceanBase Oracle: a database instance that you build in your own environment.
- OB Cloud MySQL or OB Cloud Oracle: a database instance on Alibaba Cloud.
- OB Sharding MySQL: a logical database, which supports only the MySQL mode.
Example: Create an OceanBase data source in MySQL mode named obmysql4.2.0 in ODC, and bind the data source to the odc_4.2.0 project.
Parameter |
Example value |
|---|---|
| Project name | odc_4.2.0 |
| Data source name | obmysql4.2.0 |
| Host IP address | xxx.x.x.x |
| Port | 8080 |
| Cluster name | odc_cluster |
| Tenant name | mysql_tenant |
| Database username | odc |
| Database password | ****** |
| sys tenant account | test |
| sys tenant password | ****** |
Log in to Web ODC. In the left-side navigation pane of the project collaboration window, choose Data Sources > Create Data Source > OceanBase MySQL.
In the Create Data Source panel, specify the following information.
Note
If you have obtained the connection string of OceanBase Database, you can obtain the following information from the connection string or use the Intelligent Parsing tool provided on the tab to populate the information.
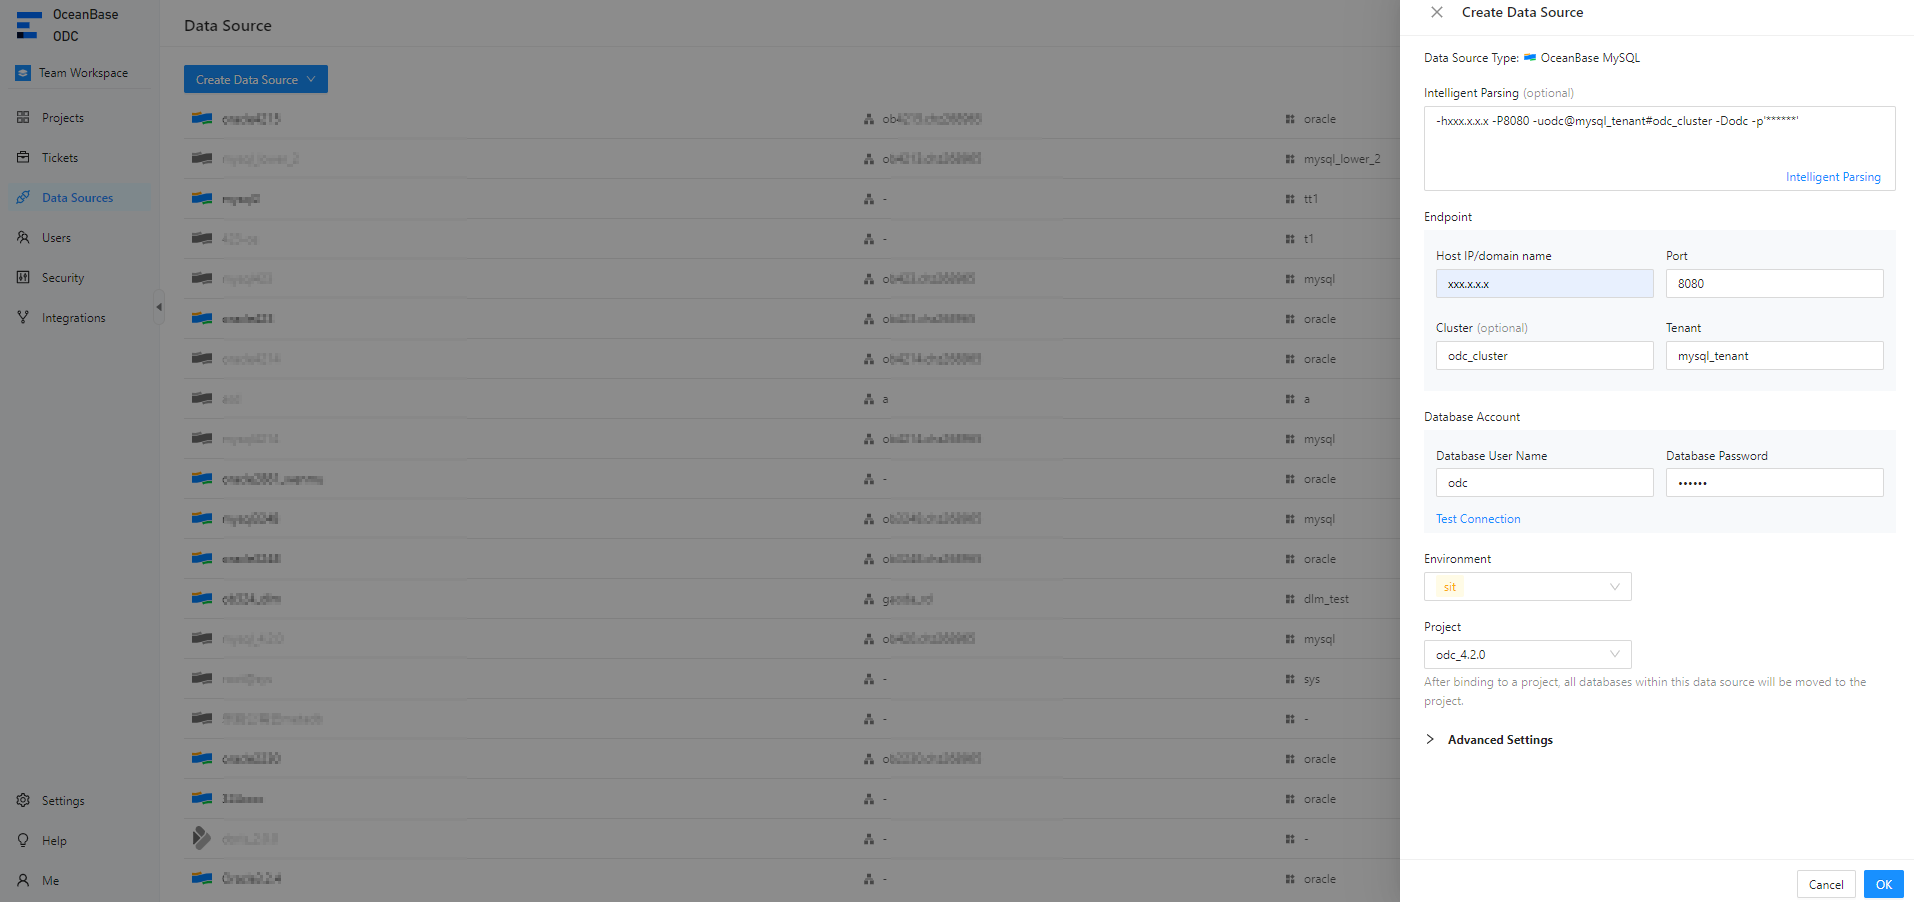 ParameterDescription
Data Source Type By default, the selected data source type is displayed. Intelligent Parsing You can paste the connection string to the text box. ODC automatically identifies the string and populates the corresponding fields. Endpoint - Host IP: the IP address of the server where the target database is located.
- Port: the port number of the server where the target database is located.
- Cluster: the name of the cluster where the target database is located. This parameter is not required for logical databases.
- Tenant: the name of the tenant where the target database is located. This parameter is not required for logical databases.
Note
- You can obtain the host name and port number from the details page of the tenant where the target database is located, such as a tenant created on Alibaba Cloud or in OceanBase Cloud Platform (OCP).
- The cluster name is required only when you connect to OceanBase Database by using OceanBase Database Proxy (ODP).
Database Account - Database User Name: the username of an account created in the tenant. In MySQL mode, this account must haconve the permission to access the default database.
- Database Password: the password of the account created in the tenant. You can click Test Connection next to the password field to test whether you can connect to the target database.
Note
- An error is returned if the configurations such as the username, password, or network settings are invalid.
- You can connect only to a database in the current tenant. Otherwise, a test failure error is returned.
- Before you save the configurations, you can click Test Connection to test the database connection. If the database username and password are correct, the system returns a message indicating that the connection succeeded. In ODC V4.0.0 and later, you can save the connection without setting the database account and password.
Environment The type of the environment. Valid values: dev (development), sit (system integration test), and prod (production). Project You can choose to bind the created data source to the specified project. After the data source is bound to the project, the databases created in the data source are automatically moved to the project. Note
The system parameterodc.connect.database.sync.block-internal-databasespecifies whether to automatically synchronize built-in databases to the project. The default value is true, which specifies not to automatically synchronize built-in databases to the bound project. The built-in databases identified by ODC for different data sources are as follows:- OceanBase Oracle:
SYS - OceanBase MySQL:
information_schema,mysql,test, andoceanbase - MySQL:
information_schema,mysql, andtest.
Advanced Settings - sys Tenant Account: If you select Query Tenant Views with sys Tenant Account, you must specify Account and Password.
When the database is a physical database, you can specify an account that has the permission to query the sys tenant views and the password. This field is automatically populated whensysis specified as the tenant in Endpoint.- Account: the username of an account that has the permission to query views in the sys tenant.
- Password: the password of the account.
- SSL: Choose whether to enable SSL link encryption to ensure secure data transmission between clients and servers.
Before you enable SSL in ODC, make sure that SSL is enabled for the OBServer nodes. If you connect to the OBServer nodes by using ODP, make sure that SSL is enabled for ODP. For more information about how to enable SSL for an OBServer node, see OBServer transmission encryption and SSL link encryption. - Startup Script: You can configure a connection session by using an SQL statement, such as
set session ob_query_timeout=60000000. - Driver: You can configure the database URL to connect to OceanBase Database and implement specified features.
Note
- To use the import/export feature in ODC V2.3.0 and later, you must configure the root@sys account in Advanced Settings when you create a connection.
- When you use the import/export feature to query views in ODC V2.4.1 and later, the root@sys account is not a must. Specifically, if you do not configure the root@sys account, some objects such as stored procedures and functions cannot be exported from ODC. If you configure the root@sys account, you can query views in the sys tenant to obtain the optimal data routing strategy, thereby increasing the export speed.
- The account username and password of the sys tenant are the account username and password of a user in a cluster tenant. Do not specify the account username in the "@sys#cluster" format. For example, the
rootaccount can be used. - By default, the
REQUIRE NONEoption is specified when you create a user. TheREQUIRE NONEoption specifies that no encryption method is used. In this case, if you select Enable SSL, an SSL connection is created. Otherwise, a regular connection is created. - If the
REQUIRE SSLoption is specified when you create the user, you must select Enable SSL to create an SSL connection. Otherwise, the connection fails.
If the user is created by specifying theREQUIRE SSLoption, you do not need to upload the certificates, but you must select Enable SSL. Otherwise, the connection fails. We recommend that you upload the following certificates for identity verification:- CA certificate for the client to verify the identity of the server.
- Client key and client certificate for the server to verify the identity of the client.
- If the user is created by specifying the
REQUIRE X509option, you must select Enable SSL and upload the CA certificate, client key, and client certificate. The client and the server verify the identity of each other. If you do not select Enable SSL or upload the required certificates, you cannot create the connection.
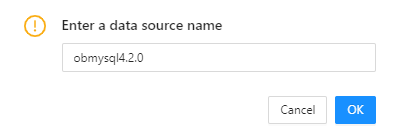
After you specify the preceding information, click OK in the lower-right corner of the panel.
In the dialog box that appears, enter the data source name and click OK. The data source is then saved to the data source list of ODC.
Note
- In the Create Data Source panel, click Copy Connection String in the lower-right corner to copy the current connection information as a connection string. This allows you to obtain the connection information with ease.
- If you do not want to save the current connection configuration, click Cancel. In the dialog box that appears, confirm whether to exit the data source creation page.
After the data source is created, you can view the created data source in the data source list.

Note
In ODC V4.2.2 and later, you can create a MySQL data source to manage the data in a MySQL database from ODC. For information about the limitations on features of MySQL data sources, see Limitations.
Example: Create a MySQL data source in ODC and bind the data source to the odc_4.2.0 project.
Parameter |
Example value |
|---|---|
| Project name | odc_4.2.0 |
| Data source name | mysql4.2.2 |
| Host IP address | xxx.x.x.x |
| Port | 8080 |
| Database username | odc |
| Database password | ****** |
Log in to Web ODC. In the left-side navigation pane of the project collaboration window, choose Data Sources > Create Data Source > MySQL.
In the Create Data Source panel, specify the following information.
Note
If you have obtained the connection string of the MySQL database, you can obtain the following information from the connection string or use the Intelligent Parsing tool provided on the tab to populate the information.
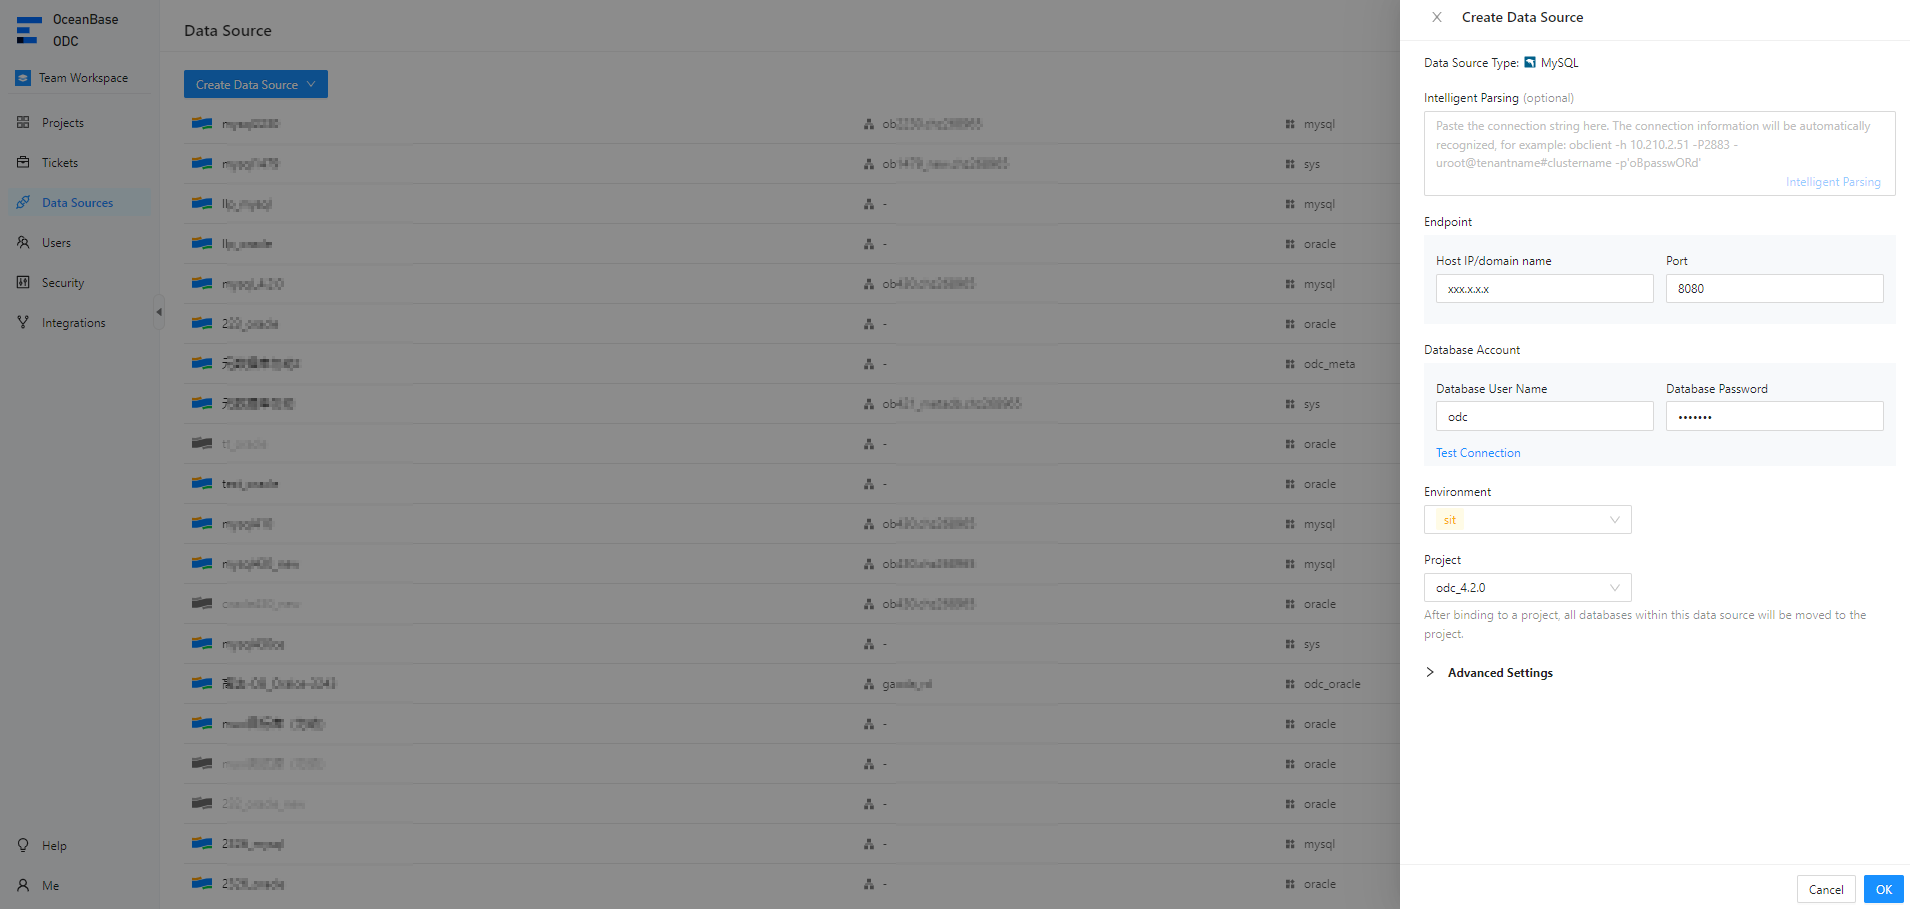 ParameterDescription
Data Source Type By default, the selected data source type is displayed. Intelligent Parsing You can paste the connection string to the text box. ODC automatically identifies the string and populates the corresponding fields. Endpoint - Host IP: the IP address of the server where the target database is located.
- Port: the port number of the server where the target database is located.
Database Account - Database User Name: the username of an account created in the MySQL database.
- Database Password: the password of the account created in the MySQL database. You can click Test Connection next to the password field to test whether you can connect to the target database.
Note
- An error is returned if the configurations such as the username, password, or network settings are invalid.
- Before you save the configurations, you can click Test Connection to test the database connection. If the database username and password are correct, the system returns a message indicating that the connection succeeded. In ODC V4.0.0 and later, you can save the connection without setting the database account and password.
Environment The type of the environment. Valid values: dev (development), sit (system integration test), and prod (production). Project You can choose to bind the created data source to the specified project. After the data source is bound to the project, the databases created in the data source are automatically moved to the project. Note
The system parameterodc.connect.database.sync.block-internal-databasespecifies whether to automatically synchronize built-in databases to the project. The default value is true, which specifies not to automatically synchronize built-in databases to the bound project. The built-in databases identified by ODC for different data sources are as follows:- OceanBase Oracle:
SYS - OceanBase MySQL:
information_schema,mysql,test, andoceanbase - MySQL:
information_schema,mysql, andtest
Advanced Settings - Startup Script: You can configure a connection session by using an SQL statement, such as
set session ob_query_timeout=60000000. - Driver: You can configure the database URL to connect to OceanBase Database and implement specified features.
Note
When you create a MySQL data source in ODC V4.2.2, you can specify only the startup script and driver attributes.
After you specify the preceding information, click OK in the lower-right corner of the panel.
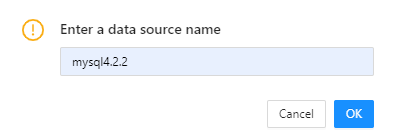
In the dialog box that appears, enter the data source name and click OK. The data source is then saved to the data source list of ODC.
Note
- In the Create Data Source panel, click Copy Connection String in the lower-right corner to copy the current connection information as a connection string. This allows you to obtain the connection information with ease.
- If you do not want to save the current connection configuration, click Cancel. In the dialog box that appears, confirm whether to exit the data source creation page.
- After the data source is created, you can view the created data source in the data source list.
Note
In ODC V4.2.4 and later, you can create an Oracle data source to manage the data in an Oracle database from ODC. For information about the limitations on features of Oracle data sources, see Limitations.
Example: Create an Oracle data source in ODC.
Parameter |
Example value |
|---|---|
| Data source name | oracle4.2.4 |
| Host IP address | xxx.x.x.x |
| Port | 8080 |
| Database SID | test |
| Database username | odc |
| Database password | ****** |
Log in to Web ODC. In the left-side navigation pane of the project collaboration window, choose Data Sources > Create Data Source > MySQL.
In the Create Data Source panel, specify the following information.
 ParameterDescription
Data Source Type By default, the selected data source type is displayed. Endpoint - Host IP/Domain Name: the IP address of the server where the target database is located.
- Port: the port number of the server where the target database is located.
- Database: the SID or service name.
Database Account - Role: the role of the database account. Valid values: Default, SYSDBA, and SYSOPER.
- Database User Name: the username of an account created in the Oracle database.
- Database Password: the password of the account created in the Oracle database. You can click Test Connection next to the password field to test whether you can connect to the target database.
Note
- An error is returned if the configurations such as the username, password, or network settings are invalid.
- Before you save the configurations, you can click Test Connection to test the database connection. If the database username and password are correct, the system returns a message indicating that the connection succeeded. In ODC V4.0.0 and later, you can save the connection without setting the database account and password.
Environment The type of the environment. Valid values: dev (development), sit (system integration test), and prod (production). Project You can choose to bind the created data source to the specified project. After the data source is bound to the project, the databases created in the data source are automatically moved to the project. Advanced Settings - Startup Script: You can configure a connection session by using an SQL statement, such as
set session ob_query_timeout=60000000. - Driver: You can configure the database URL to connect to OceanBase Database and implement specified features.
After you specify the preceding information, click OK in the lower-right corner of the panel.
In the dialog box that appears, enter the data source name and click OK. The data source is then saved to the data source list of ODC.

Note
ODC allows you to create a Doris data source to manage the data in a Doris database from ODC. For information about the limitations on features of Doris data sources, see Limitations.
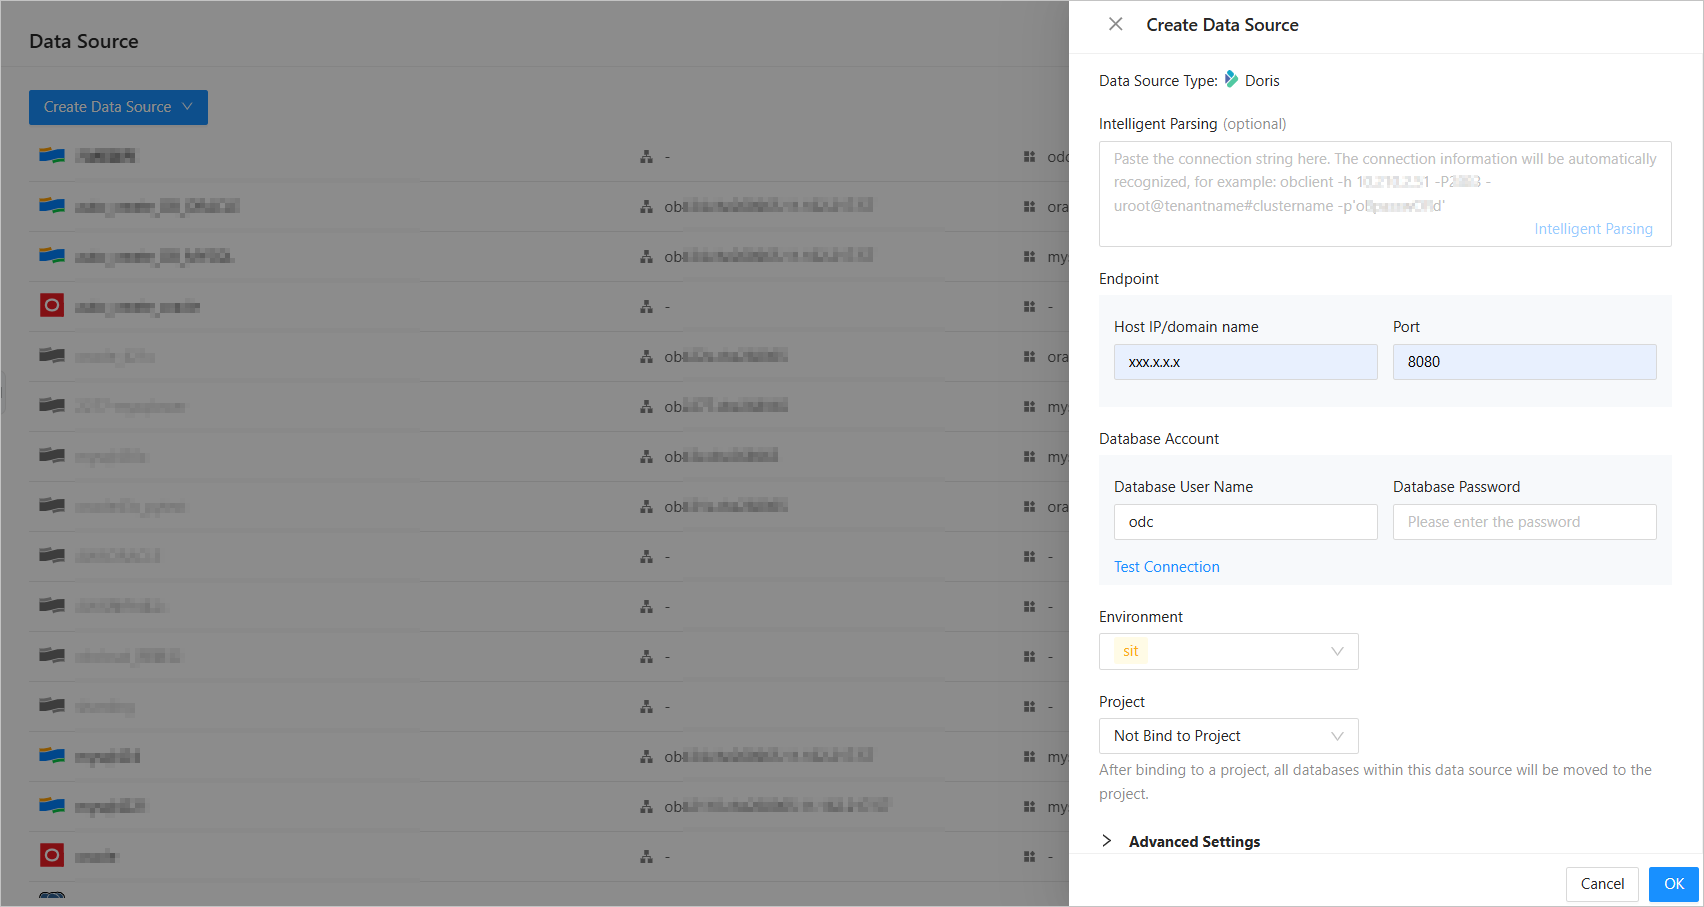
Log in to Web ODC. In the left-side navigation pane of the project collaboration window, choose Data Sources > Create Data Source > Doris.
In the Create Data Source panel, specify the following information.
 ParameterDescription
Data Source Type By default, the selected data source type is displayed. Endpoint - Host IP/Domain Name: the IP address of the server where the target database is located.
- Port: the port number of the server where the target database is located.
Database Account - Database User Name: the username of an account created in the Doris database.
- Database Password: the password of the account created in the Doris database. You can click Test Connection next to the password field to test whether you can connect to the target database.
Note
- An error is returned if the configurations such as the username, password, or network settings are invalid.
- Before you save the configurations, you can click Test Connection to test the database connection. If the database username and password are correct, the system returns a message indicating that the connection succeeded. In ODC V4.0.0 and later, you can save the connection without setting the database account and password.
Environment The type of the environment. Valid values: dev (development), sit (system integration test), and prod (production). Project You can choose to bind the created data source to the specified project. After the data source is bound to the project, the databases created in the data source are automatically moved to the project. Advanced Settings - Startup Script: You can configure a connection session by using an SQL statement, such as
set session ob_query_timeout=60000000. - Driver: You can configure the database URL to connect to OceanBase Database and implement specified features.
After you specify the preceding information, click OK in the lower-right corner of the panel.
In the dialog box that appears, enter the data source name and click OK. The data source is then saved to the data source list of ODC.
Note
In ODC V4.3.2 and later, you can create a PostgreSQL data source to manage the data in a PostgreSQL database from ODC. For information about the limitations on features of PostgreSQL data sources, see Limitations.
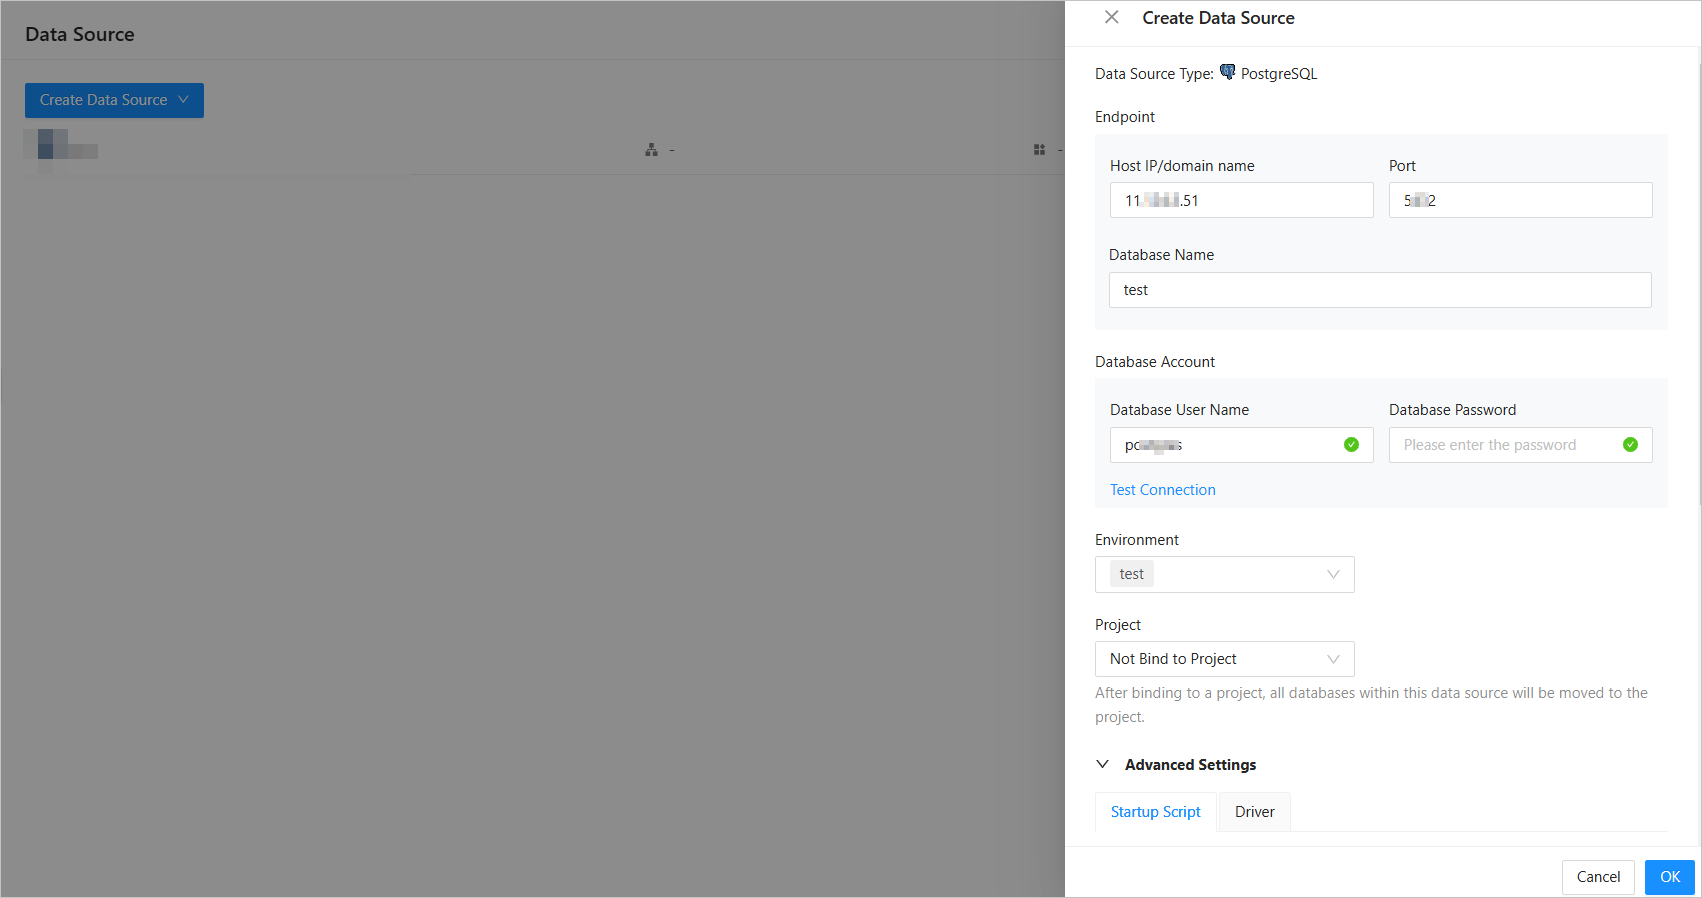
Log in to Web ODC. In the left-side navigation pane of the project collaboration window, choose Data Sources > Create Data Source > PostgreSQL.
In the Create Data Source panel, specify the following information.
 ParameterDescription
Data Source Type By default, the selected data source type is displayed. Endpoint - Host IP/Domain Name: the IP address of the server where the target database is located.
- Port: the port number of the server where the target database is located.
- Database: the name of the PostgreSQL database.
Database Account - Database User Name: the username of an account created in the PostgreSQL database.
- Database Password: the password of the account created in the PostgreSQL database. You can click Test Connection next to the password field to test whether you can connect to the target database.
Note
- An error is returned if the configurations such as the username, password, or network settings are invalid.
- Before you save the configurations, you can click Test Connection to test the database connection. If the database username and password are correct, the system returns a message indicating that the connection succeeded. In ODC V4.0.0 and later, you can save the connection without setting the database account and password.
Environment The type of the environment. Valid values: dev (development), sit (system integration test), and prod (production). Project You can choose to bind the created data source to the specified project. After the data source is bound to the project, the databases created in the data source are automatically moved to the project. Advanced Settings - Startup Script: You can configure a connection session by using an SQL statement, such as
set session ob_query_timeout=60000000. - Driver: You can configure the database URL to connect to OceanBase Database and implement specified features.
After you specify the preceding information, click OK in the lower-right corner of the panel.
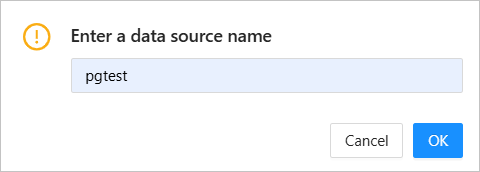
In the dialog box that appears, enter the data source name and click OK. The data source is then saved to the data source list of ODC.

Note
- An OSS data source created in ODC supports only data archiving tasks.
- ODC V4.3.3 and later supports data sources of the following object storage services: Alibaba Cloud OSS, Tencent COS, Huawei Cloud OBS, and AWS S3.
- In ODC V4.3.2 and later, you can create an OSS data source to manage the data in an OSS database from ODC. For information about the limitations on features of OSS data sources, see Limitations.
Example: Create an Alibaba Cloud OSS data source in ODC.
Log in to Web ODC. In the left-side navigation pane of the project collaboration window, choose Data Sources > Create Data Source > Alibaba Cloud OSS.
In the Create Data Source panel, specify the following information.
 ParameterDescription
Data Source Type By default, the selected data source type is displayed. File URL The URL of the object file, such as oss://odc-sample/bucketname.Endpoint The access endpoint for external services, such as oss-cn-hangzhou.aliyuncs.com.Access Key The AccessKey ID and AccessKey secret used to access the OSS data source. Environment The type of the environment. Valid values: dev (development), sit (system integration test), and prod (production). Project You can choose to bind the created data source to the specified project. After the data source is bound to the project, the databases created in the data source are automatically moved to the project. After you specify the preceding information, click OK in the lower-right corner of the panel.
In the dialog box that appears, enter the data source name and click OK. The data source is then saved to the data source list of ODC.
Import data sources in batches
In ODC V4.2.0 and later, you can upload a configuration file to import data sources in batches. To do so, perform the following steps:
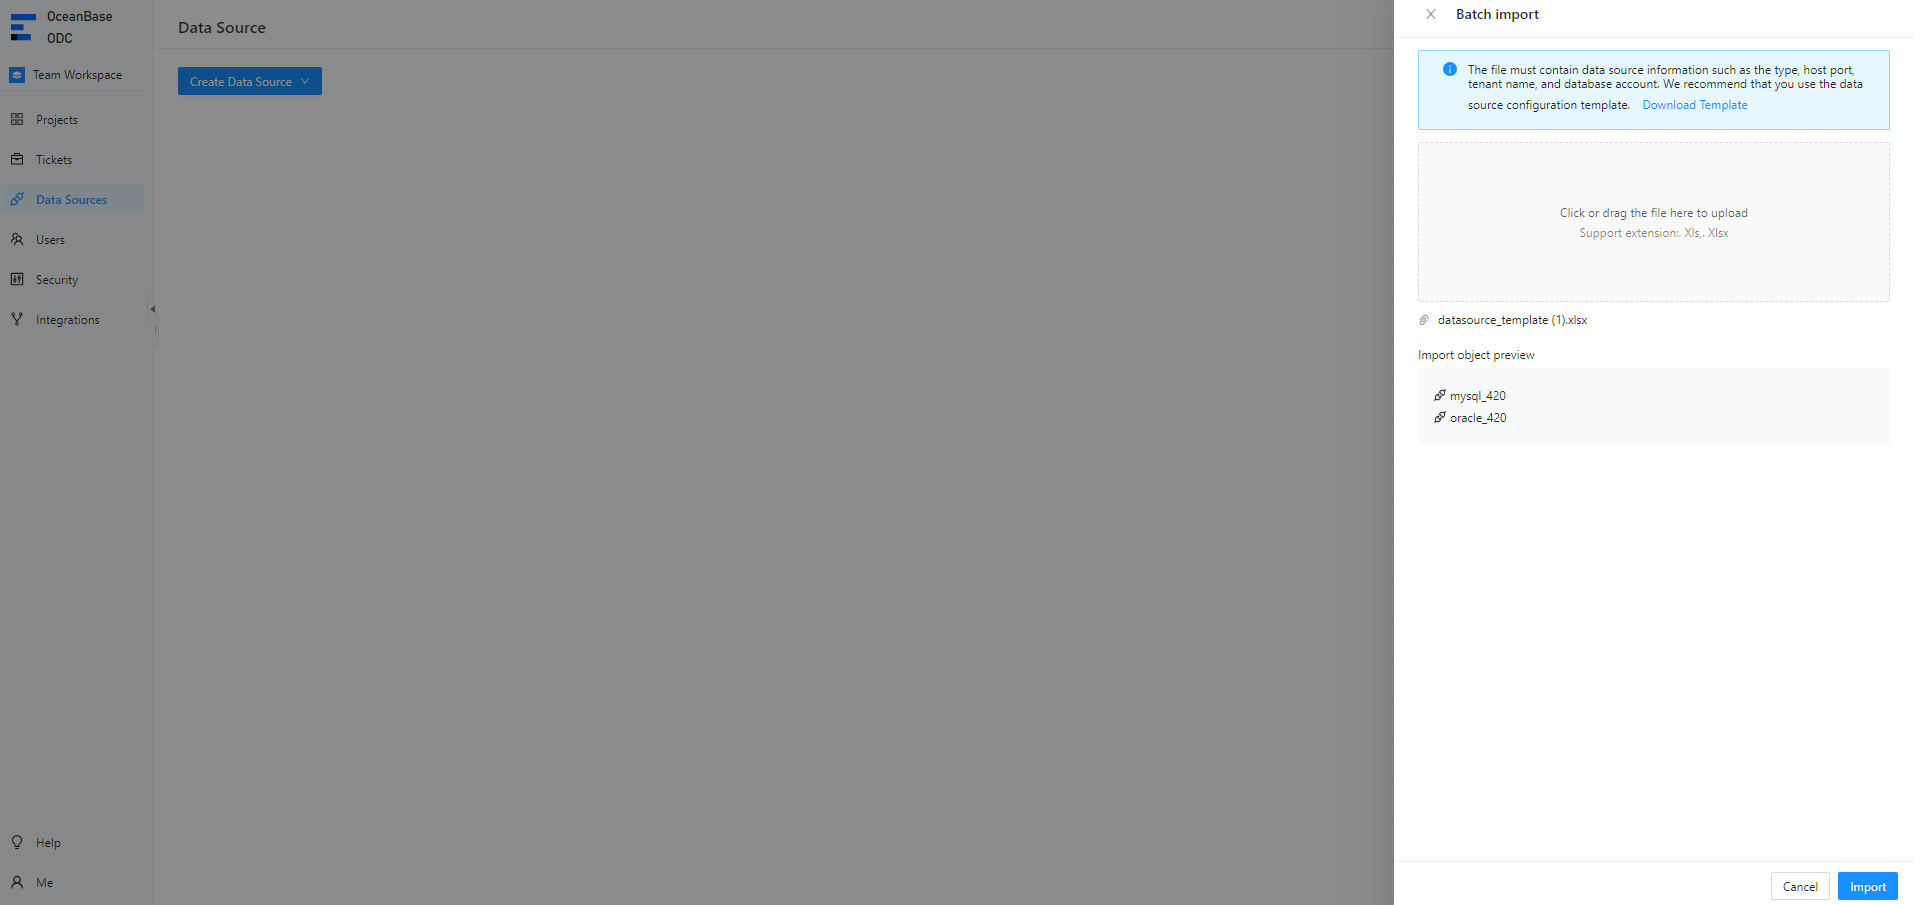
On the Data Sources page, choose Create Data Source > Batch Import.
In the Batch Import panel, click Download Template and specify the information about the data sources to be imported.
 ParameterDescription
Data Source Name Required. The name of the data source, which cannot contain spaces and must be unique. Data Source Type Required. The type of the data source. Valid values: OceanBase Oracle, OceanBase MySQL, OB Cloud Oracle, OB Cloud MySQL, and OB Sharding MySQL. Host IP Address Required. The IP address of the server where the target database is located.
You can obtain the host IP address from the details page of the tenant where the target database is located, such as a tenant created on Alibaba Cloud or in OCP.Port Required. The port number of the server where the target database is located.
You can obtain the port number from the details page of the tenant where the target database is located, such as a tenant created on Alibaba Cloud or in OCP.Cluster Name Optional. The name of the cluster where the target database is located. This parameter is not required for logical databases. Tenant Name Required. The name of the tenant where the target database is located. This parameter is not required for logical databases.
The tenant name cannot contain spaces.Database User Name Required. The username of an account created in the tenant. In MySQL mode, this account must have the permission to access the default database. Database Password The password of the account under the tenant. If the Password parameter is left unspecified, it indicates that the password is an empty string. Environment The type of the environment. Valid values: dev (development), sit (system integration test), and prod (production). Sys Tenant Account Optional. The account that has the permission to query views in the sys tenant. Sys Tenant Password Optional. The password of the account. Click the file pool in the Batch Import panel to open the file explorer and select the file to be imported. You can also directly drag the file to the file pool to upload it.
Click Import to import the data sources in batches. After the import, you can view the information about imported data sources in the data source list.