


You can add or delete zones by using SQL statements or in the OCP console.
You can add a zone to a cluster to scale out the cluster or delete a zone from a cluster to scale in the cluster.
Add or delete a zone by using an SQL statement
To add a zone, execute the following SQL statement:
ALTER SYSTEM ADD ZONE zone_name [zone_option_list];

zone_option_list:
    zone_option [, zone_option ...]

zone_option:
    | region
    | idc
    | zone_type {READWRITE | ENCRYPTION}
To delete a zone, execute the following SQL statement:
ALTER SYSTEM DELETE ZONE zone_name;
Note:
This statement can be executed only in the
systenant.zone_namespecifies the name of the target zone. This statement adds or deletes only one zone at a time.zone_option_listspecifies the attributes of the zone. Separate multiple attributes with commas (,).Attributes of a zone:
region: the name of the region where the zone is located. If this attribute is not specified, the default valuedefault_regionis used.idc: the name of the IDC where the zone is located. If the attribute is not specified, it is empty by default.zone_type: the type of the zone. Valid values:READWRITEandENCRYPTION. Ifzone_typeis not specified, the zone is a read/write zone by default.Notice
In the current version,
zone_typecannot be modified. That is, you cannot change a read/write zone to an encrypted zone or change an encrypted zone to a read/write zone.
After you add a zone by using the
ALTER SYSTEM ADD ZONE zone_name;statement, to use the zone in a cluster, you must start the zone, add OBServer nodes to the zone, allocate resources, and add replica information.For more information about how to start a zone, see Start or stop a zone. For more information about how to add a node, see Add an OBServer node.
For more information about how to add zones to a cluster to scale out the cluster, see Add a zone to a cluster.
Before you delete a zone, make sure that no OBServer node is deployed in the zone. Otherwise, the deletion will fail.
For examples:
Add
zone1to the cluster.obclient> ALTER SYSTEM ADD ZONE zone1;Delete
zone1from the cluster.obclient> ALTER SYSTEM DELETE ZONE zone1;
Add a zone in the OCP console
You can add zones to a cluster based on the actual deployment mode.
Prerequisites
The target cluster can be managed in the current OCP cluster.
If the cluster has not been added to OCP, request the administrator to add the cluster. For more information, see the Take over a cluster topic in the OCP User Guide of the corresponding version.
You have the permission to update the cluster.
If you do not have the permissions to manage the cluster, request the administrator to assign the required role. For more information, see the Edit a user topic in the OCP User Guide of the corresponding version.
Procedure
Log on to the OCP console.
The Clusters page automatically appears.
In the Clusters list, find the target cluster and click its name.
In the upper-right corner on the Overview page, click Create Zone.
In the dialog box that appears, set the zone information.
By default, only one zone is added. You can click Add to add more zones.
Note
The hardware architecture of the hosts in the zone must be the same as that of the cluster.
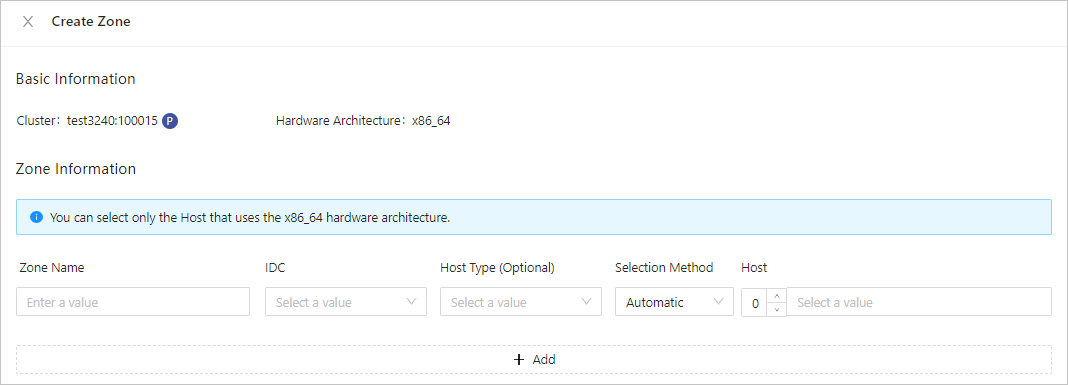
The following table describes the fields required for setting the zone information.
FieldDescriptionZone Name The name of the zone. IDC The IDC where the zone is located. Host Type (Optional) If you select a host type, the host list displays only the hosts of the specified host type. Selection Method Choose Automatic or Manual. Host You can select multiple IP addresses.
If Selection Method is set to Automatic, you only need to enter the number of hosts, and OCP automatically selects the specified number of hosts from the available hosts. If Selection Method is set to Manual, you need to manually select the IP addresses from the list.Click OK.
In the feedback dialog box, click View Task to view the task progress.
You can also choose System Management > Tasks in the left-side navigation pane to view the progress of the zone creation task.
When the task status is Completed, and the status of the zone is Running in the Zones list on the Overview page, the zone is created.
Delete a zone in the OCP console
Notice
If you delete a zone from an OceanBase cluster in the OCP console, all the OBServer nodes and data of the zone will be deleted, and resources allocated to the host will be released. Proceed with caution.
Prerequisites
The logged-on user has the privilege to manage the cluster. If you do not have the permissions to manage the cluster, request the administrator to assign the required role. For more information, see the Edit a user topic in the OCP User Guide of the corresponding version.
Before you delete a zone, make sure that no OBServer node is deployed in the zone. Otherwise, the deletion will fail.
Make sure that there are other available full-featured replicas of the tenant on other zones. If not, the deletion of the zone will cause service interruption, which cannot be recovered.
Procedure
Log on to the OceanBase Cloud Platform (OCP) console.
The Clusters page automatically appears.
In the Clusters list, find the target cluster and click its name.
In the Zones list, find the row that contains the target zone, and click Delete in the Actions column.

A dialog box appears, asking you to confirm whether to delete the zone.
In the dialog box that appears, click Delete.
In the dialog box, you can click View Task to view the progress of the deletion task.
You can also choose System Management > Tasks to view the progress of the task.
When the task status is Completed, and the Zones list on the Overview page does not contain the zone, the zone is deleted.