


You can add OBServer nodes to a cluster that you manage.
Overview
OceanBase Database is a single-process software solution. Its process is named observer. Generally, a server that runs an observer process is referred to as a node. A node is not equivalent to a physical server. An OBServer node is an OceanBase Database server on which the observer process runs.
In OceanBase Database, each observer process is uniquely identified by an IP address and a port number. Typically, a physical or virtual server runs one observer process. As the core process for OceanBase Database, the observer process provides almost all database kernel features, including the SQL engine, storage engine, and transaction engine. The process also provides distributed features such as RPC communication, load balancing, and partition management.
Add an OBServer node to a cluster by using a statement
Before you execute a statement to add an OBServer node, obtain the RPM package of the corresponding version for OceanBase Database.
Note
You can choose Resources > Download on the official website of OceanBase to go to the software download page and download RPM packages related to OceanBase Database. You can also contact OceanBase Technical Support to obtain the packages.
Log on to the
systenant of OceanBase Database as therootuser.(Optional) Execute the following statements in sequence to add a zone and specify its region and IDC attributes.
Note
You can skip this step if you add an OBServer node to an existing zone. If you must add a zone and then add an OBServer node to it, this step is required.
This section describes how to add a zone named
zone4with theREGION='HANGZHOU',IDC='HZ1'attributes.obclient> ALTER SYSTEM ADD ZONE zone4 REGION HANGZHOU; obclient> ALTER SYSTEM START ZONE zone4; obclient> ALTER SYSTEM ALTER ZONE zone4 SET REGION='HANGZHOU',IDC='HZ1';Log on to the OBServer node to be added through
SSHand perform a pre-installation check.Go to the directory that stores the tool.
[root@xxx /]# cd /root/t-oceanbase-antman/clonescriptsRun the following command to start the check.
We recommend that you use OAT-CLI. For more information about OAT-CLI, see the OceanBase Database Deployment Guide of the corresponding version.
[root@xxx clonescripts]# sh precheck.sh -m obRun the following command to check whether the clocks are synchronized. Make sure that the clock difference between all nodes is within 100 ms.
$IPspecifies the IP addresses of other OBServer nodes in the cluster.[root@xxx /]# ntpdate $IP
Install the RPM package of OceanBase Database.
rpm_dirspecifies the directory that stores the RPM package.$rpm_namespecifies the name of the RPM package.[root@xxx /]# cd $rpm_dir [root@xxx $rpm_dir]# rpm -i --prefix=/home/admin/oceanbase $rpm_nameNote
The OceanBase Database software will be installed in the
/home/admin/oceanbasedirectory.Create
/data/1and/data/log1directories on the OBServer node to be added, and change the owner of the directories toadmin.Generally,
/data/1is used as the data directory, and/data/log1as the log directory.[root@xxx /]# mkdir -p /data/1 /data/log1 [root@xxx /]# cd data [root@xxx data]# ll total 8 drwxr-xr-x 2 root root 4096 Nov 18 14:24 1 drwxr-xr-x 2 root root 4096 Nov 18 14:24 log1 [root@xxx data]# cd .. [root@xxx /]# chown -R admin:admin data [root@xxx /]# cd data [root@xxx data]# ll total 8 drwxr-xr-x 2 admin admin 4096 Nov 18 14:24 1 drwxr-xr-x 2 admin admin 4096 Nov 18 14:24 log1Initialize the directories of OceanBase Database.
We recommend that you set the data directory of OceanBase Database on an independent disk and link this directory to the home directory of OceanBase Database by using a soft link.
[root@xxx admin]# su - admin
-bash-4.2$ mkdir -p /data/1/$cluster_name/{etc3,sort_dir,sstable}
-bash-4.2$ mkdir -p /data/log1/$cluster_name/{clog,etc2,ilog,slog,oob_clog}
-bash-4.2$ mkdir -p /home/admin/oceanbase/store/$cluster_name
-bash-4.2$ for t in {etc3,sort_dir,sstable};do ln -s /data/1/$cluster_name/$t /home/admin/oceanbase/store/$cluster_name/$t; done
-bash-4.2$ for t in {clog,etc2,ilog,slog,oob_clog};do ln -s /data/log1/$cluster_name/$t /home/admin/oceanbase/store/$cluster_name/$t; done
$cluster_name specifies the cluster where the OBServer node is to be added.
For example,
[root@xxx admin]# su - admin
-bash-4.2$ mkdir -p /data/1/obdemo/{etc3,sort_dir,sstable}
-bash-4.2$ mkdir -p /data/log1/obdemo/{clog,etc2,ilog,slog,oob_clog}
-bash-4.2$ mkdir -p /home/admin/oceanbase/store/obdemo
-bash-4.2$ for t in {etc3,sort_dir,sstable};do ln -s /data/1/obdemo/$t /home/admin/oceanbase/store/obdemo/$t; done
-bash-4.2$ for t in {clog,etc2,ilog,slog,oob_clog};do ln -s /data/log1/obdemo/$t /home/admin/oceanbase/store/obdemo/$t; done
Start the OBServer node and register it with the cluster.
Set the
ulimitparameter for theadminuser.[admin@xxx oceanbase]$ ulimit -s 10240; ulimit -c unlimitedConfigure environment variables.
[admin@xxx oceanbase]$ export LD_LIBRARY_PATH=/home/admin/oceanbase/lib:$LD_LIBRARY_PATH LD_PRELOAD=''Start the OBServer node.
Syntax:
[admin@xxx oceanbase]$ /home/admin/oceanbase/bin/observer -i eth0 -P XXXX -p YYYY -z zone1 -d /home/admin/oceanbase/store/obdemo -r 'xxx.xxx.xxx.xxx:xxxx:xxx.xxx.xxx.xxx:xxxx xxx.xxx.xxx.xxx:xxxx:yyyy' -c 20190716 -n obdemo -o "memory_limit_percentage=90,memstore_limit_percentage=60,datafile_disk_percentage=80,config_additional_dir=/data/1/obdemo/etc3;/data/log1/obdemo/etc2"The parameters are described as follows:
-Pspecifies the RPC port number.-pspecifies the port number for direct connection.-zspecifies the zone to which the OBServer node is added.-dspecifies the storage directory of data.-rspecifies the IP address of the OBServer node to be added.-cspecifies the cluster ID.-nspecifies the cluster name.-ospecifies the startup parameter.For more information about the parameters, see System parameters.
Notice
When you start an OBServer node, you must specify the correct zone name and initial parameter values.
Log on to the
systenant of OceanBase Database as therootuser again and add the OBServer node to the cluster.$IPspecifies the IP address of the OBServer node to be added.$PORTspecifies the RPC port number of the OBServer node, which is2882by default.obclient> ALTER SYSTEM ADD SERVER '$IP:$PORT' ZONE 'zone4';This statement adds the OBServer node to the service list. Only OBServer nodes in the service list can provide services.
Then, execute the following statement to check whether the OBServer node you added exists in the list. If yes, the OBServer node is added to the cluster.
obclient> SELECT * FROM oceanbase.__all_server;
Add OBServer nodes at a time to multiple zones of a cluster in the OCP console
You can also add the same number of OBServer nodes to multiple zones of a cluster in the OceanBase Cloud Platform (OCP) console.
Prerequisites
The target cluster can be managed in the current OCP cluster.
If the cluster has not been added to OCP, request the administrator to add the cluster. For more information, see "Take over a cluster" in the OCP User Guide of the corresponding version.
You have the permissions to manage the cluster.
If you do not have the permissions to manage the cluster, request the administrator to assign the required role. For more information, see "Edit a user" in the OCP User Guide of the corresponding version.
The hardware architecture of the OBServer node to be added is the same as that of the cluster. The OBServer node has been added to OCP.
Procedure
Log on to the OCP console.
The Clusters page automatically appears.
In the Clusters list, find the target cluster and click its name.
In the upper-right corner on the Overview page, click Add OBServer.
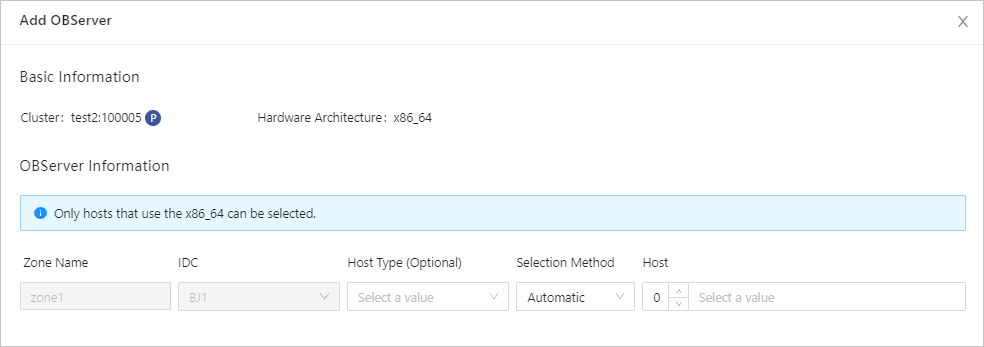
In the OBServer Information section, specify the host type, server selection method, and IP address (multiple IP addresses supported) of the OBServer node to be added.
If you do not need to add an OBServer node to a zone, click the Delete icon of the corresponding zone to delete it.
Click OK.
You can click View Task in the dialog box that appears to view the progress.
You can also choose System Management > Tasks to view the progress of the task.
When the task status is Completed, and the status of the OBServer node is Running in the OBServers list on the Overview page, the OBServer node is added.
Add an OBServer node to a specified zone in the OCP console
You can add one or more OBServer nodes to multiple specified zones in the OCP console.
Prerequisites
You have the permissions to manage the cluster. If you do not have the permissions to manage the cluster, request the administrator to assign the required role. For more information, see "Edit a user" in the OCP User Guide of the corresponding version.
The hardware architecture of the OBServer node to be added is the same as that of the cluster.
Procedure
Log on to the OCP console. The Clusters page automatically appears.
In the Clusters list, find the target cluster and click its name.
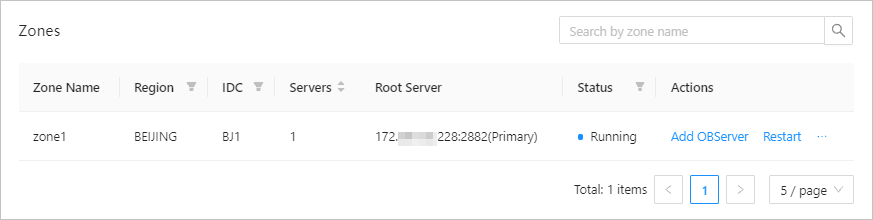
On the Overview page, locate the row that contains the target zone in the Zones list, and click Add OBServer in the Actions column.
In the OBServer Information section, specify the host type, server selection method, and host IP address of the OBServer node.
By default, one OBServer node is added. To add more OBServer nodes, click Add.
Click OK.