


After OceanBase Database is deployed, a cluster is created by default. You can use OceanBase Cloud Platform (OCP) to create clusters as needed.
Prerequisites
Ensure that you have the necessary permissions of the CLUSTER_MANAGER role. If not, request the administrator to assign this role. For more information, see the Edit a user topic in the OCP User Guide of the corresponding version.
Procedure
You can use OCP to add servers, upload the RPM package of OceanBase Database, and create a cluster.
Log on to the OCP console, and find the entry to cluster creation based on your specific business scenario.
If you do not have a manageable cluster, the system displays a message on the Clusters page, prompting you to create one. Click Create Cluster in the prompt.
If you already have a manageable cluster, go to the Clusters page, and then click Create Cluster in the upper-right corner.
On the Create Cluster page, configure the basic information for the cluster.
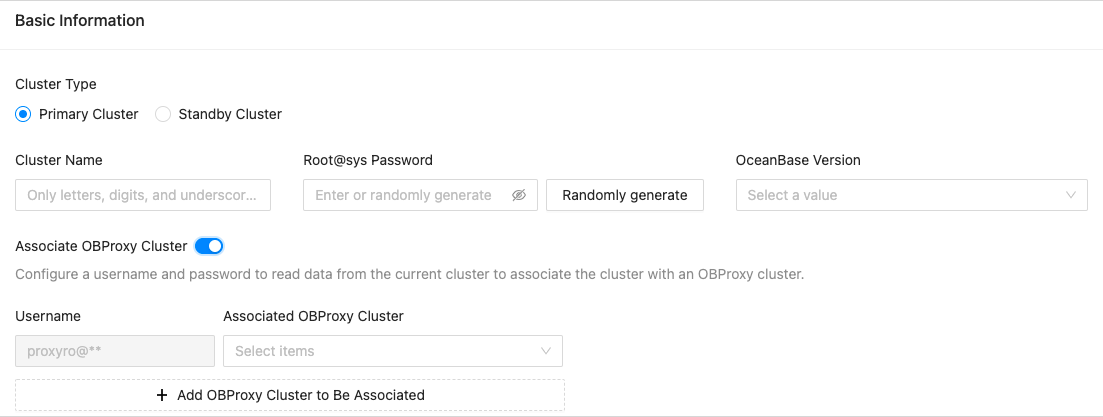
The following table describes the fields in the Basic Information section when you select Primary Cluster for Cluster Type.
FieldDescriptionCluster Type Select Primary Cluster. Cluster Name The name of the cluster to be created. The cluster name must be globally unique. It must start with a letter and consist of 2 to 48 characters, including uppercase and lowercase letters, digits, and underscores ( _).Root@sys Password Customize or randomly generate a password that meets the following complexity requirements: - Contains 8 to 32 characters, including at least two digits, two uppercase letters, two lowercase letters, and two special characters.
- Supported special characters are . _ + @ # $ % )
OceanBase Version The OceanBase Database version. You can select a version from the drop-down list or click Add Version at the bottom of the list to upload the RPM package of a version. Associate OBProxy Cluster This option associates the cluster with an OceanBase Database Proxy (ODP, also known as OBProxy) cluster. You can enable this option and select an existing ODP cluster to associate it with the cluster. - By default, the association uses the proxyro user without requiring a username or password.
- Select the ODP cluster to be associated with from the drop-down list.
If no existing ODP cluster is available, you can create one. For more information, see Create an ODP cluster.
This association ensures that business SQL requests are forwarded to the corresponding replica, offering a seamless experience comparable to accessing a standalone database in OceanBase Database.
Configure the deployment mode for the cluster.
By default, three zones are added to the cluster. To deploy more than three zones, click Add. To reduce the number of zones, click the Delete icon next to the zone you want to remove.

The following table describes the settings for each zone.
FieldDescriptionZone Name You can keep the default name or specify a custom name. The zone name must be unique within the tenant and start with a letter. It can consist of 2 to 48 characters, including uppercase and lowercase letters, digits, and underscores ( _).IDC The IDC of the zone. Each zone can be deployed in only one IDC. Host Type (Optional) If you select a host type, the host list displays only the hosts of the specified host type. Selection Method Select Automatic or Manual. IP You can select multiple IP addresses. - If Selection Method is set to Automatic, you only need to enter the number of servers.
- If Selection Method is set to Manual, you must manually select several IP addresses from the list.
Root Server You must select an IP address as the host for the RootService. If you want to create a multi-replica OceanBase cluster, you must specify this parameter for each zone. Zone Priority Rankings The priorities of the zones. The priority order affects the priority of the primary zone of the sys tenant. Ranking method: - Select one or more zones from the list on the left-side. The list displays all zones available in the cluster.
- Click the closing angle bracket (>) in the middle.
The selected zones are moved to the Priority Rankings list. The zones that are selected at the same time have the same priority. - Repeat the preceding two steps to add zones with lower priorities.
- You can drag a zone in the Priority Rankings list to adjust its priority.
Zones in the list are displayed in descending order based on their priority.
Click Parameter Settings to modify startup parameters.

For more information about the cluster parameters, see System parameters.
Go to the Configure Installation Path page and specify related parameters.
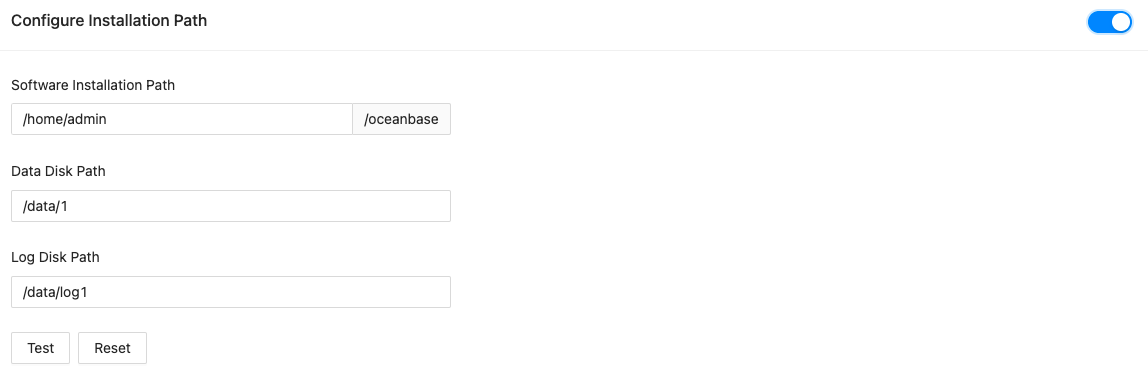
Specify Software Installation Path, Data Disk Path, and Logs Path as needed.
Click Test.
If the test fails, try to modify the settings as prompted.
After the test succeeds, click Submit.
In the Confirm Information dialog box, confirm the information and then click OK.
The system starts to create the cluster. You can choose System Management > Tasks in the OCP console to view the task progress.
It takes about 12 minutes to create an OceanBase cluster. Please wait.