


This topic describes how to create an OceanBase cluster from OCP.
Prerequisite
You have the OceanBase RPM package to be uploaded.
Background
The graphic user interface (GUI) varies with the OCP version. This topic takes OCP V2.5.0 as an example. For other OCP versions, see User Guide of the corresponding version.
Procedure
Enter the access address http://< IP address of the OCP server >:8080 in the address bar of your browser and press the Enter Key. Then, use the admin account to log on to the OCP console.
In the left-side navigation pane, click Cluster .
In the upper-right corner of the Cluster Overview page, click Create Cluster .
On the Create Cluster page, configure the basic information of the cluster.

The following table describes the Basic information fields.
FieldDescriptionCluster Type You can select Primary Cluster or Standby Cluster . In this example, select Primary Cluster . Cluster Name The name of the cluster to be managed. The cluster name must be 2 to 48 characters in length and can contain letters, digits, and underscores (_). It must start with a letter. Root@sys Password This parameter can be customized or randomly generated. The password must meet the following complexity conditions: * Be 8 to 32 characters in length. * Contain at least 2 digits, 2 uppercase letters, 2 lowercase letters, and 2 special characters. The following special characters are supported: . _+@#$%) OceanBase Version Click Add Version and upload the OceanBase RPM package. Associate OBProxy cluster This option is used to associate existing OBProxy clusters. In this example, this option is disabled. For more information about how to associate an OBProxy cluster, see the OCP User Guide.
Set the deployment mode of the cluster.
Three zones are added by default.
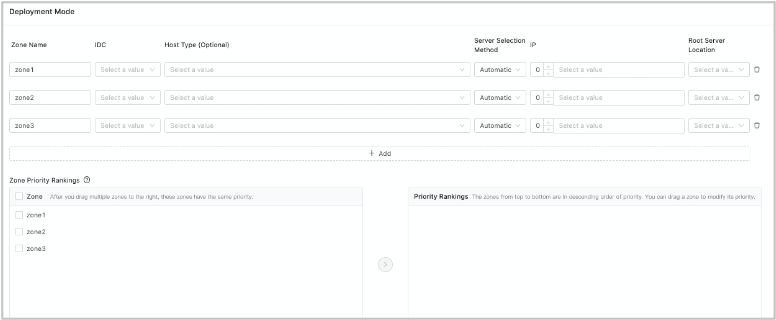
The following table describes the settings for each zone.
FieldDescriptionZone Name Generally, a default name is provided. You can customize the name as needed. The zone name must be 2 to 32 characters in length and can contain letters, digits, and underscores (_). It must start with a letter. IDC The data center of the zone. Each zone can be deployed in only one data center. Host Type Optional. If you select a host type, the host list is filtered based on the host type. Server Selection Method Select Manual and select the server you just added. IP Manually select multiple IP addresses from the list. Root Server Location You can select an IP address as the host for the RootService. Priority Rankings The priority rankings of the zone. This priority order affects the priority order of the primary zone of the sys tenant. The left-side list shows all zones in the cluster. * You can select one or more zones from the list box on the left to add them to the list box on the right. By default, the priority of the zone selected first is higher than that of the zone selected later, and the zones selected at one time have the same priority. * After you move the zones to the list box on the right, you can also drag them upward or downward to adjust their priority order. The upper zone takes priority over the lower zone.
Click Submit .
In the Confirm Information dialog box that is displayed, confirm the information and then click OK .