


Background information
Data desensitization deforms sensitive privacy information, such as names, ID card numbers, mobile numbers, landline numbers, bank accounts, and email addresses, by using desensitization algorithms to protect sensitive privacy data.
Concepts
Data desensitization: a feature that uses specific algorithms and techniques to process, obfuscate, or replace sensitive data during data processing and storage so that the data cannot be identified or restored, thereby protecting data security and preventing data breaches.
Dynamic desensitization: a process of desensitizing sensitive data in real time when a user queries the database, without modifying the source data in the database. Generally, dynamic desensitization is used in a production environment. It avoids data breaches while ensuring the integrity and accuracy of the original data. However, dynamic desensitization is slow, which can compromise the query efficiency of the database.
Static desensitization: a process of preprocessing sensitive data and storing the processed data in storage media, such as a database. Static desensitization is usually used in testing, development, and demonstration environments. It protects sensitive data from being viewed by unauthorized personnel and avoids the legal liability of data breaches. Static desensitization is quick, which can improve the query efficiency. However, after static desensitization, the original data cannot be restored, which undermines data accuracy.
Desensitization algorithm: an algorithm used to desensitize sensitive data. A desensitization algorithm can effectively protect the security of sensitive data and avoid data breaches while retaining the data formats and structures to facilitate queries and usage.
Identification rule: a rule used to automatically identify sensitive data for data desensitization. When you scan to add sensitive columns, sensitive columns are automatically identified based on specified rules.
Sensitive column: a column that contains sensitive data in a database table.
Execution process

Log in to the ODC console as the project administrator and choose Security Specifications > Masking Algorithm to view the built-in desensitization algorithms and test the desensitization effect.
Log in to the ODC console as the project administrator and choose Projects > Sensitive Columns. You can click Add Sensitive Column and select Add Manually or Scan to Add. To select Scan to Add, make sure that identification rules have been created.
When you log in as a regular user and perform queries in the SQL window, export a result set, export a ticket, or submit a database change ticket, the output data in the sensitive columns is desensitized.
Prerequisites
The project administrator or DBA can manage sensitive columns and identification rules.
All users can view and test the desensitization effect, but regular users are not allowed to create, edit, or delete desensitization algorithms.
Considerations
Data desensitization is not supported in command-line windows.
Data desensitization is not supported during PL execution.
When you configure an identification rule script, Groovy supports only the Objects and String classes in Java.
When you configure an identification rule script, Groovy closures and inherent closure functions are not supported.
If sensitive data is involved when you export data from a MySQL data source, the mask all algorithm is used for desensitization.
Sensitive column management
Add sensitive columns
Note
In ODC V4.2.2 and later, you can add sensitive columns for a MySQL data source. For the limitations on features of MySQL data sources, see Limitations.
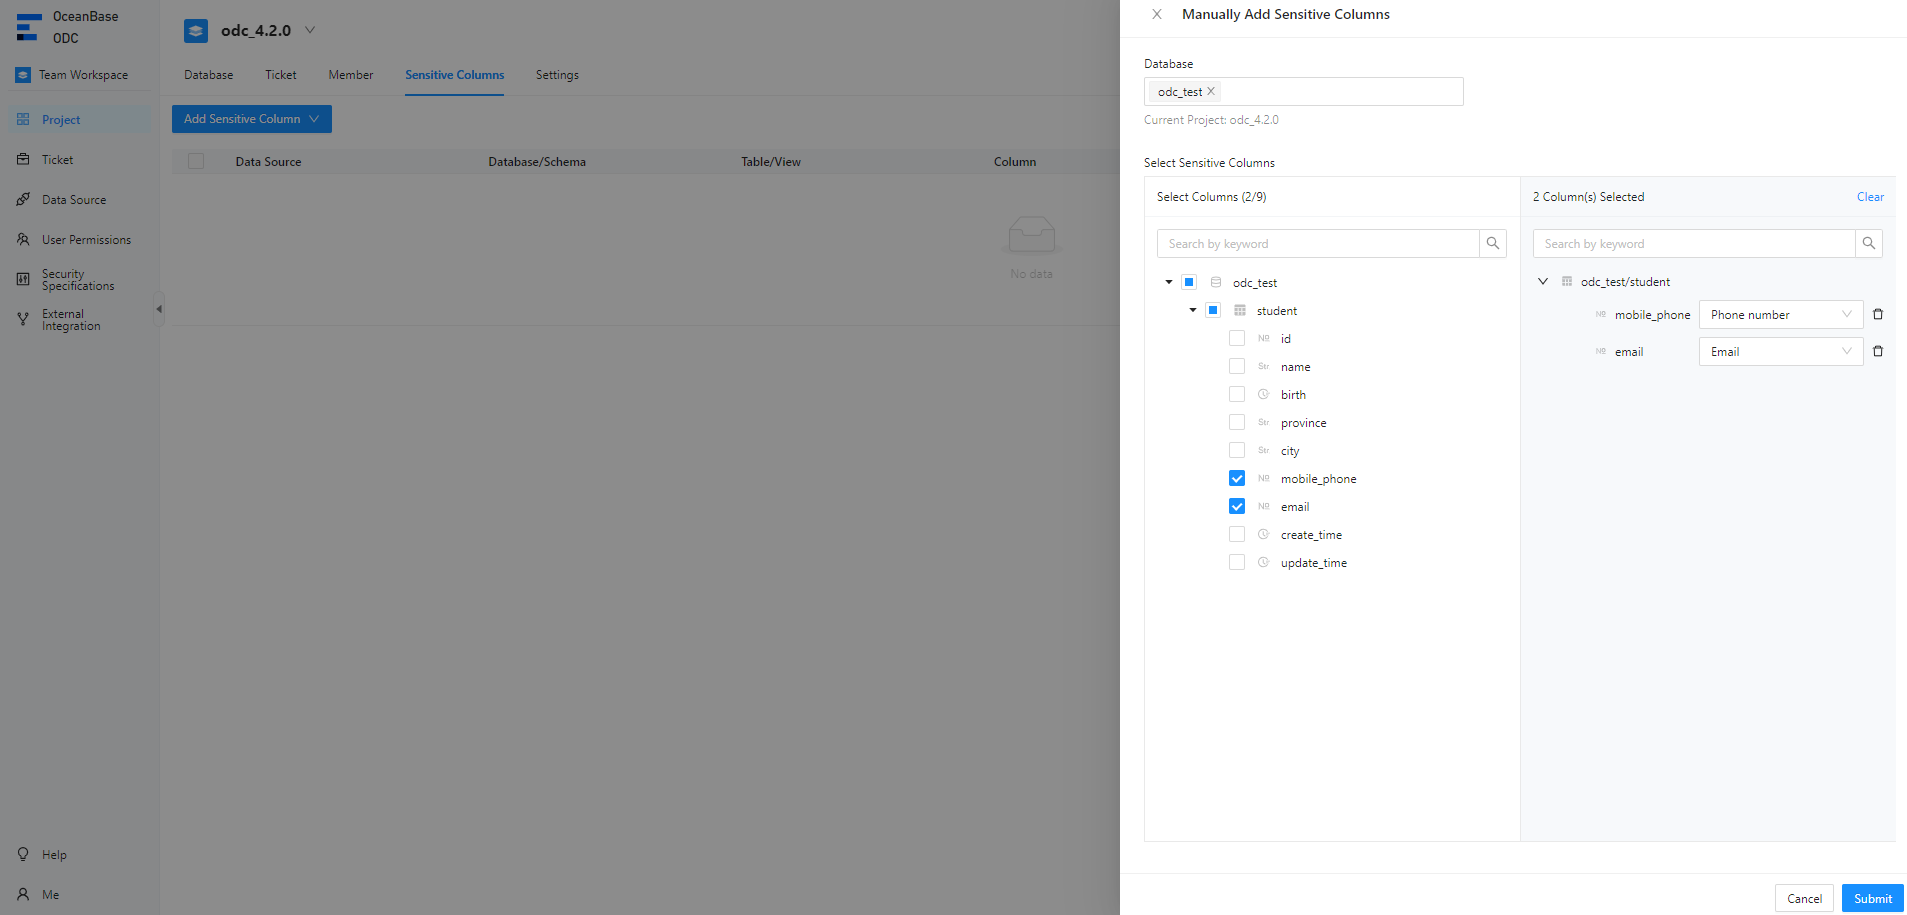
Example: Desensitize the email and mobile_phone columns of the student table in the odc_test database.
Parameter |
Example value |
|---|---|
| Data source | mysql_4.2.0 |
| Source database name | odc_test |
| Table name | student |
In the project collaboration window, choose Projects > Sensitive Columns. You can click Add Sensitive Column and select Add Manually or Scan to Add.

After you manually add or scan to add sensitive columns, click Submit.
Method 1: Manually add sensitive columns
Method 2: Scan to add sensitive columns
Note
Before you scan to add sensitive columns, make sure that identification rules have been created. For more information, see the Identification rule management section in this topic.
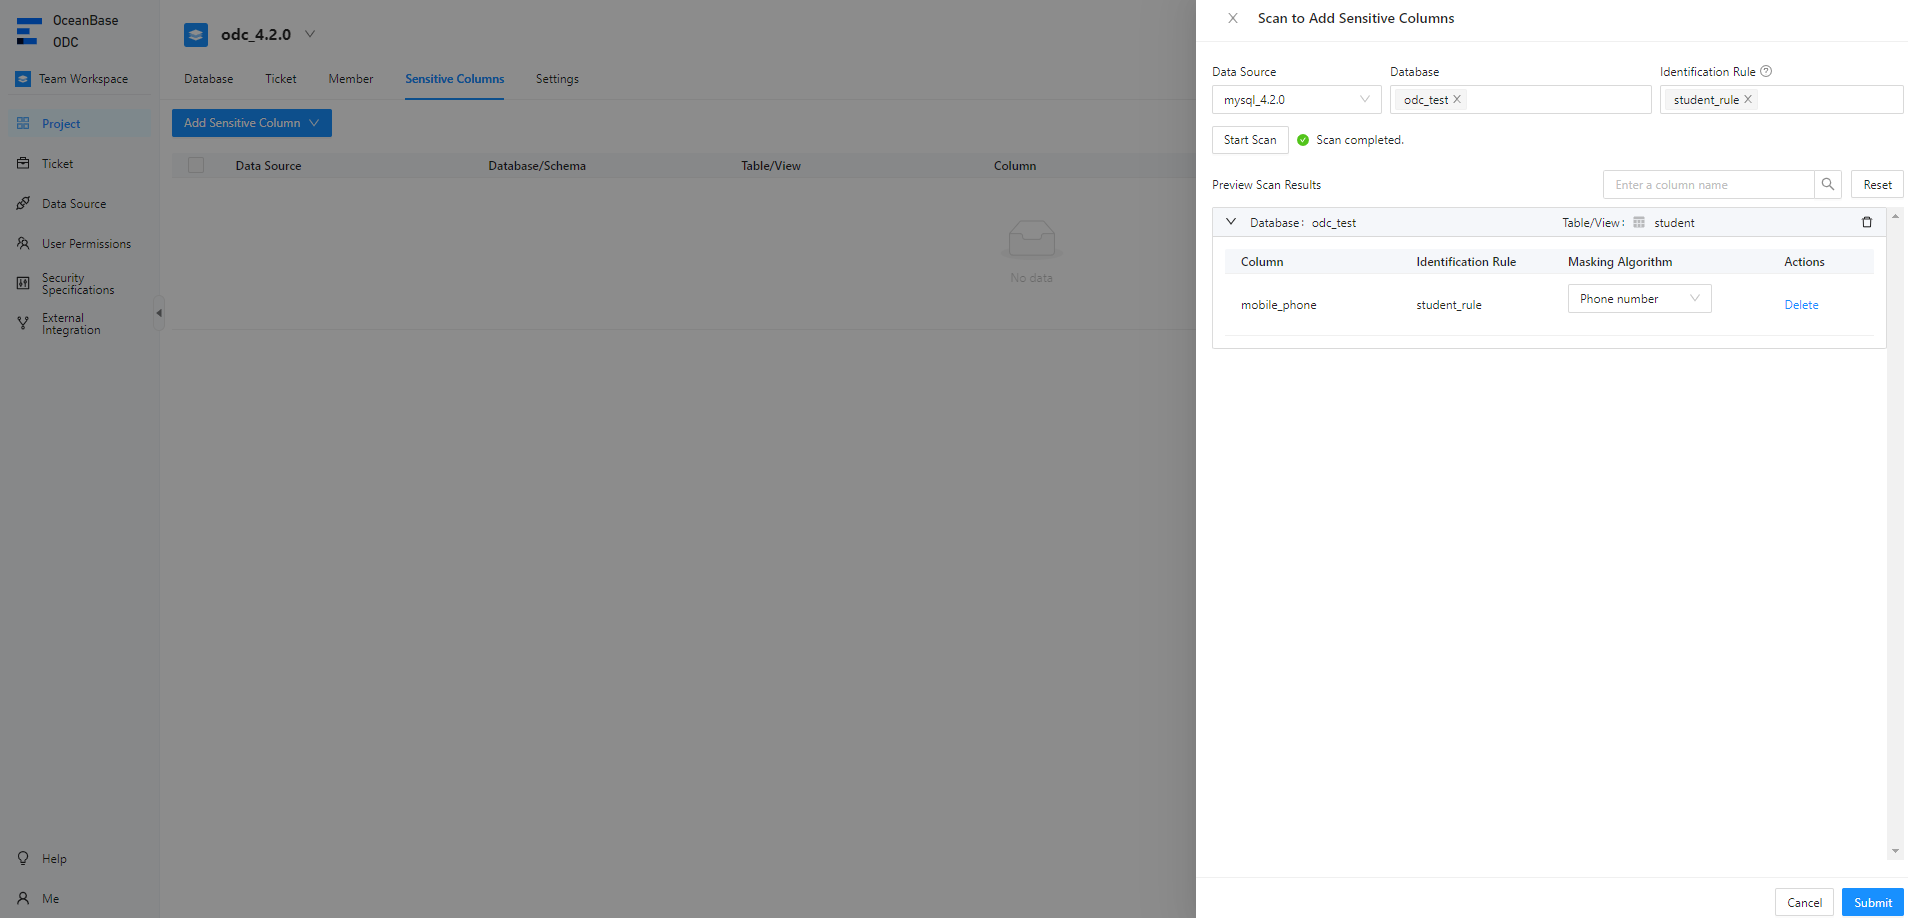
In the sensitive column list, you can view and enable added sensitive columns.

Edit a sensitive column
In the sensitive column list shown in the preceding figure, click Edit in the Actions column of a sensitive column to change the desensitization algorithm for the sensitive column.
Delete a sensitive column
In the sensitive column list, click Delete in the Actions column of a sensitive column to delete it.
Identification rule management
Identification rules are an extension of the sensitive data management capability. In addition to manually adding sensitive columns, you can also specify identification rules to implement automatic scan of sensitive columns. An identification rule defines the matching conditions. ODC will identify the columns that meet the specified conditions as sensitive columns. ODC supports three identification methods for identification rules: path, regular expression, and script.
Path: An identification rule based on a path expression identifies a sensitive column based on its database name, table name, or column name. The database name, table name, and column name are separated with periods (.). Matching conditions are separated with commas (,). Asterisks (*) are used as wildcard characters.
ParameterRequired?DescriptionRule Name Yes The name of the identification rule, which cannot exceed 64 characters in length. Rule Status Yes The status of the identification rule. Valid values: Enable and Disable. Matching Rule Yes Conditions for matching sensitive columns. Columns that meet the conditions specified here are identified as sensitive columns.
For example, the identification rule\*\.\*\.mobile_phonespecifies to match columns namedmobile_phonein any tables and databases.Exclusion Rule No Conditions for excluding data columns. Notice
The system determines whether a data column is a sensitive column based on the exclusion conditions first and then the matching conditions.
Masking Algorithm Yes The default desensitization algorithm for identified sensitive columns. Rule Description No The description of the identification rule. Regular expression: An identification rule based on a regular expression identifies a sensitive column based on its database name, table name, column name, or column remarks.
ParameterRequired?DescriptionRule Name Yes The name of the identification rule, which cannot exceed 64 characters in length. Rule Status Yes The status of the identification rule. Valid values: Enable and Disable. Identification Object-Database Name No The regular expression for matching database names.
For example,*indicates databases with any names.Identification Object-Table Name No The regular expression for matching table names.
For example,e[a-z]?.*indicates tables whose names are in lowercase and start with the letter e.Identification Object-Column Name No The regular expression for matching column names. Identification Object-Column Remarks No The regular expression for matching column remarks. Masking Algorithm Yes The default desensitization algorithm for identified sensitive columns. Rule Description No The description of the identification rule. Script: An identification rule based on a Groovy script identifies a sensitive column based on its database name, table name, column name, column remarks, or data type.
Notice
The output of the script must be a Boolean value, namely
TrueorFalse.ParameterRequired?DescriptionRule Name Yes The name of the identification rule, which cannot exceed 64 characters in length. Rule Status Yes The status of the identification rule. Valid values: Enable and Disable. Groovy Script Yes The script that determines whether a data column is a sensitive column. The script is written based on Groovy syntax specifications. Masking Algorithm No The default desensitization algorithm for identified sensitive columns. Rule Description No The description of the identification rule. ODC provides built-in column objects for you to reference in the Groovy script. The following table describes the attributes in a column object.
AttributeTypeDescriptionschema String The name of the database to which the column belongs. table String The name of the table to which the column belongs. name String The name of the column. comment String The comment on the column. type String The data type of the column.
Here are several sample identification rules that use a script as the identification method:
- Address:
if (("varchar".equals(column.type) || "char".equals(column.type))) {
    if (column.name.indexOf("address") >= 0) {
        return true;
    }
    if (column.comment != null &&
            (column.comment.toLowerCase().indexOf("address") >= 0
                    || column.comment.indexOf("Address") >= 0
                    || column.comment.indexOf("Residence address") >= 0
                    || column.comment.indexOf("Location") >= 0)) {
        return true;
    }
}
return false;
- Mobile number:
if (column.name.length() == 11 && ("varchar".equals(column.type) || "char".equals(column.type))) {
    if (column.name.indexOf("phone") >= 0 || column.name.indexOf("mobile") >= 0) {
        return true;
    }
    if (column.comment != null &&
            (column.comment.toLowerCase().indexOf("phone") >= 0
                    || column.comment.indexOf("Phone number") >= 0
                    || column.comment.indexOf("mobile") >= 0
                    || column.comment.indexOf("Mobile number") >= 0)) {
        return true;
    }
}
return false;
- ID card number:
if (column.name.length() >= 15 && ("varchar".equals(column.type) || "char".equals(column.type))) {
    if (column.name.indexOf("id_number") >= 0 || column.name.indexOf("identity_card") >= 0) {
        return true;
    }
    if (column.comment != null &&
            (column.comment.toLowerCase().indexOf("identity card") >= 0
                    || column.comment.indexOf("ID card number") >= 0)) {
        return true;
    }
}
return false;
Add an identification rule
Example: Add an identification rule for the mobile_phone column of the student table in the odc_test database as the administrator.
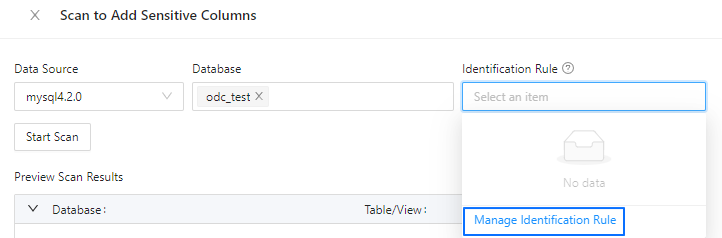
In the project collaboration window, choose Projects > Sensitive Columns. Then click Add Sensitive Column and select Scan to Add.

In the Scan to Add Sensitive Columns dialog box, click Identification Rule and select Manage Identification Rule from the drop-down list.
In the Manage Identification Rule dialog box, click Create Identification Rule.
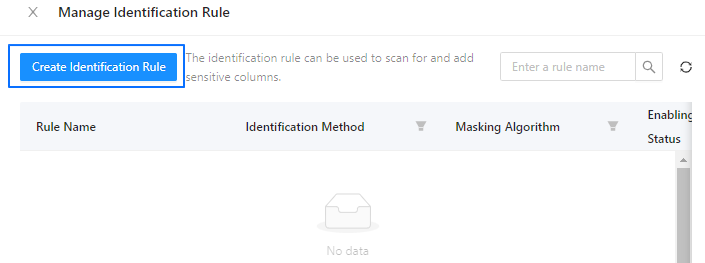
In the Create Identification Rule pane, specify the name, status, identification method, and desensitization algorithm of the rule and click Create.
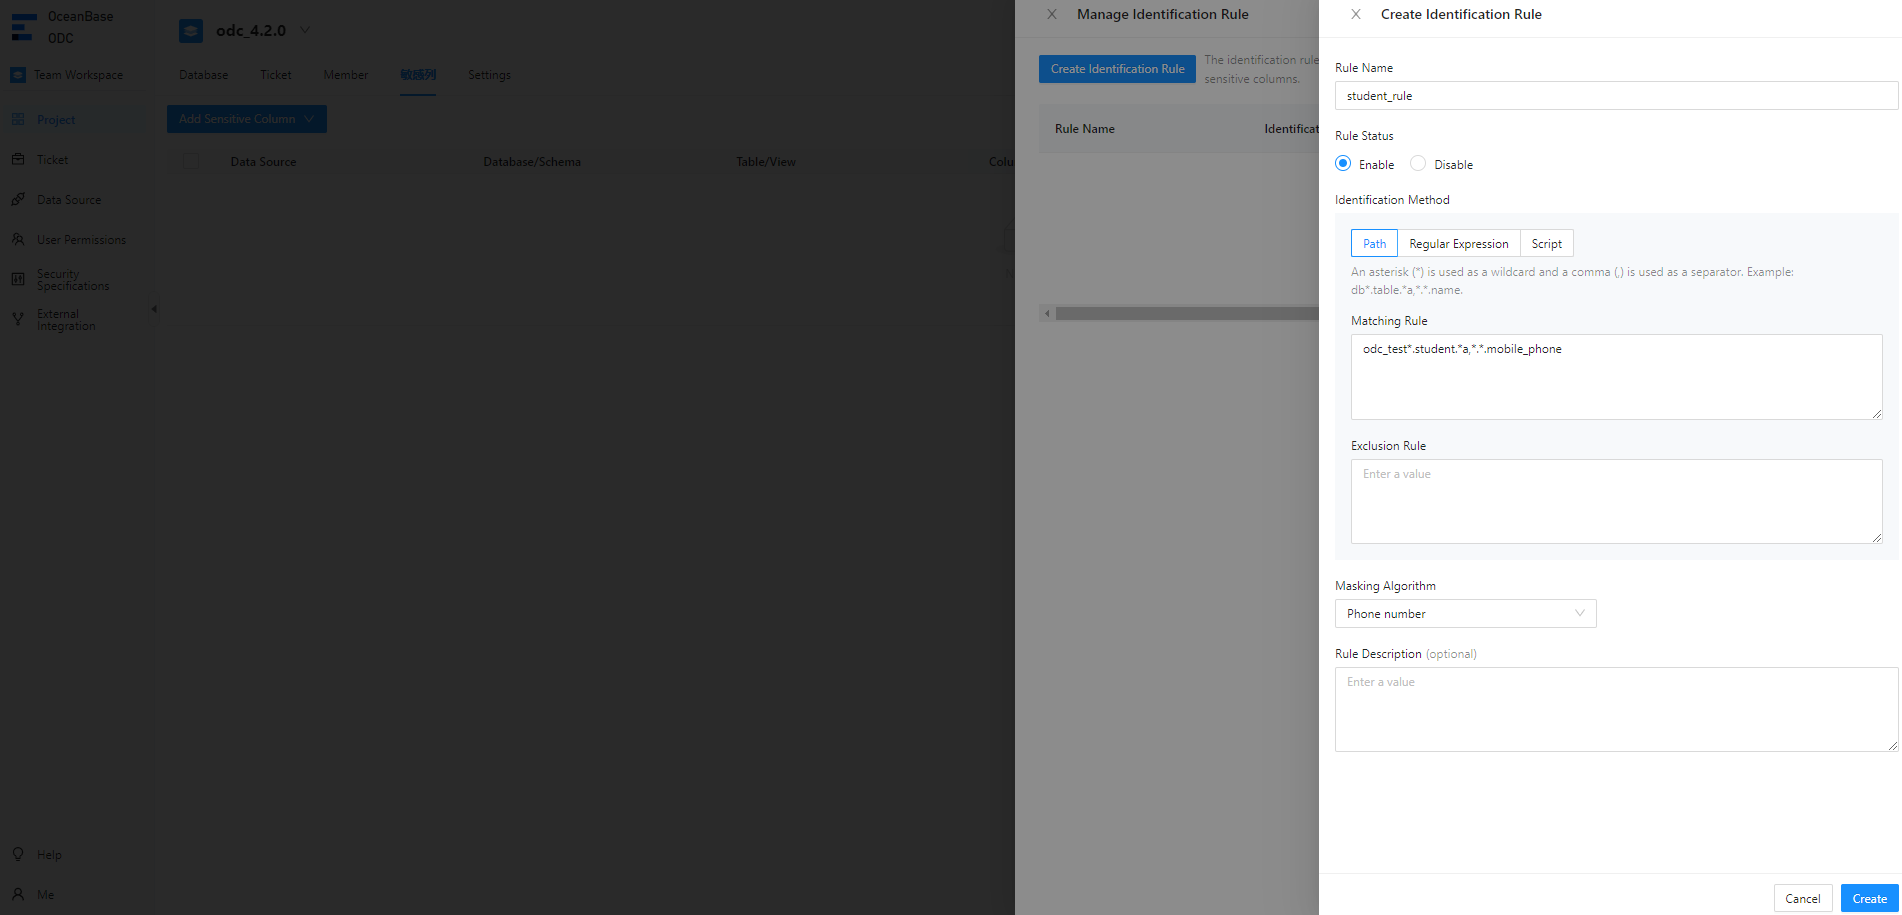
For example, the path-based identification rule
odc_test*.student.*a,*.*.mobile_phonespecifies to match themobile_phonecolumn of thestudenttable in theodc_testdatabase.In the identification rule list, you can view and enable the added identification rule.
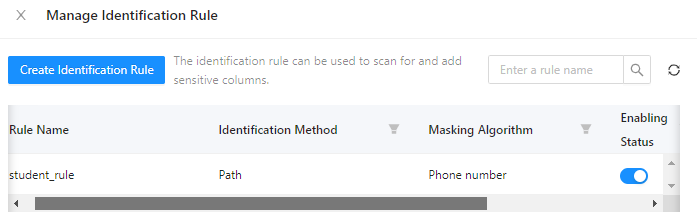
Manage identification rules
On the page shown in the preceding figure, click View, Edit, or Delete in the Actions column of an identification rule to view, modify, or delete the identification rule.
View desensitization algorithms
In the project collaboration window, choose Security Specifications > Masking Algorithm and view the desensitization algorithms supported by ODC.
The following table lists the desensitization algorithms supported by ODC.
Algorithm |
Test data |
Preview result |
|---|---|---|
| Mask all (system default) | test value | ***** |
| Personal name (Chinese character) | 个人姓名 | **名 |
| Personal name (alphabet) | Personal Name | P** |
| Nickname | Nickname | N***e |
| odc@test.com | o**@test.com | |
| Address | Hangzhou, Zhejiang Province, China | Hangzhou, Z*** |
| Phone number | 13500000000 | 135******00 |
| Fixed line phone number | 010-12345678 | **********78 |
| Certificate number | 123456789 | 1*******9 |
| Bank card number | 1234 5678 5678 1234 | ***************1234 |
| License plate number | GZ1234 | G**234 |
| Device unique identification number | AB123456789CD | ****89CD |
| IP address | 10.123.456.789 | 10...* |
| MAC address | ab:cd:ef:gh:hi:jk | ab:*:*:*:*:* |
| MD5 | default | c21f969b5f03d33d43e04f8f136e7682 |
| SHA256 | default | 37a8eec1ce19687d132fe29051dca629d164e2c4958ba141d5f4133a33f0688f |
| SHA512 | default | 1625cdb75d25d9f699fd2779f44095b6e320767f606f095eb7edab5581e9e3441adbb0d628832f7dc4574a77a382973ce22911b7e4df2a9d2c693826bbd125bc |
| SM3 | default | 40c357923156504f734717d8b4f5623e75209e9572701f4b51ef2a03d9ced863 |
| Rounding | 123.456 | 123 |
| Blanking | default | - |
| Default | abcd1234 | abc**234 |
Scenarios
Added sensitive columns are desensitized in the SQL window and during data export and data changes.
Scenario 1: Data desensitization during data export
Example: When you export data from the student table in the odc_test database, data is automatically desensitized.
After you export the
studenttable by submitting a ticket in the ODC console, click View in the Actions column of the export task in the export task list.In the Task Details panel, click Download in the lower-right corner.
View the downloaded
studenttable in your local disk.
Scenario 2: Data desensitization during data changes
Example: When you insert data into the student table, data is automatically desensitized.
In the ODC console, submit a database change ticket to insert data into the
studenttable.In the left-side navigation pane of the SQL window, locate the
 odc_test database and view the desensitized data in the
 studenttable.
Scenario 3: Data desensitization in an SQL window
Example: When you insert data into the student table, data is automatically desensitized.
In the SQL window, write an SQL statement to insert data into the
studenttable.On the result tab, you can view the desensitized data in the
studenttable.