


After you log on to OceanBase Developer Center (ODC) and enter the ODC homepage, you can click Create Connection in the upper-right corner of the Connections tab to configure a new connection. When you exit ODC and enter it again, you can view the saved connections in the connection list.
Notice
In ODC V2.3.0 and later versions, to use the import and export features, you need to set a root@sys user in Advanced Configuration during connection creation. If no root@sys user is set, an error will be returned, indicating that the import and export features are unavailable. This is because starting from V2.3.0, the root@sys user privileges are required to query views when you use the import and export features.
The root@sys user privileges are also required to view partition information. This also requires that you set a root@sys user in Advanced Configuration during connection creation.
OceanBase connections are designed to share sessions. Whether you actively commit or roll back a transaction, or trigger a transaction commit or rollback by creating, modifying, or deleting a database object or by executing a DDL statement, the transaction commit or rollback takes effect in all windows. When you enter an OceanBase connection for the first time, a related reminder is displayed.
In manual-commit mode, make sure to set ob_trx_idle_timeout to a value greater than the timeout value of SQL queries. Otherwise, if two SQL statements in one transaction are executed at an interval longer than the value of ob_trx_idle_timeout, the connection will be terminated. However, if ob_trx_idle_timeout is set to an excessively large value, the session cannot be released in time, resulting in unnecessary memory consumption. Therefore, you need to set this parameter to a proper value.
Procedure:
Log on to ODC and click Create Connection .
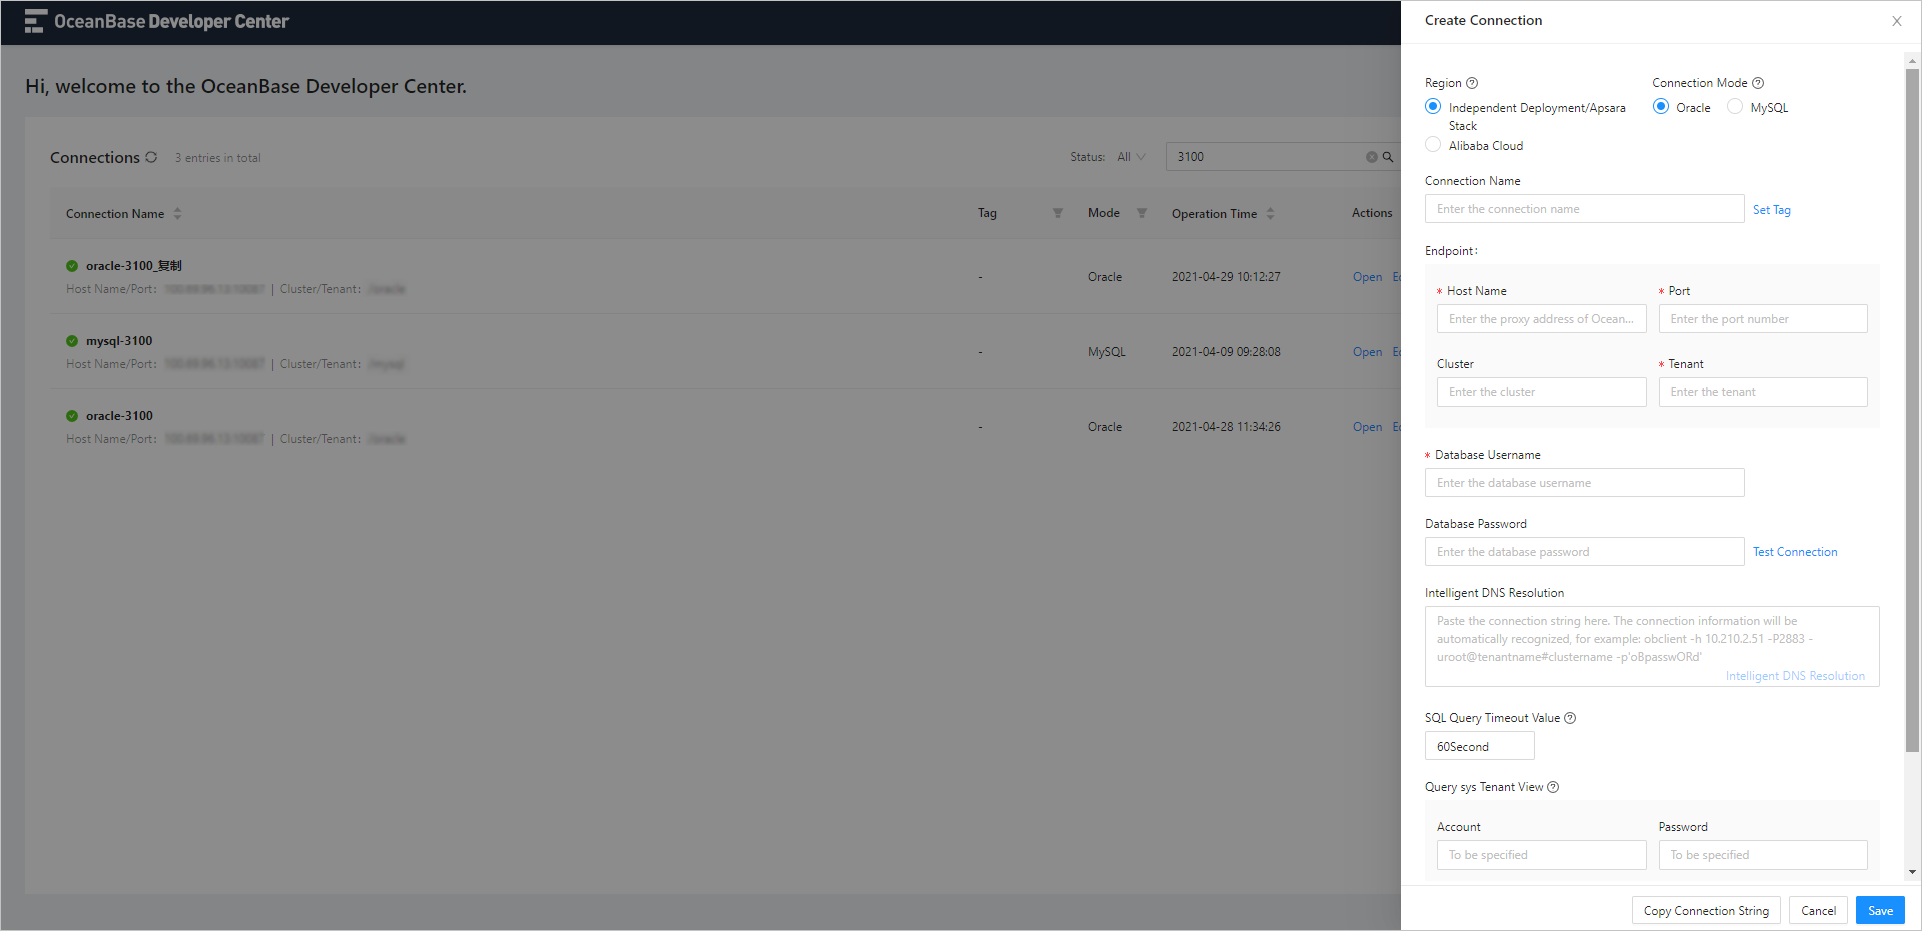
Specify the following parameters on the Create Connection tab. If you have an OceanBase connection string, which is in the format of mysql -h <host name> -P <port number> -u <database username@tenant name> # <cluster name> -D <default database> -p ' <database password> ', you can obtain the information from the string or you can use the Intelligent DNS Resolution tool on the tab to automatically specify these parameters.
Parameter Description Region Select Public Cloud if your database instance is deployed on Alibaba Cloud, or select Independent Deployment/Apsara Stack if your database instance is deployed in your own environment. Connection Mode Select MySQL or Oracle . Connection Name Specify the name of the connection. Set Tag Click Set Tag after Connection Name to set a tag for the current connection. You can set and manage tags in the list that appears. * Set Tag: Select a tag from the drop-down list. Create tags first if the list is empty. * Manage tags: Click Create Tag at the bottom of the list or the settings icon above the list to go to the Tags page, In the tag management window, you can edit or delete created tags. You can also click Create Tag to set a name or color for the new tag. Endpoint * Host Name : the host name, which you can find on the tenant information page. * Port : the port number, which you can find on the tenant information page. * Cluster : the name of the cluster in which the database you want to connect to is located. * Tenant : the name of the tenant under which the database you want to connect to is located. Default Database When you connect to a database under a MySQL tenant, you must specify the default database for the connection. You do not need to specify this parameter when you connect to a database under an Oracle tenant. Database Username An account under the tenant. In MySQL mode, this account must have the privilege to access the default database. Database Password The password of the account under the tenant. You can click Test Connection after the password box to test whether you can connect to the target database. An error will be returned if the configuration information such as the username, password, or network settings are invalid. You can only connect to a database under the current tenant. Otherwise, a test failure error will be returned. Save Database Password If you disable this option, the database password for the connection is not saved. Each time you use or test a connection, you must enter the database password in the password dialog box to use the connection. If you enable this option, the database password for the connection is saved. You do not need to enter the database password each time you use the connection. Intelligent DNS Resolution You can paste a connection string to the field. ODC automatically identifies the string and fills in the corresponding fields on the page. SQL Query Timeout Value This option appears after you click Advanced Configuration . You can specify a timeout value for SQL queries. A query whose execution time exceeds the timeout value is automatically terminated. The default timeout value is 60 seconds. Query SYS Tenant View This option appears after you click Advanced Configuration . When Tenant under Endpoint is set to sys, this option is automatically filled. * Account : an account having the privilege to check the views under the sys tenant. * Password : the password of the account. After you specify the account and password, you can click Test Connection next to the password box to verify whether the account information is valid. In ODC V2.3.0 and later versions, to use the import and export features and check the partition information, you need to configure the root@sys account by using this option. Features You can select the features that the connection supports. By default, all features are selected. After you deselect a feature, the feature is disabled on the corresponding connection management page. The current version only allows you to disable or enable the data mocking feature. Click Save to save the current configuration in the ODC connection list. Next time you log on to ODC, you can directly select the connection from the list. The connection configuration does not necessarily need to pass the connection test when you save the configuration.
Click Copy Connection String to copy the connection information being edited on the current page as a connection string if necessary. This allows you to obtain the connection information with ease.
Click Cancel if you do not need to save the current connection configuration. A pop-up dialog box will appear, asking you to confirm whether to exit the current connection creation page.