


Background information
Single sign-on (SSO) is an authentication method that allows a user to use only a set of credentials to get securely authenticated for logging on to OceanBase Developer Center (ODC).
You can configure OAuth2- or OIDC-based SSO for ODC.
Concepts
Open Authorization (OAuth) is an open standard authorization protocol that allows users to authorize third-party applications to access their protected information stored on resource services without providing the username or password to the third-party applications. This decouples authentication from authorization. OAuth is a widely recognized and used international standard. OAuth 2.0 is an extension to OAuth 1.0. It is more secure and easier to implement. However, it is incompatible with OAuth 1.0. In other words, OAuth 2.0 deprecates OAuth 1.0. OAuth defines a secure, open, and simple standard for the authorization of user resources. It allows third-party application systems to obtain user authorization information without getting the user account and password.
OAuth 2.0 is a delegated authorization framework used for REST/APIs.
OAuth 2.0 is a token-based authorization protocol that grants applications limited access to user data without disclosing the user password.
OAuth 2.0 decouples authentication from authorization.
OpenID Connect (OIDC) is an authentication protocol that allows third-party applications to connect to an identity provider to obtain user information and returns the information to third-party applications in a secure and reliable manner. OIDC extends the OAuth 2.0 framework to provide basic user identity information by using extended ID token fields. OIDC uses JSON web tokens (JWTs) to encapsulate ID tokens, providing a self-contained and tamper-proof mechanism. This mechanism secures the transmission of user identity information to third-party applications for verification.
Principle
OAuth2
ODC is compatible with the standard OAuth2 authentication protocol. Currently, ODC supports only the authorization-code mode, in which an application uses an authorization code to apply for or update an access token from the authorization server.
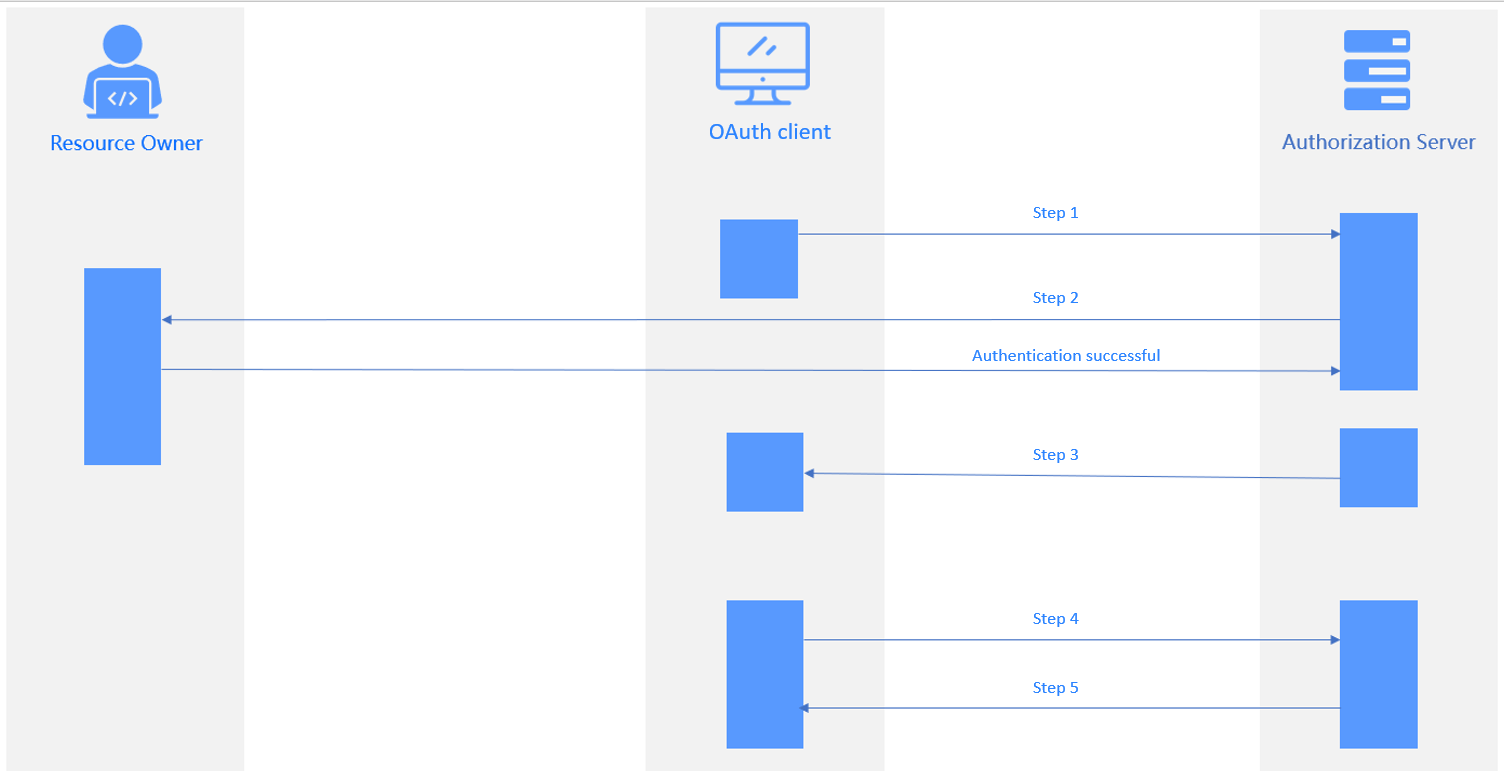
As shown in the figure, the authorization process involves the following steps:
- The user sends a logon request to the application system. The request is redirected to the authentication server. The user receives a 302 status code and returns to the logon authentication page.
- The user enters the account and password for authentication. The authentication server verifies the information and returns an authorization code to the application system.
- The application system exchanges the authorization code with the authentication server for an access token. The authentication server verifies information such as the client ID and authorization code and sends the access token to the application system.
- The application system queries the user logon information by using the access token. The authentication server returns the user information, such as the user name.
- The application system verifies the correctness of the username, creates a session, and redirects to the redirect URL.
The following table describes the parameters in the preceding process.
Step |
Parameter description |
|---|---|
| Step 1 | Authorization Request
|
| Step 2 | Verify the parameters passed in step 1. Display the login page for the user to authenticate. The user grants authorization for resources to the client. |
| Step 3 | Authorization Response The server redirects to the redirect URL specified in Step 1 and returns:
|
| Step 4 | Access Token Request
|
| Step 5 | Access Token Response
|
OIDC
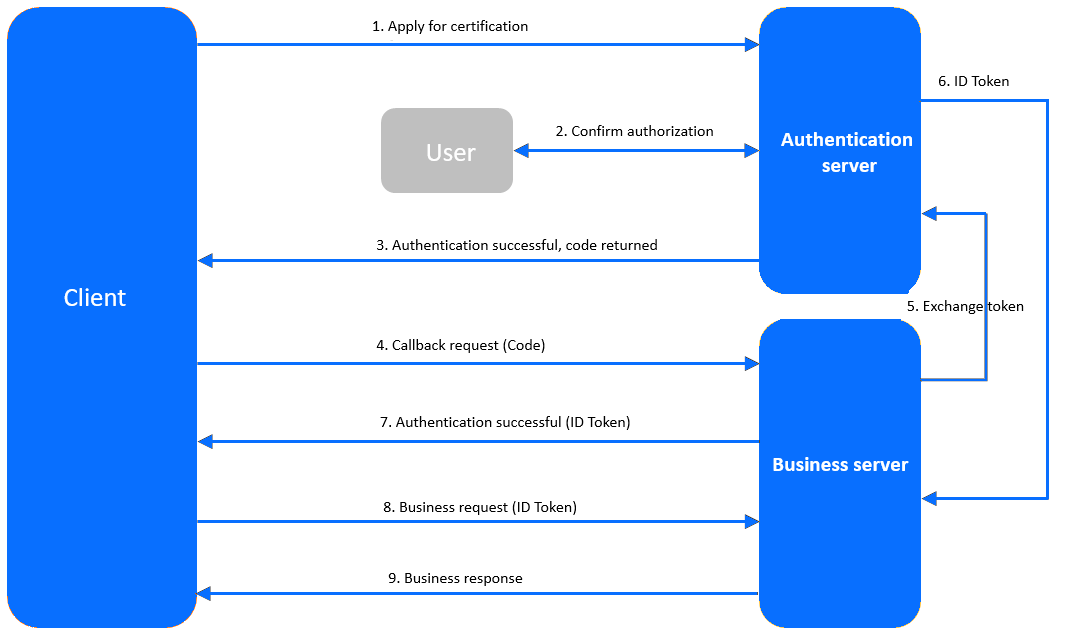
The client sends an authentication request to the authentication server.
The user consents to grant the authorization on the authentication page by logging in with the user name and password.
The authentication server verifies the authentication request and returns an authorization code to the client.
The client requests the callback API from the business server. The request carries the code.
The business server requests the authentication server to issue a token. The request contains the code, client ID, and client secret.
The authentication server verifies the validity and returns the ID token.
If the authentication succeeds, the business server returns an ID token to the client.
The client sends a request to the business server. The request carries the ID token.
The business service verifies whether the ID token is valid, and then returns a business response.
Prerequisites
You have the permissions to perform system integration operations.
You have deployed the authorization service.
Create an SSO integration configuration
Configure OAUTH2-based SSO
Configure SSO of the OAUTH type to integrate Apereo Central Authentication Service (CAS) into ODC to authorize access to ODC with a CAS account.
Log on to web ODC. In the project collaboration window, choose External Integration > SSO Integration > Create SSO Integration.
On the Create SSO Integration page, configure the gateway authentication parameters.
The following table describes the parameters for the OAUTH type.
ParameterDescriptionConfig Name The configuration name that will be applied to the custom login. Type Select OAUTH. Client ID The application identifier, which is consistent with the ID specified for the authorization server during registration. Auth URL The grant-code URL provided by the authorization server. User Info URL The user-info URL provided by the authorization server. Token URL The access-token URL provided by the authorization server. Redirect URL The ODC service URL to be called back by the authorization server. Note
You must add the URL to the callback allowlist if any.User information data structure type Valid values: FLAT (flat structure) and NESTED (nested structure) Scope The application authorization scope. Separate multiple scopes with spaces. We recommend that you set this parameter to profile. Note
When you configure OSS by using a third-party application, set Scope toopenid.jwkSet URL Optional. The public key URL provided by the authorization server. The public key is used for authentication. userNameAttribute Optional. The username field. Client Authentication Method The method used by the authorization server to authenticate clients. Authorization Grant Type The authorization type of OAUTH2. User Info Authentication Method The authentication method used for sending the bearer access token in a resource request to the resource server. User information data structure type Valid values: FLAT (flat structure) and NESTED (nested structure) Click Test Connection to go to the CAS logon page.
Note
A CAS does not require a callback allowlist. If you need to configure an allowlist when you integrate other applications into ODC, follow the instructions on the page.
Enter the CAS account and password, and click Allow on the Authorize page to authorize access to ODC.

After the connection test succeeds, the structure of the user information API is returned. Specify the parameters for user field mapping based on the returned information.
Note
- The structure returned by the user information API may vary with the third-party application. To map user information from a third-party application to ODC, you must fill in the user information mapping table. User field mapping identifies ODC accounts associated with OAuth2 login.
- You can select the parameter names from the returned connection information and specify Username Field and Nickname Field.
- You can also enter custom fields and customize field mapping rules.
- The system administrator can configure custom field names on the Automatic Authorization page. When a user logs on to ODC by using a custom field, the user is automatically granted the role or permission.
Click Save to create the SSO integration.
In the SSO integration list, enable the created SSO integration.
Note
You can enable only one SSO integration.
On the web ODC logon page, click Third-party Logon to go to the third-party logon page and use the third-party logon account to access ODC.
Configure the OIDC type
Use the OIDC type to integrate a third-party application into ODC to authorize access to ODC with a third-party account.
Log on to web ODC. In the project collaboration window, choose External Integration > SSO Integration > Create SSO Integration.
On the Create SSO Integration page, configure the gateway authentication parameters.
The following table describes the parameters for the OIDC type.
ParameterDescriptionConfig Name The configuration name that will be applied to the custom login. Type Select OIDC. Client ID The application identifier, which is consistent with the ID specified for the authorization server during registration. Client Secret The application key, which is consistent with the one configured for the authorization server during registration. Scope The application authorization scope. Separate multiple scopes with spaces. We recommend that you set this parameter to profile. Note
When you configure OSS by using a third-party application, set Scope toopenid.Issue URL The Issue URL of the authentication service. Redirect URL The ODC service URL to be called back by the authorization server. Note
You must add the URL to the callback allowlist if any.User information data structure type Valid values: FLAT (flat structure) and NESTED (nested structure) A separate callback allowlist is required for connection tests. Manually add an allowlist as prompted and click Test Connection.
Enter the third-party logon account and password.
After the connection test succeeds, the structure of the user information API is returned. Specify the parameters for user field mapping based on the returned information.
Note
- The structure returned by the user information API may vary with the third-party application. To map user information from a third-party application to ODC, you must fill in the user information mapping table. User field mapping identifies ODC accounts that are associated with the OIDC login.
- You can select the parameter names from the returned connection information and specify Username Field and Nickname Field.
- You can also enter custom fields and customize field mapping rules.
- The system administrator can configure custom field names on the Automatic Authorization page. When a user logs on to ODC by using a custom field, the user is automatically granted the role or permission.
Click Save to create the SSO integration.
In the SSO integration list, enable the created SSO integration.
Note
You can enable only one SSO integration.
On the Web ODC logon page, click Third-party Logon to go to the third-party logon page and use the third-party logon account to access ODC.
Manage SSO integration
In the SSO integration list, you can enable, view, edit, and delete SSO integration settings.