







Administrators can view and revoke the permissions of members who have completed their applications. This chapter describes how to manage project member permissions.
Background information
Project members are essential for database maintenance and management within a project.
Add a member
Log in to the Web version of ODC and click Project in the left-side navigation pane of the project collaboration window.
In the project list, click the name of the target project.
In the project interface, click Members.
On the Members tab, you can view the basic information of the current project members.
Click Add Member in the upper-left corner of the tab.

In the Add Member interface, select the target member and check the corresponding role, then click OK.
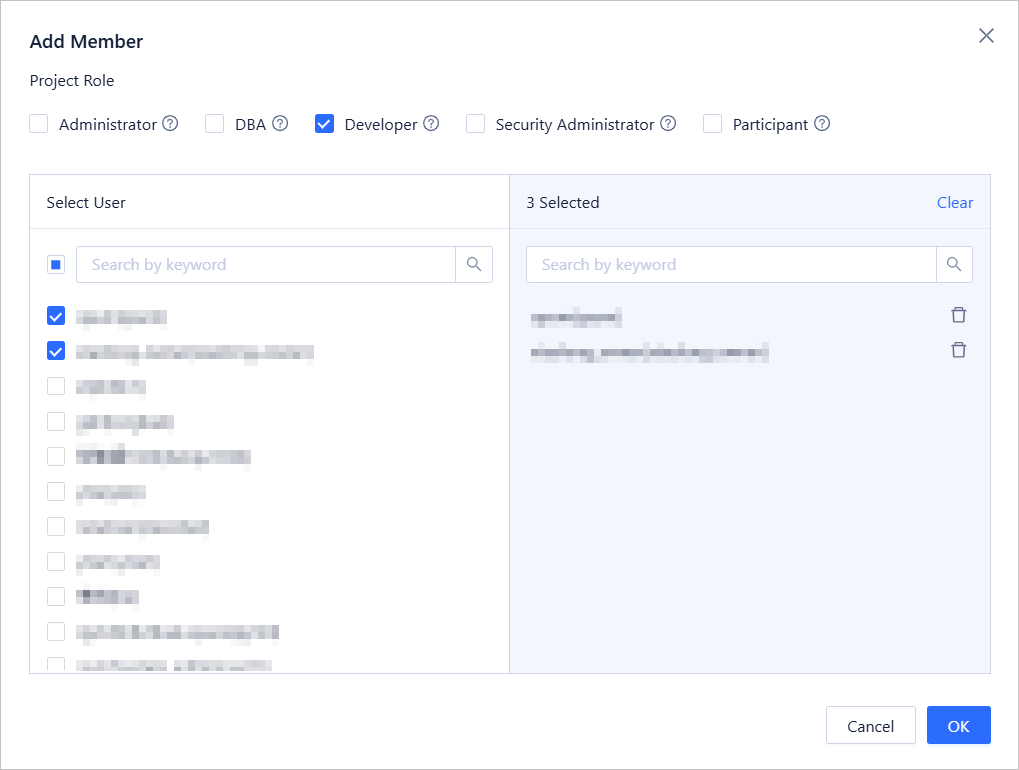
Role description:
Administrator: Has all permissions in the project and can view and manage all tickets in the project.
DBA: Has all permissions in the project except for member management, message configuration, and project settings. It can view and manage all tickets in the project.
Developer: Has all database permissions in the project. It allows login to the database, execution of SQL statements, and submission of tickets. It can view all tickets in the project and manage tickets initiated by itself.
Security Administrator: In addition to the permissions of a participant, it can manage sensitive columns.
Participant: Allows viewing of basic project information. By default, it has no database permissions in the project. It supports self-service application for database permissions and submission of tickets. It can view all tickets in the project and manage tickets initiated by itself.
Manage member permissions
In the project interface, click Members.
On the Members tab, you can view the basic information of the current project members.
Click Manage Permission in the Actions column of the target member.
In the Manage Permissions interface, you can view the current permissions of the member. You can switch between Database Permission and Table/View Permissions by using the left-side navigation pane.
You can also view the permission sources by using Ticket Application (permissions applied by users through tickets) and User Authorization (permissions granted by project administrators or DBAs).
Grant permissions
To grant database or table/view permissions to members, you can either have an administrator or DBA grant them, or you can apply through a ticket. The following section explains how to add permissions as an administrator. For detailed steps on applying for permissions through a ticket, see Apply for database permissions, Apply table/view permissions.
In the Manage Permissions interface, click Add Database Authorization or Add Table/View Authorization in the upper-right corner.
In the Add Database Authorization or Add Table/View Authorization interface, configure the following options and click OK.
- Database: Select the target database or table/view.
- Permission Type:
- Query: Permission to execute query statements.
- Export: Permission to create export and export result set tickets.
- Change: Permission to create database change tickets (including import, data simulation, database change, shadow table synchronization, SQL plan, partition plan, data archiving, and data cleanup) and execute change statements in the SQL window (whether the SQL window can execute change statements is constrained by security specifications).
- Permission Expiration Policy: The effective time of the permission. Then, click OK.
Revoke permissions
In the Member Permissions interface, find the target permission and click Revoke in the Actions column.
In the dialog box that appears, click OK.
After the operation is successful, the permission will be revoked.
Edit the role of a member
In the Member Permissions interface, find the target member and click Edit Role in the Actions column.
In the dialog box that appears, select the target role and click OK.
After the operation is successful, the role of the member will be modified.
Remove a member
In the Member Permissions interface, find the target member and click Remove in the Actions column.
In the dialog box that appears, click OK.
After the operation is successful, the member will be removed.