







To solve the problem of table locking during database schema changes, OceanBase Database Connect ODC V4.2.0 and later provides the online schema change feature. This feature can effectively avoid business blocking caused by table locking. This topic describes how to submit a online schema change ticket to implement online database schema changes.
Notice
Only the MySQL compatible mode of OceanBase Database supports the online schema change feature. In addition, you must use the enterprise or community edition of OceanBase OMS.
Background information
Principles
Note
If a task involves multiple tables, the schema changes are performed in a serial manner. That is, the schema changes of one table are completed before the schema changes of the next table are performed.
The schema change of a single table includes the following steps:
Create a shadow table: A shadow table is created based on the schema change requirements. The schema of the shadow table is the final schema that you expect.
Synchronize data: The data in the original table is synchronized to the shadow table in full and incremental modes.
Check data consistency: During the incremental synchronization, data consistency is checked periodically.
Suspend business: When the data in the original table and the shadow table are close to each other, business is suspended. OceanBase Database provides two ways to suspend business: lock user and lock table. The lock user and lock table operations are performed by the database kernel. The program does not restrict the lock user and lock table operations. After the lock user operation is successful, the program synchronously kills the user's session. If the session is not killed within 2 seconds, the lock user operation fails.
Make data consistent: After business is suspended, incremental synchronization and data consistency checks are performed. If the data is not consistent within 25 seconds, the task fails.
Switch the table names: After the data is consistent, the original table and the shadow table are renamed. The shadow table becomes the new business table.
Workflow of online schema change tickets
A user submits a online schema change ticket.
Precheck the SQL statements entered by the user.
Approve the task process.
Execute the online schema change task.
Supported change operations
Category |
Operation |
Supported? |
Description |
|---|---|---|---|
| Column operations | Modify column type | Yes | |
| Rearrange columns (before/after/first) | Yes | ||
| Convert to another character set | Yes | ||
| Rename column | No | ||
| Add a column | Yes | ||
| Drop a column | Yes | ||
| Add a primary key column | No | ||
| Primary key | Add a primary key | Yes | The table has a non-null unique key. |
| Modify a primary key | Yes | The table has a non-null unique key. | |
| Drop a primary key | Yes | The table has a non-null unique key. | |
| Partition | Drop a partition | Yes | |
| TRUNCATE a partition | No | ||
| Repartition | Yes | ||
| Convert a non-partitioned table to a partitioned table | Yes |
Considerations
Ensure sufficient disk space in the database.
The table must have a primary key or non-null unique key and must not have a foreign key.
If the current table is executing a online schema change, it cannot execute other DDL operations, or the task will fail.
The length of a table name in OceanBase Database in MySQL compatible mode must not exceed 54 characters.
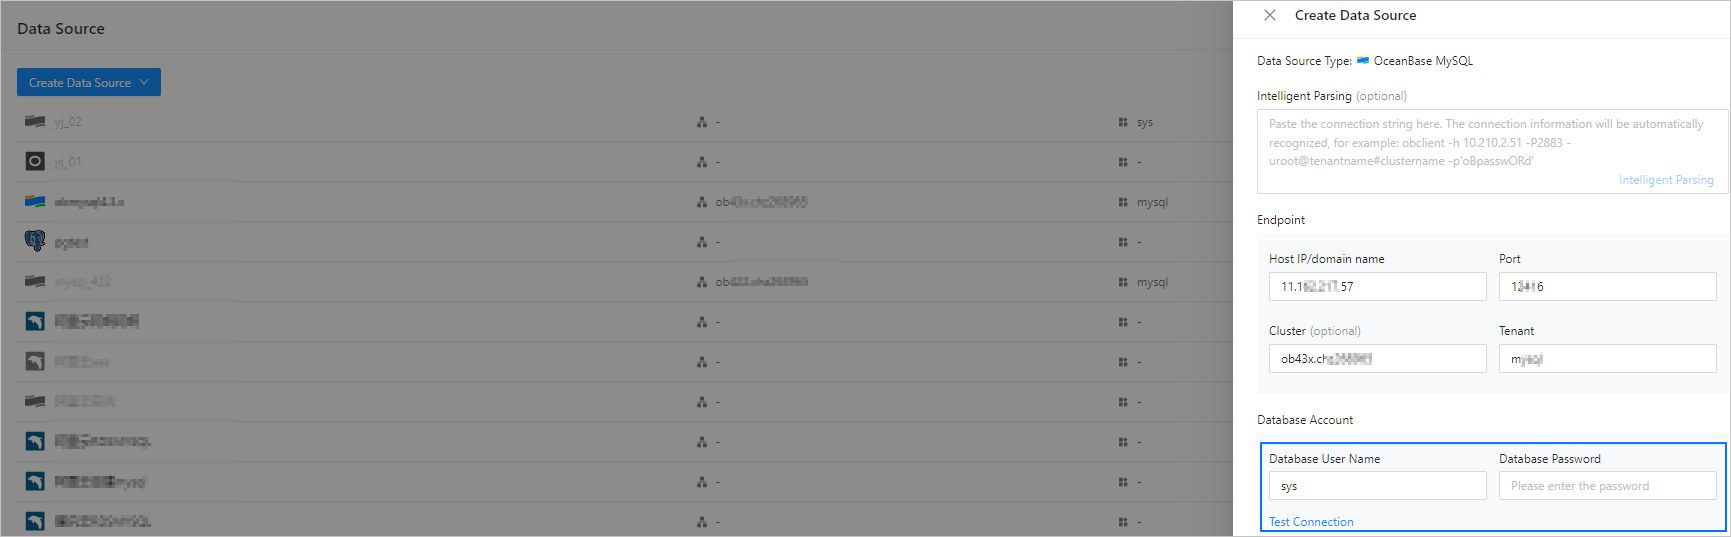
When you connect to an OceanBase Community Edition database in the Object-Relational Developer (ODC) console, the data source configuration information must include the cluster name and the SYS tenant account.
By default, only the lock user method is provided for the table name switching write protection strategy. Some OceanBase Database versions also provide the lock table method.
During a single online schema change, adding columns and dropping columns cannot be performed at the same time. If needed, perform these changes in batches.
Create a online schema change task
The example below uses OceanBase Database Community Edition and Enterprise Edition OMS as an example. The example is to change the type of the birth column in the student table to date. The example uses odc_4.2.0 as the project name, odc_test as the database name, and student as the table name.
(Optional) Deploy an OceanBase Community Edition cluster. If you have completed the cluster configuration, skip this step.
Note
When you create an OceanBase data source in OceanBase Database Enterprise Edition OMS, you must specify the cluster name. You cannot create a data source on a standalone server. For more information about how to deploy a cluster, see Solution 2: Deploy an OceanBase cluster.
Install ConfigServer. ConfigServer serves as the interface between OceanBase and OBProxy for accessing OceanBase rs_list. After you configure the address of the OceanBase ConfigServer, OceanBase automatically registers rs_list with ConfigServer.
Note
If you deploy a cluster by using OCP (non-OCP Express), you can skip this step. OCP automatically sets the IP address of OCP as the OceanBase ConfigServer for the cluster that is created.
Install OceanBase Database Enterprise Edition OMS. This example uses OceanBase Database Enterprise Edition OMS. You can obtain it from Docker. You can also choose OceanBase Database Community Edition OMS as needed and complete the configuration.
Configure the metadata of ODC and enable the online schema change feature.
a. Configure the information of ODC and Enterprise Edition OMS.
Connect to the MetaDB of ODC and configure the URL and login authentication information of Enterprise Edition OMS. The format of oms_url is
http://${oms_host}:${oms_port}, and the format of oms_authornization isusername:passwordin Base64 encoding. After the configuration is completed, restart ODC to make the settings of Enterprise Edition OMS take effect.Syntax:
# Configure oms_url
update config_system_configuration set `value` = '${oms_url}' where `key` = 'odc.osc.oms.url';

# Configure oms_authornazition
update config_system_configuration set `value` = '${oms_authornazition}' where  `key` = 'odc.osc.oms.authorization';

# Configure oms_region, for example, cn-anhui
update config_system_configuration set value = '${oms_region}' where `key` = 'odc.osc.oms.region'
Examples:
# Configure oms_url, and specify the URL for accessing OMS: http://localhost:8089
update config_system_configuration set `value` = 'http://localhost:8089' where `key` = 'odc.osc.oms.url';

# Configure oms_authornazition. Assume that the username is test and the password is 123456. After `test:123456` is encoded in Base64, it becomes: dGVzdDoxMjM0NTY=
update config_system_configuration set `value` = 'dGVzdDoxMjM0NTY=' where `key` = 'odc.osc.oms.authorization';

# Configure oms_region. Assume that the region specified during the installation of OMS is cn-anhui. For more information, see the OMS installation process.
update config_system_configuration set value = 'cn-anhui' where `key` = 'odc.osc.oms.region'
b. Enable the online schema change feature. The online schema change feature is available for OceanBase Database on Alibaba Cloud but not for OceanBase Database Community Edition. By default, the online schema change feature is disabled for OceanBase Database Community Edition. You need to configure ODC MetaDB and execute the corresponding SQL statement to enable the feature.
```shell
update config_system_configuration set value = 'true' where `key` = 'odc.features.task.osc.enabled';
```
Create and synchronize a data source in ODC.
Notice
For OceanBase Database Community Edition, when you use ODC to create a data source, you must configure the sys tenant.
In the SQL window, edit an SQL statement to create a student table in the odc_test database.

CREATE TABLE `odc_test`.`student` (
`id` int(11) COMMENT 'student id' NOT NULL,
`name` varchar(120) COMMENT 'student name' NULL,
`birthday` datetime(0) COMMENT 'student birthday' NOT NULL,
`province` varchar(120) COMMENT 'student province' NULL,
`city` varchar(120) COMMENT 'student city' NULL,
`mobile_phone` int COMMENT 'student mobile_phone' NULL,
`email` varchar(120) COMMENT 'student email' NULL,
`create_time` datetime(0) COMMENT 'update time' NULL,
CONSTRAINT `cons_id` PRIMARY KEY (`id`)
) DEFAULT CHARSET = utf8mb4 COLLATE = utf8mb4_general_ci ;
Lock accounts or tables.
For OceanBase Database of a version earlier than V4.2.5 MySQL, the lock table feature is not supported when you change the schema of a database table. You need to specify the account to be locked. Before renaming the tables (
Rename), ODC will execute thealter table user lock accountcommand on the specified account and close the session to terminate all processes on the locked account.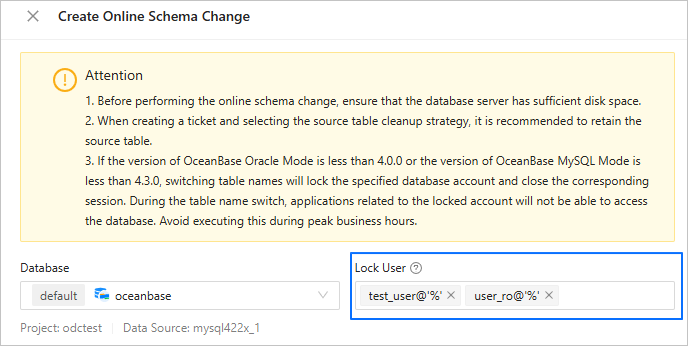
For OceanBase Database V4.2.5 MySQL and later versions before V4.3.0, the lock table feature is not supported when you change the schema of a database table. You need to make sure that the OBProxy version is V4.3.1 or later, and perform the following operations before creating a online schema change task to lock tables. Otherwise, the locking will fail.
Modify the OBProxy parameters.
alter proxyconfig set proxy_id=1;
alter proxyconfig set client_session_id_version=2;
alter proxyconfig set enable_single_leader_node_routing = false;
Modify the tenant-level parameters.
alter system set enable_lock_priority=true;Modify the range of OceanBase Database versions that support the lock table feature.
By default, the lock table feature supports OceanBase Database versions from V4.2.5 to V4.2.9. To change the range of OceanBase Database versions that support the lock table feature, connect to ODC MetaDB and execute the following SQL statement.
insert into config_system_configuration( key, application, profile, label, description, value) values('odc.osc.support-lock-table-ob-version-json', 'odc', 'default', 'master', 'control odc enable lock table version, default is ["4\\.2\\.[5-9].* "]', '$Expected version range');Here,
'$Expected version range'must be a JSON array whose elements follow the Java wildcard rules. For example, to change the OceanBase Database version range to V4.2.5 ~ V4.2.9 and V4.3.5, the value is["4\\\\.2\\\\.[5-9].*", "4.3.5.*"].Verify whether the locking is successful. Execute the
lock tablecommand in ODC to lock a temporary table. Then, try to insert data into the temporary table by using a new connection. If the data insertion is blocked, the locking is effective.create table test_table(id int not null primary key); session 1: session 2 lock table test_table; insert into test_table values(1); Blocked... unlock table test_table; Insert succeeded
Create a online schema change task.
- Choose Projects > All Projects. On the tab that appears, click the project name.
- On the Tickets tab, choose Online Schema Change > Create New.
On the Create Online Schema Change page, configure the following parameters and click Create.
ParameterDescriptionDatabase The database whose schema is to be changed. Locked User - If you specify a user account to be locked, ODC locks the specified database account and closes all sessions corresponding to the account before renaming the tables (
Rename). This ensures data consistency during table renaming and minimizes impact on your business as much as possible. - If you do not specify any account, ODC will not lock any account or close any session. You must ensure data consistency during table renaming.
Note
During the execution of a online schema change task, the user who executes the task cannot modify the tables involved in the task.
Change Definition - CREATE TABLE: For syntaxes not supported by OceanBase Database, you must use the CREATE TABLE statement.
- ALTER TABLE: For OceanBase Database V4.0.0 and later, you can use the ALTER TABLE statement in the ALTER TABLE OFFLINE mode.
SQL Content The SQL script. Table Switch Settings After data consistency is ensured, the original table is switched with the destination table. - Lock Table Timeout: Tables are locked during table switching. If the switching is not completed within the specified time, the execution may fail.
- Number of Retries on Failure: If the switching is not completed after the specified time, automatic retries will be performed.
- Source Table Cleanup Strategy After Completion: You can choose Renaming tasks are not handled. to rename the source table and keep it, or Delete Now to delete the source table after a online schema change task is completed.
Task Settings - You can set the task execution mode to Execute Immediately, Execute On Schedule, or Manual Execution.
- The online schema change tool provides two ways to handle task errors:
- Abort Task: This is the default setting. The script execution is stopped when an error occurs.
- Ignore Error and Continue: With this setting, the script execution skips error statements and continues.
- You can choose Automatic Switch or Manual Switch to enable the online schema change feature for table name switching.
Description You can enter up to 200 characters in the Description field as a task description. This parameter is optional. - If you specify a user account to be locked, ODC locks the specified database account and closes all sessions corresponding to the account before renaming the tables (
After the task is generated, you can find the task information in the Online Schema Change list of the Tickets page.
View the online schema change task
In the left-side navigation pane, choose Tickets > Online Schema Change. In the task list, click the name of the target task to view its details. You can also click the ··· icon in the Actions column to perform more operations on the task.
- Execute: If the task is manually executed, you can execute the task.
- Terminate: If the task is periodically or regularly executed, you can terminate the task.
- Disable/Enable: If the task is periodically or regularly executed, you can disable the task to temporarily stop its execution. After the task is enabled, it will resume execution.
- Edit: If the task is disabled, you can edit the task.
- Delete: If the task is completed or terminated, you can delete the task.
- View: View the details of the task.
- Clone: Copy the task execution content to quickly generate a new task with the same configuration.
- Share: Copy the access address of the task.
In the task details panel that appears, the Basic Information tab is displayed by default. You can view information such as the task type, database, variable configuration, and execution method.
In the task details panel, click the Workflow tab to view the task initiation status, approval status, execution status, and execution result.
In the task details panel, click the Result tab to view the task execution records.
In the task details panel, click the Logs tab to view all logs and alert logs of the task.
ItemDescriptionAll Logs All logs display the INFO, ERROR, and WARN logs of the task. You can click the Find, Download, and Copy buttons to search for, download, or copy all logs. Alert Logs Alert logs display the ERROR and WARN logs of the task. When the task fails, you can view the error information in the alert logs. You can click the Find, Download, and Copy buttons to search for, download, or copy the alert logs.