







Background information
OceanBase Developer Center (ODC) allows you to export the schemas and data of database objects in batches.
You can create an export task to export both the schemas and data, only the data, or only the schemas of database objects.
Export schemas and data: Definition statements and data of database objects are exported.
Export data only: Only data of table or view objects is exported.
Export only schemas: Only definition statements of database objects are exported.
Export format
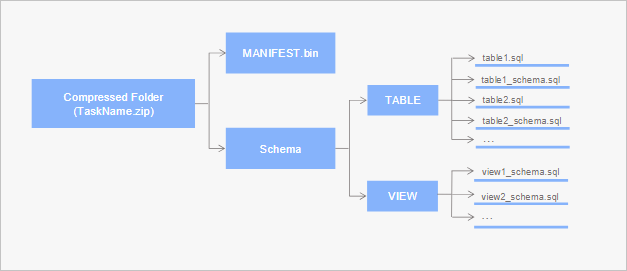
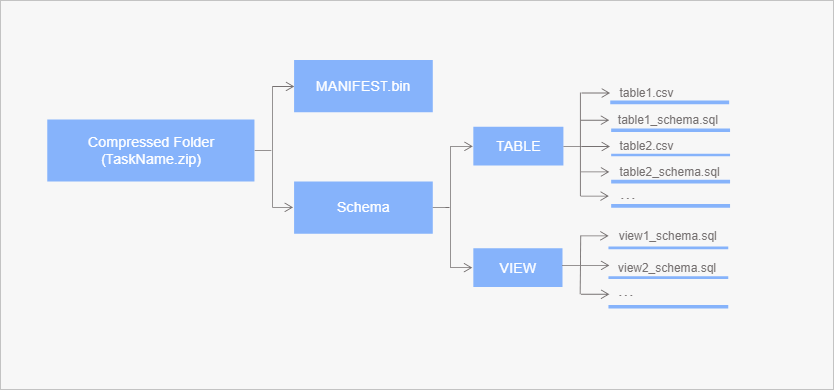
ODC exports data in a .zip file, which contains the metadata file MANIFEST.bin, the schema definition files of the exported objects, and the data files.
When you create an export task, if you set Data Format to SQL Format, the .zip file contains schema definition files named in the format of object name-schema.sql and data files named in the format of object name.sql. The object names are the same as those in the database.
If you set Data Format to CSV Format, the .zip file contains schema definition files named in the format of object name-schema.sql and data files named in the format of object name.csv. The object names are the same as those in the database.
Considerations
The maximum size of data exported in one batch in ODC cannot exceed 2 GB before compression. To export data of a larger size, use the data export tool OBDUMPER.
At most five concurrent export tasks are supported. Subsequent tasks need to wait in the queue.
By default, files related to export tasks are retained for 14 days.
In OceanBase V4.0.0 and earlier versions, configuring the sys tenant account and password in the data source can improve export speed. ODC can calculate the optimal parallel export strategy based on partition locations, and OceanBase V4.0.0 and earlier versions require querying and determining partition locations through the sys tenant.
For OceanBase versions after V4.0.0, it is not necessary to configure the sys tenant account and password in the data source. ODC supports querying and determining partition locations through the views of the business tenant.
Create an export task
Note
ODC V4.2.3 and later versions support exporting the schema and data of a MySQL database. ODC V4.2.4 and later versions support exporting the schema and data of an Oracle database.
On the Tickets page, choose Data Export > Data/Schema.
On the export page, set the parameters and click Next: Export Settings.
ParameterDescriptionExport Content Specifies the format of the export content. Valid values: Export Schema and Data/Export Data Only/Export Schema Only. Database Specifies the database where the export objects are located. Export Scope Specifies the export scope. Valid values: Partial Export and Full Export. - Partial Export: In the Select Objects window under Export Objects, select the objects to be exported. You can also search for objects in the search box.
- Export Entire Library: Exports all objects in the current database.
Set the export parameters and click Export.
Set the data file.
Note
If the Export Content is set to Export Schema Only, you do not need to set the data file.
ParameterDescriptionData Format ODC supports exporting data in CSV Format and SQL Format formats. If the Export Content is set to Export Schema Only, you can only export data in SQL format. Encoding Standard ODC supports the following encoding formats: ASCII, ISO-8859-1, GB2312, GBK, GB18030, Unicode (UTF-8), Unicode (UTF-16), Unicode (UTF-32), and BIG5. Maximum Size of a Single File If the Export Content is set to Export Schema Only, you do not need to set the maximum size of a single file.
You can set the maximum size of a single table data file. If the file size exceeds the maximum size, the file is automatically split. If you do not set the maximum size, the file is not split.CSV Settings If you export data in CSV format and the Export Content is set to Export Schema and Data, you can set the following parameters: - Include Column Header: This parameter is enabled by default. If you enable this parameter, the column headers are included in the exported CSV file.
- Convert Empty Character String into Null Value: This parameter is enabled by default. If you enable this parameter, empty strings in the table are converted to the NULL value \N in the exported CSV file.
- Field Separator: The separator between fields. You can select , (comma), ; (semicolon), or : (colon) as the field separator. You can also customize a character of a specified length as the field separator.
- Text Identifier: The delimiter for text content. You can select ' (single quotation mark) or " (double quotation mark) as the text delimiter.
- Line Break: The line break symbol. You can select \n, \r, or \r\n as the line break symbol.
Batch Commit Quantity (SQL Format) If you export data in SQL format, you can specify the batch commit count. In the exported file, a COMMITstatement is added after the specified number of data records.Use Global Snapshot If you enable this parameter, ODC exports the latest snapshot of the specified table in the global snapshot. Enabling this parameter ensures data consistency in the global snapshot. Set the schema file.
When Export Content is set to Export Schema Only, you can choose whether to Merge Exported Results into an SQL File. If you select this option, DDL statements will be merged and exported as a single SQL file.
Select whether to add Add DROP TABLE Statement Before CREATE TABLE Statement. If you select this option, a
DROPstatement will be added before eachCREATEstatement in the exported object schema file.
Set the task execution method.
Select Manual Execution/Execute Immediately / Scheduled Execution.
Enter a description.
Retain the current configuration.
After you specify all the information, select Retain Current Configuration in the lower-left corner of the panel to retain the current data and structure file configurations.
After the task is generated, you can view the task information in the Tickets > Data/Schema list.
View an export task
Go to Tickets > Data/Schema. In the export task list, click the name of the target task to view the task details. You can also click the ··· in the Actions column to perform more operations on the task.
- Execute: When the task execution mode is manual, click this option to manually execute the task.
- Terminate: When the task execution mode is periodic or scheduled, click this option to terminate the task.
- Edit: When the task status is disabled, click this option to edit the task.
- Delete: When the task status is completed or terminated, click this option to delete the task.
- View: Click this option to view the task details.
- Clone: Click this option to copy the task execution content and quickly generate a new task with the same configuration.
- Share: Click this option to quickly copy the task access address.
- Download: Click this option to download the generated mock data to your local disk. You can view the exported data schema files from your local disk.
In the task details panel that appears, the Basic Information tab is displayed by default. You can view the task type, database, variable configuration, and execution mode.
Note
You can configure whether query results support queries and downloads in the system settings. For more information, see System settings.
Click the Workflow tab to view the task initiation status, approval status, execution status, and execution result.
Click the Logs tab to view all logs and alert logs of the task.
ItemDescriptionAll Logs All logs display the INFO, ERROR, and WARN logs of the task. You can click the Find, Download, and Copy buttons to find, download, or copy all log information. Alert Logs Alert logs display the ERROR and WARN logs of the task. When a task fails, you can view the error information in the alert logs. You can click the Find, Download, and Copy buttons to find, download, or copy alert log information.