


This topic will guide you through deploying OceanBase Database Community Edition in a demo environment, in a cluster, and in a container, to help you quickly get started with OceanBase Database.
Notice
The methods described here are tailored for a quick hands-on experience with OceanBase Database and are not suitable for production environments. For production deployment, refer to the Deployment overview section.
Background information
Starting from V4.0.0, OceanBase Database provides a unified all-in-one package for installing obd, OceanBase Database, ODP, OBAgent, Grafana, and Prometheus. As of V4.1.0, OCP Express is added to the all-in-one package. You can choose to install components based on your needs.
Component overview
obd
OceanBase Deployer, the installation and deployment tool for OceanBase Database, is commonly referred to as obd. For more information, see obd Documentation.
ODP
OceanBase Database Proxy (ODP), also known as OBProxy, is a dedicated proxy server for OceanBase Database. For more information, see ODP Documentation.
OCP Express
OCP Express is a web-based management tool for OceanBase Database 4.x that is integrated with an OceanBase cluster. It allows you to view key performance metrics of the cluster and perform basic database management operations on the cluster. For more information, see OceanBase Cloud Platform Express (OCP Express).
OBAgent
OBAgent is a framework for data monitoring and collection in OceanBase Database. The framework supports both pushing and pulling modes for data collection in different scenarios.
Grafana
Grafana is an open-source data visualization tool that visualizes various metrics in data sources to help you understand the system running status and performance. For more information, visit the official website of Grafana.
Prometheus
Prometheus is an open-source service monitoring system and time series database. It provides common data models and APIs for fast data collection, storage, and query. For more information, visit the official website of Prometheus.
Overview
To help you quickly get started with OceanBase Database, we offer three different deployment solutions. You can select the most suitable one based on your specific environment.
Solution 1: Deploy OceanBase Database in a demo environment
If you have only one server, you can quickly build a demo environment to deploy OceanBase Database. The demo database has basic features for you to quickly learn about OceanBase Database, but does not support distributed capabilities or high availability. Therefore, long-term use is not recommended. For more information, see Solution 1: Deploy OceanBase Database in a demo environment.
Solution 2: Deploy OceanBase Database in a cluster
You can choose this solution if you want to learn more about the distributed architecture and features of OceanBase Database. The OceanBase cluster has distributed capabilities and high availability in addition to complete database features. To use this solution, you need to have three hosts, each of which has four CPU cores, 10 GB of memory, and 50 GB of disk space. For more information, see Solution 2: Deploy OceanBase Database in a cluster.
Solution 3: Deploy OceanBase Database in a container
You can choose this solution if you want to deploy and manage OceanBase Database in a container. This solution has not been verified by large-scale practices and therefore is not recommended. For more information, see Solution 3: Deploy OceanBase Database in a container.
Prerequisites
Before installing OceanBase Database, make sure your software and hardware environments meet the following requirements:
Item |
Description |
|---|---|
| OS |
|
| CPU | At least two cores or preferably four cores or more |
| Memory | At least 6 GB or preferably 16 GB to 1024 GB |
| Disk type | SSD |
| Disk space | At least 20 GB |
| File system | EXT4 or XFS. Choose XFS when the data volume exceeds 16 TB. |
| All-in-one package | V4.1.0 or later |
| Docker | To deploy OceanBase Database in a Docker container, install and start Docker in advance. For more information, see Docker documentation.
NoteIn an x86-based Mac environment, you can deploy OceanBase Database only in a Docker container using Docker V4.9.0 or earlier. To download Docker V4.9.0 or earlier, click here. |
Note
The following describes the setup environment used in the x86-based CentOS Linux 7.9 image. If you are using a different OS, the procedure may vary slightly.
Solution 1: Deploy OceanBase Database in the demo environment
If you have only one server available, you can use the obd demo command to deploy OceanBase Database in standalone mode.
Step 1: Download and install the all-in-one package
Download the latest all-in-one package from OceanBase Download Center and upload it to any directory on your server.
In the directory where the package is located, run the following commands to decompress and install the package.
[admin@test001 ~]$ tar -xzf oceanbase-all-in-one-*.tar.gz
[admin@test001 ~]$ cd oceanbase-all-in-one/bin/
[admin@test001 bin]$ ./install.sh
[admin@test001 bin]$ source ~/.oceanbase-all-in-one/bin/env.sh
Step 2: Deploy OceanBase Database on a single server
Run the following command to deploy OceanBase Database.
[admin@test001 ~]$ obd demoBy default, the
obd democommand deploys OceanBase Database and its components (which are ODP, OBAgent, Grafana, and Prometheus) with minimum specifications in the home directory on your server and then starts them. The name of the deployed cluster is fixed todemoin obd. If you want more information about custom deployment, see Quick deployment command.You can use obd commands to manage OceanBase Database. For more information about the commands, see Cluster commands.
Note
If you install Grafana or Prometheus, its access address is returned in the command output. On Alibaba Cloud or in other cloud environments, an intranet IP address may be returned in the case of a failure to obtain a public IP address. You need to use a correct public IP address.
Run the connection command in the output to connect to the database.
After the
obd democommand is executed successfully, you will find the command for connecting to OceanBase Database via OBClient. The examples are as follows:Directly connect to the database through port 2881
[admin@test001 ~]$ obclient -h127.0.0.1 -P2881 -uroot@sys -Doceanbase -AConnect to the database in proxy mode through ODP
[admin@test001 ~]$ obclient -h127.0.0.1 -P2883 -uroot@sys -Doceanbase -A
For detailed instructions on how to connect to an OceanBase cluster using the OBClient client, see Connect to an OceanBase tenant by using OBClient. For more information about how to connect to OceanBase Database, see Overview of connection methods.
(Optional) Configure the password.
After you deploy OceanBase Database using the
obd democommand, you can follow the steps below to configure a password for the demo cluster.Modify the configuration file.
obd cluster edit-config demoAfter you execute the above command to open the configuration file, add
root_password: xxxxin the configuration file under the oceanbase-ce component in the configuration file. Then, save and exit. The following is an example:oceanbase-ce: servers: - 127.0.0.1 global: home_path: /home/admin/oceanbase-ce ... # Some parameters are omitted here. log_disk_size: 13G root_password: ******Restart the cluster.
After you modify and save the configuration file, obd will output the restart command. You can directly copy and execute it. The following is an example.
[admin@test001 ~]$ obd cluster edit-config demo
Search param plugin and load ok
Search param plugin and load ok
Parameter check ok
Save deploy "demo" configuration
Use `obd cluster reload demo` to make changes take effect.
Trace ID: 29dd12fa-3d73-11ee-91bc-00163e01cd7a
If you want to view detailed obd logs, please run: obd display-trace 29dd12fa-3d73-11ee-91bc-00163e01cd7a
As we can see in the output, after you modify the password for the root@sys user in the configuration file, you need to execute the
obd cluster reload democommand to restart the demo cluster.
Solution 2: Deploy OceanBase Database in a cluster
If you have multiple servers available, you can use the obd web interface to deploy a distributed OceanBase cluster.
Note
This section describes only simple operations needed to quickly deploy a distributed OceanBase cluster. For more information, see Deploy an OceanBase cluster on the obd web interface.
Step 1: Download and install the all-in-one package
Download the latest all-in-one package from OceanBase Download Center and upload it to any directory on your server.
In the directory where the package is located, run the following commands to decompress and install the package.
[admin@test001 ~]$ tar -xzf oceanbase-all-in-one-*.tar.gz
[admin@test001 ~]$ cd oceanbase-all-in-one/bin/
[admin@test001 bin]$ ./install.sh
[admin@test001 bin]$ source ~/.oceanbase-all-in-one/bin/env.sh
Step 2: Deploy OceanBase Database using the GUI
Run the
obd webcommand to start the GUI, then log in to the GUI by using the output address and click Start your OceanBase Database deployment experience to begin the deployment.[admin@test001 ~]$ obd web start OBD WEB in 0.0.0.0:8680 please open http://172.xx.xxx.233:8680Note
The GUI uses port 8680 by default. You can use the
obd web -p <PORT>command to specify a different port.On Alibaba Cloud or in other cloud environments, the program may fail to obtain a public IP address but return an intranet IP address. You must use a correct public IP address to access the GUI.
The
obd webcommand is bound to 0.0.0.0. In a multi-NIC deployment, you can use any accessible IP address to access the GUI.
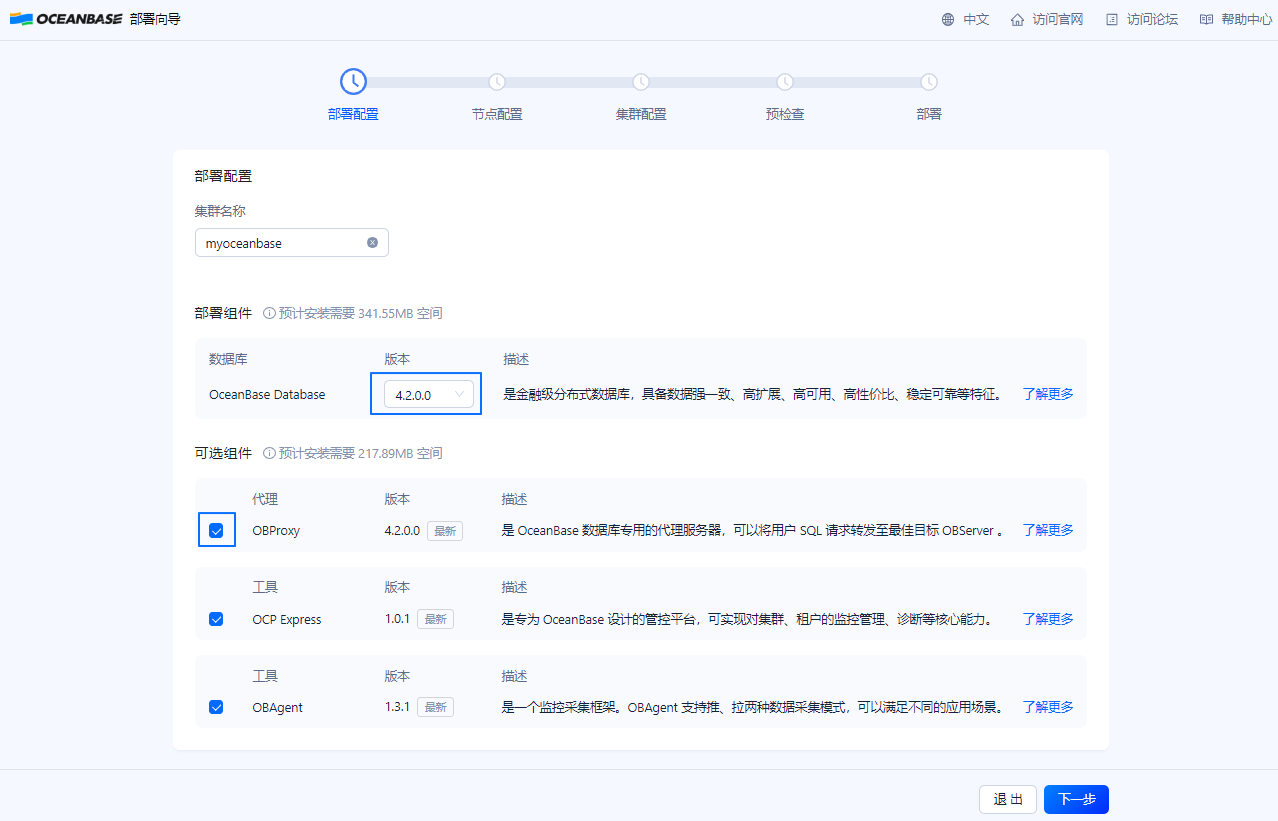
On the Deployment Configuration page, modify the Cluster Name and select the components to deploy. If you do not modify the parameters, the default values will be used (all components are deployed by default). Click Next to go to the Node Configuration page.
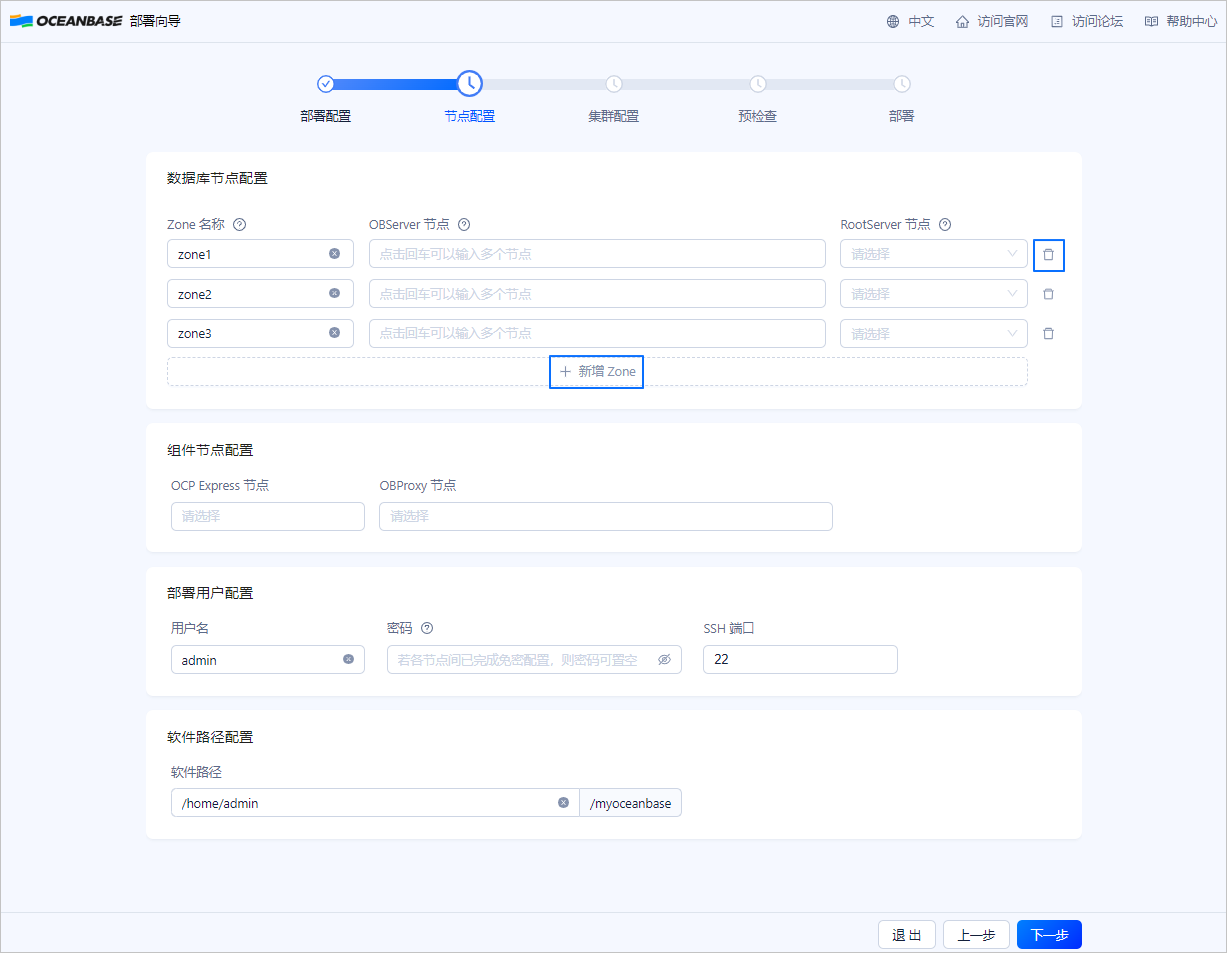
On the Node Configuration page, enter the IP address and user password of the node, and click Next to go to the Cluster Configuration page.
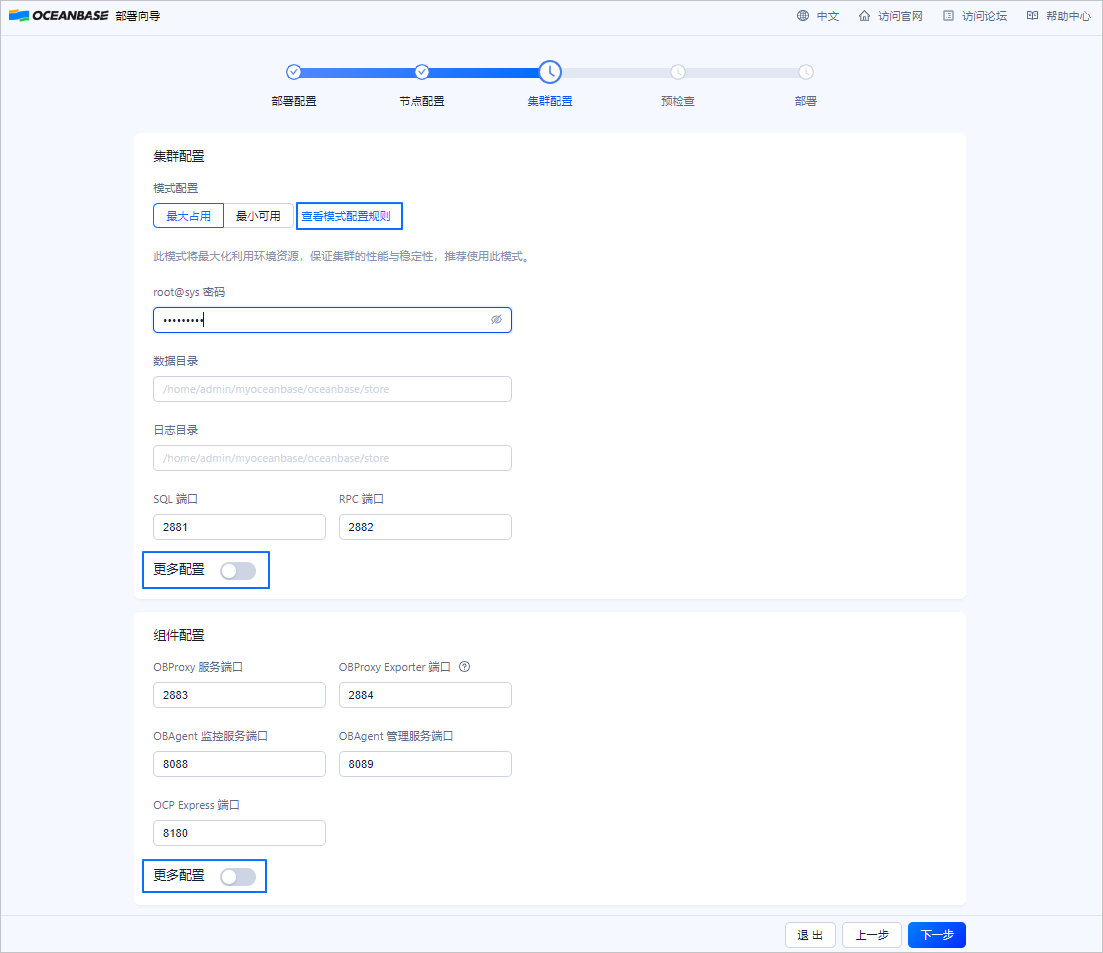
On the Cluster Configuration page, configure the deployment mode, password, directory, port, and other parameters of the cluster. If you do not modify the parameters, the default values will be used. Click Next to go to the Pre-check page.
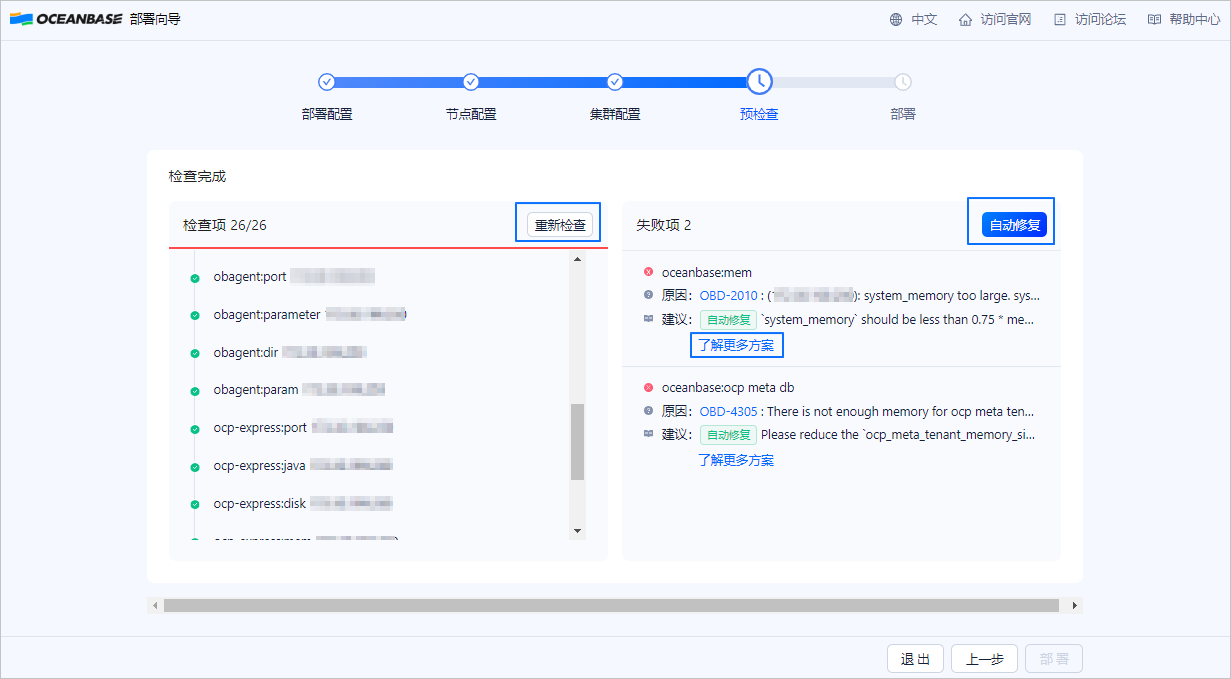
On the Pre-check page, check the configuration information. If everything is correct, click Pre-check to perform the precheck. If an error occurs during the precheck, you can choose Auto Repair on the page or click More Solutions to jump to the error code topic in the documentation for self-modification. After all modifications are completed, click Recheck to perform the precheck again.
After the precheck is completed, click Deploy to deploy the OceanBase cluster. The connection methods of the components are displayed in the console after the deployment is successful. You can copy and use them to access the components.
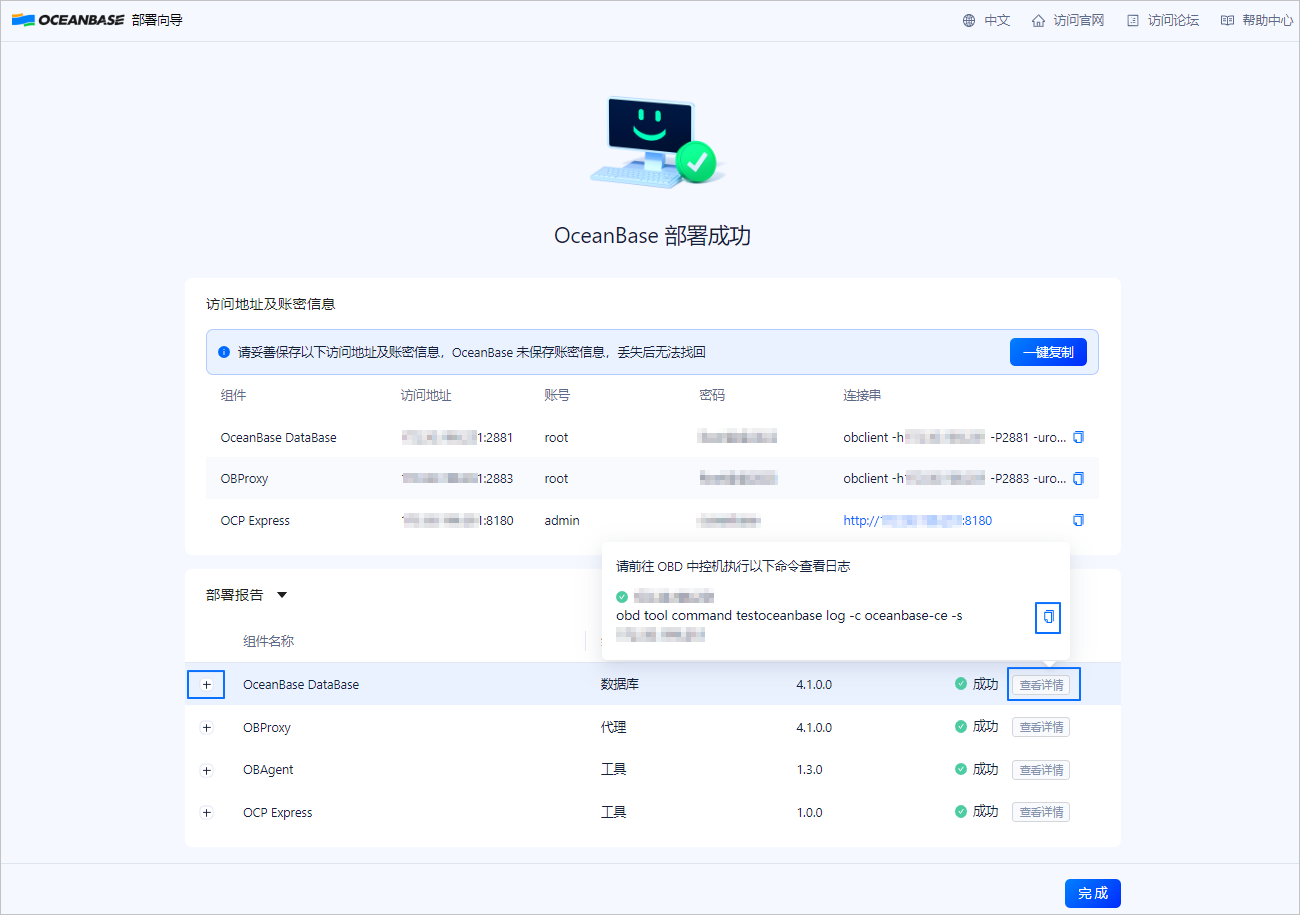
Click Complete to end the deployment process.
Connect to the OceanBase Database using the OBClient client or manage the cluster using the OCP Express GUI.
For more information about how to connect to an OceanBase cluster using the OBClient client, see Connect to an OceanBase tenant by using OBClient. For more information about connection methods, see Overview.
Directly connect to the database on port 2881, for example, to connect to the node with the IP address of 10.10.10.1
[admin@test001 ~]$ obclient -h10.10.10.1 -P2881 -uroot@sys -p -Doceanbase -AConnect to the database with ODP as the proxy, for example, if the ODP node is 10.10.10.1
[admin@test001 ~]$ obclient -h10.10.10.1 -P2883 -uroot@sys -p -Doceanbase -A
Solution 3: Deploy OceanBase Database in a container
You can start OceanBase Database in a Docker container to quickly learn about OceanBase Database.
(Optional) Step 1: Pull the image of OceanBase Database
Run the following commands to pull the image of OceanBase Database.
Search for images related to OceanBase Database.
[admin@test001 ~]$ sudo docker search oceanbasePull the latest image of OceanBase Database.
[admin@test001 ~]$ sudo docker pull oceanbase/oceanbase-ceNote
By default, the preceding command pulls the latest version of Docker image. You can select a desired image from Docker images as needed.
Step 2: Start an OceanBase Database instance
Run the following command to start an OceanBase Database instance.
[admin@test001 ~]$ sudo docker run -p 2881:2881 -v $PWD/ob:/root/ob -v $PWD/obd/cluster:/root/.obd/cluster --name obstandalone -e MODE=NORMAL -d oceanbase/oceanbase-ce
[admin@test001 ~]$ sudo docker run -p 2881:2881 -v $PWD/ob:/root/ob -v $PWD/obd/cluster:/root/.obd/cluster --name obstandalone -e MODE=MINI -d oceanbase/oceanbase-ce
In quick start mode, if you configure tenant and resource-related environment variables, the variables other than OB_TENANT_PASSWORD and OB_SYS_PASSWORD are ignored. The username of the created user tenant is default set to test and can be changed.
[admin@test001 ~]$ sudo docker run -p 2881:2881 -v $PWD/ob:/root/ob -v $PWD/obd/cluster:/root/.obd/cluster --name obstandalone -e MODE=SLIM -d oceanbase/oceanbase-ce
The options in the example are described as follows:
-pis used to map a port of the container to a port on the host. In the example, port2881of the container is mapped to port2881on the host.-vis used to share files or directories between the container and the host for data persistence or configuration sharing. By default, the system deploys OceanBase Database in the/root/obdirectory of the container and saves its configuration in the/root/.obd/clusterdirectory. You can use the-voption to persist data on the host.You can also use the
-voption to mount an SQL script for execution. Remember to modify{init_sql_folder_path}in the following example to the actual file path of the initialization script.[admin@test001 ~]$ sudo docker run -p 2881:2881 -v {init_sql_folder_path}:/root/boot/init.d --name obstandalone -e MODE=SLIM -d oceanbase/oceanbase-ce--nameis used to set the Docker container name, such asobstandalonein the example.-eis used to set environment variables. In the example, theMODEvariable is used to set the startup mode of OceanBase Database. For more information about the environment variables, see [Configurable environment variables](#Configurable environment variables).
Note
By default, Docker enables the enable_rich_error_msg parameter when it starts. If an error occurs, you can use the trace command to obtain detailed error information.
The startup is expected to take 2 to 5 minutes. Run the following command, and if it returns boot success!, the startup was successful.
[admin@test001 ~]$ sudo docker logs obstandalone | tail -1
boot success!
Step 3: Connect to the OceanBase Database instance
The oceanbase-ce image includes OceanBase Deployer (obd) and OceanBase Client (OBClient). You can either enter the container and use the obd commands and OBClient to manage and connect to the instance, or you can connect to the OceanBase Database instance from your host machine using a local OBClient or a MySQL client.
Connect to the instance after you enter the container
Enter the Docker container.
[admin@test001 ~]$ sudo docker exec -it obstandalone bashView cluster details.
# View the list of clusters
obd cluster list
# View the details of the obcluster cluster
obd cluster display obcluster
Connect to the cluster.
obclient -h127.0.0.1 -uroot@sys -A -Doceanbase -P2881 -p
Connect to the instance from your host machine
You can connect to the OceanBase Database instance from your host machine using a local OBClient or a MySQL client. Here is an example of connecting to the instance using a local OBClient:
[admin@test001 ~]$ obclient -uroot@sys -h127.0.0.1 -P2881 -p
Note
If you do not configure the password through an environment variable when you start the OceanBase Database instance, the instance allows users created in it to use the empty password by default.
After the connection is established, your terminal will display the following message:
Welcome to the OceanBase.  Commands end with ; or \g.
Your OceanBase connection id is 3221711319
Server version: OceanBase_CE 4.3.0.1 (r100000242024032211-0193a343bc60b4699ec47792c3fc4ce166a182f9) (Built Mar 22 2024 13:19:48)

Copyright (c) 2000, 2018, OceanBase and/or its affiliates. All rights reserved.

Type 'help;' or '\h' for help. Type '\c' to clear the current input statement.

obclient [(none)]>
Supported environment variables
Variable |
Default value |
Description |
Value range |
|---|---|---|---|
| MODE | MINI |
NoteIf |
The cluster startup mode. |
| EXIT_WHILE_ERROR | true |
|
Control whether to exit the container when OceanBase Database fails to start. |
| OB_CLUSTER_NAME | obcluster | None | Set the OceanBase cluster name. |
| OB_TENANT_NAME | test | The tenant name must be 63 bytes or less in length and can contain only uppercase and lowercase English letters, digits, and underscores, and cannot be an OceanBase keyword. | After configuration, a MySQL tenant with the same name is created in the OceanBase cluster. If not configured, the default tenant named test is created.
NoteIf |
| OB_MEMORY_LIMIT | 6G | [6G, +∞) | The total memory size available to the OceanBase cluster. It is equivalent to the memory_limit parameter in the other two solutions. |
| OB_DATAFILE_SIZE | 5G | [5G, +∞) | The size of data files in the OceanBase cluster. It is equivalent to the datafile_size parameter in the other two solutions. |
| OB_LOG_DISK_SIZE | 5G | [5G, +∞) | The size of the redo log disk in the OceanBase cluster. It is equivalent to the log_disk_size parameter in the other two solutions. |
| OB_SYS_PASSWORD | Not required | It must be a non-empty string. | The password of the administrator (root@sys) in the sys tenant of the OceanBase cluster. |
| OB_TENANT_PASSWORD | Not required | It must be a non-empty string. | The password of the administrator in the OB_TENANT_NAME tenant. If OB_TENANT_NAME is not configured, the default value root@test is used. |
| OB_SYSTEM_MEMORY | 1G | [1G, +∞) | The memory size reserved for the tenant with ID 500 in the OceanBase cluster. It is equivalent to the system_memory parameter in the other two solutions. |
| OB_TENANT_MIN_CPU | Not required | It specifies the minimum CPU specifications of the OB_TENANT_NAME tenant. If not configured, the tenant will occupy all the remaining resources of the OceanBase cluster. It is equivalent to the MIN_CPU parameter in a resource unit. For more information, see CREATE RESOURCE UNIT. |
|
| OB_TENANT_MEMORY_SIZE | Not required | It specifies the memory specifications of the OB_TENANT_NAME tenant. If not configured, the tenant will occupy all the remaining resources of the OceanBase cluster. It is equivalent to the MEMORY_SIZE parameter in a resource unit. For more information, see CREATE RESOURCE UNIT. |
|
| OB_TENANT_LOG_DISK_SIZE | Not required | It specifies the size of the log disk of the OB_TENANT_NAME tenant. If not configured, the tenant will occupy all the remaining resources of the OceanBase cluster. It is equivalent to the LOG_DISK_SIZE parameter in a resource unit. For more information, see CREATE RESOURCE UNIT. |
|
| OB_CONFIGSERVER_ADDRESS | Not required | It specifies the address of obconfigserver. For example: http://10.10.10.1:8080. |
References
For more information about deploying the Enterprise Edition of OceanBase Database, see Deploy OceanBase Enterprise Edition.