


Canal is an open-source product of Alibaba. It parses incremental logs in MySQL databases and thereby provides incremental data subscription and consumption. The open-source project is available at https://github.com/alibaba/canal.
Architecture
Canal works with the following four components:
Canal Deployer: theCanalcomponent that serves as a server and convertsbinlogstoCanalEntrydata.Canal Admin: the configuration administrator ofCanal. It provides a web page for you to manage theCanalDeployer.Canal Adapter: the client adapter ofCanal. It parses theCanalEntrydata and synchronizes the incremental changes to the destination database.Canal Example: theclientexample ofCanal. You can modify the sample code as needed to implement your consumption logic.
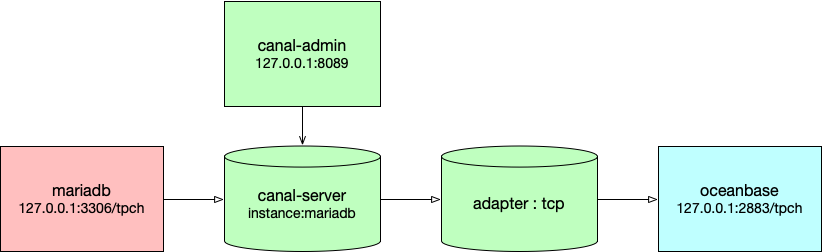
In the above figure, canal-admin is for deployment and is optional, canal-server is the Canal Deployer software, and adapter is the Canal Adapter software. The source database is a MariaDB`` database and the destination database is a MySQL tenant in OceanBase Database.
Canal Deployer
In OceanBase Database, Canal Deployer provides services by using Canal serversand instances. A Canal server is a deployer service that can have multiple instances, and an instance represents a data synchronization channel.``````
A canal instance is created by Spring during operation. The configuration information of the Canal instance is specified in the canal.properties file in the conf/ directory of the Canal Deployer. Canal provides several configuration files that are stored in the conf/spring directory. You can directly use these configuration files.
After a Canal instance parses binlogs into the CanalEntry data, it stores the CanalEntry data in the memory for later consumption. Canal provides two data consumption modes:
TCP mode: The destination database directly connects to Canal for data consumption.
MQ mode: The data in the Canal memory is written to a message queue (MQ), and the destination database connects to the MQ by using a client for data consumption.
Canal provides two types of position information. One is the parsing position, which is recorded during the conversion of a log into an entry and managed by LogPositionManager. The other is the client consumption position, which is managed by MetaManager. These two types of position information are also specified in the spring xml file of the Canal instance.
Canal Adapter
Canal Adapter consumes the CanalEntry data and writes it to the corresponding destination container. Similar to Canal Deployer, Canal Adapter also provides instances. Canal Adapter is started by the Adapter launcher and generates instances based on the configurations that you specified. The instances read the `CanalEntry``` data and write it to the destination database.
Canal Admin
Canal Admin is a service platform that simplifies the deployment of Canal. Both Canal servers and instances support standalone deployment and high-availability cluster deployment. `Canal Admin````` allows you to easily manage their deployment on a web page.
Deployment example
Prepare a MySQL database
``MariaDB is used here.
yum install mariadb mariadb-server
You must first enable Binlog writing and set the binlog-format parameter to ROW. The following example shows you how to configure the my.cnf file in the /etc directory:
[mysqld]
log-bin=mysql-bin # Enable the Binlog.
binlog-format=ROW # Set the binlog format to ROW.
server_id=1 # The server ID must be defined for the configuration of MySQL replication. It must be different from the slaveId of Canal.
Run the following commands to grant the MySQL slave privileges to the Canal user for connection with the MySQL database. If you already have a Canal user, directly run the grant command.
CREATE USER canal IDENTIFIED BY 'canal';
GRANT SELECT, REPLICATION SLAVE, REPLICATION CLIENT ON *.* TO 'canal'@'%';
-- GRANT ALL PRIVILEGES ON *.* TO 'canal'@'%' ;
FLUSH PRIVILEGES;
Then a business database is initialized for TPC-H benchmark tests, which will be described in detail in Chapter 6).
Deploy Canal Admin
Using Canal Admin to deploy Canal Deployer is easier, but it is not mandatory.
Canal Admin is used here.
Download Canal Admin at https://github.com/alibaba/canal/releases.
wget https://github.com/alibaba/canal/releases/download/canal-1.1.5/canal.admin-1.1.5.tar.gzRun the following command to extract files to the specified directory:
mkdir ~/canal-admin && tar zxvf canal.admin-1.1.5.tar.gz -C ~/canal-admin/Modify the configuration file.
cd ~/canal-admin && vim conf/application.ymlThe following example shows how to modify the configuration file:
server:
  port: 8089
spring:
  jackson:
    date-format: yyyy-MM-dd HH:mm:ss
    time-zone: GMT+8
spring.datasource:
  address: 127.0.0.1:3306
  database: canal_manager
  username: canal
  password: ******
  driver-class-name: com.mysql.jdbc.Driver
  url: jdbc:mysql://${spring.datasource.address}/${spring.datasource.database}?useUnicode=true&characterEncoding=UTF-8&useSSL=false
  hikari:
    maximum-pool-size: 30
    minimum-idle: 1
canal:
  adminUser: admin
  adminPasswd: ******
To avoid connection failure caused by an incorrect password, we do not recommend that you change the password in the
adminPasswdfield during the first test.Run the following command to initialize the MetaDB:
mysql -h127.1 -uroot -P3306 -p******
source conf/canal_manager.sql
The related tables are automatically created based on the script:
show tables;
MariaDB [tpch]> use canal_manager;
Database changed
MariaDB [canal_manager]> show tables;
+-------------------------+
| Tables_in_canal_manager |
+-------------------------+
| canal_adapter_config    |
| canal_cluster           |
| canal_config            |
| canal_instance_config   |
| canal_node_server       |
| canal_user              |
+-------------------------+
6 rows in set (0.00 sec)
Run the following command to start the web service:
cd ~/canal-admin && bin/startup.shIn general cases, if the web service is started, port 8089 is listened to.
[root@obce00 adapter]# netstat -ntlp |grep 15973
tcp        0      0 0.0.0.0:8089            0.0.0.0:*               LISTEN      15973/java
If any problem occurs during the startup, check the logs.
vim logs/admin.log +Log on to the web UI of Canal Admin.
Access webpage of Canal Admin: http://127.0.0.1:8089/
Username for logon:
adminPassword for logon:
******
Deploy Canal Deployer
Download Canal at https://github.com/alibaba/canal/releases.
wget https://github.com/alibaba/canal/releases/download/canal-1.1.5/canal.deployer-1.1.5.tar.gzRun the following command to extract files to the specified directory:
mkdir ~/canal && tar zxvf canal.deployer-1.1.5.tar.gz -C ~/canalModify configurations.
If you do not use Canal Admin to deploy the Canal server and instances, use the default configuration files
conf/canal.propertiesandconf/example/instance.properties. These configuration files are provided to create a default instance namedexample. You need to modify the database connection address, username, and password of theexampleinstance. The following sample code shows you how to modify the configuration file:vi conf/example/instance.properties # mysql serverId canal.instance.mysql.slaveId = 1234 # Specify the position information of your database. canal.instance.master.address = 127.0.0.1:3306 canal.instance.master.journal.name = canal.instance.master.position = canal.instance.master.timestamp = #canal.instance.standby.address = #canal.instance.standby.journal.name = #canal.instance.standby.position = #canal.instance.standby.timestamp = # Specify the username and password of your database. canal.instance.dbUsername = canal canal.instance.dbPassword = ****** canal.instance.defaultDatabaseName = canal.instance.connectionCharset = UTF-8 #table regex canal.instance.filter.regex = .*\\..*The
canal.instance.connectionCharsetparameter specifies the java encoding type corresponding to the database encoding method. Valid values:UTF-8,GBK, andISO-8859-1. If the system has only one CPU core, set thecanal.instance.parser.parallelparameter tofalse.If you use Canal Admin to deploy Canal
serversandinstances, you must replace the content in theconf/canal.propertiesconfiguration file with the content in theconf/canal_local.propertiesconfiguration file and then modify themanageraddress in theconf/canal.propertiesfile. You can retain the default values for other parameters.[root@obce00 canal]# cat conf/canal.properties # register ip canal.register.ip = # canal admin config canal.admin.manager = 127.0.0.1:8089 canal.admin.port = 11110 canal.admin.user = admin canal.admin.passwd = **************************************** # admin auto register canal.admin.register.auto = true canal.admin.register.cluster = canal.admin.register.name =Note The value of the
passwdparameter is cyphertext ofadminin the MySQL database. The password must be the same as the one specified in the Canal Admin configuration file. If you have changed the password in the Canal Admin configuration file, you must change this password accordingly. To obtain the cyphertext, run the followingselect passwordcommand in MySQL:MariaDB [canal_manager]> select password('admin'); +-------------------------------------------+ | password('admin') | +-------------------------------------------+ | ***************************************** | +-------------------------------------------+ 1 row in set (0.00 sec)Start Canal Server
Regardless of the deployment method you choose, you can run the following command to start Canal Server after you modify the configuration files:
sh bin/startup.sh(Optional) Use Canal Admin to deploy the Canal server and Canal instance
To use Canal Admin to manage Canal servers, log on to the Canal Admin console at http://xxx.xxx.xxx.xxx:8089/#/canalServer/nodeServers. In the left-side navigation pane, choose Canal Server > Server Management. Then, click Create Server.
Note
The IP address in the preceding link is the IP address of the server where Canal Admin is deployed. Replace it with the actual IP address of the server where Canal Admin is deployed.

In the New Server Information dialog box, click OK.
In the left-side navigation pane, choose Canal Server > Instance Management, and then click Create Instance on the Instance Management page.

On the New Instance Configuration page, click Load Template. The instance configuration file appears, which is similar to the one described in the Deploy Canal Deployer section. You need to modify configurations related to
Canaland the source database in the configuration file.
Click Save and name the instance as
mariadb.The status of the new instance is Stopped. You can click Start in the Actions column to start the instance. After the instance is started, the status changes to Started.

View server logs
You can view the
serverlogs either inCanal Adminor in the CLI by running the following command:vi logs/canal/canal.logView instance logs
You can view the
instancelogs either inCanal Adminor in the CLI by running the following commands:tail -f logs/canal/canal.log tail -f logs/example/example.log tail -f logs/mariadb/mariadb.logRun the following command to stop the service:
sh bin/stop.sh
Deploy the RDB adapter
Canal Adapter supports multiple containers. For OceanBase Community Edition, the Canal Adapter uses the RDB module. The destination container can be a MySQL database or an OceanBase Community Edition database. In this example, the destination container is an OceanBase database.
You need to perform the following steps to manually deploy Canal Adapter:
Download the Canal Adapter at https://github.com/alibaba/canal/releases.
wget https://github.com/alibaba/canal/releases/download/canal-1.1.5/canal.adapter-1.1.5.tar.gzRun the following command to extract files to the specified directory:
mkdir ~/adapter && tar zxvf canal.adapter-1.1.5.tar.gz -C ~/adapter/Modify the configuration file
application.ymlof the launcher under theconfdirectory.Set
modeof the adapter source totcp. Specify thecanal.tcpproperties, including the IP address and port of the canal server and the username and password for database connection. Then, specify the connection information of the adapter destination.instanceis the source instance name, which is defined when Canal is deployed.Note If you did not use Canal Admin for deployment, the instance name would be
example. If you used Canal Admin for deployment, theinstancename would be the one that you specified, for example,mariadbin the preceding example.keyis a custom parameter. The value will be used later.jdbcproperties specify the information used to connect to the destination OceanBase database. You can use the MySQL driver.mode: tcp #tcp kafka rocketMQ rabbitMQ flatMessage: true zookeeperHosts: syncBatchSize: 1000 retries: 0 timeout: accessKey: secretKey: consumerProperties: # canal tcp consumer canal.tcp.server.host: 127.0.0.1:11111 canal.tcp.zookeeper.hosts: canal.tcp.batch.size: 500 canal.tcp.username: tpch canal.tcp.password: ********* canalAdapters: - instance: mariadb # canal instance Name or mq topic name groups: - groupId: g1 outerAdapters: - name: logger - name: rdb key: obmysql properties: jdbc.driverClassName: com.mysql.jdbc.Driver jdbc.url: jdbc:mysql://127.0.0.1:2883/tpch?useUnicode=true jdbc.username: tpch@obmysql#obdemo jdbc.password: *********Modify the RDB mapping file.
You need to modify the
mytest_user.ymlfile in theconf/rdb/directory.The mapping modes include table mapping and full-database mapping. The following example shows how to configure full-database mapping.
[root@obce00 adapter]# cat conf/rdb/mytest_user.yml
#dataSourceKey: defaultDS
#destination: example
#groupId: g1
#outerAdapterKey: mysql1
#concurrent: true
#dbMapping:
#  database: mytest
#  table: user
#  targetTable: mytest
#  targetPk:
#    id: id
##  mapAll: true
#  targetColumns:
#    id:
#    name:
#    role_id:
#    c_time:
#    test1:
#  etlCondition: "where c_time>={}"
#  commitBatch: 3000 # The size of batch commit.
# Mirror schema synchronize config
dataSourceKey: defaultDS
destination: mariadb
groupId: g1
outerAdapterKey: obmysql
concurrent: true
dbMapping:
  mirrorDb: true
  database: tpch
  commitBatch: 1000
The
destinationparameter specifies the name of theCanal instance. TheouterAdapterKeyparameter is the user-definedkey. ThemirrorDbparameter specifies to mirror the database-level DDL and DML operations of the source database to the destination database.The type of imported data depends on the metatype of the destination table. Data types are automatically converted.
Start RDB.
If you use the driver of OceanBase Database for the destination database, place the driver package in the
libfolder.Run the following command to start the canal-adapter launcher:
bin/startup.shModify the data of the
mysql mytest.usertable to verify the configuration. The modification will be automatically synchronized to theMYTEST.TB_USERtable of the MySQL database. The logs of DML operations will be displayed.Run the following command to stop RDB:
bin/stop.shRun the following command to view RDB logs:
tail -f logs/adapter/adapter.log
2021-12-09 09:56:04.148 [pool-6-thread-1] DEBUG c.a.o.canal.client.adapter.rdb.service.RdbSyncService - DML: {"data":{"s_suppkey":99995,"s_name":null,"s_address":null,"s_nationkey":null,"s_phone":null,"s_acctbal":null,"s_comment":null},"database":"tpch","destination":"mariadb","old":null,"table":"supplier2","type":"INSERT"}
2021-12-09 09:56:04.149 [pool-6-thread-1] DEBUG c.a.o.canal.client.adapter.rdb.service.RdbSyncService - DML: {"data":{"s_suppkey":99998,"s_name":null,"s_address":null,"s_nationkey":null,"s_phone":null,"s_acctbal":null,"s_comment":null},"database":"tpch","destination":"mariadb","old":null,"table":"supplier2","type":"INSERT"}
2021-12-09 10:13:35.915 [Thread-3] INFO  c.a.o.canal.client.adapter.rdb.monitor.RdbConfigMonitor - Change a rdb mapping config: mytest_user.yml of canal adapter
Perform synchronization tests
You can perform DML and DDL operations in the source MySQL database named tpch, and check whether the modifications can be synchronized to the destination database. Note the following synchronization restrictions:
The source table must have a primary key. Otherwise, when a record is deleted from the source table, synchronizing the operation to the destination will delete the entire table in the destination.
The CREATE TABLE and CREATE COLUMN DDL operations can be synchronized. However, due to the restrictions on the MySQL tenant in OceanBase Database, a primary key added after a table is created or the change of the column type, such as change between the Numeric, String, and Datetime types, cannot be synchronized.