


This topic describes the partitioned tables in OceanBase Database.
Background
Partitioning is one of the most important features of OceanBase Database. It solves capacity problems and performance problems during highly concurrent access to large tables. It splits a large table into smaller independent objects with the same structure. These smaller objects are called partitions. A regular table contains only one partition. This can be considered a special case of partitioned tables. A partition can be deployed on only one node. Different partitions in a table can be distributed on different nodes.
Table partitioning means to aggregate the same type of data in a large data table into several smaller tables based on specified rules.
Benefits
With partitioned tables, you can:
Improve data management.
Enhance the data usage efficiency.
Partitioning types
Partitioning strategies
OceanBase Database provides multiple partitioning strategies that specify how data is distributed across partitions.
The basic partitioning strategies supported by OceanBase Database are RANGE, LIST, and HASH.
A single-level partitioning strategy uses only one data distribution method. For example, during single-level partitioning, you can use LIST partitioning or RANGE partitioning, but you cannot use them at the same time.
In composite partitioning, a table is partitioned by using a data distribution method and then subpartitioned by using another data distribution method. For example, assume that you have a table that contains the create_time and user_id columns. You can use RANGE partitioning on the create_time column and use HASH partitioning on the user_id column to create subpartitions.
RANGE partitioning
RANGE partitioning is the most frequently used partitioning method. It is often used when you want to query tables with dates. In RANGE partitioning, the database maps rows to partitions based on ranges of partitioning key values.
You can use only one column of the INT type as the partitioning key for RANGE partitioning.
If you want to use multiple columns or a column of other data types as the partitioning key, you can choose RANGE COLUMNS partitioning.
RANGE COLUMNS partitioning is similar to RANGE partitioning, but the two differ in the following aspects:
Columns for RANGE COLUMNS partitioning are not restricted to integer columns. Instead, all column types are supported.
Expressions are not accepted for RANGE COLUMNS partitioning.
Multiple columns or column vectors are accepted for RANGE COLUMNS partitioning.
Syntax
RANGE partitioning maps data to partitions based on ranges of partitioning key values that you set up for each partition when you define the partitioned table. It is the most common partitioning type and is often used with dates. For example, you can partition business log tables by day, week, or month. Basic syntax for RANGE partitioning:
CREATE TABLE table_name (
    column_name1        column_type
    [, column_nameN     column_type]
) PARTITION BY RANGE ( expr(column_name1) )
(
    PARTITION   p0      VALUES LESS THAN ( expr )
    [, PARTITION pN     VALUES LESS THAN (expr ) ]
 [, PARTITION pX    VALUES LESS THAN (maxvalue) ]
);
The following rules apply when you use RANGE partitioning:
The expr expression in the PARTITION BY RANGE (expr) clause must return an integer value.
Each partition has a VALUES LESS THAN clause, which specifies a non-inclusive upper bound literal for the partitions. Values of the partitioning key equal to or higher than this upper bound are added to the next higher partition.
All partitions, except the first one, have an implicit lower bound, which is the upper bound of the previous partition.
A MAXVALUE literal can and can only be defined for the last partition. MAXVALUE represents a virtual infinite value that is always greater than other possible values for the partitioning key, including the NULL value.
Examples
Create a RANGE-partitioned table.
Create a partitioned table named
t_log_part_by_range.CREATE TABLE t_log_part_by_range ( log_id bigint NOT NULL, log_value varchar(50), log_date timestamp NOT NULL ) PARTITION BY RANGE(UNIX_TIMESTAMP(log_date)) ( PARTITION M197001 VALUES LESS THAN(UNIX_TIMESTAMP('1970/02/01')), PARTITION M197002 VALUES LESS THAN(UNIX_TIMESTAMP('1970/03/01')), PARTITION M197003 VALUES LESS THAN(UNIX_TIMESTAMP('1970/04/01')), PARTITION M197004 VALUES LESS THAN(UNIX_TIMESTAMP('1970/05/01')), PARTITION M197005 VALUES LESS THAN(UNIX_TIMESTAMP('1970/06/01')), PARTITION M197006 VALUES LESS THAN(UNIX_TIMESTAMP('1970/07/01')), PARTITION M197007 VALUES LESS THAN(UNIX_TIMESTAMP('1970/08/01')), PARTITION M197008 VALUES LESS THAN(UNIX_TIMESTAMP('1970/09/01')), PARTITION M197009 VALUES LESS THAN(UNIX_TIMESTAMP('1970/10/01')), PARTITION M197010 VALUES LESS THAN(UNIX_TIMESTAMP('1970/11/01')), PARTITION M197011 VALUES LESS THAN(UNIX_TIMESTAMP('1970/12/01')), PARTITION M197012 VALUES LESS THAN(UNIX_TIMESTAMP('2021/01/01')) );View the
t_log_part_by_rangepartitioned table.obclient> SHOW CREATE TABLE t_log_part_by_range\G *************************** 1. row *************************** Table: t_log_part_by_range Create Table: CREATE TABLE `t_log_part_by_range` ( `log_id` bigint(20) NOT NULL, `log_value` varchar(50) DEFAULT NULL, `log_date` timestamp NOT NULL ) DEFAULT CHARSET = utf8mb4 ROW_FORMAT = DYNAMIC COMPRESSION = 'zstd_1.3.8' REPLICA_NUM = 1 BLOCK_SIZE = 16384 USE_BLOOM_FILTER = FALSE TABLET_SIZE = 134217728 PCTFREE = 0 partition by range(UNIX_TIMESTAMP(log_date)) (partition M197001 values less than (1580486400), partition M197002 values less than (1582992000), partition M197003 values less than (1585670400), partition M197004 values less than (1588262400), partition M197005 values less than (1590940800), partition M197006 values less than (1593532800), partition M197007 values less than (1596211200), partition M197008 values less than (1598889600), partition M197009 values less than (1601481600), partition M197010 values less than (1604160000), partition M197011 values less than (1606752000), partition M197012 values less than (1609430400)) 1 row in set
You can add and drop RANGE partitions. If the MAXVALUE is specified in the last RANGE partition, you cannot add another partition.
RANGE partitioning requires the partitioning key expression to return an integer value. To partition a table by RANGE based on a time column, the column must be a TIMESTAMP column and you must use the UNIX_TIMESTAMP function to convert timestamps to numeric values. This can also be implemented by RANGE COLUMNS partitioning, which does not require the results of the partitioning key expression to be integer values.
RANGE COLUMNS partitioning
RANGE COLUMNS partitioning is similar to RANGE partitioning, but the two differ in the following aspects:
Columns for RANGE COLUMNS partitioning are not restricted to integer columns. Instead, all column types are supported.
Expressions are not accepted for RANGE COLUMNS partitioning.
Multiple columns or column vectors are accepted for RANGE COLUMNS partitioning.
Syntax
Basic syntax for RANGE COLUMNS partitioning:
CREATE TABLE table_name (
    column_name1        column_type
    [, column_nameN     column_type]
) PARTITION BY RANGE ( column_name1 [, column_name2] )
(
    PARTITION   p0      VALUES LESS THAN ( expr )
    [, PARTITION pN     VALUES LESS THAN (expr ) ]
[, PARTITION pX VALUES LESS THAN (maxvalue) ]
);
Examples
Create a RANGE COLUMNS-partitioned table.
Create a RANGE COLUMNS-partitioned table named
t_log_part_by_range_columns.CREATE TABLE t_log_part_by_range_columns ( log_id bigint NOT NULL, log_value varchar(50), log_date date NOT NULL ) PARTITION BY RANGE COLUMNS(log_date) ( PARTITION M197001 VALUES LESS THAN('1970/02/01'), PARTITION M197002 VALUES LESS THAN('1970/03/01'), PARTITION M197003 VALUES LESS THAN('1970/04/01'), PARTITION M197004 VALUES LESS THAN('1970/05/01'), PARTITION M197005 VALUES LESS THAN('1970/06/01'), PARTITION M197006 VALUES LESS THAN('1970/07/01'), PARTITION M197007 VALUES LESS THAN('1970/08/01'), PARTITION M197008 VALUES LESS THAN('1970/09/01'), PARTITION M197009 VALUES LESS THAN('1970/10/01'), PARTITION M197010 VALUES LESS THAN('1970/11/01'), PARTITION M197011 VALUES LESS THAN('1970/12/01'), PARTITION M197012 VALUES LESS THAN('2021/01/01'), PARTITION MMAX VALUES LESS THAN MAXVALUE );View the
t_log_part_by_range_columnspartitioned table.obclient> SHOW create table t_log_part_by_range_columns\G *************************** 1. row *************************** Table: t_log_part_by_range_columns Create Table: CREATE TABLE `t_log_part_by_range_columns` ( `log_id` bigint(20) NOT NULL, `log_value` varchar(50) DEFAULT NULL, `log_date` date NOT NULL ) DEFAULT CHARSET = utf8mb4 ROW_FORMAT = DYNAMIC COMPRESSION = 'zstd_1.3.8' REPLICA_NUM = 1 BLOCK_SIZE = 16384 USE_BLOOM_FILTER = FALSE TABLET_SIZE = 134217728 PCTFREE = 0 partition by range columns(log_date) (partition M197001 values less than ('1970-02-01'), partition M197002 values less than ('1970-03-01'), partition M197003 values less than ('1970-04-01'), partition M197004 values less than ('1970-05-01'), partition M197005 values less than ('1970-06-01'), partition M197006 values less than ('1970-07-01'), partition M197007 values less than ('1970-08-01'), partition M197008 values less than ('1970-09-01'), partition M197009 values less than ('1970-10-01'), partition M197010 values less than ('1970-11-01'), partition M197011 values less than ('1970-12-01'), partition M197012 values less than ('2021-01-01'), partition MMAX values less than (MAXVALUE)) 1 row in set
HASH partitioning
In HASH partitioning, the database maps rows to partitions based on a hashing algorithm that the database applies to the user-specified partitioning key.
The destination of a row is determined based on the number of HASH partitions calculated by using the internal hash function applied to the row. The hashing algorithm is designed to evenly distribute rows across partitions when the number of partitions is a power of two.
Therefore, the partitions are almost the same size.
If you want to evenly distribute data across nodes, we recommend that you use the HASH partitioning method. HASH partitioning is also a simple alternative to RANGE partitioning, especially when you want to partition a table that contains non-historical data or does not have an obvious partitioning key.
You can also use HASH partitioning in online transaction processing (OLTP) systems with high update contention. HASH partitioning allows you to divide modifications to a single table into modifications to different partitions.
The values returned by the expression of a HASH partitioning key must be of the INT type.
Syntax
HASH partitioning applies to scenarios where RANGE partitioning or LIST partitioning cannot be used. HASH partitioning enables easy partitioning of data by distributing records over partitions based on a hash function on the partitioning key. HASH partitioning is a better choice in the following cases:
You cannot identify an obvious partitioning key for the data.
The sizes of RANGE partitions differ substantially or are difficult to balance manually.
RANGE partitioning can cause the data to be undesirably clustered.
Performance features such as parallel DML, partition pruning, and partition-wise joins are important.
CREATE TABLE table_name (column_name column_type[,column_name column_type])
  PARTITION BY { HASH(expr) | KEY([column_name_list]) }
    PARTITIONS partition_count;
Examples
Create a HASH-partitioned table.
Create a HASH-partitioned table named
ware.CREATE TABLE ware ( w_id int, w_ytd number(12, 2), w_tax number(4, 4), w_name varchar(10), w_street_1 varchar(20), w_street_2 varchar(20), w_city varchar(20), w_state char(2), w_zip char(9), PRIMARY KEY (w_id) ) PARTITION BY HASH (w_id) PARTITIONS 60;Note
HASH partitioning does not support partition deletion.
View the
warepartitioned table.obclient> SHOW CREATE TABLE ware\G *************************** 1. row *************************** Table: ware Create Table: CREATE TABLE `ware` ( ` w_id` int DEFAULT NULL, `w_name` varchar(10) DEFAULT NULL, `w_street_1` varchar(20) DEFAULT NULL, `w_street_2` varchar(20) DEFAULT NULL, `w_city` varchar(20) DEFAULT NULL, `w_state` char(2) DEFAULT NULL, `w_zip` char(9) DEFAULT NULL, PRIMARY KEY (`w_id`) ) DEFAULT CHARSET = utf8mb4 ROW_FORMAT = DYNAMIC COMPRESSION = 'zstd_1.3.8' REPLICA_NUM = 1 BLOCK_SIZE = 16384 USE_BLOOM_FILTER = FALSE TABLET_SIZE = 134217728 PCTFREE = 0 partition by hash(w_id) (partition p0, partition p1, partition p2, partition p3, partition p4, partition p5, partition p6, partition p7, partition p8, partition p9, partition p10, partition p11, partition p12, partition p13, partition p14, partition p15, partition p16, partition p17, partition p18, partition p19, partition p20, partition p21, partition p22, partition p23, partition p24, partition p25, partition p26, partition p27, partition p28, partition p29, partition p30, partition p31, partition p32, partition p33, partition p34, partition p35, partition p36, partition p37, partition p38, partition p39, partition p40, partition p41, partition p42, partition p43, partition p44, partition p45, partition p46, partition p47, partition p48, partition p49, partition p50, partition p51, partition p52, partition p53, partition p54, partition p55, partition p56, partition p57, partition p58, partition p59) 1 row in set
KEY partitioning
KEY partitioning is similar to HASH partitioning. The two partitioning strategies differ in the following aspects:
The partitioning key for HASH partitioning can be a custom expression, whereas the partitioning key for KEY partitioning must be a column or left empty.
The partitioning key for KEY partitioning is not limited to the
INTtype.
During KEY partitioning, you can specify one or multiple columns as the partitioning key or specify no partitioning key. If the table where KEY partitioning is performed has a primary key, the primary key must consist of one or more columns of the partitioning key. If no partitioning key is specified during KEY partitioning, the primary key of the table functions as the partitioning key. If the table has no primary key but a unique key, the unique key is used as the partitioning key.
Syntax
KEY partitioning is similar to HASH partitioning and applies to all data types except for TEXT and BLOB. KEY partitioning does not support custom expressions but the hash function provided by the MySQL server.
CREATE TABLE table_name (column_name column_type[,column_name column_type])
  PARTITION BY { HASH(expr) | KEY([column_name_list]) }
    PARTITIONS partition_count;
Examples
Create a KEY-partitioned table.
Create a KEY-partitioned table named
t_key_ny.CREATE TABLE t_key_ny ( id INT , var CHAR(32) ) PARTITION BY KEY(var) PARTITIONS 10;View the
t_key_nytable.obclient> SHOW create table t_key_ny\G *************************** 1. row *************************** Table: t_key_ny Create Table: CREATE TABLE `t_key_ny` ( `id` int(11) DEFAULT NULL, `var` char(32) DEFAULT NULL ) DEFAULT CHARSET = utf8mb4 ROW_FORMAT = DYNAMIC COMPRESSION = 'zstd_1.3.8' REPLICA_NUM = 1 BLOCK_SIZE = 16384 USE_BLOOM_FILTER = FALSE TABLET_SIZE = 134217728 PCTFREE = 0 partition by key(var) (partition p0, partition p1, partition p2, partition p3, partition p4, partition p5, partition p6, partition p7, partition p8, partition p9) 1 row in set
LIST partitioning
In LIST partitioning, the database uses a list of discrete values as the partitioning key for each partition. The partitioning key consists of one or more columns.
You can perform LIST partitioning to control how a single row is mapped to a specified partition. LIST partitioning allows you to group and organize related sets of data when the key used to identify them is not conveniently ordered.
LIST partitioning supports only a single partitioning key that may be a column or an expression. The partitioning key must be of the INT type.
Syntax
Unlike RANGE partitioning and HASH partitioning, LIST partitioning enables you to explicitly control how rows map to partitions by specifying a list of discrete values for the partitioning key in the description for each partition. The advantage of LIST partitioning is that you can partition unordered and unrelated data. Basic syntax for LIST partitioning:
CREATE TABLE table_name (
    column_name1        column_type
    [, column_nameN     column_type]
) PARTITION BY LIST ( expr(column_name1) )
(
    PARTITION   p0      VALUES IN ( v01 [, v0N] )
    [, PARTITION pN     VALUES IN ( vN1 [, vNN] ) ]
 [, PARTITION pX    VALUES IN (default) ]
);
The following rules apply when you use LIST partitioning:
The partitioning expression must return an integer value.
The partitioning expression can reference only one column, instead of a list of multiple columns (column vectors).
Examples
Create a LIST-partitioned table.
Create a table named
t_part_by_list.CREATE TABLE t_part_by_list ( c1 BIGINT PRIMARY KEY, c2 VARCHAR(50) ) PARTITION BY list(c1) ( PARTITION p0 VALUES IN (1, 2, 3), PARTITION p1 VALUES IN (5, 6), PARTITION p2 VALUES IN (DEFAULT) );Note
You can add more LIST partitions, specifying a new non-duplicate table. You can also drop a partition.
View the
t_part_by_listpartitioned table.obclient> SHOW create table t_part_by_list\G *************************** 1. row *************************** Table: t_part_by_list Create Table: CREATE TABLE `t_part_by_list` ( `c1` bigint(20) NOT NULL, `c2` varchar(50) DEFAULT NULL, PRIMARY KEY (`c1`) ) DEFAULT CHARSET = utf8mb4 ROW_FORMAT = DYNAMIC COMPRESSION = 'zstd_1.3.8' REPLICA_NUM = 1 BLOCK_SIZE = 16384 USE_BLOOM_FILTER = FALSE TABLET_SIZE = 134217728 PCTFREE = 0 partition by list(c1) (partition p0 values in (1,2,3), partition p1 values in (5,6), partition p2 values in (DEFAULT)) 1 row in set
LIST COLUMNS partitioning
If you want to use multiple columns or a column of other data types as the partitioning key, you can choose LIST COLUMNS partitioning.
LIST COLUMNS partitioning is a variant of LIST partitioning. During LIST COLUMNS partitioning, you can specify multiple partitioning keys. The partitioning keys can be of the following data types: INT, DATE, and DATETIME.
Syntax
LIST COLUMNS partitioning is similar to LIST partitioning, but they are different in the following aspects:
The use of expressions is not accepted for LIST COLUMNS partitioning.
LIST COLUMNS partitioning enables the use of multiple columns as partitioning keys (column vectors).
Basic syntax for LIST COLUMNS partitioning:
CREATE TABLE table_name (
    column_name1        column_type
    [, column_nameN     column_type]
) PARTITION BY LIST COLUMNS ( column_name1 [, column_nameN ] )
(
    PARTITION   p0      VALUES IN ( v01 [, v0N] )
    [, PARTITION pN     VALUES IN ( vN1 [, vNN] ) ]
 [, PARTITION pX    VALUES IN (default) ]
);
Examples
Create a LIST COLUMNS-partitioned table.
Create a LIST COLUMNS-partitioned table named
t2.CREATE TABLE t2 ( id varchar(64), type varchar(16), info varchar(512), gmt_create datetime(6), gmt_modified datetime(6), partition_id varchar(2) GENERATED ALWAYS AS (substr(`id`, 19, 20)) VIRTUAL, PRIMARY KEY (id) ) partition by list columns(partition_id) ( partition p0 values in ('00', '01'), partition p1 values in ('02', '03'), partition p2 values in (default) );View the
t2partitioned table.obclient> SHOW CREATE TABLE t2\G *************************** 1. row *************************** Table: t2 Create Table: CREATE TABLE `t2` ( `id` varchar(64) NOT NULL, `type` varchar(16) DEFAULT NULL, `info` varchar(512) DEFAULT NULL, `gmt_create` datetime(6) DEFAULT NULL, `gmt_modified` datetime(6) DEFAULT NULL, `partition_id` varchar(2) GENERATED ALWAYS AS (substr(`id`,19,20)) VIRTUAL, PRIMARY KEY (`id`) ) DEFAULT CHARSET = utf8mb4 ROW_FORMAT = DYNAMIC COMPRESSION = 'zstd_1.3.8' REPLICA_NUM = 1 BLOCK_SIZE = 16384 USE_BLOOM_FILTER = FALSE TABLET_SIZE = 134217728 PCTFREE = 0 partition by list columns(partition_id) (partition p0 values in ('00','01'), partition p1 values in ('02','03'), partition p2 values in (DEFAULT)) 1 row in set
Subpartitioning
You can use the RANGE, LIST, and HASH partitioning methods to divide a partition into subpartitions.
In composite partitioning, a table is partitioned by using a data distribution method and then subpartitioned by using another data distribution method. Composite partitioning is a combination of two basic partitioning methods. All subpartitions of a specified partition represent a logical subset of data in the partition.
Composite partitioning provides the following benefits:
You can perform partition pruning on one or two dimensions based on the SQL statement to improve query performance.
You can perform partial partition-wise and full partition-wise joins for queries on either dimension.
You can perform parallel backup and recovery on a table.
Compared with single-level partitioning, composite partitioning generates more partitions. This can be beneficial for the efficient parallel execution of queries.
You can implement a rolling window to support historical data and still partition on another dimension if many statements can benefit from partition pruning or partition-wise joins.
You can store data based on the partitioning key. For example, you can store data for a specific product type in a read-only and compressed format, and keep data of other product types uncompressed.
The following figure shows a graphical view of the range-hash and range-list composite partitioning methods. 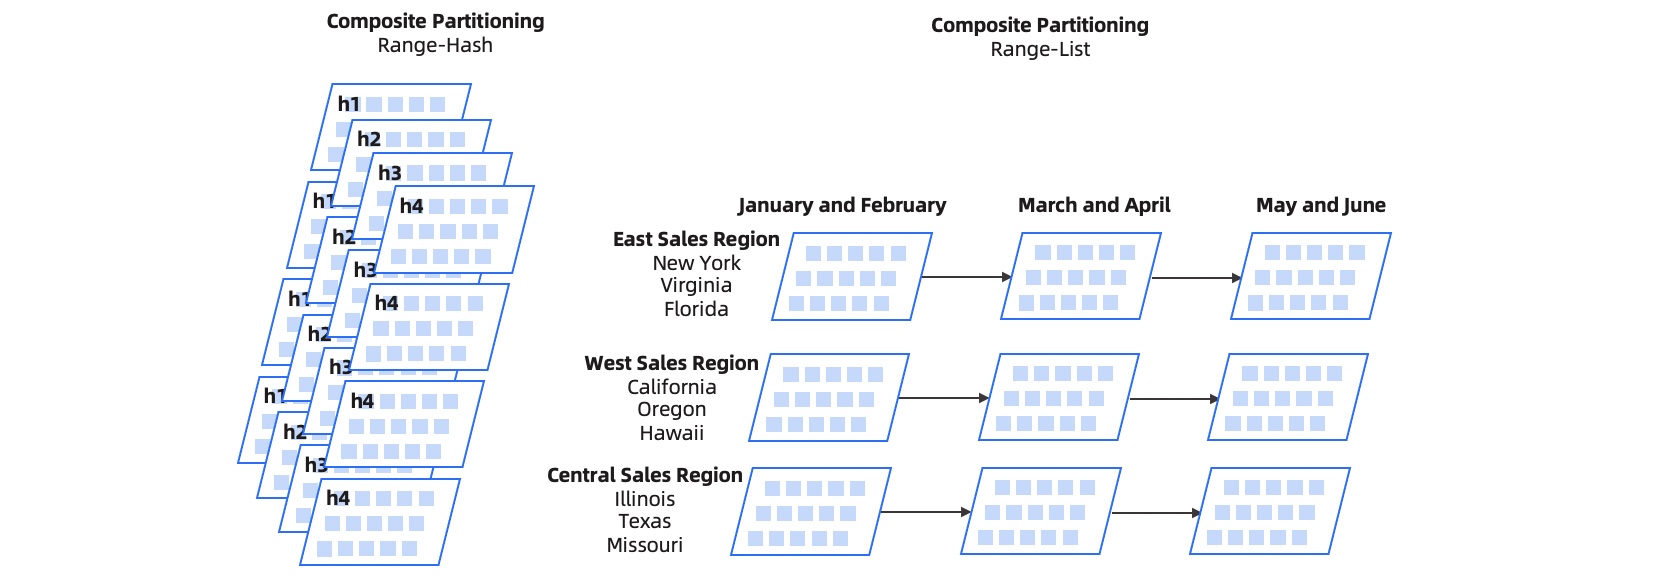
Examples
Create a table named
t_ordr_part_by_hash_range.CREATE TABLE t_ordr_part_by_hash_range ( o_w_id int, o_d_id int, o_id int, o_c_id int, o_carrier_id int, o_ol_cnt int, o_all_local int, o_entry_d TIMESTAMP NOT NULL, index idx_ordr(o_w_id, o_d_id, o_c_id, o_id) LOCAL, primary key (o_w_id, o_d_id, o_id, o_entry_d) ) PARTITION BY hash(o_w_id) SUBPARTITION BY RANGE(UNIX_TIMESTAMP(o_entry_d)) SUBPARTITION template ( SUBPARTITION M197001 VALUES LESS THAN(UNIX_TIMESTAMP('1970/02/01')), SUBPARTITION M197002 VALUES LESS THAN(UNIX_TIMESTAMP('1970/03/01')), SUBPARTITION M197003 VALUES LESS THAN(UNIX_TIMESTAMP('1970/04/01')), SUBPARTITION M197004 VALUES LESS THAN(UNIX_TIMESTAMP('1970/05/01')), SUBPARTITION M197005 VALUES LESS THAN(UNIX_TIMESTAMP('1970/06/01')), SUBPARTITION M197006 VALUES LESS THAN(UNIX_TIMESTAMP('1970/07/01')), SUBPARTITION M197007 VALUES LESS THAN(UNIX_TIMESTAMP('1970/08/01')), SUBPARTITION M197008 VALUES LESS THAN(UNIX_TIMESTAMP('1970/09/01')), SUBPARTITION M197009 VALUES LESS THAN(UNIX_TIMESTAMP('1970/10/01')), SUBPARTITION M197010 VALUES LESS THAN(UNIX_TIMESTAMP('1970/11/01')), SUBPARTITION M197011 VALUES LESS THAN(UNIX_TIMESTAMP('1970/12/01')), SUBPARTITION M197012 VALUES LESS THAN(UNIX_TIMESTAMP('2021/01/01')), SUBPARTITION MMAX VALUES LESS THAN MAXVALUE ) partitions 16;View the
t_ordr_part_by_hash_rangetable.obclient> SHOW CREATE TABLE t_ordr_part_by_hash_range\G *************************** 1. row *************************** Table: t_ordr_part_by_hash_range Create Table: CREATE TABLE `t_ordr_part_by_hash_range` ( `o_w_id` int(11) NOT NULL, `o_d_id` int(11) NOT NULL, `o_id` int(11) NOT NULL, `o_c_id` int(11) DEFAULT NULL, `o_carrier_id` int(11) DEFAULT NULL, `o_ol_cnt` int(11) DEFAULT NULL, `o_all_local` int(11) DEFAULT NULL, `o_entry_d` timestamp NOT NULL, PRIMARY KEY (`o_w_id`, `o_d_id`, `o_id`, `o_entry_d`), KEY `idx_ordr` (`o_w_id`, `o_d_id`, `o_c_id`, `o_id`) BLOCK_SIZE 16384 LOCAL ) DEFAULT CHARSET = utf8mb4 ROW_FORMAT = DYNAMIC COMPRESSION = 'zstd_1.3.8' REPLICA_NUM = 1 BLOCK_SIZE = 16384 USE_BLOOM_FILTER = FALSE TABLET_SIZE = 134217728 PCTFREE = 0 partition by hash(o_w_id) subpartition by range(UNIX_TIMESTAMP(o_entry_d)) subpartition template ( subpartition M197001 values less than (2649600), subpartition M197002 values less than (5068800), subpartition M197003 values less than (7747200), subpartition M197004 values less than (10339200), subpartition M197005 values less than (13017600), subpartition M197006 values less than (15609600), subpartition M197007 values less than (18288000), subpartition M197008 values less than (20966400), subpartition M197009 values less than (23558400), subpartition M197010 values less than (26236800), subpartition M197011 values less than (28828800), subpartition M197012 values less than (1609430400), subpartition MMAX values less than (MAXVALUE)) (partition p0, partition p1, partition p2, partition p3, partition p4, partition p5, partition p6, partition p7, partition p8, partition p9, partition p10, partition p11, partition p12, partition p13, partition p14, partition p15) 1 row in setCreate a table named
t_log_part_by_range_hash.CREATE TABLE t_log_part_by_range_hash ( log_id int NOT NULL, log_value varchar(50), log_date TIMESTAMP NOT NULL, PRIMARY key(log_id, log_date) ) PARTITION BY RANGE(UNIX_TIMESTAMP(log_date)) SUBPARTITION BY HASH(log_id) SUBPARTITIONS 16 ( PARTITION M197001 VALUES LESS THAN(UNIX_TIMESTAMP('1970/02/01')), PARTITION M197002 VALUES LESS THAN(UNIX_TIMESTAMP('1970/03/01')), PARTITION M197003 VALUES LESS THAN(UNIX_TIMESTAMP('1970/04/01')), PARTITION M197004 VALUES LESS THAN(UNIX_TIMESTAMP('1970/05/01')), PARTITION M197005 VALUES LESS THAN(UNIX_TIMESTAMP('1970/06/01')), PARTITION M197006 VALUES LESS THAN(UNIX_TIMESTAMP('1970/07/01')), PARTITION M197007 VALUES LESS THAN(UNIX_TIMESTAMP('1970/08/01')), PARTITION M197008 VALUES LESS THAN(UNIX_TIMESTAMP('1970/09/01')), PARTITION M197009 VALUES LESS THAN(UNIX_TIMESTAMP('1970/10/01')), PARTITION M197010 VALUES LESS THAN(UNIX_TIMESTAMP('1970/11/01')), PARTITION M197011 VALUES LESS THAN(UNIX_TIMESTAMP('1970/12/01')), PARTITION M197012 VALUES LESS THAN(UNIX_TIMESTAMP('2021/01/01')), PARTITION MMAX VALUES LESS THAN MAXVALUE );View the
t_log_part_by_range_hashtable.obclient> SHOW CREATE TABLE t_log_part_by_range_hash\G *************************** 1. row *************************** Table: t_log_part_by_range_hash Create Table: CREATE TABLE `t_log_part_by_range_hash` ( `log_id` int(11) NOT NULL, `log_value` varchar(50) DEFAULT NULL, `log_date` timestamp NOT NULL, PRIMARY KEY (`log_id`, `log_date`) ) DEFAULT CHARSET = utf8mb4 ROW_FORMAT = DYNAMIC COMPRESSION = 'zstd_1.3.8' REPLICA_NUM = 1 BLOCK_SIZE = 16384 USE_BLOOM_FILTER = FALSE TABLET_SIZE = 134217728 PCTFREE = 0 partition by range(UNIX_TIMESTAMP(log_date)) subpartition by hash(log_id) subpartition template ( subpartition p0, subpartition p1, subpartition p2, subpartition p3, subpartition p4, subpartition p5, subpartition p6, subpartition p7, subpartition p8, subpartition p9, subpartition p10, subpartition p11, subpartition p12, subpartition p13, subpartition p14, subpartition p15) (partition M197001 values less than (2649600), partition M197002 values less than (5068800), partition M197003 values less than (7747200), partition M197004 values less than (10339200), partition M197005 values less than (13017600), partition M197006 values less than (15609600), partition M197007 values less than (18288000), partition M197008 values less than (20966400), partition M197009 values less than (23558400), partition M197010 values less than (26236800), partition M197011 values less than (28828800), partition M197012 values less than (1609430400), partition MMAX values less than (MAXVALUE)) 1 row in set