


After a data migration project starts, you can view the project metrics on the details page of the project, such as basic information, and project progress and status.
Access the details page
Log on to the OceanBase Migration Service (OMS) console.
In the left-side navigation pane, click Data Migration.
On the Data Migration page, click the name of the target project. On the details page that appears, view the basic information and migration details of the project.
On the Data Migration page, you can search for data migration projects by tag, status, type, or keywords. A data migration project has the following status:
Not Started: The data migration project has not been started. You can click Start in the Actions column to start the project.
Running: The data migration project is in progress. You can view the data migration plan and current progress on the right.
Modifying: The migration objects of the data migration project are being modified.
Integrating: The data migration project whose migration objects are modified is integrating with the migration object modification task.
Paused: The data migration project is manually paused. You can click Resume in the Actions column to resume the project.
Failed: The data migration project has failed. You can view where the failure occurred on the right. To view the error messages, click the project name to go to the project details page.
Completed: The data migration project is completed and OMS has migrated the specified data to the destination database in the configured migration mode.
Releasing: The data migration project is being released. You cannot edit a data migration project in this status.
Released: The data migration project is released. After the project is released, OMS releases the current migration and incremental synchronization projects.
View basic information
The Basic Information section displays the configuration information of the data migration project in the following columns: ID, Migration Type, Alert Level, Created By, Creation Time, Concurrency for Full Migration, Full Verification Concurrency, and Connection Details.
You can perform the following operations:
View connection details
Click Connection Details next to the Connection Details field to view the connection information of the source and destination databases in a data migration project.
View migration objects
Click View Migration Objects in the upper-right corner. The migration objects of the current data migration project are displayed. You can also modify the migration objects of a data migration object that meets the restrictions. For more information, see View and modify migration objects.
View the component monitoring metrics
Click View Component Monitoring in the upper-right corner to view the information about the Store, JDBCWriter, Checker-Full, and Checker-Verify components.
View or modify parameter configurations
For a data migration project in the Running state, click the More icon in the upper-right corner and then select View Parameter Configurations from the drop-down list to view the parameters of the data migration project when it was created.
For a data migration project in the Not Started, Paused, or Failed state, click the More icon in the upper-right corner and then select Modify Parameter Configurations from the drop-down list. In the Modify Parameter Configurations dialog box, modify the parameters and click OK.
The parameters that can be modified vary with the type of the data migration project, and the stage of the task.
Download object settings
OMS allows you to download the configurations of data migration projects in batches. For more information, see Download and import the settings of migration objects.
View migration details
The Migration Details section displays the status, progress, start time, completion time, and total time spent of all subtasks of the current project.
Schema migration
The definitions of data objects, such as tables, indexes, constraints, comments, and views, are migrated from the source database to the destination database. Temporary tables are automatically filtered out.
If the source database is not an OceanBase database, OMS performs format conversion and encapsulation based on the syntax definition and standard of the tenant type of the destination OceanBase database and then replicates the data to the destination database.
On the Schema Migration page, you can view the overall status, start time, end time, and total time consumed of the schema migration, as well as the migration progresses of databases, tables, and views. You can perform the following operations on an object:
View Creation Syntax: On the Database or Table tab, click View next to the target object to view the creation syntax of a database, table, or index.
Compatible DDL syntax executed on the OBServer is displayed. Incompatible syntax is converted before it is displayed.
Modify Creation Syntax and Try Again: View the error information, check and modify the definition of the conversion result of a failed DDL statement, and then migrate the data to the destination again.
Retry/Retry All Failed Objects: You can retry failed schema migration tasks one by one or retry all failed tasks at a time.
Skip/Batch Skip: You can skip failed schema migration tasks one by one or skip multiple failed tasks at a time. To skip multiple objects at a time, select the objects and click Batch Skip in the upper-right corner. If you skip an object, its index is also skipped.
Remove/Batch Remove: You can remove failed schema migration tasks one by one or remove multiple failed tasks at a time. To remove multiple failed tasks at a time, select the tasks and click Batch Remove in the upper-right corner. If you remove an object, its index is also removed.
View Database Return Code: You can view the DDL statements executed on the OBServer and the execution error information of a failed schema migration task.
Full migration
The existing data is migrated from tables in the source database to the corresponding tables in the destination database. On the Full Migration tab, you can filter by the source or destination database, or select View Objects with Errors to view the objects that block the overall migration progress. You can also view related information on the Table Objects, Table Indexes, and Full Migration Performance tabs. The status of the full migration task changes to Completed only after the table objects and table indexes are migrated.
On the Table Objects tab, you can view the names, source and destination databases, estimated data volumes, migrated data volumes, and statuses of tables.
On the Table Indexes tab, you can view the table objects, source and destination databases, creation time, end time, time consumed, and status. You can also view the index creation syntax and remove unwanted indexes.
On the Full Migration Performance tab, you can view the graphs of performance data such as the RPS and migration traffic of the source database and destination database, average read time and average sharding time of the source database, average write time of the destination database, and performance benchmarks. Such information can help you identify performance issues in a timely manner.
You can combine full migration with incremental synchronization to ensure data consistency between the source and destination databases. If any objects fail to be migrated during a full migration, the causes of the failure are displayed.
Notice:
If you did not select Schema Migration for Migration Type, OMS migrates the fields in the source database that match those in the destination database during full migration, without checking whether the table structures are consistent.
After the full migration is completed and the subsequent procedure is started, you cannot choose O&M and Monitoring > Component > Checker and click Rerun on the Checker page.
Incremental synchronization
Changed data in the source database is synchronized to the corresponding tables in the destination database after an incremental synchronization task starts. Data changes are data addition, modification, and deletion. When services continuously write data to the source database, OMS starts the incremental data pull module to pull incremental data from the source instance, parses and encapsulates the incremental data, and then stores the data in OMS. After that, OMS starts the full data migration.
After the full data migration task is completed, OMS starts the incremental data replay module to pull incremental data from the incremental data pull module. The incremental data is synchronized to the destination instance after being filtered, mapped, and converted. If you execute a DDL statement in the source database and cause a JDBCWriter exception, which then cause the data migration project to fail, the DDL statement and the Skip button are displayed. You can click Skip in the dialog box that appears and confirm your operation.
Notice:
This operation may lead to data structure inconsistency between the source and destination databases. Proceed with caution.
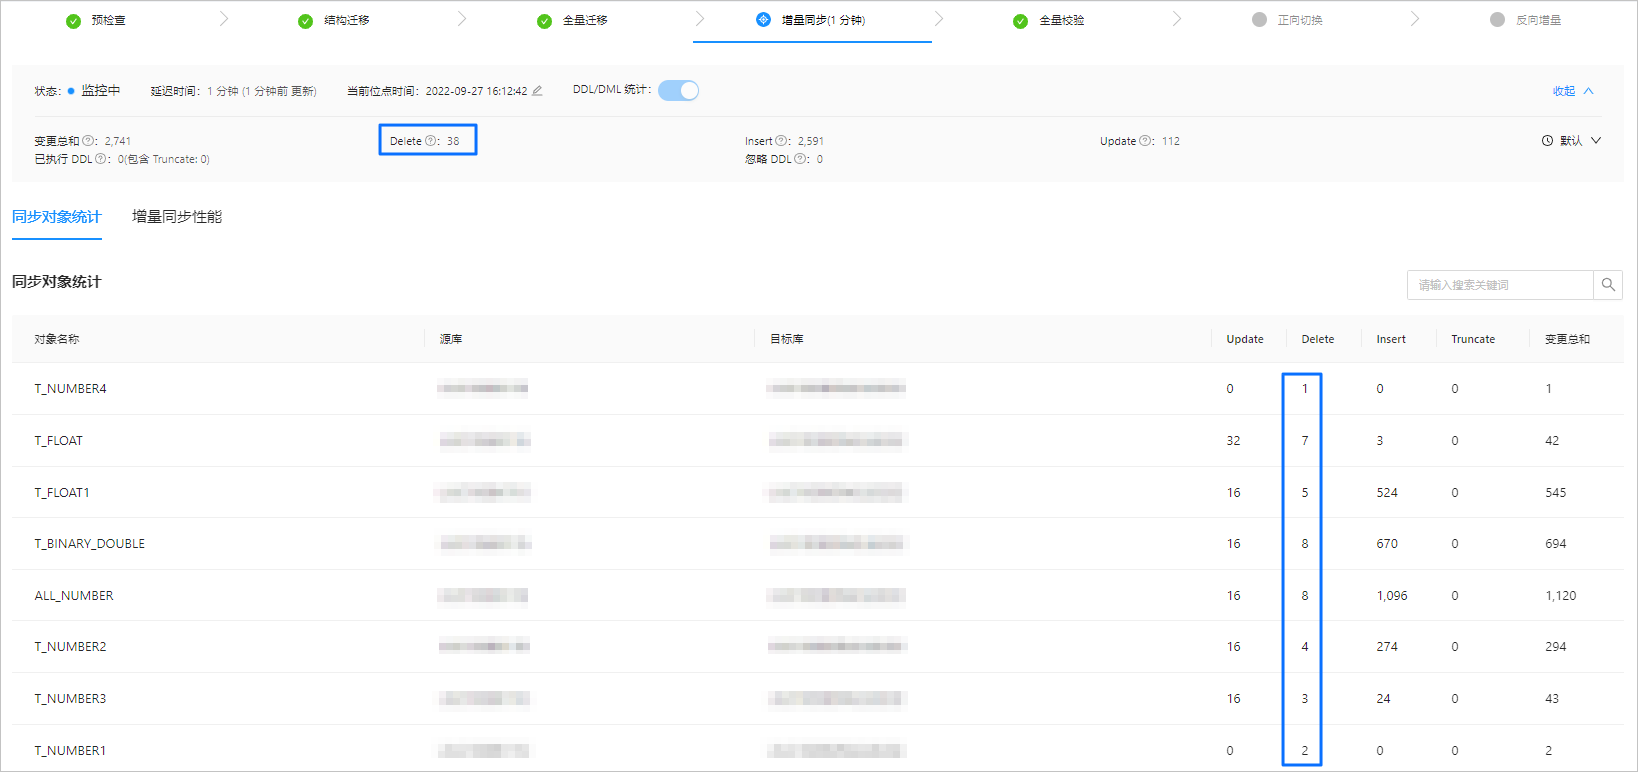
For a Running data migration project, you can view its latency, current timestamp, and incremental synchronization performance in the incremental synchronization section. The latency is displayed in the following format: X seconds (updated Y seconds ago). Normally, Y is less than 20.
For a Paused or Failed data migration project, you can enable the DDL/DML statistic feature to collect statistics on the database operations performed after this feature is enabled, You can also view the specific information about incremental synchronization objects and the incremental synchronization performance.
The Synchronization Object Statistics tab displays the statistics about DML statements executed for each incremental synchronization object in the current project. The numbers displayed in the Change Sum, Delete, Insert, and Update fields in the section above the Synchronization Object Statistics tab are the sum of the corresponding columns on this tab.
The Incremental Synchronization Performance tab displays the following content:
Latency: the latency in synchronizing incremental data from the source database to the destination database, in seconds.
Migration traffic: the traffic throughput of incremental data synchronization from the source database to the destination database, in Kbit/s.
Average execution time: the average execution time of an SQL statement, in ms.
Average commit time: the average commit time of a transaction, in ms.
RPS: the number of records processed per second.
When you create a data migration project, we recommend that you specify related information such as the alert level and alert frequency, to help you understand the project status. OMS applies low-level protection by default. You can modify the alert level based on business needs. For more information, see Alert settings.
When the incremental synchronization latency exceeds the specified alert threshold, the incremental synchronization status stays at Running and the system does not trigger any alerts.
When the incremental synchronization latency is less than or equal to the specified alert threshold, the incremental synchronization status changes from Running to Monitoring. After the incremental synchronization status changes to Monitoring, it will not change back to Running when the latency exceeds the specified alert threshold.
Full verification
After the full data migration and incremental data migration are completed, OMS automatically initiates a full data verification task to verify the data tables in the source and destination databases.
Notice:
If you did not select Schema Migration for Migration Type, OMS verifies the fields in the source database that match those in the destination database during full verification, without checking whether the table structures are consistent.
During the full data verification, if you perform the
create,drop,alter, orrenameoperation on the source tables, the full data verification may exit.
OMS also provides APIs for you to initiate custom data verification tasks during incremental data synchronization.
On the Full Verification page, you can view the overall status, start time, end time, total consumed time, estimated total number of rows, number of migrated rows, real-time traffic, and RPS of the full verification.
The Full Verification page contains the Verified Objects and Full Verification Performance tabs.
On the Verified Objects tab, you can view the verification progress and verification object list.
You can view the names, source and destination databases, full data verification progress and results, and result summary of all migration objects.
You can filter migration objects by source or destination database.
You can select View Completed Objects Only to view the basic information of objects that have completed schema migration, such as the object names.
You can choose Reverify > Restart Full Verification to run a full verification again for all migration objects.
For tables with inconsistent verification results:
If you need to reverify all data in the tables, choose Reverify > Reverify Abnormal Table.
If you need to reverify only inconsistent data, choose Reverify > Verify Only Inconsistent Records.
Notice:
The correction operation is not supported if the source database has no corresponding data.
On the Full Verification Performance tab, you can view the graphs of performance data such as the RPS and verification traffic of the source and destination databases and performance benchmarks. Such information can help you identify performance issues in a timely manner.
OMS allows you to skip full verification for a project that is being verified or has failed verification. On the Full Verification page, click Skip Full Verification in the upper-right corner. In the dialog box that appears, click OK.
Notice:
If you skip full verification, you cannot recover this verification task for data comparison or correction. In this case, you must clone the current project and initiate full verification again. Proceed with caution.
After the full verification is completed, you can click Go To Next Stage to start a forward switchover. After you enter the switchover process, you cannot recheck the current verification task to compare or correct data.
Forward switchover
Forward switchover is an abstract and standard process of traditional system cutover and does not involve the switchover of application connections. This process includes a series of tasks that are performed by OMS for the application switchover in a data migration project. You need to make sure that the entire forward switchover process is completed before the application connections are switched over to the destination database.
Forward switchover will be performed if you choose to perform data migration. During forward switchover, you need to terminate forward incremental synchronization, delete the additional columns and unique indexes that the migration depends on, add the CHECK constraint that was filtered out by OMS during the synchronization, and activate the triggers and foreign keys in the destination database to ensure the data integrity and availability of the destination database. Objects such as triggers and foreign keys are disabled before the migration to avoid data inconsistency.
If reverse incremental migration is configured, the subtasks for starting reverse incremental migration and disabling triggers and foreign keys in the source database are included in the forward switchover process. This enables you to start real-time incremental synchronization from the destination database to the source database. This ensures that the business data flows back to the source database and allows application switchover at any time.
Start the forward switchover
This step does not stop the migration. You only need to confirm the switchover process that is about to start. To start the forward switchover task, click Start Forward Switchover.
Notice:
Before you start the forward switchover task, make sure that the data source of the source is about to stop writing or has stopped writing.
Perform switchover precheck
Check whether the current project status supports switchover. The precheck involves the following steps:
Check the synchronization latency: If the synchronization latency is within 15 seconds after incremental synchronization is started, the switchover passes this check item. If incremental synchronization is not started, the switchover automatically passes this check item.
Check the user write privilege on the source side.
If the switchover passes the precheck, the system automatically performs the next step. If the switchover fails the precheck, the system shows the error details.
In this case, you can retry or skip the precheck.
After you click Skip, you must also click Skip in the dialog box that appears.
Start the destination Store
Start incremental data pulling in the destination database. Create and start a destination Store. If the start fails, you can choose to click Retry or Skip.
Confirm that writing has stopped in the source database
In the Make sure that writing is stopped at the source section, click OK to make sure that no incremental data is generated in the source database.
Confirm the writing stop timestamp upon synchronization completion
OMS automatically checks whether the source and destination databases are synchronized to the same timestamp. After the check is completed, the latency and timestamp of the incremental synchronization are displayed. If the synchronization of incremental data is not completed, you can choose to retry or skip.
Stop forward synchronization
Stop the JDBCWriter from the source database to the destination database. If the forward synchronization fails to be stopped, you can click Retry or Skip.
Process database objects
In this step, the database objects are migrated, the additional columns and indexes added by OMS are deleted, and the constraints that are automatically ignored during the schema migration are added. You must also confirm that objects such as triggers and sequences have been manually migrated and that the triggers and foreign keys of the source are disabled.
You need to click Run to process the database objects. For a running project, the View Logs or Skip options are provided in the Actions column. For manually handled projects, you need to click Mark as Complete. After all projects have been marked as completed, proceed to the next step.
Start reverse incremental migration
In the Start Reverse Incremental Migration section, click Start Reverse Incremental Migration to start the JDBCWriter from the destination database to the source database. Wait until the "Reverse incremental migration started" message appears.
Reverse incremental migration
For a Running data migration project, you can view its latency, current timestamp, and reverse incremental migration performance in the reverse incremental migration section. The latency is displayed in the following format: X seconds (updated Y seconds ago). Normally, Y is less than 20.
For a Paused or Failed data migration project, you can enable the DDL/DML statistic feature to collect statistics on the database operations performed after this feature is enabled, You can also view the specific information about reverse migration objects and the reverse incremental migration performance.
The performance metrics of reverse incremental migration:
Latency: the time consumed to synchronize changed incremental data from the destination database to the source database, in seconds.
Migration Traffic: the traffic throughput of incremental data synchronization from the destination database to the source database, in KB/s.
View the component monitoring metrics
On the details page of the data migration project, click View Component Monitoring to view the information about the Store, JDBCWriter, Checker-Full, and Checker-Verify components. You can perform the following operations on the components:
Start the component: Click Start in the Actions column of the component that you want to start. In the dialog box that appears, click OK.
Pause the component: Click Pause in the Actions column of the component that you want to pause. In the dialog box that appears, click OK.
Update the component: click Update next to the component you want to update. On the Update Configuration page, modify the configurations and click Update.
Notice:
The system restarts after you update the component. Proceed with caution.
View logs: Click the More icon for the component and choose View Logs from the drop-down list. The View Logs page displays the latest logs. You can search for, download, and copy the logs.