


This topic describes how to deploy OceanBase Migration Service (OMS) on multiple nodes in a single region by using deployment tools.
Background
You can deploy OMS on a single node first and scale out to multiple nodes.
If you choose to deploy OMS with the
config.yamlconfiguration file, note that the settings are slightly different from those for the single-node deployment mode. For more information, see the "Template and example of the configuration file" section.To deploy OMS on multiple nodes, you must apply for a virtual IP address (VIP) and use it as the mount point for the OMS console. In addition, you must configure the mapping rules of Ports 8088 and 8089 in the VIP network strategy.
You can use the VIP to access the OMS console even if an OMS node fails.
Prerequisites
The installation environment meets the system requirements. For more information, see System requirements.
The MetaDB cluster is prepared as the OMS MetaDB.
The OMS installation package is obtained. Generally, the package is a
tar.gzfile whose name starts withoms.Make sure that the server to deploy OMS can connect to all other servers.
The downloaded OMS image file has been loaded to the local image repository of the Docker container on each server node.
docker load -i <Storage path of the OMS image>In this example, the name of the loaded image file is
OMS_IMAGE. You need to replace it with the actual name of your image file.Make sure that all servers involved in the multi-node deployment can connect to each other and that you can obtain root permissions on a node by using its username and password.
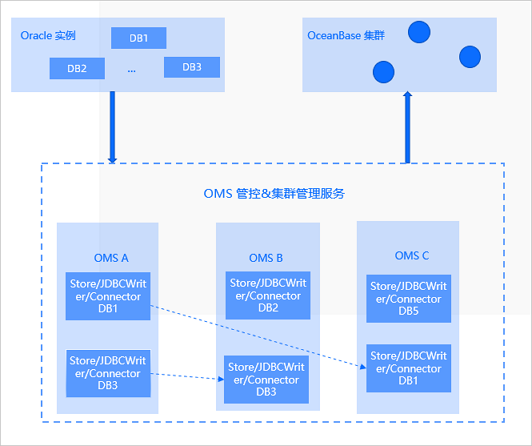
Multi-node deployment architecture
The following figure shows an architecture of multi-node deployment. Store is the log pulling component, and JDBCWriter and Connector are real-time synchronization components. When the OMS A fails, store, JDBCWriter, and connector processes running on the node are protected by the HA service and switched to OMS B or OMS C.
Notice:
By default, the high availability feature is disabled. To ensure the high availability of stores, JDBCWriters, and connectors, enable HA in the OMS console. For more information, see Modify HA configurations.
Deploy OMS without the configuration file
Log on to the server where OMS is to be deployed.
Optional. Deploy a time-series database.
If you need to collect and display OMS monitoring data, deploy a time-series database. Otherwise, you can skip this step. For more information, see Deploy a time-series database.
Run the following command to obtain the deployment script from the loaded image:
sudo docker run -d --name oms-config-tool <OMS_IMAGE> bash && sudo docker cp oms-config-tool:/root/docker_remote_deploy.sh . && sudo docker rm -f oms-config-toolUse the deployment script to start the deployment tool.
sh docker_remote_deploy.sh -o <deploy_tool_workdir> -i <IP address of the server> -d <OMS_IMAGE>Follow the prompts to complete the deployment. After you set each parameter, press Enter to move on to the next parameter.
Select the deployment mode.
Select Multiple Nodes in Single Region.
Select the task.
Select No Configuration File. Deploy OMS Starting from Configuration File Generation.
Specify the following MetaDB information:
IP address of the MetaDB
Port number of the MetaDB
Username used to connect to the MetaDB
Password used to connect to the MetaDB
Prefix for names of databases in the MetaDB
For example, if you set the prefix to
oms, the final database names areoms_rm,oms_cm, andoms_cm_hb.
Confirm your settings.
If the settings are correct, enter
yand press Enter to proceed. Otherwise, enternand press Enter to modify the settings.If the system displays "The specified database names already exist in the metadatabase. Are you sure that you want to continue?", it indicates that the database names you specified already exist in the MetaDB. This may be caused by repeated deployment or upgrade of OMS. You can enter
yand press Enter to proceed, or enternand press Enter to re-specify the settings.Perform the following operations to configure the Cluster Manager (CM) service of OMS:
Specify the URL of the CM service, which is the virtual IP address (VIP) or domain name to which all CM servers in the region are mounted. The original parameter is
cm-url.You can separately specify the IP address and port number in the URL, or use a colon (:) to join the IP address and port number in the
: format. Note:
The
http://prefix in the URL is optional.Enter the IP addresses of all servers in the region. Separate them with commas (,).
Confirm the displayed CM settings.
If the settings are correct, enter
yand press Enter to proceed. Otherwise, enternand press Enter to modify the settings.
Confirm whether to enable OMS historical data monitoring.
If you have deployed a time-series database, enter
yand press Enter to go to the next step to configure the time-series database and enable the monitoring of OMS historical data.If you did not deploy a time-series database, enter
nand press Enter to go to the step of "determining whether to enable the audit log feature and setting Simple Log Service (SLS) parameters". In this case, OMS does not monitor the historical data after deployment.
Configure the time-series database.
Perform the following operations:
Confirm whether you have deployed a time-series database.
If yes, enter
yand press Enter. If not, enternand press Enter to go to the step of "determining whether to enable the audit log feature and setting SLS parameters".Set the type of the time-series database to
INFLUXDB.Notice:
At present, only INFLUXDB is supported.
Enter the URL of the time-series database.
You can separately enter the IP address and port number in the URL, or use a colon (:) to join the IP address and port number in the
: format. Enter the username used to connect to the time-series database.
Enter the password used to connect to the time-series database.
Confirm whether the displayed settings are correct.
If the settings are correct, enter
yand press Enter to proceed. Otherwise, enternand press Enter to modify the settings.
Determine whether to enable the audit log feature and set SLS parameters.
To enable the audit log feature, enter
yand press Enter to go to the next step to specify the SLS parameters.To start deployment on each node, enter
nand press Enter to go to the step of "starting the deployment on each node one after another". In this case, OMS does not audit the logs after deployment.Specify the following SLS parameters:
URL of SLS
access-key used to access SLS
secret-key used to access SLS
user-site-topic of SLS
ops-site-topic of SLS
Confirm whether the displayed settings are correct.
If the settings are correct, enter
yand press Enter to proceed. Otherwise, enternand press Enter to modify the settings.Start the deployment on each node one after another.
Perform the following operations to specify additional information that is required for the deployment on a node:
Enter the username used to connect to the server.
Enter the password used to connect to the server.
Specify the path of the
config.yamlfile, which must end with a slash (/).Specify the root directory to which the OMS container is mounted in the host.
Use a directory with a large capacity.- Confirm whether the OMS image file can be named as
OMS_IMAGE.
If yes, enter `y` and press **Enter**. If not, enter `n` and press **Enter**.- Confirm whether to install a Secure Sockets Layer (SSL) certificate for the OMS container.
If yes, enter `y`, press **Enter**, and specify the `https_key` and `https_crt` directories as prompted. If not, enter `n` and press **Enter**.- Repeat the operations in the previous step on each node until the deployment is completed on all nodes.
Deploy OMS with the configuration file available
Log on to the server where OMS is to be deployed.
Optional. Deploy a time-series database.
If you need to collect and display OMS monitoring data, deploy a time-series database. Otherwise, you can skip this step. For more information, see Deploy a time-series database.
Run the following command to obtain the deployment script from the loaded image:
sudo docker run -d --name oms-config-tool <OMS_IMAGE> bash && sudo docker cp oms-config-tool:/root/docker_remote_deploy.sh . && sudo docker rm -f oms-config-toolUse the deployment script to start the deployment tool.
sh docker_remote_deploy.sh -o <deploy_tool_workdir> -c <directory of the config.yaml file> -i <IP address of the server> -d <OMS_IMAGE>Note:
For more information about settings of the
config.yamlfile, see the "Template and example of the configuration file" section.Follow the prompts to complete the deployment. After you set each parameter, press Enter to move on to the next parameter.
Select the deployment mode.
Select Multiple Nodes in Single Region.
Select the task.
Select Use Configuration File Uploaded with Script Option [-c].
If the system displays "The specified database names already exist in the metadatabase. Are you sure that you want to continue?", it indicates that the database names you specified already exist in the MetaDB. This may be caused by repeated deployment or upgrade of OMS. You can enter
yand press Enter to proceed, or enternand press Enter to re-specify the settings.If the configuration file passes the check, all the settings are displayed. If the settings are correct, enter
yand press Enter to proceed. Otherwise, enternand press Enter to modify the settings.If the configuration file fails the check, modify the configuration information as prompted.
Start the deployment on each node one after another.
Perform the following operations to specify additional information that is required for the deployment on a node:
Enter the username used to connect to the server.
Enter the password used to connect to the server.
Specify the path of the
config.yamlfile, which must end with a slash (/).Specify the root directory to which the OMS container is mounted in the host.
Use a directory with a large capacity.
Confirm whether the OMS image file can be named as
OMS_IMAGE.If yes, enter
yand press Enter. Otherwise, enternand press Enter to modify it.Confirm whether to install an SSL certificate for the OMS container.
If yes, enter
y, press Enter, and specify thehttps_keyandhttps_crtdirectories as prompted. If not, enternand press Enter.
Repeat the operations in the previous step on each node until the deployment is completed on all nodes.
Template and example of the configuration file
Configuration file template
Notice:
The same configuration file applies to all nodes in the multi-node deployment architecture. In the configuration file, you must specify the IP addresses of multiple nodes for the
cm_nodesparameter and set thecm_urlparameter to the VIP corresponding to Port 8088.You must replace the sample values of required parameters based on your actual deployment environment. Optional parameters are commented in this example. You can modify the optional parameters or uncomment the parameters as needed.
In the
config.yamlfile, you must specify the parameters in the key: value format, with a space after the colon (:).
# Information about the OMS MetaDB
oms_meta_host: ${oms_meta_host}
oms_meta_port: ${oms_meta_port}
oms_meta_user: ${oms_meta_user}
oms_meta_password: ${oms_meta_password}

# You can customize the names of the following three databases, which are created in the MetaDB when you deploy OMS.
drc_rm_db: ${drc_rm_db}
drc_cm_db: ${drc_cm_db}
drc_cm_heartbeat_db: ${drc_cm_heartbeat_db}

# The user that consumes the incremental data of OceanBase Database.
# To read incremental logs of OceanBase Database, create the user in the sys tenant.
# You must create the drc_user in the sys tenant of the OceanBase cluster to be migrated and specify the drc_user in the config.yaml file.
drc_user: ${drc_user}
drc_password: '${drc_password}'

# Configurations of the OMS cluster
# To deploy OMS on multiple nodes in a single region, you must set the cm_url parameter to a VIP or domain name to which all CM servers in the region are mounted.
cm_url: ${cm_url}
cm_location: ${cm_location}
# The cm_region parameter is not required for single-region deployment.
# cm_region: ${cm_region}
cm_is_default: true
cm_nodes:
 - ${host_ip1}
 - ${host_ip2}

# Configurations of the time-series database
# Default value: false. To enable metric reporting, set the parameter to `true` and delete the comments for the parameter.
# tsdb_enabled: false
# If the `tsdb_enabled` parameter is set to `true`, delete comments for the following parameters and specify the values based on your actual configurations.
# tsdb_service: 'INFLUXDB'
# tsdb_url: '${tsdb_url}'
# tsdb_username: ${tsdb_user}
# tsdb_password: ${tsdb_password}
Parameter |
Description |
Required |
|---|---|---|
| oms_meta_host | The IP address of the MetaDB, which can be the IP address of a MySQL database or a MySQL tenant of OceanBase Database. Notice: This parameter is valid only in OceanBase Database V2.0 and later. |
Yes |
| oms_meta_port | The port number of the MetaDB. | Yes |
| oms_meta_user | The username of the MetaDB. | Yes |
| oms_meta_password | The user password of the MetaDB. | Yes |
| drc_rm_db | The name of the database for the OMS console. | Yes |
| drc_cm_db | The name of the MetaDB for the CM service. | Yes |
| drc_cm_heartbeat_db | The name of the heartbeat database for the CM service. | Yes |
| drc_user | The user that reads the incremental logs of OceanBase Database. You need to create the user in the sys tenant. For more information, see the "User privileges" topic in OMS User Guide. | No |
| drc_password | The password of the drc_user account. |
No |
| cm_url | The URL of the OMS CM service. Example: http://VIP:8088. Note: To deploy OMS on multiple nodes in a single region, you must set the cm_url parameter to a VIP or domain name to which all CM servers in the region are mounted. We do not recommend that you use http://127.0.0.1:8088 because this IP address does not support the multi-node multi-region deployment mode. The access URL of the OMS console is in the format of IP address of the host on which OMS is deployed:8089. Example: http://xxx.xxx.xxx.1:8089, or https://xxx.xxx.xxx.1:8089. Port 8088 is used for program calls, and Port 8089 is used for web page access. You must specify Port 8088. |
Yes |
| cm_location | The code of the region. Value range: [0,127]. You can select one number for each region. Notice: If you upgrade to OMS V3.2.1 from an earlier version, you must set the cm_location parameter to 0. |
Yes |
| cm_region | The name of the region. Example: cn-jiangsu. Notice: If you use OMS with the Alibaba Cloud Multi-Site High Availability (MSHA) service in an active-active disaster recovery scenario, use the region configured for the Alibaba Cloud service. |
No |
| cm_nodes | The IP addresses of servers on which the OMS CM service is deployed. In multi-node deployment mode, you must specify multiple IP addresses for the parameter. | Yes |
| cm_is_default | Indicates whether the OMS CM service is enabled by default. | No. Default value: true |
| tsdb_service | The type of the time-series database. Valid values: INFLUXDB and CERESDB. |
No. Default value: CERESDB |
| tsdb_enabled | Indicates whether metric reporting is enabled for monitoring. Valid values: true and false. |
No. Default value: false |
| tsdb_url | The IP address of the server where InfluxDB is deployed. You need to modify this parameter based on the actual environment if you set the tsdb_enabled parameter to true. |
No |
| tsdb_username | The username used to connect to the time-series database. You need to modify this parameter based on the actual environment if you set the tsdb_enabled parameter to true. After you deploy the time-series database, manually create a user and specify the username and password. |
No |
| tsdb_password | The password used to connect to the time-series database. You need to modify this parameter based on the actual environment if you set the tsdb_enabled parameter to true. |
No |
Example
oms_meta_host: xxx.xxx.xxx.1
oms_meta_port: 2883
oms_meta_user: root@oms#obcluster
oms_meta_password: oms
drc_rm_db: oms_rm
drc_cm_db: oms_cm
drc_cm_heartbeat_db: oms_cm_heartbeat
drc_user: drc_user_name
drc_password: 'OceanBase#oms'
cm_url: http://xxx.xxx.xxx.2:8088
cm_location: 100
cm_region: cn-anhui
cm_is_default: true
cm_nodes:
 - xxx.xxx.xxx.2
 - xxx.xxx.xxx.3
tsdb_service: 'INFLUXDB'
tsdb_enabled: true
tsdb_url: 'xxx.xxx.xxx.5:8086'
tsdb_username: username
tsdb_password: 123456