


This topic aims to introduce information about table lists, table properties, and table data.
Table list
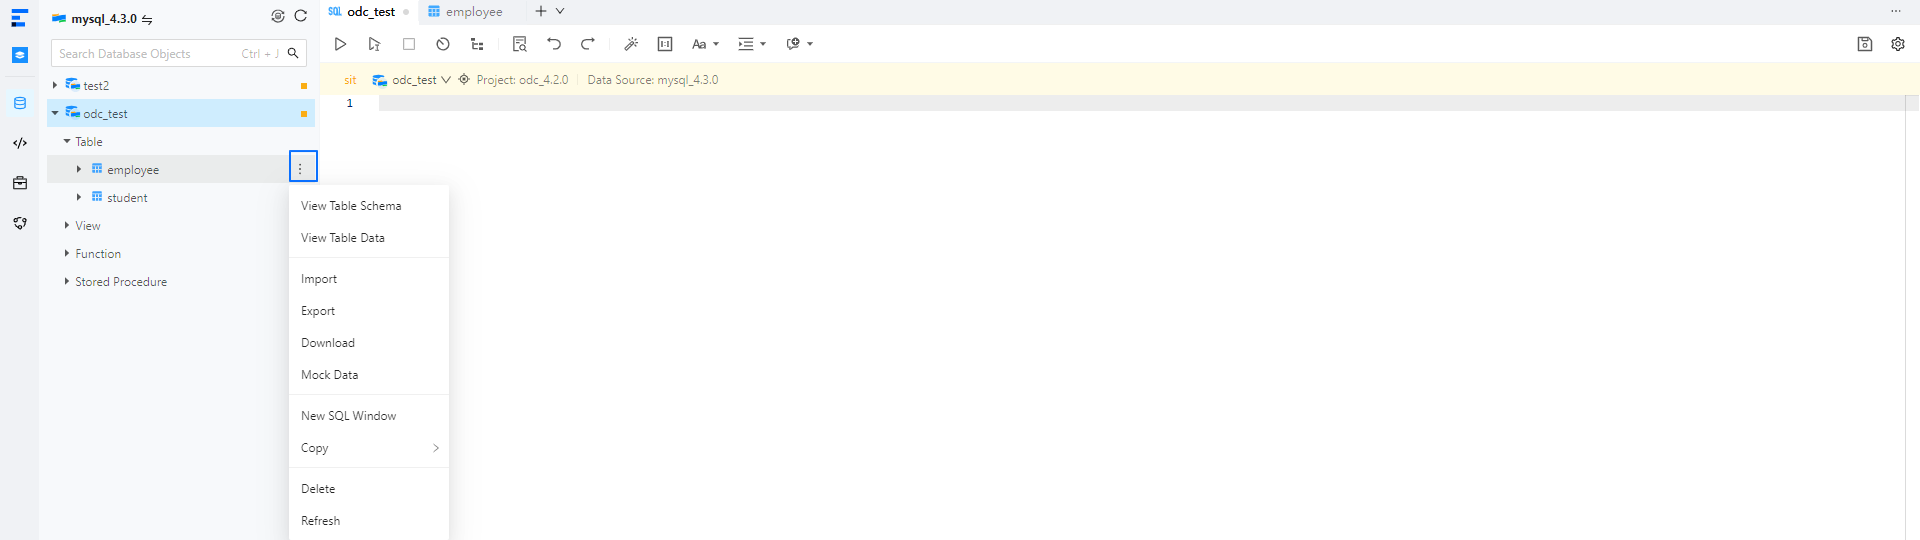
Log on to OceanBase Developer Center (ODC) and click the name of the target connection to go to the corresponding connection management page. You can click Table in the left-side navigation pane to get a list of tables. The table list displays the table objects in the connected database. In the table list, you can view the structure tree of an object. You can also right-click the target object to perform some management actions on the object.
Structure tree
You can click the expand icon before the name of the target table in the table list, and the structure tree of the table is displayed in a drop-down list, as shown in the above figure. The structure tree of a table can have up to three levels. When you right-click an item in the tree, the shortcut menu displays some actions that you can perform on the item.
Management actions
Right-click the target object in the structure tree. A shortcut menu appears, displaying some management options provided by ODC for you to conveniently manage the target object. The following table describes the management options.
Option |
Description |
|---|---|
| View Table Schema | Click this option to go to the Attribute tab. On this tab, you can view comprehensive information of the table such as the basic information, columns, indexes, constraints, and DDL statements. |
| View Table Data | Click this option to go to the Data tab to view the data in the table. |
| Import | Click this option to import data to the table. For more information, see Single table export and import. |
| Export | Click this option to export data from the table. For more information, see Single table export and import. |
| Download | Download the SQL file for the table object. |
| Mock Data | Click this option to go to the Mock Data panel. |
| Copy | Click this option to copy the table name, SELECT statement, INSERT statement, UPDATE statement, or DELETE statement. |
| Delete | Click this option to delete the table. |
| Refresh | Click this option to refresh the structure tree after you perform management actions on the table, so that the structure tree displays the latest information. |
Manage table attributes
In the left navigation bar of the SQL development window, double-click the table name in the table list to enter the table management page, or select View Table Schema from the more options to the right of the table name.

Basic information>
Click Basic Information in the left-side navigation pane of the Attribute tab to view the basic information of the current table.
Parameter |
Description |
|---|---|
| Table Name | Displays the name of the current table. You can rename the table here. |
| Default Character Set | Displays the character set that the table uses. |
| Default Sorting Rule | Displays the sorting rule that the table uses. |
| Description | Displays the description that you specified when you created the table. You can also modify the table description here. |
| Owner | Displays the database to which the table belongs. |
| Last Modified On | Displays the date on which the table was last modified. |
| Row Data Volume | Displays the number of rows in the table. |
| Size | Displays the size of data in the table. |
Column information

Click Column in the let-side navigation pane of the Attribute tab to view the columns in the current table. On the Column tab, you can modify the name, length, nullability, and comment of a column.
Field |
Description |
|---|---|
| Name | The name of the column. |
| Type | The data type of the column. |
| Length | The length of the data type. |
| Scale | The number of decimal places of the data type. |
| Non-empty | Specifies whether the value of the column must be specified. |
| Auto-increment | Specifies whether to set the column to an auto-increment column. This parameter is valid in MySQL mode. |
| Virtual Column | Specifies whether to set the column to a virtual column. |
| Default Value/Expression | The default value or expression of the column. |
| Comment | The additional information about the column. |
Index information

Click Index in the left-side navigation pane of the Attribute tab to view the indexes in the current table.
On the Index tab, you can rename an index and make an index visible or invisible.
In ODC V4.2.2 and later, you can view whether an index is available. An index marked with the alert icon ![]() is unavailable.
is unavailable.
Field |
Description |
|---|---|
| Index Name | The name of the index. |
| Scope | The default value is GLOBAL. Valid values: GLOBAL and LOCAL. |
| Method | The default value is BTREE, which is applicable to a global index. Valid values: Empty, BTREE, and HASH.
|
| Index Type | The default value isNORMAL. Valid values: NORMAL, UNIQUE, and FULLTEXT.
|
| Columns | The columns to be indexed. Pay attention to the order of the indexed columns. |
| Invisible | Specify whether the index is invisible. |
Constraint information
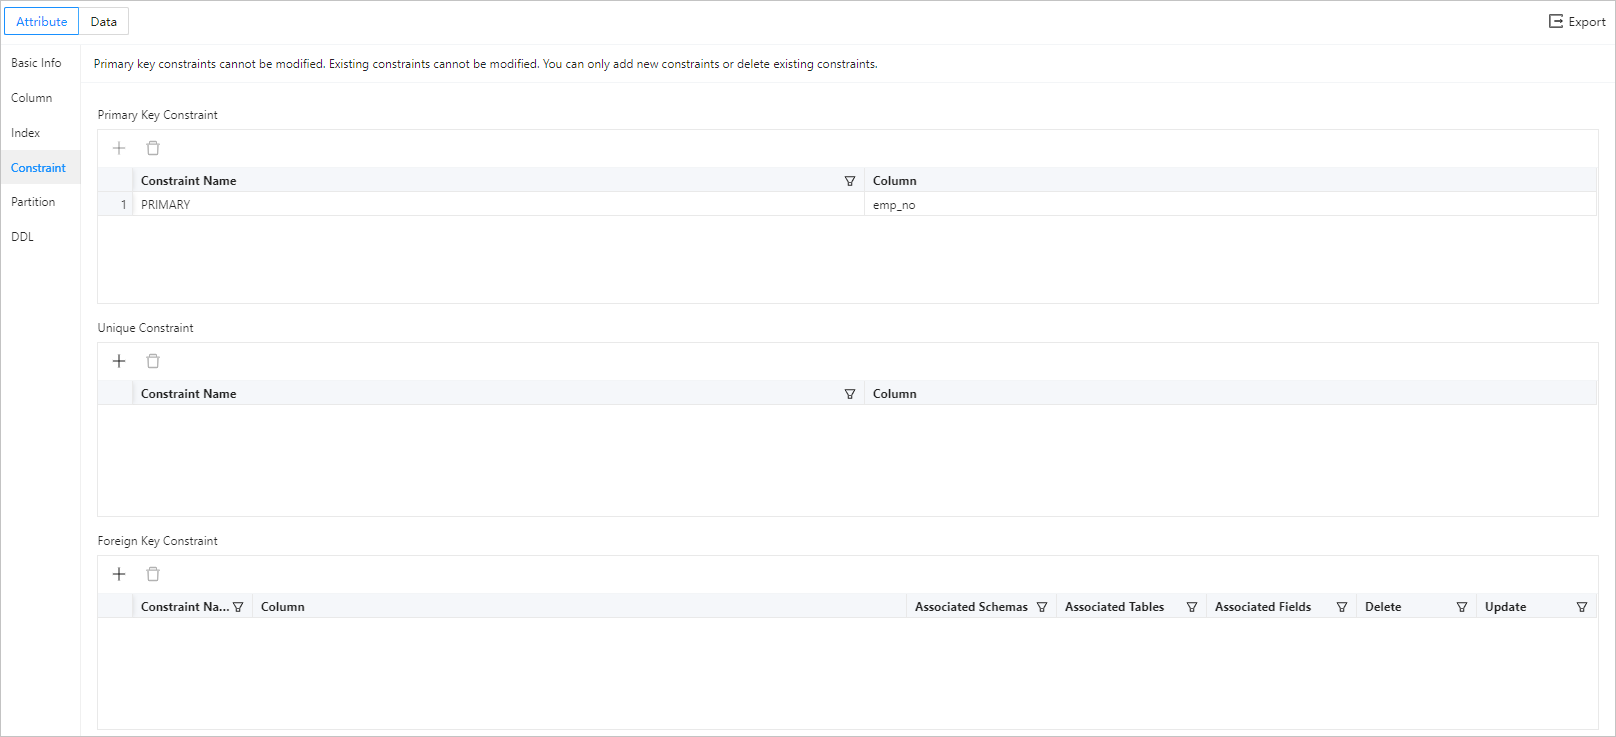
OceanBase Cloud supports different constraints in MySQL and Oracle modes, and different constraints require different information. Therefore, you need to specify the required information based on the constraint you selected and the requirements on the page.
Field |
Description |
|---|---|
| Constraint Name | The name of the constraint. |
| Column Information | The field or a group of fields specified as the constraint. |
| Associated Schema | The schema where the associated table is located when Foreign Key Constraint is used. The associated table is the parent table. This field is valid only in Oracle mode. |
| Associated Database | The database where the associated table is located when Foreign Key Constraint is used. The associated table is the parent table. This field is valid only in MySQL mode. |
| Associated Table | The associated table when Foreign Key Constraint is used. The associated table is the parent table. |
| Associated Field | The associated field when Foreign Key Constraint is used. The associated field is in the parent table. |
| Delete | Specifies the action to be performed on the current table when the data in the associated table is deleted. The current table is the child table, and the associated table is the parent table. The following four types of action are supported: CASCADE, NO ACTION, RESTRICT, and SET NULL. OceanBase Cloud supports different foreign key actions in MySQL and Oracle modes.
|
| Update | Specifies the action to be performed on the current table when the data in the associated table is updated. The current table is the child table, and the associated table is the parent table. The following four types of action are supported: CASCADE, NO ACTION, RESTRICT, and SET NULL. OceanBase Cloud supports different foreign key actions in MySQL and Oracle modes.
|
| Check Condition | Specifies the check rules for data verification when Check Constraint is enabled. |
Partition information

The definition of a partition in MySQL mode is different from that in Oracle mode. So, the values of the following fields vary in different modes. You need to specify the following fields based on the selected partitioning method.
Field |
Description |
|---|---|
| Partitioning Method | Specifies the partitioning method. The partitioning methods supported in MySQL mode are different from those in Oracle mode.
|
| Field | The column that is used as the partition key. |
| Expression | Partitions are divided based on the return value of the expression. The partition expression is not supported in Oracle mode. |
| Partition | Based on the value specified for Partitioning Method, you may need to specify information such asPartition Name, Partition Quantity, Upper Limit, and Value Enumeration. You can add multiple partitions and drag selected fields to adjust their order. |
DDL information

Click DDL in the left-side navigation pane of the attribute tab to view the DDL statement of the current table, namely, the SQL statement that defines the table. This statement cannot be edited. The following table describes the icons provided in the toolbar.
Table data management
In the left navigation bar of the SQL development window, double-click the table name in the table list to enter the table management page, or select View Table Data from the more options to the right of the table name.
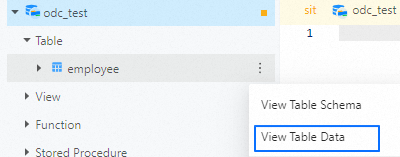
In the View Table Data tab, you can view, add, modify, and delete data in the current table.
