


This topic introduces how to build an application by using a HikariCP connection pool, OceanBase Connector/J, and OceanBase Database. It also covers the use of the application for fundamental database operations, including table creation, data insertion, data deletion, data updating, and data query.
 Download the hikaricp-oceanbase-client sample project
 Prerequisites
You have installed OceanBase Database and created an Oracle tenant.
You have installed Java Development Kit (JDK) 1.8 and Maven.
You have installed Eclipse.
Note
The tool used to run the sample code in this topic is Eclipse IDE for Java Developers (2022-03), but you can also choose a tool that suits your personal preference to run the code.
Procedure
Note
The steps outlined in this topic are for the Windows environment. If you are using a different operating system or compiler, the steps may vary slightly.
- Import the
hikaricp-oceanbase-clientproject into Eclipse. - Obtain the URL of OceanBase Database.
- Modify the database connection information in the
hikaricp-oceanbase-clientproject. - Run the
hikaricp-oceanbase-clientproject.
Step 1: Import the hikaricp-oceanbase-client project into Eclipse
Start Eclipse and choose File > Open Projects from File System.
In the dialog box that appears, click Directory to browse and select the project, and then click Finish.
Note
When you import a Maven project using Eclipse, it will automatically detect the
pom.xmlfile in the project, download the required dependency libraries based on the described dependencies in the file, and add them to the project.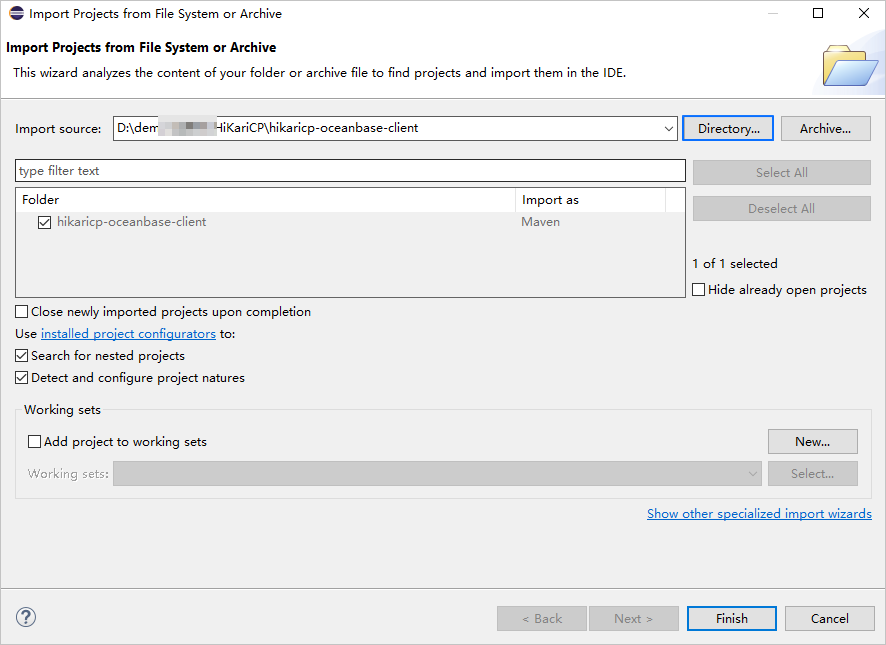
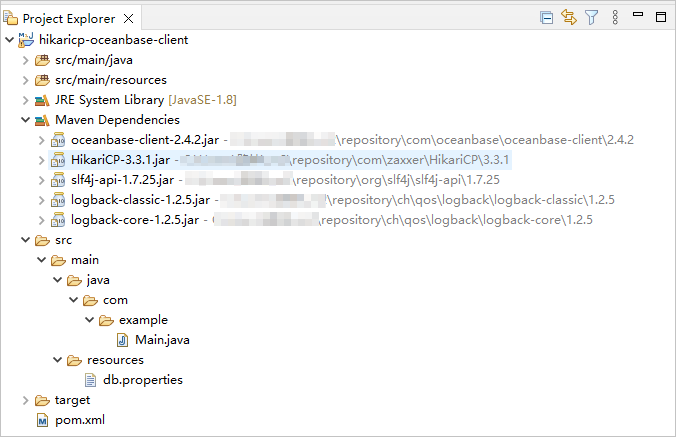
View the project.
Step 2: Obtain the URL of OceanBase Database
Contact the deployment personnel or administrator of OceanBase Database to obtain the connection string.
Here is an example:
obclient -hxxx.xxx.xxx.xxx -P2881 -utest_user001@oracel001 -p******For more information about the connection string, see Connect to an OceanBase Database tenant by using OBClient.
Fill in the URL below based on the OceanBase Database connection string.
jdbc:oceanbase://$host:$port/$schema_name?user=$user_name&password=$passwordwhere:
$hostspecifies the IP address for connecting to OceanBase Database. For connection through OceanBase Database Proxy (ODP), use the IP address of an ODP. For direct connection, use the IP address of an OBServer node.$portspecifies the port for connecting to OceanBase Database. For connection through ODP, the default value is2883, which can be customized when ODP is deployed. For direct connection, the default value is2881, which can be customized when OceanBase Database is deployed.$schema_namespecifies the name of the schema to be accessed.Notice
The user used to connect to the tenant must have the
CREATE SESSIONprivilege and theCREATE TABLE,INSERT,DELETE,UPDATE, andSELECTprivileges on this schema. For more information about user privileges, see Privilege types in Oracle mode.$user_namespecifies the tenant account. For connection through ODP, two account formats are supported:username@tenant name#cluster nameandcluster name:tenant name:username. For direct connection, theusername@tenant nameformat is supported.$passwordspecifies the password of the account.
For more information about URL parameters in OceanBase Connector/J, see Database URL.
Here is an example:
jdbc:oceanbase://xxx.xxx.xxx.xxx:2881/test_schema001?user=test_user001@oracel001&password=******
Step 3: Modify the database connection information in the hikaricp-oceanbase-client project
Modify the database connection information in the db.properties file in the hikaricp-oceanbase-client/src/main/resources/ directory based on the information obtained in Step 2: Obtain the URL of OceanBase Database.

Here is an example:
- The IP address of the OBServer node is
xxx.xxx.xxx.xxx. - The access port is 2881.
- The name of the schema to be accessed is
test_schema001. - The tenant account is
test_user001@oracle001.oracle001is an Oracle user tenant created in OceanBase Database, andtest_user001is the username of a user in theoracle001tenant. - The password is
******.
Here is the sample code:
...
jdbcUrl=jdbc:oceanbase://xxx.xxx.xxx.xxx:2881/test_schema001
username=test_user001@oracle001
password=******
...
Step 4: Run the hikaricp-oceanbase-client project
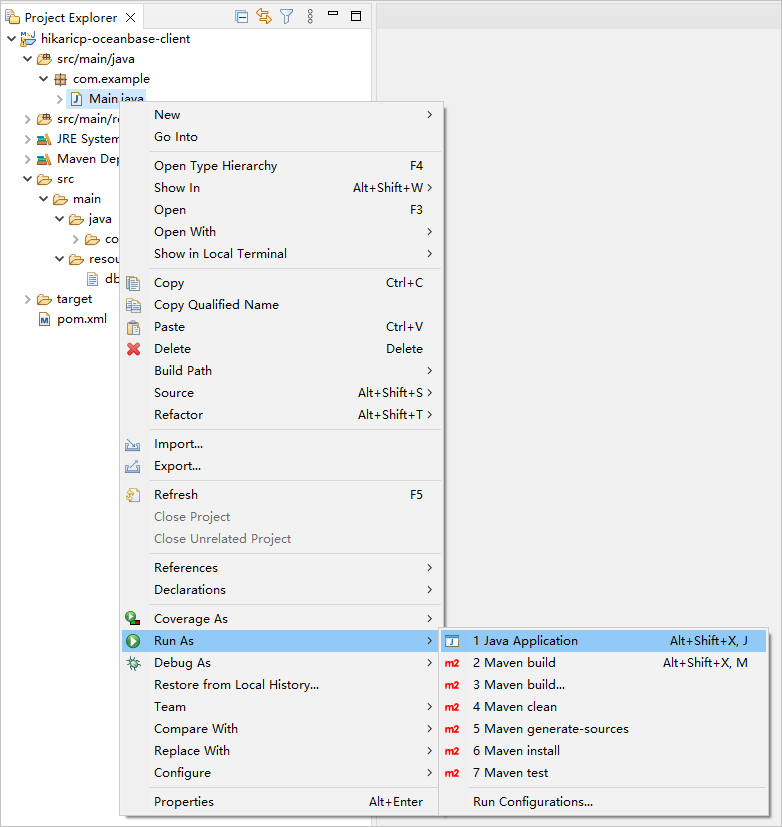
In the project navigation view, locate and expand the src/main/java directory.
Right-click the Main.java file and choose Run As > Java Application.
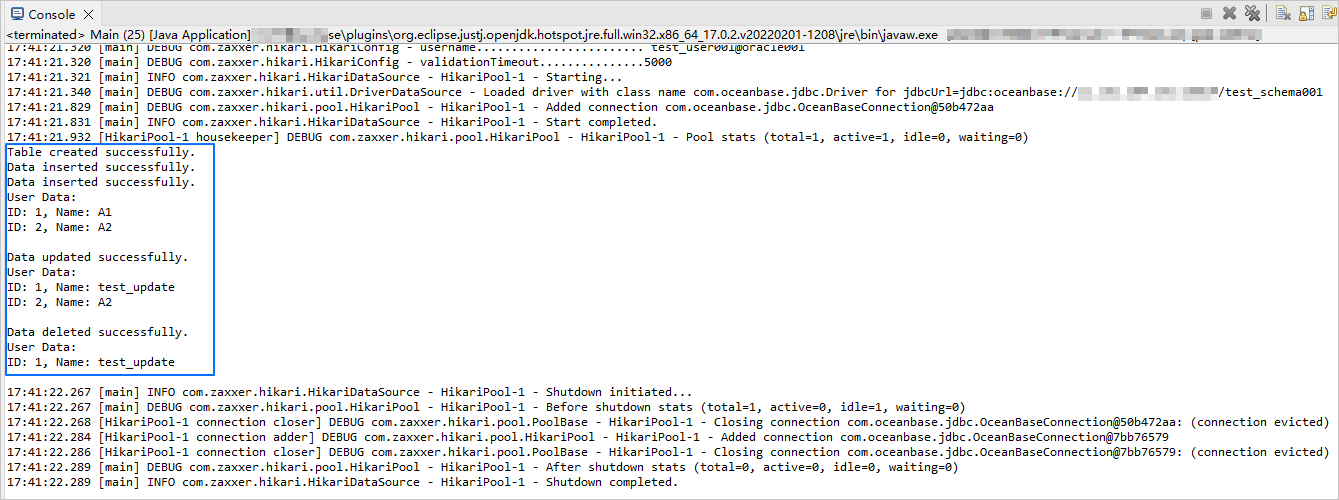
In the console window of Eclipse, view the project logs and output results.
You can also execute the following SQL statement in OceanBase Client (OBClient) to view the results:
obclient [SYS]> SELECT * FROM test_schema001.test_hikaricp;The return result is as follows:
+------+-------------+ | ID | NAME | +------+-------------+ | 1 | test_update | +------+-------------+ 1 row in set
Project code
Click here to download the project code, which is a package named hikaricp-oceanbase-client.zip.
Decompress the package to obtain a folder named hikaricp-oceanbase-client. The directory structure is as follows:
hikaricp-oceanbase-client
├── src
│ └── main
│ ├── java
│ │ └── com
│ │ └── example
│ │ └── Main.java
│ └── resources
│ └── db.properties
└── pom.xml
Here is a breakdown of the files and directories:
src: the root directory for storing the source code.main: the directory for storing the main code, including the major logic of the application.java: the directory for storing the Java source code.com: the directory for storing the Java package.example: the directory for storing the packages of the sample project.Main.java: a sample file of the main class that contains logic for table creation, data insertion, data deletion, data modification, and data query.resources: the directory for storing resource files, including configuration files.db.properties: the configuration file of the connection pool, which contains relevant database connection parameters.pom.xml: the configuration file of the Maven project, which is used to manage project dependencies and build settings.
Code in pom.xml
The pom.xml file is a configuration file for Maven projects, which defines the dependencies, plug-ins, and build rules of the projects. Maven is a Java project management tool that can automatically download dependencies, compile, and package the projects.
To configure the pom.xml file, perform the following steps:
Declare the file.
Declare the file to be an XML file that uses XML standard
1.0and character encodingUTF-8.Here is the sample code:
<?xml version="1.0" encoding="UTF-8"?>Configure namespaces and the POM version.
xmlns: the default XML namespace for the POM, which is set tohttp://maven.apache.org/POM/4.0.0.xmlns:xsi: the XML namespace for XML elements prefixed withxsi, which is set tohttp://www.w3.org/2001/XMLSchema-instance.xsi:schemaLocation: the location of an XML schema definition (XSD) file. The value consists of two parts: the default XML namespace(http://maven.apache.org/POM/4.0.0)and the URI of the XSD file (http://maven.apache.org/xsd/maven-4.0.0.xsd).<modelVersion>: the POM version used by the POM file, which is set to4.0.0.
Here is the sample code:
<project xmlns="http://maven.apache.org/POM/4.0.0" xmlns:xsi="http://www.w3.org/2001/XMLSchema-instance" xsi:schemaLocation="http://maven.apache.org/POM/4.0.0 http://maven.apache.org/xsd/maven-4.0.0.xsd"> <modelVersion>4.0.0</modelVersion> <!-- Other configurations --> </project>Configure basic information.
<groupId>: the ID of the group to which the project belongs, which is set tocom.example.<artifactId>: the name of the project, which is set tohikaricp-oceanbase-client.<version>: the project version, which is set to1.0-SNAPSHOT.
Here is the sample code:
<groupId>com.example</groupId> <artifactId>hikaricp-oceanbase-client</artifactId> <version>1.0-SNAPSHOT</version>Configure the attributes of the project source file.
Specify
maven-compiler-pluginas the compiler plug-in of Maven, and set the source code version and target code version of the compiler to Java 8. This means that the project source code is compiled by using Java 8 and the compiled bytecode is compatible with the Java 8 runtime environment. This ensures that Java 8 syntax and characteristics can be correctly processed during the compilation and running of the project.Note
Java 1.8 and Java 8 are different names for the same version.
Here is the sample code:
<build> <plugins> <plugin> <groupId>org.apache.maven.plugins</groupId> <artifactId>maven-compiler-plugin</artifactId> <configuration> <source>8</source> <target>8</target> </configuration> </plugin> </plugins> </build>Configure the components on which the project depends.
Add the
oceanbase-clientdependency library for interactions with the database, and configure the following parameters:<groupId>: the ID of the group to which the dependency belongs, which is set tocom.oceanbase.<artifactId>: the name of the dependency, which is set tooceanbase-client.<version>: the version of the dependency, which is set to2.4.2.
Note
The following code defines that the project depends on OceanBase Connector/J V2.4.2. For more information about other versions, see OceanBase Connector/J.
Here is the sample code:
<dependency> <groupId>com.oceanbase</groupId> <artifactId>oceanbase-client</artifactId> <version>2.4.2</version> </dependency>Add the
HikariCPdependency library for implementing a high-performance JDBC connection pool, and configure the following parameters:<groupId>: the ID of the group to which the dependency belongs, which is set tocom.zaxxer.<artifactId>: the name of the dependency, which is set toHikariCP.<version>: the version of the dependency, which is set to3.3.1.
Here is the sample code:
<dependency> <groupId>com.zaxxer</groupId> <artifactId>HikariCP</artifactId> <version>3.3.1</version> </dependency>Add the
logback-classicdependency library for log recording and management, and configure the following parameters:<groupId>: the ID of the group to which the dependency belongs, which is set toch.qos.logback.<artifactId>: the name of the dependency, which is set tologback-classic.<version>: the version of the dependency, which is set to1.2.5.
Here is the sample code:
<dependency> <groupId>ch.qos.logback</groupId> <artifactId>logback-classic</artifactId> <version>1.2.5</version> </dependency>
Code in db.properties
db.properties is a sample configuration file of the connection pool. The configuration file contains the URL, username, and password for connecting to the database, and other optional parameters of the connection pool.
To configure the db.properties file, perform the following steps:
Configure database connection parameters.
- Specify the URL for connecting to the database, including the host IP address, port number, and schema to be accessed.
- Specify the username for connecting to the database.
- Specify the password for connecting to the database.
Here is the sample code:
jdbcUrl=jdbc:oceanbase://$host:$port/$schema_name username=$user_name password=$passwordwhere
$hostspecifies the IP address for connecting to OceanBase Database. For connection through ODP, use the IP address of an ODP. For direct connection, use the IP address of an OBServer node.$portspecifies the port for connecting to OceanBase Database. For connection through ODP, the default value is2883, which can be customized when ODP is deployed. For direct connection, the default value is2881, which can be customized when OceanBase Database is deployed.$schema_namespecifies the name of the schema to be accessed.$user_namespecifies the tenant account. For connection through ODP, two account formats are supported:username@tenant name#cluster nameandcluster name:tenant name:username. For direct connection, theusername@tenant nameformat is supported.$passwordspecifies the password of the account.
Configure other connection pool parameters.
- Enable caching for precompiled SQL statements.
- Set the cache size for precompiled SQL statements to 250.
- Set the maximum lifetime of connections to 1,800,000 ms (30 minutes). Connections exceeding the specified lifetime are closed.
- Set the timeout value of idle connections to 600,000 ms (10 minutes). Connections that have been idle for the specified period of time are closed.
- Set the timeout value for requesting a connection to 30,000 ms (30s). If no connection is obtained when the specified timeout value expires, an exception is thrown.
Here is the sample code:
dataSource.cachePrepStmts=true dataSource.prepStmtCacheSize=250 dataSource.maxLifetime=1800000 dataSource.idleTimeout=600000 dataSource.connectionTimeout=30000
Notice
The actual parameter configurations depend on the project requirements and database characteristics. We recommend that you adjust and configure the parameters based on the actual situation. For more information about parameters of the HikariCP connection pool, see Configuration.
The following table describes the general parameters of a HikariCP connection pool.
Category |
Parameter |
Default value |
Description |
|---|---|---|---|
| Required parameters | dataSourceClassName | N/A | The name of the DataSource class provided by the JDBC driver.
NoticeGenerally, the |
| jdbcUrl | N/A | The URL for the JDBC driver to connect to OceanBase Database. | |
| username | N/A | The username for connecting to the database. | |
| password | N/A | The password for connecting to the database. | |
| Optional parameters | autoCommit | true | Specifies whether to enable auto-commit for connections. |
| connectionTimeout | 30000 | The maximum waiting time when the client requests a connection from the connection pool, in ms. The default value is 30000, indicating 30s. The minimum timeout value of connections is 250 ms. |
|
| idleTimeout | 600000 | The maximum duration for which a connection can remain idle in the connection pool, in ms. The default value is 600000, indicating 10 minutes. Observe the following limitations:
|
|
| keepaliveTime | 0 | The frequency for keeping a connection alive. This parameter prevents a connection from being timed out by the database or network infrastructure. The default value is 0, which specifies to disable the connection keepalive feature. The value must be smaller than the value of maxLifetime. |
|
| maxLifetime | 1800000 | The maximum lifetime of a connection in the connection pool, in ms. Connections in use are not automatically recycled. A connection is removed from the connection pool only after it is closed. The default value is 1800000, indicating 30 minutes. If you set maxLifetime to 0, the lifetime of connections in the connection pool is unlimited. |
|
| connectionTestQuery | N/A | A query statement sent by the connection pool to the database for connection verification. When a connection is requested from the connection pool, this query statement is executed to verify whether the connection with the database is still valid. | |
| minimumIdle | N/A | The minimum number of idle connections in the connection pool. If the number of idle connections is smaller than the specified value and the total number of connections is smaller than the value of maximumPoolSize, HikariCP will add extra connections in a prompt and efficient way. By default, the values of minimumIdle and maximumPoolSize are the same. |
|
| maximumPoolSize | 10 | The maximum size of the connection pool, including the number of idle connections and the number of connections in use. This value determines the maximum number of actual connections with the database. | |
| poolName | N/A | The name of the connection pool. This name is used to identify the connection pool and its configurations in logs and the Java Management Extensions (JMX) management console. By default, a name is automatically generated for the connection pool. |
Code in Main.java
The Main.java file is a part of the sample application. It demonstrates the process of obtaining a database connection from the HikariCP connection pool, executing a series of database operations, such as table creation, data insertion, data deletion, data modification, and data query, and returning the query result.
To configure the Main.java file, perform the following steps:
Import the required classes and packages.
- Define the name of the Java package as
com.example, where the package is used for organizing and managing Java classes. - Import the
java.sql.Connectionclass for establishing and managing connections with the database. - Import the
java.sql.PreparedStatementclass for executing precompiled SQL statements. - Import the
java.sql.ResultSetclass for processing query result sets. - Import the
java.sql.SQLExceptionclass for handling SQL exceptions. - Import the
HikariConfigclass for configuring HikariCP connection pools. - Import the
HikariDataSourceclass for creating and managing HikariCP connection pools.
Here is the sample code:
package com.example; import java.sql.Connection; import java.sql.PreparedStatement; import java.sql.ResultSet; import java.sql.SQLException; import com.zaxxer.hikari.HikariConfig; import com.zaxxer.hikari.HikariDataSource;- Define the name of the Java package as
Define class names and methods.
Define a
Mainclass. Themainmethod serves as the entry to the application. Call themainmethod to read thedb.propertiesfile to configure the HikariCP connection pool and request database connections. Then, call a series of methods in sequence to create a table, insert data, query data, update data, and delete data. If anSQLExceptionoccurs during the operation, the stack trace of the exception is recorded. To do this, perform the following steps:- Define a public class named
Main. - Define an entry method named
mainof theMainclass. - Create a
HikariConfigobject and configure the object based on thedb.propertiesfile. - Create a
HikariDataSourceobject and obtain a database connection by using thetry-with-resourcesblock. - Call the table creation method and pass in the obtained database connection object to create a table named
test_hikaricp. - Call the data insertion method and pass in the obtained database connection object and data parameters to insert the
(1,'A1')and(2,'A2')records. - Call the data query method and pass in the obtained database connection object to query the inserted data.
- Call the data update method and pass in the obtained database connection object and update parameters to update the
namecolumn value of the row whoseidvalue is1totest_update. - Call the data query method and pass in the obtained database connection object to query the updated data.
- Call the data deletion method and pass in the obtained database connection object and deletion parameters to delete the row whose
idvalue is2. - Call the data query method and pass in the obtained database connection object to query the data after the deletion.
- If an
SQLExceptionoccurs in thetryblock, the stack trace of the exception is recorded. - Define methods for creating tables, inserting data, querying data, updating data, and deleting data.
Here is the sample code:
public class Main { public static void main(String[] args) { try { HikariConfig config = new HikariConfig("/db.properties"); try (HikariDataSource dataSource = new HikariDataSource(config); Connection conn = dataSource.getConnection()) { createTable(conn); insertData(conn, 1, "A1"); insertData(conn, 2, "A2"); selectData(conn); updateData(conn, "test_update", 1); selectData(conn); deleteData(conn, 2); selectData(conn); } } catch (SQLException e) { e.printStackTrace(); } } // Define a method for creating tables. // Define a method for inserting data. // Define a method for querying data. // Define a method for updating data. // Define a method for deleting data. }- Define a public class named
Define a method for creating tables.
Define a private static method
createTablefor creating a table namedtest_hikaricpin the database. The table contains theidandnamecolumns. To do this, perform the following steps:- Define a private static method
createTablethat receives aConnectionobject as parameters, and declare that the method can throw anSQLException. - Define an SQL statement string for creating a table named
test_hikaricp. The table contains theidcolumn of theNUMBERtype and thenamecolumn of theVARCHAR2(50)type. - Create a precompiled SQL statement object
pstmtby using theConnectionobjectconnand use the object in thetry-with-resourcesblock. - Execute an SQL statement to create a table named
test_hikaricp. - If a success message is displayed in the console, the table is successfully created.
Here is the sample code:
private static void createTable(Connection conn) throws SQLException { String sql = "CREATE TABLE test_hikaricp (id NUMBER, name VARCHAR2(50))"; try (PreparedStatement pstmt = conn.prepareStatement(sql)) { pstmt.executeUpdate(); System.out.println("Table created successfully."); } }- Define a private static method
Define a method for inserting data.
Define a private static method
insertDatafor inserting data into thetest_hikaricptable in the database. To do this, perform the following steps:- Define a private static method
insertDatathat receives aConnectionobject, anidparameter of the integer type, and anameparameter of the string type, and declare that the method can throw anSQLException. - Define an SQL statement string for inserting the
idandnamecolumns into thetest_hikaricptable. - Create a precompiled SQL statement object
pstmtby using theConnectionobjectconnand use the object in thetry-with-resourcesblock. - Set the value of the first parameter
?in the SQL statement toid. - Set the value of the second parameter
?in the SQL statement toname. - Execute the SQL statement to insert data into the table.
- If a success message is displayed in the console, the data is successfully inserted into the table.
Here is the sample code:
private static void insertData(Connection conn, int id, String name) throws SQLException { String sql = "INSERT INTO test_hikaricp (id, name) VALUES (?, ?)"; try (PreparedStatement pstmt = conn.prepareStatement(sql)) { pstmt.setInt(1, id); pstmt.setString(2, name); pstmt.executeUpdate(); System.out.println("Data inserted successfully."); } }- Define a private static method
Define a method for querying data.
Define a private static method
selectDatafor querying data from thetest_hikaricptable in the database. To do this, perform the following steps:- Define a private static method
selectDatathat receives aConnectionobject as parameters, and declare that the method can throw anSQLException. - Define an SQL statement string for querying all data in the
test_hikaricptable. - Create a precompiled SQL statement object
pstmtby using theConnectionobjectconnand use the object in thetry-with-resourcesblock. Call theexecuteQuery()method to execute an SQL query and return the query result set objectrs. - If a message is displayed in the console, user data is being returned.
- Traverse the query result set. Call the
next()method to check whether a next row exists in the result set. If yes, a loop begins. - Obtain the values of the
idcolumn from the result set and assign them to theidvariable. - Obtain the values of the
namecolumn from the result set and assign them to thenamevariable. - Return the
idandnamevalues of each row in the console. - Return an empty row in the console.
Here is the sample code:
private static void selectData(Connection conn) throws SQLException { String sql = "SELECT * FROM test_hikaricp"; try (PreparedStatement pstmt = conn.prepareStatement(sql); ResultSet rs = pstmt.executeQuery()) { System.out.println("User Data:"); while (rs.next()) { int id = rs.getInt("id"); String name = rs.getString("name"); System.out.println("ID: " + id + ", Name: " + name); } System.out.println(); } }- Define a private static method
Define a method for updating data.
Define a private static method
updateDatafor updating data in thetest_hikaricptable in the database. To do this, perform the following steps:- Define a private static method
updateDatathat receives aConnectionobject, anidparameter of the integer type, and anameparameter of the string type, and declare that the method can throw anSQLException. - Define an SQL statement string for updating the value of the
namecolumn in the row whoseidcolumn value equals the specifiedidvalue in thetest_hikaricptable to the specified name value. - Create a precompiled SQL statement object
pstmtby using theConnectionobjectconnand use the object in thetry-with-resourcesblock. - Set the value of the first parameter
?in the SQL statement toname. - Set the value of the second parameter
?in the SQL statement toid. - Execute the SQL statement to update data in the table.
- If a success message is displayed in the console, the data is successfully updated.
Here is the sample code:
private static void updateData(Connection conn, String name, int id) throws SQLException { String sql = "UPDATE test_hikaricp SET name = ? WHERE id = ?"; try (PreparedStatement pstmt = conn.prepareStatement(sql)) { pstmt.setString(1, name); pstmt.setInt(2, id); pstmt.executeUpdate(); System.out.println("Data updated successfully."); } }- Define a private static method
Define a method for deleting data.
Define a private static method
deleteDatafor deleting data that meets the specified condition from thetest_hikaricptable in the database. To do this, perform the following steps:- Define a private static method
deleteDatathat receives aConnectionobject and anidparameter of the integer type, and declare that the method can throw anSQLException. - Define an SQL statement string for deleting data that meets the
id = ?condition from thetest_hikaricptable. - Create a precompiled SQL statement object
pstmtby using theConnectionobjectconnand use the object in thetry-with-resourcesblock. - Set the value of the first parameter
?in the SQL statement toid. - Execute the SQL statement to delete data that meets the specified condition from the table.
- If a success message is displayed in the console, the data is successfully deleted.
Here is the sample code:
private static void deleteData(Connection conn, int id) throws SQLException { String sql = "DELETE FROM test_hikaricp WHERE id = ?"; try (PreparedStatement pstmt = conn.prepareStatement(sql)) { pstmt.setInt(1, id); pstmt.executeUpdate(); System.out.println("Data deleted successfully."); } }- Define a private static method
Complete code
<?xml version="1.0" encoding="UTF-8"?>
<project xmlns="http://maven.apache.org/POM/4.0.0"
xmlns:xsi="http://www.w3.org/2001/XMLSchema-instance"
xsi:schemaLocation="http://maven.apache.org/POM/4.0.0 http://maven.apache.org/xsd/maven-4.0.0.xsd">
<modelVersion>4.0.0</modelVersion>
<groupId>com.oceanbase</groupId>
<artifactId>hikaricp-oceanbase-client</artifactId>
<version>1.0-SNAPSHOT</version>
<build>
<plugins>
<plugin>
<groupId>org.apache.maven.plugins</groupId>
<artifactId>maven-compiler-plugin</artifactId>
<configuration>
<source>8</source>
<target>8</target>
</configuration>
</plugin>
</plugins>
</build>
<dependencies>
<dependency>
<groupId>com.oceanbase</groupId>
<artifactId>oceanbase-client</artifactId>
<version>2.4.2</version>
</dependency>
<dependency>
<groupId>com.zaxxer</groupId>
<artifactId>HikariCP</artifactId>
<version>3.3.1</version>
</dependency>
<dependency>
<groupId>ch.qos.logback</groupId>
<artifactId>logback-classic</artifactId>
<version>1.2.5</version>
</dependency>
</dependencies>
</project>
jdbcUrl=jdbc:oceanbase://$host:$port/$schema_name
username=$user_name
password=$password
dataSource.cachePrepStmts=true
dataSource.prepStmtCacheSize=250
dataSource.maxLifetime=1800000
dataSource.idleTimeout=600000
dataSource.connectionTimeout=30000
package com.example;
import java.sql.Connection;
import java.sql.PreparedStatement;
import java.sql.ResultSet;
import java.sql.SQLException;
import com.zaxxer.hikari.HikariConfig;
import com.zaxxer.hikari.HikariDataSource;
public class Main {
public static void main(String[] args) {
try {
HikariConfig config = new HikariConfig("/db.properties");
try (HikariDataSource dataSource = new HikariDataSource(config);
Connection conn = dataSource.getConnection()) {
createTable(conn);
insertData(conn, 1, "A1");
insertData(conn, 2, "A2");
selectData(conn);
updateData(conn, "test_update", 1);
selectData(conn);
deleteData(conn, 2);
selectData(conn);
}
} catch (SQLException e) {
e.printStackTrace();
}
}
private static void createTable(Connection conn) throws SQLException {
String sql = "CREATE TABLE test_hikaricp (id NUMBER, name VARCHAR2(50))";
try (PreparedStatement pstmt = conn.prepareStatement(sql)) {
pstmt.executeUpdate();
System.out.println("Table created successfully.");
}
}
private static void insertData(Connection conn, int id, String name) throws SQLException {
String sql = "INSERT INTO test_hikaricp (id, name) VALUES (?, ?)";
try (PreparedStatement pstmt = conn.prepareStatement(sql)) {
pstmt.setInt(1, id);
pstmt.setString(2, name);
pstmt.executeUpdate();
System.out.println("Data inserted successfully.");
}
}
private static void selectData(Connection conn) throws SQLException {
String sql = "SELECT * FROM test_hikaricp";
try (PreparedStatement pstmt = conn.prepareStatement(sql);
ResultSet rs = pstmt.executeQuery()) {
System.out.println("User Data:");
while (rs.next()) {
int id = rs.getInt("id");
String name = rs.getString("name");
System.out.println("ID: " + id + ", Name: " + name);
}
System.out.println();
}
}
private static void updateData(Connection conn, String name, int id) throws SQLException {
String sql = "UPDATE test_hikaricp SET name = ? WHERE id = ?";
try (PreparedStatement pstmt = conn.prepareStatement(sql)) {
pstmt.setString(1, name);
pstmt.setInt(2, id);
pstmt.executeUpdate();
System.out.println("Data updated successfully.");
}
}
private static void deleteData(Connection conn, int id) throws SQLException {
String sql = "DELETE FROM test_hikaricp WHERE id = ?";
try (PreparedStatement pstmt = conn.prepareStatement(sql)) {
pstmt.setInt(1, id);
pstmt.executeUpdate();
System.out.println("Data deleted successfully.");
}
}
}
References
- For more information about OceanBase Connector/J, see OceanBase Connector/J.
- For more information about the HikariCP connection pool, see HikariCP.