OceanBase logo

OceanBase

A unified distributed database ready for your transactional, analytical, and AI workloads.

DEPLOY YOUR WAY

OceanBase Cloud

The best way to deploy and scale OceanBase

OceanBase Enterprise

Run and manage OceanBase on your infra

TRY OPEN SOURCE

OceanBase Community Edition

The free, open-source distributed database

OceanBase seekdb

Open source AI native search database

Customer Stories

Real-world success stories from enterprises across diverse industries.

View All
BY USE CASES

Mission-Critical Transactions

Global & Multicloud Application

Elastic Scaling for Peak Traffic

Real-time Analytics

Active Geo-redundancy

Database Consolidation

Resources

Comprehensive knowledge hub for OceanBase.

Blog

Live Demos

Training & Certification

Documentation

Official technical guides, tutorials, API references, and manuals for all OceanBase products.

View All
PRODUCTS

OceanBase Cloud

OceanBase Database

Tools

Connectors and Middleware

QUICK START

OceanBase Cloud

OceanBase Database

BEST PRACTICES

Practical guides for utilizing OceanBase more effectively and conveniently

Company

Learn more about OceanBase – our company, partnerships, and trust and security initiatives.

About OceanBase

Partner

Trust Center

Contact Us

International - English
中国站 - 简体中文
日本 - 日本語
Sign In
Start on Cloud

A unified distributed database ready for your transactional, analytical, and AI workloads.

DEPLOY YOUR WAY

OceanBase Cloud

The best way to deploy and scale OceanBase

OceanBase Enterprise

Run and manage OceanBase on your infra

TRY OPEN SOURCE

OceanBase Community Edition

The free, open-source distributed database

OceanBase seekdb

Open source AI native search database

Customer Stories

Real-world success stories from enterprises across diverse industries.

View All
BY USE CASES

Mission-Critical Transactions

Global & Multicloud Application

Elastic Scaling for Peak Traffic

Real-time Analytics

Active Geo-redundancy

Database Consolidation

Comprehensive knowledge hub for OceanBase.

Blog

Live Demos

Training & Certification

Documentation

Official technical guides, tutorials, API references, and manuals for all OceanBase products.

View All
PRODUCTS
OceanBase CloudOceanBase Database
ToolsConnectors and Middleware
QUICK START
OceanBase CloudOceanBase Database
BEST PRACTICES

Practical guides for utilizing OceanBase more effectively and conveniently

Learn more about OceanBase – our company, partnerships, and trust and security initiatives.

About OceanBase

Partner

Trust Center

Contact Us

Start on Cloud
编组
All Products
    • Databases
    • iconOceanBase Database
    • iconOceanBase Cloud
    • iconOceanBase Tugraph
    • iconInteractive Tutorials
    • iconOceanBase Best Practices
    • Tools
    • iconOceanBase Cloud Platform
    • iconOceanBase Migration Service
    • iconOceanBase Developer Center
    • iconOceanBase Migration Assessment
    • iconOceanBase Admin Tool
    • iconOceanBase Loader and Dumper
    • iconOceanBase Deployer
    • iconKubernetes operator for OceanBase
    • iconOceanBase Diagnostic Tool
    • iconOceanBase Binlog Service
    • Connectors and Middleware
    • iconOceanBase Database Proxy
    • iconEmbedded SQL in C for OceanBase
    • iconOceanBase Call Interface
    • iconOceanBase Connector/C
    • iconOceanBase Connector/J
    • iconOceanBase Connector/ODBC
    • iconOceanBase Connector/NET
icon

OceanBase Developer Center

V3.2.2Community Edition

  • OceanBase Developer Center Documentation
  • What's New
    • Product updates
  • Overview
    • What is ODC?
    • Benefits
    • Architecture
    • Features
    • Limits
  • Quick Start
    • Overview
    • Install ODC
    • Log on to ODC with an account
    • Create a private connection
  • Tutorials
    • Tips on the SQL Console
    • Create a connection
    • Export data
    • Import data
    • Debug a stored procedure
    • View the performance of an SQL statement
  • User Guide (Web ODC)
    • Log on to ODC
      • Log on to ODC with an account
      • Change the password
    • ODC homepage
    • Connect to a database
      • Create a private connection
      • Manage private connections
    • Public resource management
      • Overview
      • Member management
        • Manage users
        • Manage roles
      • Resource management
        • Manage public connections
        • Manage resource groups
      • System settings
    • Use the workspace
      • Overview
      • SQL window
      • Anonymous block window
      • Command-line window
      • Stored scripts
      • Snippet
    • Use tools
      • Data export and import
        • Overview
        • Export and import formats
        • Batch export and import
        • Single table export and import
      • Data mocking
      • Asynchronous execution
    • Recycle bin
    • Task management
      • Overview
      • Import tasks
      • Export tasks
      • Data mocking tasks
      • Asynchronous tasks
    • Session management
    • Database objects
      • Table objects
        • Overview
        • Create a table
        • Table list
        • Manage table attributes
        • Manage table data
      • View objects
        • Overview
        • Create a view
        • Manage views
      • Function objects
        • Overview
        • Create a function
        • Manage functions
      • Stored procedure objects
        • Overview
        • Create a stored procedure
        • Manage stored procedures
      • Sequence objects
        • Overview
        • Create a sequence
        • Manage sequences
      • Package objects
        • Overview
        • Create a program package
        • Manage program packages
      • Trigger objects
        • Overview
        • Create a trigger
        • Manage triggers
      • Type objects
        • Overview
        • Create a type
        • Manage types
      • Synonym objects
        • Overview
        • Create a synonym
        • Manage synonyms
    • Help center
    • Revision note
  • User Guide (Client ODC)
    • Install ODC
    • ODC homepage
    • Connect to a database
      • Create a connection
      • Manage connections
    • Use the workspace
      • Overview
      • SQL window
      • Anonymous block window
      • Command-line window
      • Stored scripts
      • Snippet
    • Use tools
      • Data export and import
        • Overview
        • Export and import formats
        • Batch export and import
        • Single table export and import
      • Data mocking
      • Asynchronous execution
    • Recycle bin
    • Task management
      • Overview
      • Import tasks
      • Export tasks
      • Data mocking tasks
      • Asynchronous tasks
    • Session management
    • Database objects
      • Table objects
        • Overview
        • Create a table
        • Table list
        • Manage table attributes
        • Manage table data
      • View objects
        • Overview
        • Create a view
        • Manage views
      • Function objects
        • Overview
        • Create a function
        • Manage functions
      • Stored procedure objects
        • Overview
        • Create a stored procedure
        • Manage stored procedures
      • Sequence objects
        • Overview
        • Create a sequence
        • Manage sequences
      • Package objects
        • Overview
        • Create a program package
        • Manage program packages
      • Trigger objects
        • Overview
        • Create a trigger
        • Manage triggers
      • Type objects
        • Overview
        • Create a type
        • Manage types
      • Synonym objects
        • Overview
        • Create a synonym
        • Manage synonyms
    • Help center
    • Revision note
  • Deployment Guide
    • Deployment overview
    • Preparations before deployment
    • Deploy a single ODC node
      • Deployment process
      • Load and run an ODC image
    • Deploy ODC in high availability mode
      • Deployment process
      • Load and run an ODC image
      • Deploy SSL certificate
      • Deploy the NGINX proxy
      • Configure certificate trust
    • Deployment verification
    • Revision note
  • Upgrade Guide
    • Overview
    • Preparation for upgrade
    • Upgrade single-node ODC
      • Upgrade process
      • Stop ODC of the earlier version
      • Load and run an ODC image
    • Upgrade high-availability
      • Upgrade process
      • Stop ODC of the earlier version
      • Load and run an ODC image
      • Upgrade NGINX image
    • Upgrade verification
    • Rollback after upgrade failed
    • Revision note
  • FAQ

Download PDF

OceanBase Developer Center DocumentationProduct updates What is ODC? Benefits Architecture Features Limits Overview Install ODC Log on to ODC with an account Create a private connection Tips on the SQL Console Create a connection Export data Import data Debug a stored procedure View the performance of an SQL statement Log on to ODC with an account Change the password ODC homepage Create a private connection Manage private connections Overview System settings Overview SQL window Anonymous block window Command-line window Stored scripts Snippet Data mocking Asynchronous execution Recycle bin Overview Import tasks Export tasks Data mocking tasks Asynchronous tasks Session management Help center Revision note Install ODC ODC homepage Create a connection Manage connections Overview SQL window Anonymous block window Command-line window Stored scripts Snippet Data mocking Asynchronous execution Recycle bin Overview Import tasks Export tasks Data mocking tasks Asynchronous tasks Session management Help center Revision note Deployment overview Preparations before deployment Deployment process Load and run an ODC image Deployment process Load and run an ODC image Deploy SSL certificate Deploy the NGINX proxy Configure certificate trust Deployment verification Revision note Overview Preparation for upgrade Upgrade process Stop ODC of the earlier version Load and run an ODC image Upgrade process Stop ODC of the earlier version Load and run an ODC image Upgrade NGINX image Upgrade verification Rollback after upgrade failed Revision note FAQ
OceanBase logo

The Unified Distributed Database for the AI Era.

Follow Us
Products
OceanBase CloudOceanBase EnterpriseOceanBase Community EditionOceanBase seekdb
Resources
DocsBlogLive DemosTraining & Certification
Company
About OceanBaseTrust CenterLegalPartnerContact Us
Follow Us

© OceanBase 2026. All rights reserved

Cloud Service AgreementPrivacy PolicySecurity
Contact Us
Document Feedback
  1. Documentation Center
  2. OceanBase Developer Center
  3. V3.2.2
iconOceanBase Developer Center
V 3.2.2Community Edition
  • V 4.4.2
  • V 4.4.1
  • V 4.4.0
  • V 4.3.4
  • V 4.3.3
  • V 4.3.2
  • V 4.3.1
  • V 4.3.0
  • V 4.2.4
  • V 4.2.3
  • V 4.2.2
  • V 4.2.1
  • V 4.2.0
  • V 4.1.3 and earlier
Community Edition
  • V 4.1.0
  • V 4.0.0
  • V 3.3.2
  • V 3.2.2
Enterprise Edition
  • V 4.1.3
  • V 3.4.0

Create a view

Last Updated:2026-04-13 07:35:39  Updated
share
What is on this page
Specify the basic information.
Select base tables (Optional)
Select fields (Optional)
Verify the SQL statement

folded

share

Log on to OceanBase Developer Center (ODC) and click the name of the target connection to go to the corresponding connection management page. You can click View in the left-side navigation pane to get a list of views. To create a view, click + in the upper-right corner of the view list or click Create in the navigation bar on the top of the page.

To create a view, perform the following four steps:

  1. Specify the basic information.

  2. Select base tables. (Optional)

  3. Select fields. (Optional)

  4. Verify the SQL statement.

    Image 536

Specify the basic information.

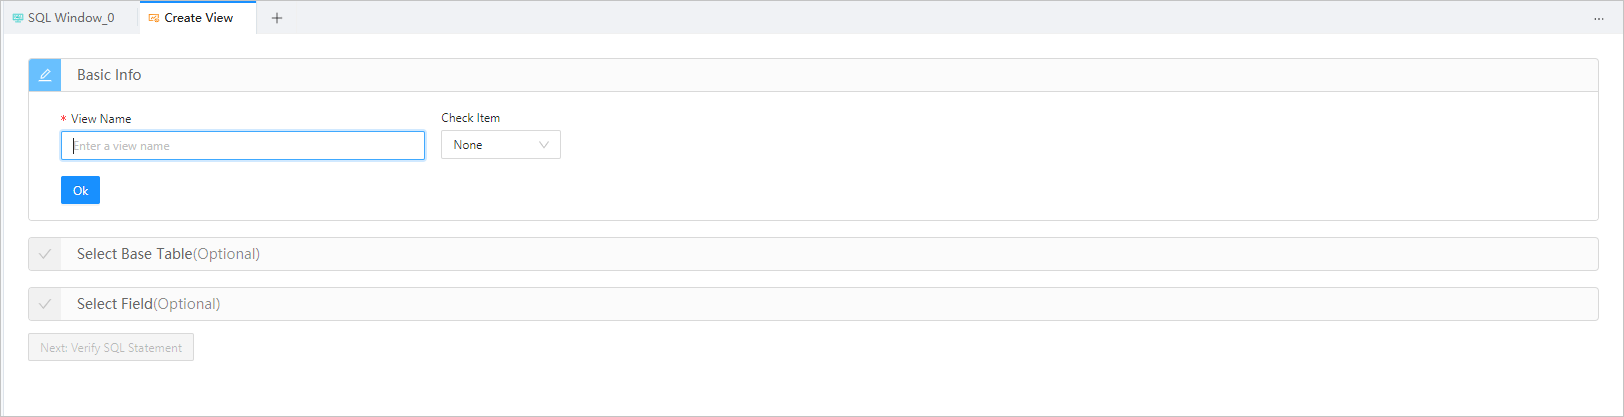
This is Step 1. The Basic Info section contains the following parameters:

  • View Name : specifies the name of the view.

  • Check Item : specifies the constraints on the input data. OceanBase does not support this parameter. It is set to None by default.

After you specify all the basic information, click OK to complete this step. You can either click Next: Verify SQL Statement to go to Step 4 to verify the SQL statement, or proceed to Step 2 to select base tables.

Select base tables (Optional)

After you specify the basic information, you can proceed to Step 2 to select base tables, or you can skip Step 2.

In the Select Base Tables section, the list on the left displays, in the hierarchy of schema > database > table/view, the base tables that you can select. You can search for base tables in this list. Select tables or views in the base table list, and click the add icon (>) next to the list to add the selected tables and views to the table operation area on the right.

In the table operation area, you can perform the following operations on a selected base table.

  • Set an alias: You can set an alias for a selected base table. Click Alias next to the table name in the table operation area and enter the alias. This operation is optional.

  • Set association relationships: when two or more tables exist in the table operation area, you can define an association relationship between the tables. The default association is JOIN . You do not need to set an association relationship for the last table. Click the drop-down list icon next to Alias and select an association relationship. Supported options: JOIN , INNER JOIN , LEFT JOIN , RIGHT JOIN , CROSS JOIN , FULL JOIN , UNION , UNION ALL , INTERSECT , MINUS , LEFT OUTER JOIN , RIGHT OUTER JOIN , and FULL OUTER JOIN .

  • Adjust the association order: You can drag the base tables in the table operation area to reorder them. When you drag a table to become the last table, the association relationships of this table are deleted.

Delete a base table: You can click the delete icon next to a table in the table operation area to delete it from the table operation area. After you delete a table, its associations with the next table are also deleted.

After you select and configure the base tables, click OK to complete this step.

Select fields (Optional)

After you select the base tables, you can proceed to Step 3 to select fields. This step is unavailable if you have skipped Step 2.

In the Select Fields section, the list on the left displays, in the hierarchy of schema > database > table/view, the fields in the base tables that you selected in Step 2. You can search for fields in this list. Select fields in the field list, and click the add icon (>) next to the list to add the selected fields to the field operation area on the right.

In the field operation area, you can perform the following operations on a selected field.

  • Set an alias: You can set an alias for a selected field. Click Alias next to the field name in the field operation area and enter the alias. This operation is optional.

  • Adjust the association order: You can drag the fields in the field operation area to reorder them.

  • Delete a field: You can click the delete icon next to a field in the field operation area to delete it from the operation area.

  • Customize fields: Click + Custom in the upper-right corner of the field operation area to add a field to the operation area. You must specify a name and an alias for the field.

After you select and configure the fields, click OK to complete this step.

Verify the SQL statement

After you complete all the previous steps, click Next: Verify SQL Statement to go to the statement editing page.

On the statement editing page, a view definition statement is generated based on the information specified in the Basic Info , Select Base Table , and Select Fields sections. You may need to fill in missing information to complete the statement. After you complete the statement, click Create in the upper-right corner of the page to create the view.

In addition, the toolbar on the editing page provides the following buttons:

Button Description
Format Click this button to apply formatting, such as indentation, line break, and keyword highlighting, to the selected SQL statements or all the SQL statements in the current SQL window.
Find and Replace You can specify search criteria in the search box to find specific content in the script and enter other content in the replacement box to replace the content found.
Undo Click this button to undo the last operation.
Redo Click this button to reverse an Undo operation.
Case Sensitivity The system supports three configurations: All Caps , All Lowercase , and Capitalize the first letter . Click this button to convert the selected statements in the script to the corresponding capitalization format.
Indent The Add Indents and Delete Indent options are provided, to allow you to add indents to or delete indents from the selected statements in the script.
Comment The Add Comments and Delete Comment options are provided, which respectively allow you to convert the selected statements in the script to comments and convert comments to SQL statements.
Previous Click this button to go back to the Create View page, where you can continue to edit or modify the parameters in the Basic Info , Select Base Tables , and Select Fields sections.

Previous topic

Overview
Last

Next topic

Manage views
Next
What is on this page
Specify the basic information.
Select base tables (Optional)
Select fields (Optional)
Verify the SQL statement