


This topic describes how to upgrade OceanBase Cloud Platform (OCP) on the GUI of OceanBase Deployer (obd).
Prerequisites
Make sure that the following conditions are met:
The current OCP version is Community Edition V4.0.3 or later.
You have installed and configured a Java environment on the OCP node. Currently, only JDK 1.8 is supported. For more information, see the How do I configure the Java environment? section in FAQ.
Procedure
(Optional) Step 1: Obtain the installation package required for upgrade
Note
If your server can connect to the Internet and remote image repositories are enabled, skip this step. You can run the obd mirror list command to confirm whether remote image repositories are enabled.
Download the installation package.
Download the OCP installation package of the desired version from OceanBase Download Center and upload it to any directory on the central control server of obd.
Decompress the installation package.
In the directory where the installation package is located, run the following command to decompress the package:
[admin@test001 ~]$ tar -xzf ocp-all-in-one-*.tar.gz(Optional) Uninstall the original obd.
If obd has been installed on your server by using the All in One package, run the following command to uninstall it:
[admin@test001 ~]$ cd ocp-all-in-one/bin && bash uninstall.shStart the installer.
Run the
install.shscript in thebindirectory under theocp-all-in-oneinstallation directory to start the installer of obd.[admin@test001 bin]$ bash install.shThis script will install obd, copy all installation packages stored in the
rpmsdirectory under the installation directory to the local image repository of obd, and disable remote image repositories. You can copy and run thesource ~/.oceanbase-all-in-one/bin/env.shcommand in the following output to apply the environment settings:add auto set env logic to profile: /home/admin/.bash_profile ######################################################################################### Install Finished ========================================================================================= Setup Environment: source ~/.oceanbase-all-in-one/bin/env.sh Quick Start: obd demo Use Web Service to install: obd web Use Web Service to upgrade: obd web upgrade More Details: obd -h =========================================================================================
Step 2: Upgrade OCP
Start the upgrade.
[admin@test001 ~]$ obd web upgradeAccess the URL provided in the output in a browser to go to the upgrade wizard page. Then, click Start Upgrade.
start OBD WEB in 0.0.0.0:8680
please open http://10.10.10.1:8680/#/updateWelcome
Note
The default port in the URL is 8680. You can use the
obd web upgrade -p <PORT>command to specify a port.In Alibaba Cloud or other cloud environments, the program may fail to obtain a public IP address but return an intranet IP address. You must use a correct public IP address to access the GUI.
The
obd webcommand is bound to 0.0.0.0. In a deployment where multiple network interface cards (NICs) are used, you can access the GUI through any accessible IP address.
Configure the deployment information.
On the deployment configuration page, select the OCP cluster to be upgraded and the target version. The system automatically obtains the names of all clusters managed by obd. You can select a cluster from the Cluster Name drop-down list. If the cluster to be upgraded is not managed by the current obd, such as a cluster deployed by using Docker, you can enter the cluster name. After the cluster upgrade is completed, obd automatically takes over the OCP cluster.
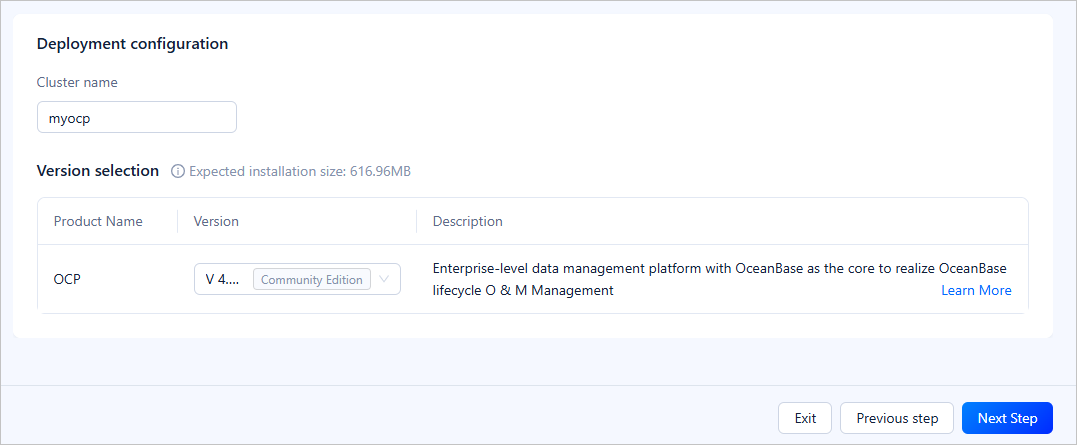
Click Next Step to go to the Connectivity Test page.
Verify the connectivity of MetaDB.
The current page automatically obtains the MetaDB configuration. If found, the information will be populated in the Connection information section. Check whether the information matches the environment you intend to upgrade. If so, enter the access password and click Verification to check whether MetaDB can be connected.

Configure an OS user.
After you verify the connectivity of MetaDB, you need to configure an OS user for the installer to automatically configure settings.
 ParameterDescription
Username The username of the OS user of the host, who has sudo privileges. The installer requires this username to automatically configure settings. Password The password of the OS user. If you have enabled password-free login for the host, ignore this parameter. After configuration, you can click Verification to test the user connectivity. Click Next Step to go to the Environment pre-check page.
Run an environment precheck.
The system obtains the configuration information of OCP based on that of MetaDB. To ensure management consistency, OCP Server and OCP Agent are also upgraded.
Check whether the information in the Installation configuration and Upgrade configuration information sections are as expected. If not, click Previous Step to modify the information. If so, click Pre-check.
If the precheck is passed, click Next Step to upgrade OCP. If the precheck fails, you can choose to fix or ignore the failed items.
If you choose to fix the failed items, wait until all of them are fixed and click Re-check to perform a precheck again.
If you choose to ignore the failed items, click Ignore all failed items. This action changes the status of all failed precheck items to Ignored. Then, click Next Step.
Notice
If you ignore all failed precheck items, the upgrade may fail. We recommend that you fix the failed precheck items before proceeding to the next step.
Upgrade OCP.
You can view detailed upgrade logs in the Upgrade logs section during the upgrade process.
If the upgrade succeeds, you can view the login information of OCP, such as the URL, username, and password, in the Upgrade logs section.
If the upgrade fails, check the logs for the causes and contact OceanBase Technical Support. After you identify the causes and fix the issue, click Upgrade Again to re-execute the failed upgrade steps.
Note
The OCP upgrade process may take some time. Please wait patiently.

References
For more information about how to use OCP, see OCP documentation.