OceanBase logo

OceanBase

A unified distributed database ready for your transactional, analytical, and AI workloads.

DEPLOY YOUR WAY

OceanBase Cloud

The best way to deploy and scale OceanBase

OceanBase Enterprise

Run and manage OceanBase on your infra

TRY OPEN SOURCE

OceanBase Community Edition

The free, open-source distributed database

OceanBase seekdb

Open source AI native search database

Customer Stories

Real-world success stories from enterprises across diverse industries.

View All
BY USE CASES

Mission-Critical Transactions

Global & Multicloud Application

Elastic Scaling for Peak Traffic

Real-time Analytics

Active Geo-redundancy

Database Consolidation

Resources

Comprehensive knowledge hub for OceanBase.

Blog

Live Demos

Training & Certification

Documentation

Official technical guides, tutorials, API references, and manuals for all OceanBase products.

View All
PRODUCTS

OceanBase Cloud

OceanBase Database

Tools

Connectors and Middleware

QUICK START

OceanBase Cloud

OceanBase Database

BEST PRACTICES

Practical guides for utilizing OceanBase more effectively and conveniently

Company

Learn more about OceanBase – our company, partnerships, and trust and security initiatives.

About OceanBase

Partner

Trust Center

Contact Us

International - English
中国站 - 简体中文
日本 - 日本語
Sign In
Start on Cloud

A unified distributed database ready for your transactional, analytical, and AI workloads.

DEPLOY YOUR WAY

OceanBase Cloud

The best way to deploy and scale OceanBase

OceanBase Enterprise

Run and manage OceanBase on your infra

TRY OPEN SOURCE

OceanBase Community Edition

The free, open-source distributed database

OceanBase seekdb

Open source AI native search database

Customer Stories

Real-world success stories from enterprises across diverse industries.

View All
BY USE CASES

Mission-Critical Transactions

Global & Multicloud Application

Elastic Scaling for Peak Traffic

Real-time Analytics

Active Geo-redundancy

Database Consolidation

Comprehensive knowledge hub for OceanBase.

Blog

Live Demos

Training & Certification

Documentation

Official technical guides, tutorials, API references, and manuals for all OceanBase products.

View All
PRODUCTS
OceanBase CloudOceanBase Database
ToolsConnectors and Middleware
QUICK START
OceanBase CloudOceanBase Database
BEST PRACTICES

Practical guides for utilizing OceanBase more effectively and conveniently

Learn more about OceanBase – our company, partnerships, and trust and security initiatives.

About OceanBase

Partner

Trust Center

Contact Us

Start on Cloud
编组
All Products
    • Databases
    • iconOceanBase Database
    • iconOceanBase Cloud
    • iconOceanBase Tugraph
    • iconInteractive Tutorials
    • iconOceanBase Best Practices
    • Tools
    • iconOceanBase Cloud Platform
    • iconOceanBase Migration Service
    • iconOceanBase Developer Center
    • iconOceanBase Migration Assessment
    • iconOceanBase Admin Tool
    • iconOceanBase Loader and Dumper
    • iconOceanBase Deployer
    • iconKubernetes operator for OceanBase
    • iconOceanBase Diagnostic Tool
    • iconOceanBase Binlog Service
    • Connectors and Middleware
    • iconOceanBase Database Proxy
    • iconEmbedded SQL in C for OceanBase
    • iconOceanBase Call Interface
    • iconOceanBase Connector/C
    • iconOceanBase Connector/J
    • iconOceanBase Connector/ODBC
    • iconOceanBase Connector/NET
icon

OceanBase Developer Center

V4.4.0

  • Topics Overview
  • Overview
    • What is ODC?
    • Features
    • Architecture
    • Limitations
    • ODC console
  • Quick Start
    • Client ODC
      • Overview
      • Install Client ODC
      • Use Client ODC
    • Web ODC
      • Overview
      • Deploy Web ODC
      • Use Web ODC
  • Data Source Management
    • Create a data source
    • Data sources and project collaboration
    • Database O&M
      • Session management
      • Global variable management
      • Recycle bin management
  • SQL Development
    • Edit and execute SQL statements
    • Perform PL compilation and debugging
    • Use the command-line window
    • Edit and export the result set of an SQL statement
    • Execution analysis
    • Generate test data
    • System settings
    • Database objects
      • Table objects
        • Overview
        • Create a table
      • View objects
        • Overview
        • Create a view
        • Manage views
      • Materialized view objects
        • Overview
        • Create a materialized view
        • Manage materialized views
      • Function objects
        • Overview
        • Create a function
        • Manage functions
      • Stored procedure objects
        • Overview
        • Create a stored procedure
        • Manage stored procedures
      • Sequence objects
        • Overview
        • Create a sequence
        • Manage sequences
      • Package objects
        • Overview
        • Create a program package
        • Manage program packages
      • Trigger objects
        • Overview
        • Create a trigger
        • Manage triggers
      • Type objects
        • Overview
        • Create a type
        • Manage types
      • Synonym objects
        • Overview
        • Create a synonym
        • Manage synonyms
  • Import and Export
    • Import schemas and data
    • Export schemas and data
  • Database Change Management
    • Manage user permissions
      • Users and roles
      • Automatic authorization
      • User permission management
    • Project collaboration management
    • Risk levels, risk identification rules, and approval processes
    • SQL check specifications
    • SQL window specification
    • Database change management
    • Manage changes to logical databases
    • Batch database change management
    • Online schema changes
    • Synchronize shadow tables
    • Schema comparison
  • Data Lifecycle Management
    • Data archiving
    • Data cleanup
    • Manage partitioning plans
      • Manage partitioning plans
      • Set partitioning strategies
      • Examples of partitioning strategies
    • SQL plan task
  • Data Masking and Auditing
    • Desensitize data
    • Operation records
  • Notification Management
    • Overview
    • View notification records
    • Manage notification channels
      • Create a notification channel
      • View, edit, and delete a notification channel
      • Configure a custom channel
    • Manage notification rules
  • System Integration
    • Login integration
    • Approval integration
    • SQL approval integration
    • Bastion host integration
  • Deployment Guide
    • Deployment overview
    • Preparations before deployment
    • Deploy ODC in single-node mode
    • Deploy ODC in high-availability mode
    • Deployment verification
  • Upgrade Guide
    • Upgrade Overview
    • Preparations before upgrade
    • Update single-node ODC
    • Update high-avaliability ODC
    • Upgrade verification
    • Rollback after upgrade failed
  • Best Practices
    • Tips for SQL development
    • Explore ODC team workspaces
    • Understanding real-time SQL diagnostics for OceanBase AP
    • OceanBase historical database solutions
    • ODC SQL check for automatic identification of high-risk operations
    • Integration with ODC enterprise-level account system
    • Manage and modify sharded databases and tables via ODC
    • Data masking and control practices
    • Enterprise-level control and collaboration: Safeguard every database change
  • Troubleshooting
    • ODC troubleshooting process
    • Collect message
      • View the runtime environment and version information
      • View web ODC logs
      • View client ODC logs
      • View end-to-end ODC-related logs
      • View ODC MetaDB data
      • Query the index status in OceanBase Database V4.x
      • Query the index status in OceanBase Database V1.4.x to V3.2.x
      • Collect JVM runtime information
      • Use tcpdump to capture packets
    • FAQ
      • Installation of client ODC
      • Web ODC deployment and startup
      • Connection Information
      • Command-line window
      • DDL statement display
  • Common features
  • Release Notes
    • V4.4
      • ODC V4.4.0
    • V4.3
      • ODC V4.3.4
      • ODC V4.3.3
      • ODC V4.3.2
      • ODC V4.3.1
      • ODC V4.3.0
    • V4.2
      • ODC V4.2.4
      • ODC V4.2.3
      • ODC V4.2.2
      • ODC V4.2.1
      • ODC V4.2.0
    • V4.1
      • ODC V4.1.3
      • ODC V4.1.2
      • ODC V4.1.1
      • ODC V4.1.0
    • V4.0
      • ODC V4.0.2
      • ODC V4.0.0
    • V3.4
      • ODC V3.4.0
    • V3.3
      • ODC V3.3.3
      • ODC V3.3.2
      • ODC V3.3.1
      • ODC V3.3.0
    • V3.2
      • ODC V3.2.3
      • ODC V3.2.2
      • ODC V3.2.1
      • ODC V3.2.0

Download PDF

Topics Overview What is ODC? Features Architecture Limitations ODC console Overview Install Client ODC Use Client ODC Overview Deploy Web ODC Use Web ODC Create a data source Data sources and project collaboration Session management Global variable management Recycle bin management Edit and execute SQL statements Perform PL compilation and debugging Use the command-line window Edit and export the result set of an SQL statement Execution analysis Generate test data System settings Import schemas and data Export schemas and data Users and roles Automatic authorization User permission management Project collaboration management Risk levels, risk identification rules, and approval processes SQL check specifications SQL window specification Database change management Manage changes to logical databases Batch database change management Online schema changes Synchronize shadow tables Schema comparison Data archiving Data cleanup Manage partitioning plans Set partitioning strategies Examples of partitioning strategies SQL plan task Desensitize data Operation records Overview View notification records Create a notification channel View, edit, and delete a notification channel Configure a custom channel Manage notification rules Login integration Approval integration SQL approval integration Bastion host integration Deployment overview Preparations before deployment Deploy ODC in single-node mode Deploy ODC in high-availability mode Deployment verification Upgrade Overview Preparations before upgrade Update single-node ODC Update high-avaliability ODC Upgrade verification Rollback after upgrade failed Tips for SQL development Explore ODC team workspaces Understanding real-time SQL diagnostics for OceanBase AP OceanBase historical database solutions ODC SQL check for automatic identification of high-risk operations Integration with ODC enterprise-level account system Manage and modify sharded databases and tables via ODC Data masking and control practices Enterprise-level control and collaboration: Safeguard every database change ODC troubleshooting process View the runtime environment and version information View web ODC logs View client ODC logs View end-to-end ODC-related logs View ODC MetaDB data Query the index status in OceanBase Database V4.x Query the index status in OceanBase Database V1.4.x to V3.2.x Collect JVM runtime information Use tcpdump to capture packets Installation of client ODC Web ODC deployment and startup Connection Information Command-line window DDL statement display Common features ODC V4.4.0 ODC V4.3.4 ODC V4.3.3 ODC V4.3.2 ODC V4.3.1 ODC V4.3.0 ODC V4.2.4
OceanBase logo

The Unified Distributed Database for the AI Era.

Follow Us
Products
OceanBase CloudOceanBase EnterpriseOceanBase Community EditionOceanBase seekdb
Resources
DocsBlogLive DemosTraining & Certification
Company
About OceanBaseTrust CenterLegalPartnerContact Us
Follow Us

© OceanBase 2026. All rights reserved

Cloud Service AgreementPrivacy PolicySecurity
Contact Us
Document Feedback
  1. Documentation Center
  2. OceanBase Developer Center
  3. V4.4.0
iconOceanBase Developer Center
V 4.4.0
  • V 4.4.2
  • V 4.4.1
  • V 4.4.0
  • V 4.3.4
  • V 4.3.3
  • V 4.3.2
  • V 4.3.1
  • V 4.3.0
  • V 4.2.4
  • V 4.2.3
  • V 4.2.2
  • V 4.2.1
  • V 4.2.0
  • V 4.1.3 and earlier

Create a view

Last Updated:2026-04-07 10:00:35  Updated
share
What is on this page
Overview
Uses of views
Procedure
Step 1: Specify basic information
Step 2: Select base tables
Step 3: Select fields
Step 4: Confirm the SQL statement
Step 5: Complete the view creation
References

folded

share

OceanBase Developer Center (ODC) allows you to create a view on a GUI. This topic describes how to create a view in the ODC console.

Overview

A view is a virtual table whose structure and data are derived from part of the data in one or more tables, and obtained through a SELECT query statement. A view does not contain actual data.

Uses of views

  • Simplify data query operations: A view can combine data required from different tables into a single table. You can use views to convert multi-table queries into single-table queries.

  • Limit data access: You can use views to grant access only to specific data to specific users. Users can view only the data displayed in the view.

1

The preceding figure shows the five steps involved in creating a view:

  1. Specify the basic information.

  2. Select the base table.

  3. Select fields.

  4. Verify the SQL statement.

  5. Complete the view creation.

In this example, a salary view is created in ODC by combining the name field from the employee table and the budget and dept_name fields from the consumer table.

Note

All data used in this example is for reference only. You can replace the data as needed.

Procedure

Step 1: Specify basic information

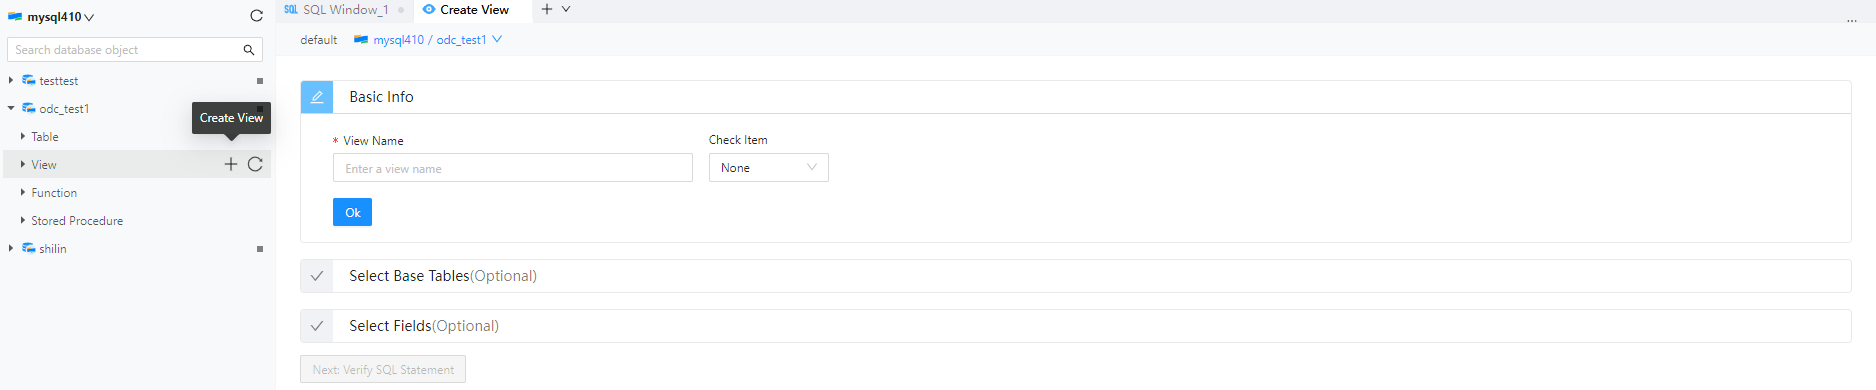
Log in to OceanBase Developer Center (ODC) and click the name of the target connection to go to the corresponding connection management page. You can click View in the left-side navigation pane to get a list of views. To create a view, click + in the upper-right corner of the view list or click Create in the top navigation bar.

On the Basic Info tab, specify the View Name and Check Item parameters.

  • View Name: the name of the view.

  • Check Item: the constraint check for data written. In the Oracle compatible mode of OceanBase Database, only read operations are supported. Default value: None.

Step 1

After you specify the basic information, click OK in the lower-left corner of the tab to complete this step.

After you complete the basic information settings, you can click Next: Verify SQL Statement at the bottom of the page to go to the Verify SQL step, or you can go to the next step that requires base table selection.

Step 2: Select base tables

After you specify the basic information, you can perform the operations of Step 2, namely, base table selection. This step can be skipped.

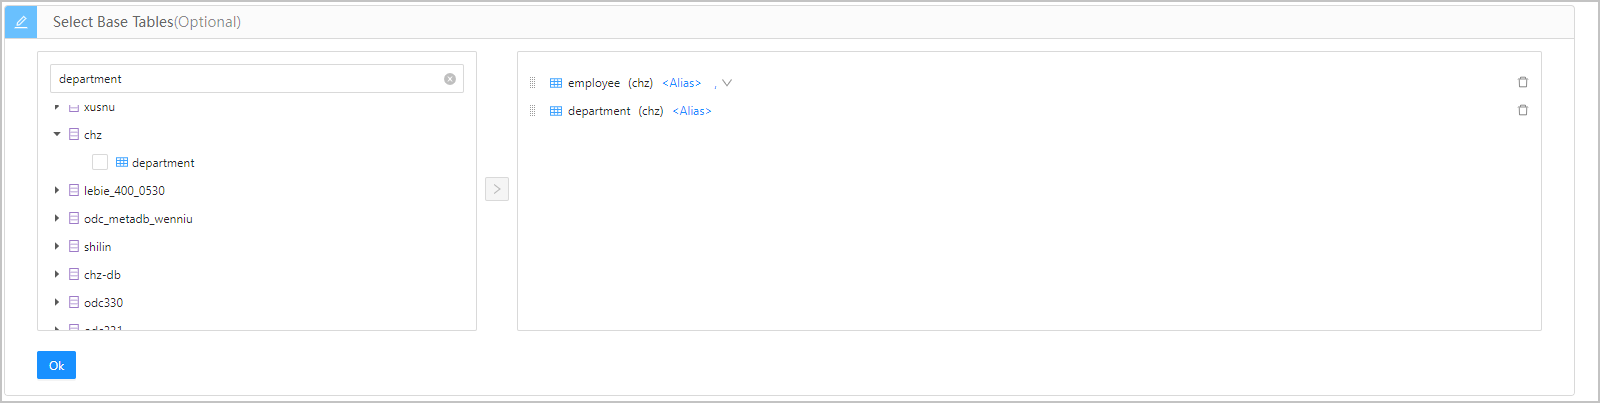
On the Select Base Tables tab, the left-side list displays the base tables that can be selected in a hierarchical manner based on schema > database > table/view. The list supports search. You can select the target table or view from the list, click the Add button next to the list, and then add the selected table or view to the table operations section on the right.

Step 2

In the table operations section, you can perform the following operations on the selected base tables:

Parameter Description
Set alias You can set an alias for the selected base table. This is an optional operation. To set an alias, click <Alias> next to the table name and enter an alias in the text box.
Set relationship When two or more tables are selected in the table operations section, you can select the relationship between tables from the drop-down list. The default value is none, and you do not need to set the relationship for the last table. To set the relationship, click the drop-down list icon drop-down list next to the alias, and select JOIN, INNER JOIN, LEFT JOIN, RIGHT JOIN, CROSS JOIN, FULL JOIN, UNION, UNION ALL, INTERSECT, MINUS, LEFT OUTER JOIN, RIGHT OUTER JOIN, or FULL OUTER JOIN from the drop-down list.
Change order You can directly drag the selected base tables in the table operations section to change the order. The relationship for the last table changed will be cleared.
Delete a base table You can click the Delete icon next to each table in the table operations section to delete the table. The relationship for the last table changed will be cleared.

After you complete the selection and settings of base tables, click OK in the lower-left corner of the tab to complete this step.

Step 3: Select fields

After you select the base tables, you can perform the operations of Step 3, namely, field selection. You cannot perform field selection if you skip Step 2.

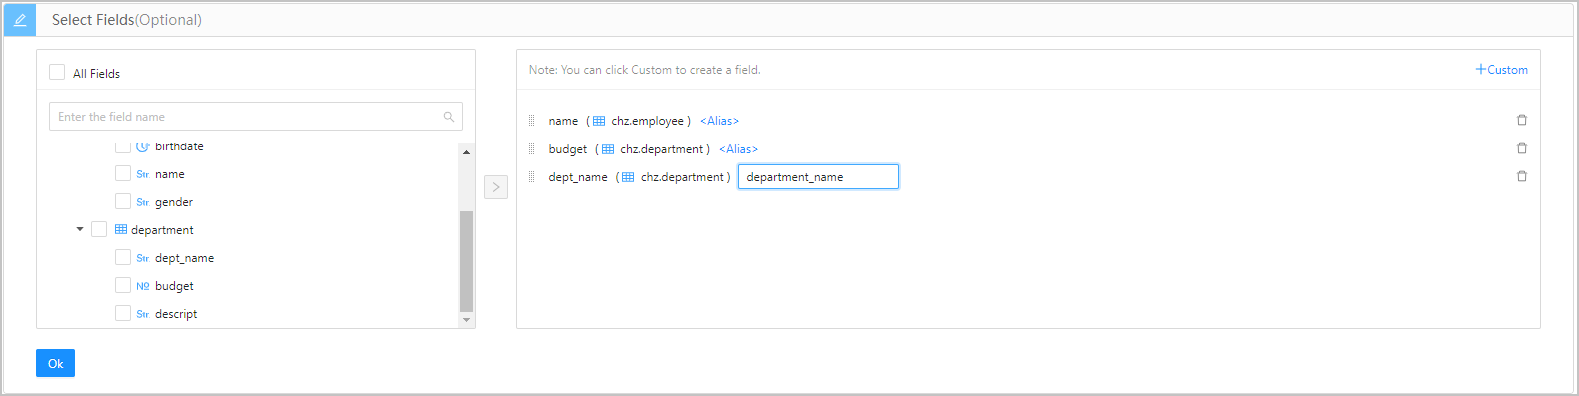
On the Select Fields tab, the left-side list displays the fields in the base tables selected in Step 2 in a hierarchical manner based on schema > database > table/view. The list supports search. You can select the target field from the list, click the Add button next to the list, and then add the selected field to the field operations section on the right.

Step 3

In the field operations section, you can perform the following operations on the selected fields:

Parameter Description
Set alias You can set an alias for the selected field. This is an optional operation. To set an alias, click <Alias> next to the field name and enter an alias in the text box.
Change order You can directly drag the selected fields in the field operations section to change the order.
Delete a field You can click the Delete icon next to each field in the field operations section to delete the field.
Add a custom field You can click +Custom in the upper-right corner of the field operations section to add a field. You need to specify the field name and alias for the new field.

After you complete the selection and settings of fields, click OK in the lower-left corner of the tab to complete this step.

Step 4: Confirm the SQL statement

After you specify all the preceding parameters, click Next: Verify SQL Statement on the page to go to the statement editing page.

Step 4

On the statement editing page, the corresponding view definition statement is generated based on the information specified on the Basic Info, Select Base Tables, and Select Fields tabs. If the statement contains definitions of more than two tables, you need to complete the statement based on the relationships between the tables and the logical conditions. After you complete the view creation statement, click the Create button in the upper-right corner of the page to complete the view creation.

You can edit the view statement on the SQL creation confirmation page. The syntax is as follows:

CREATE VIEW view_name AS
SELECT
  column1,
  column2.....
FROM
  table_name
WHERE
  [condition];

Step 5: Complete the view creation

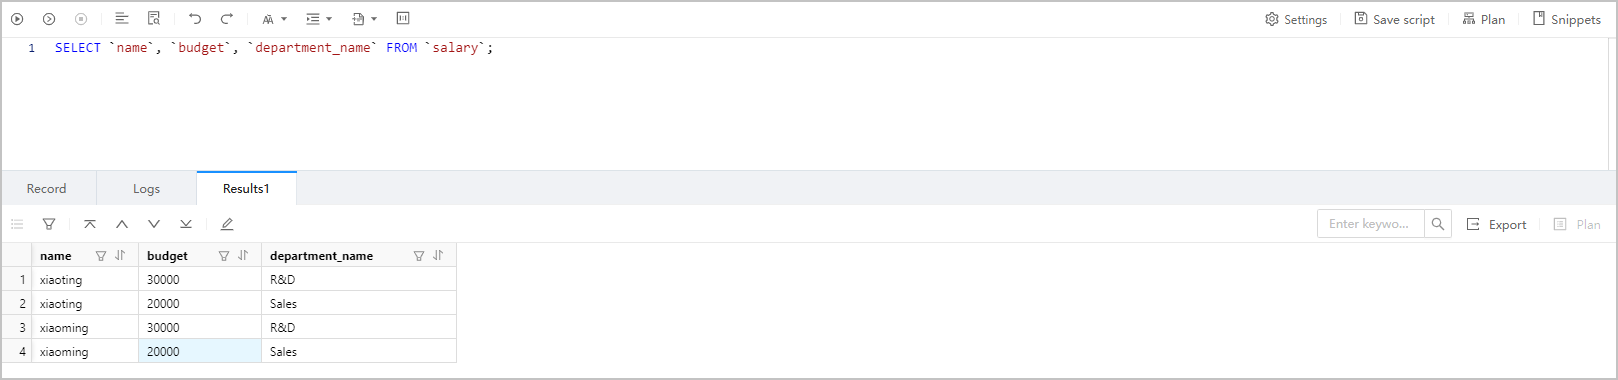
Click Create. After the view is created, you can use the SELECT statement to query the view, just like querying a table.

Step 4.2

Note

In the view list in the left-side navigation pane, click the More icon in the name of the view that you want to manage. A pop-up list appears, providing the following options for you to manage and operate the target view object: View View Properties, View View Data, Export, Download, Copy, and Delete.

The syntax is as follows:

SELECT
column1,
column2.....
FROM
table_name;

Here is an example:

SELECT `name`, `budget`, `department_name` FROM `salary`;

Step 5

References

  • Create a table
  • Create a function
  • Create a stored procedure
  • Create a sequence
  • Create a program package
  • Create a trigger
  • Create a type
  • Create a synonym

Previous topic

Overview
Last

Next topic

Manage views
Next
What is on this page
Overview
Uses of views
Procedure
Step 1: Specify basic information
Step 2: Select base tables
Step 3: Select fields
Step 4: Confirm the SQL statement
Step 5: Complete the view creation
References