Background information
As digital transformation accelerates, enterprises are placing higher demands on data analysis, particularly for processing large volumes of offline historical data. One effective solution is to build a data warehouse. OceanBase Database enables you to create a data warehouse specifically for offline data analysis. Through scheduled tasks, OceanBase Database enables the hierarchical construction of data layers, starting from the Original Data Store (ODS) layer, moving to the Data Warehouse Detail (DWD) layer, and finally reaching the Application Data Service (ADS) layer. Additionally, you can leverage supported ecosystem tools to create a visual dashboard for better data insights.
Prerequisites
The source database is a MySQL database, or you have deployed a cluster of OceanBase Database V4.3.3 or later and created a MySQL tenant. For more information about how to deploy an OceanBase cluster, see Overview.
You have the privileges to insert data to and query data in the MySQL tenant. For more information, see Grant direct privileges.
You have created a database. For more information, see Create a database.
You have enabled binlogs for the source database.
You have deployed Flink CDC, data build tool (dbt), Airflow, and Grafana.
Preparations
Create databases and tables
Create a source transaction processing (TP) database named
tptestand a target analytical processing (AP) database namedaptest.create database aptest; create database tptest;Create tables in the TP and AP databases. Here are sample statements:
CREATE TABLE `orders` (
    order_id bigint not null primary key,
    user_id varchar(50) not null,
    shop_id bigint not null,
    product_id bigint not null,
    buy_fee numeric(20,2) not null,
    create_time timestamp not null,
    update_time timestamp not null default now(),
    state int not null
    );

CREATE TABLE `orders_pay` (
    pay_id bigint not null primary key,
    order_id bigint not null,
    pay_platform varchar(64) not null,
    create_time timestamp not null
    );

CREATE TABLE `product_catalog` (
    product_id bigint not null primary key,
    catalog_name varchar(50) not null
    );
Insert several data records into the tables in the TP database.
INSERT INTO product_catalog VALUES(1, 'iphone 14'),(2, 'iphone 14 pro max'),(3, 'iphone 15'),(4, 'huawei mate 60'),(5, 'huawei pura 70');
insert into `tptest`.`orders_pay`(`pay_id`,`order_id`,`pay_platform`,`create_time`) values(1,1,'test','2024-10-01 00:00:00');
insert into `tptest`.`orders_pay`(`pay_id`,`order_id`,`pay_platform`,`create_time`) values(2,2,'test','2024-10-02 00:00:00');
insert into `tptest`.`orders_pay`(`pay_id`,`order_id`,`pay_platform`,`create_time`) values(3,3,'test','2024-10-03 00:00:00');
insert into `tptest`.`orders_pay`(`pay_id`,`order_id`,`pay_platform`,`create_time`) values(4,4,'test','2024-10-04 00:00:00');
Build Flink CDC synchronization links
Start Flink CDC, go to the folder where it is deployed, and run the ./bin/sql-client.sh command to open its SQL window. Then, execute the following statements in sequence:
```sql
CREATE TABLE mysql_orders (
order_id bigint not null primary key NOT ENFORCED,
user_id varchar(50) not null,
shop_id bigint not null,
product_id bigint not null,
buy_fee numeric(20,2) not null,
create_time timestamp not null,
update_time timestamp not null,
state int not null
) WITH (
'connector' = 'mysql-cdc',
'hostname' = 'xxx.xxx.xxx.xxx',
'port' = '3306',
'username' = 'wktest',
'password' = '******',
'database-name' = 'tptest',
'table-name' = 'orders');

CREATE TABLE `mysql_orders_pay` (
pay_id bigint not null primary key NOT ENFORCED,
order_id bigint not null,
pay_platform varchar(64) not null,
create_time timestamp not null
) WITH (
    'connector' = 'mysql-cdc',
    'hostname' = 'xxx.xxx.xxx.xxx',
    'port' = '3306',
    'username' = 'wktest',
    'password' = '******',
    'database-name' = 'tptest',
    'table-name' = 'orders_pay');

CREATE TABLE `mysql_product_catalog` (
product_id bigint not null primary key NOT ENFORCED,
catalog_name varchar(50) not null
) WITH (
    'connector' = 'mysql-cdc',
    'hostname' = 'xxx.xxx.xxx.xxx',
    'port' = '3306',
    'username' = 'wktest',
    'password' = '******',
    'database-name' = 'tptest',
    'table-name' = 'product_catalog');

CREATE TABLE `orders` (
order_id bigint not null primary key NOT ENFORCED,
user_id varchar(50) not null,
shop_id bigint not null,
product_id bigint not null,
buy_fee numeric(20,2) not null,
create_time timestamp not null,
update_time timestamp not null,
state int not null
) WITH (
    'connector' = 'jdbc',
    'url' = 'jdbc:mysql://******:3306/aptest',
    'username' = 'wktest@mysql001',
    'password' = '******',
    'table-name' = 'orders');

CREATE TABLE `orders_pay` (
pay_id bigint not null primary key NOT ENFORCED,
order_id bigint not null,
pay_platform varchar(64) not null,
create_time timestamp not null
) WITH (
    'connector' = 'jdbc',
    'url' = 'jdbc:mysql://******:3306/aptest',
    'username' = 'wktest@mysql001',
    'password' = '******',
    'table-name' = 'orders_pay');

CREATE TABLE `product_catalog` (
product_id bigint not null primary key NOT ENFORCED,
catalog_name varchar(50) not null
) WITH (
    'connector' = 'jdbc',
    'url' = 'jdbc:mysql://******:3306/aptest',
    'username' = 'wktest@mysql001',
    'password' = '******',
    'table-name' = 'product_catalog',
    'sink.buffer-flush.max-rows' = '0',
    'sink.buffer-flush.interval' = '0');

INSERT INTO product_catalog SELECT * FROM mysql_product_catalog;
INSERT INTO orders_pay SELECT * FROM mysql_orders_pay;
INSERT INTO orders SELECT * FROM mysql_orders;
```
After the preceding Flink CDC synchronization links are created, data is synchronized from the tptest database to the aptest database in real time. You can view the corresponding table data in the SQL console.
Build a computing layer
Create a dbt project
The original table structure of the TP database is not suitable for data analysis or visualization. To address this, you can use a dbt project to transform the data. By creating a dbt project based on the demo, you can define custom data models. The steps are as follows:
Install and deploy dbt. Then, run the
dbt init my_projectcommand to create a dbt project namedmy_project. In the dialog box that appears, enter database information as prompted. For theuserfield, only the username needs to be specified. Once the project is created, the entered information will be saved in theprofiles.ymlfile located in the~/.dbtdirectory. This file is essential for establishing a connection to the database.Run the
cd my_projectcommand to go to the project directory.In the
/my_project/models/exampledirectory, write an SQL file to define data models.# models/example/dwd_orders.sql {{ config( materialized='view') }} select o.order_id as order_id, o.user_id as order_user_id, o.shop_id as order_shop_id, o.product_id as order_product_id, o.buy_fee as order_fee, o.create_time as order_create_time, o.update_time as order_update_time, o.state as order_state, c.catalog_name as order_product_catalog_name, p.pay_id as pay_id, p.pay_platform as pay_platform, p.create_time as pay_create_time from orders o left join product_catalog c on o.product_id = c.product_id left join orders_pay p on o.order_id = p.order_id# models/example/dwd_shops.sql {{ config(materialized='table') }} select order_shop_id, str_to_date(date_format(pay_create_time, '%Y%m%d'), '%Y%m%d') as ds, sum(order_fee) as sum_fee from {{ ref('dwd_orders') }} where order_state=1 GROUP BY order_shop_id, date_format(pay_create_time, '%Y%m%d')# models/example/dwd_shops_all.sql {{ config(materialized='table') }} select str_to_date(date_format(pay_create_time, '%Y%m%d'), '%Y%m%d') as ds, sum(order_fee) as sum_fee from {{ ref('dwd_orders') }} where order_state=1 GROUP BY date_format(pay_create_time, '%Y%m%d')# models/example/dwd_users.sql {{ config(materialized='table') }} select order_user_id, str_to_date(concat(date_format(pay_create_time, '%Y%m'), '01'), '%Y%m%d') as ds, sum(order_fee) as sum_fee from {{ ref('dwd_orders') }} where order_state = 1 group by order_user_id, date_format(pay_create_time, '%Y%m')Run the
dbt compilecommand to compile the models, which convert SQL statements to database-specific statements.Run the
dbt runcommand to enable all models.
Create a DAG scheduling task
Airflow is a basic directed acyclic graph (DAG) scheduling platform. After you install and deploy Airflow, run the airflow db init command to initialize its database. Then, you can run the airflow scheduler command to start the scheduler for real-time DAG scheduling, and run the airflow webserver command to start the web server. On the web interface of Airflow, you can view information of the scheduling task in full.
After you configure the database to access, log in to the server where Airflow is deployed from the background, and put your DAG files in the .py format into the dags directory of Airflow. Airflow automatically discovers and loads the DAG files. Two computing nodes are defined here. One runs the dbt project to perform computing tasks for the data warehouse. The other sends an email to the user after a computing task is completed. A sample DAG is defined as follows:
# Copyright (c) 2023 OceanBase.
#
# Licensed under the Apache License, Version 2.0 (the "License");
# you may not use this file except in compliance with the License.
# You may obtain a copy of the License at
#
#     http://www.apache.org/licenses/LICENSE-2.0
#
# Unless required by applicable law or agreed to in writing, software
# distributed under the License is distributed on an "AS IS" BASIS,
# WITHOUT WARRANTIES OR CONDITIONS OF ANY KIND, either express or implied.
# See the License for the specific language governing permissions and
# limitations under the License.
from datetime import datetime, timedelta

from airflow import DAG
from airflow.operators.email import EmailOperator
from airflow_dbt import DbtRunOperator

default_args = {
    "owner": "airflow",
    "depends_on_past": False,
    "start_date": datetime(2024, 7, 12, 8, 35),
    "email": ["******@oceanbase.com"],
    "email_on_failure": True,
    "email_on_retry": False,
    "retries": 1,
    "retry_delay": timedelta(minutes=5),
}

dag = DAG("warehouse_demo", default_args=default_args, schedule=timedelta(minutes=1))

t4 = EmailOperator(
    task_id="sending_email",
    to="******@oceanbase.com",
    subject="AirFlow Notice",
    html_content="<h1>Your Airflow Has been completed</h1>",
    dag=dag,
)

dbt_operator = DbtRunOperator(
    task_id="dbt_run", dir="xxx", dag=dag
)

dbt_operator >> t4
After the preceding files are deployed, you can view information of the scheduling task in full on the web interface of Airflow. You can schedule the task as needed. 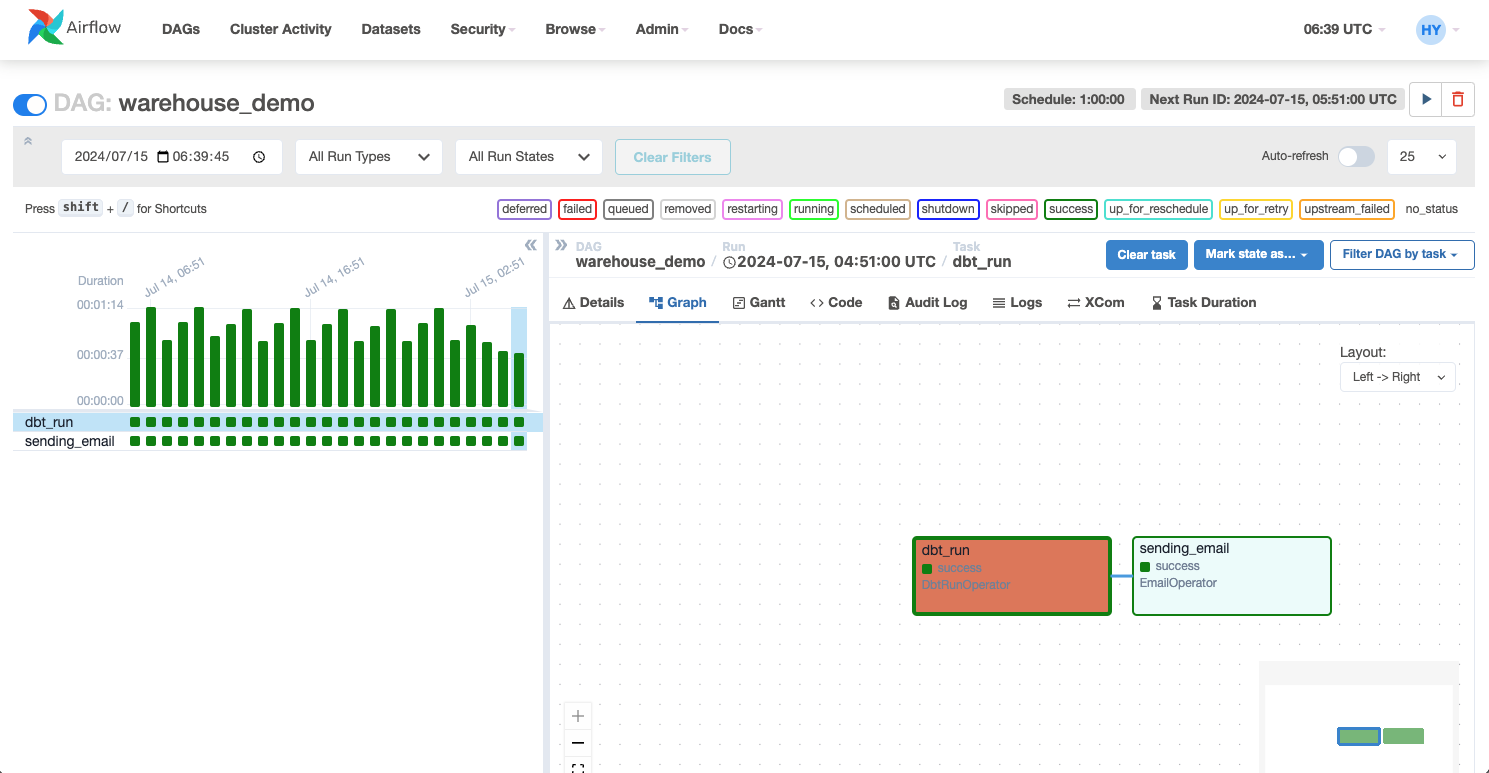
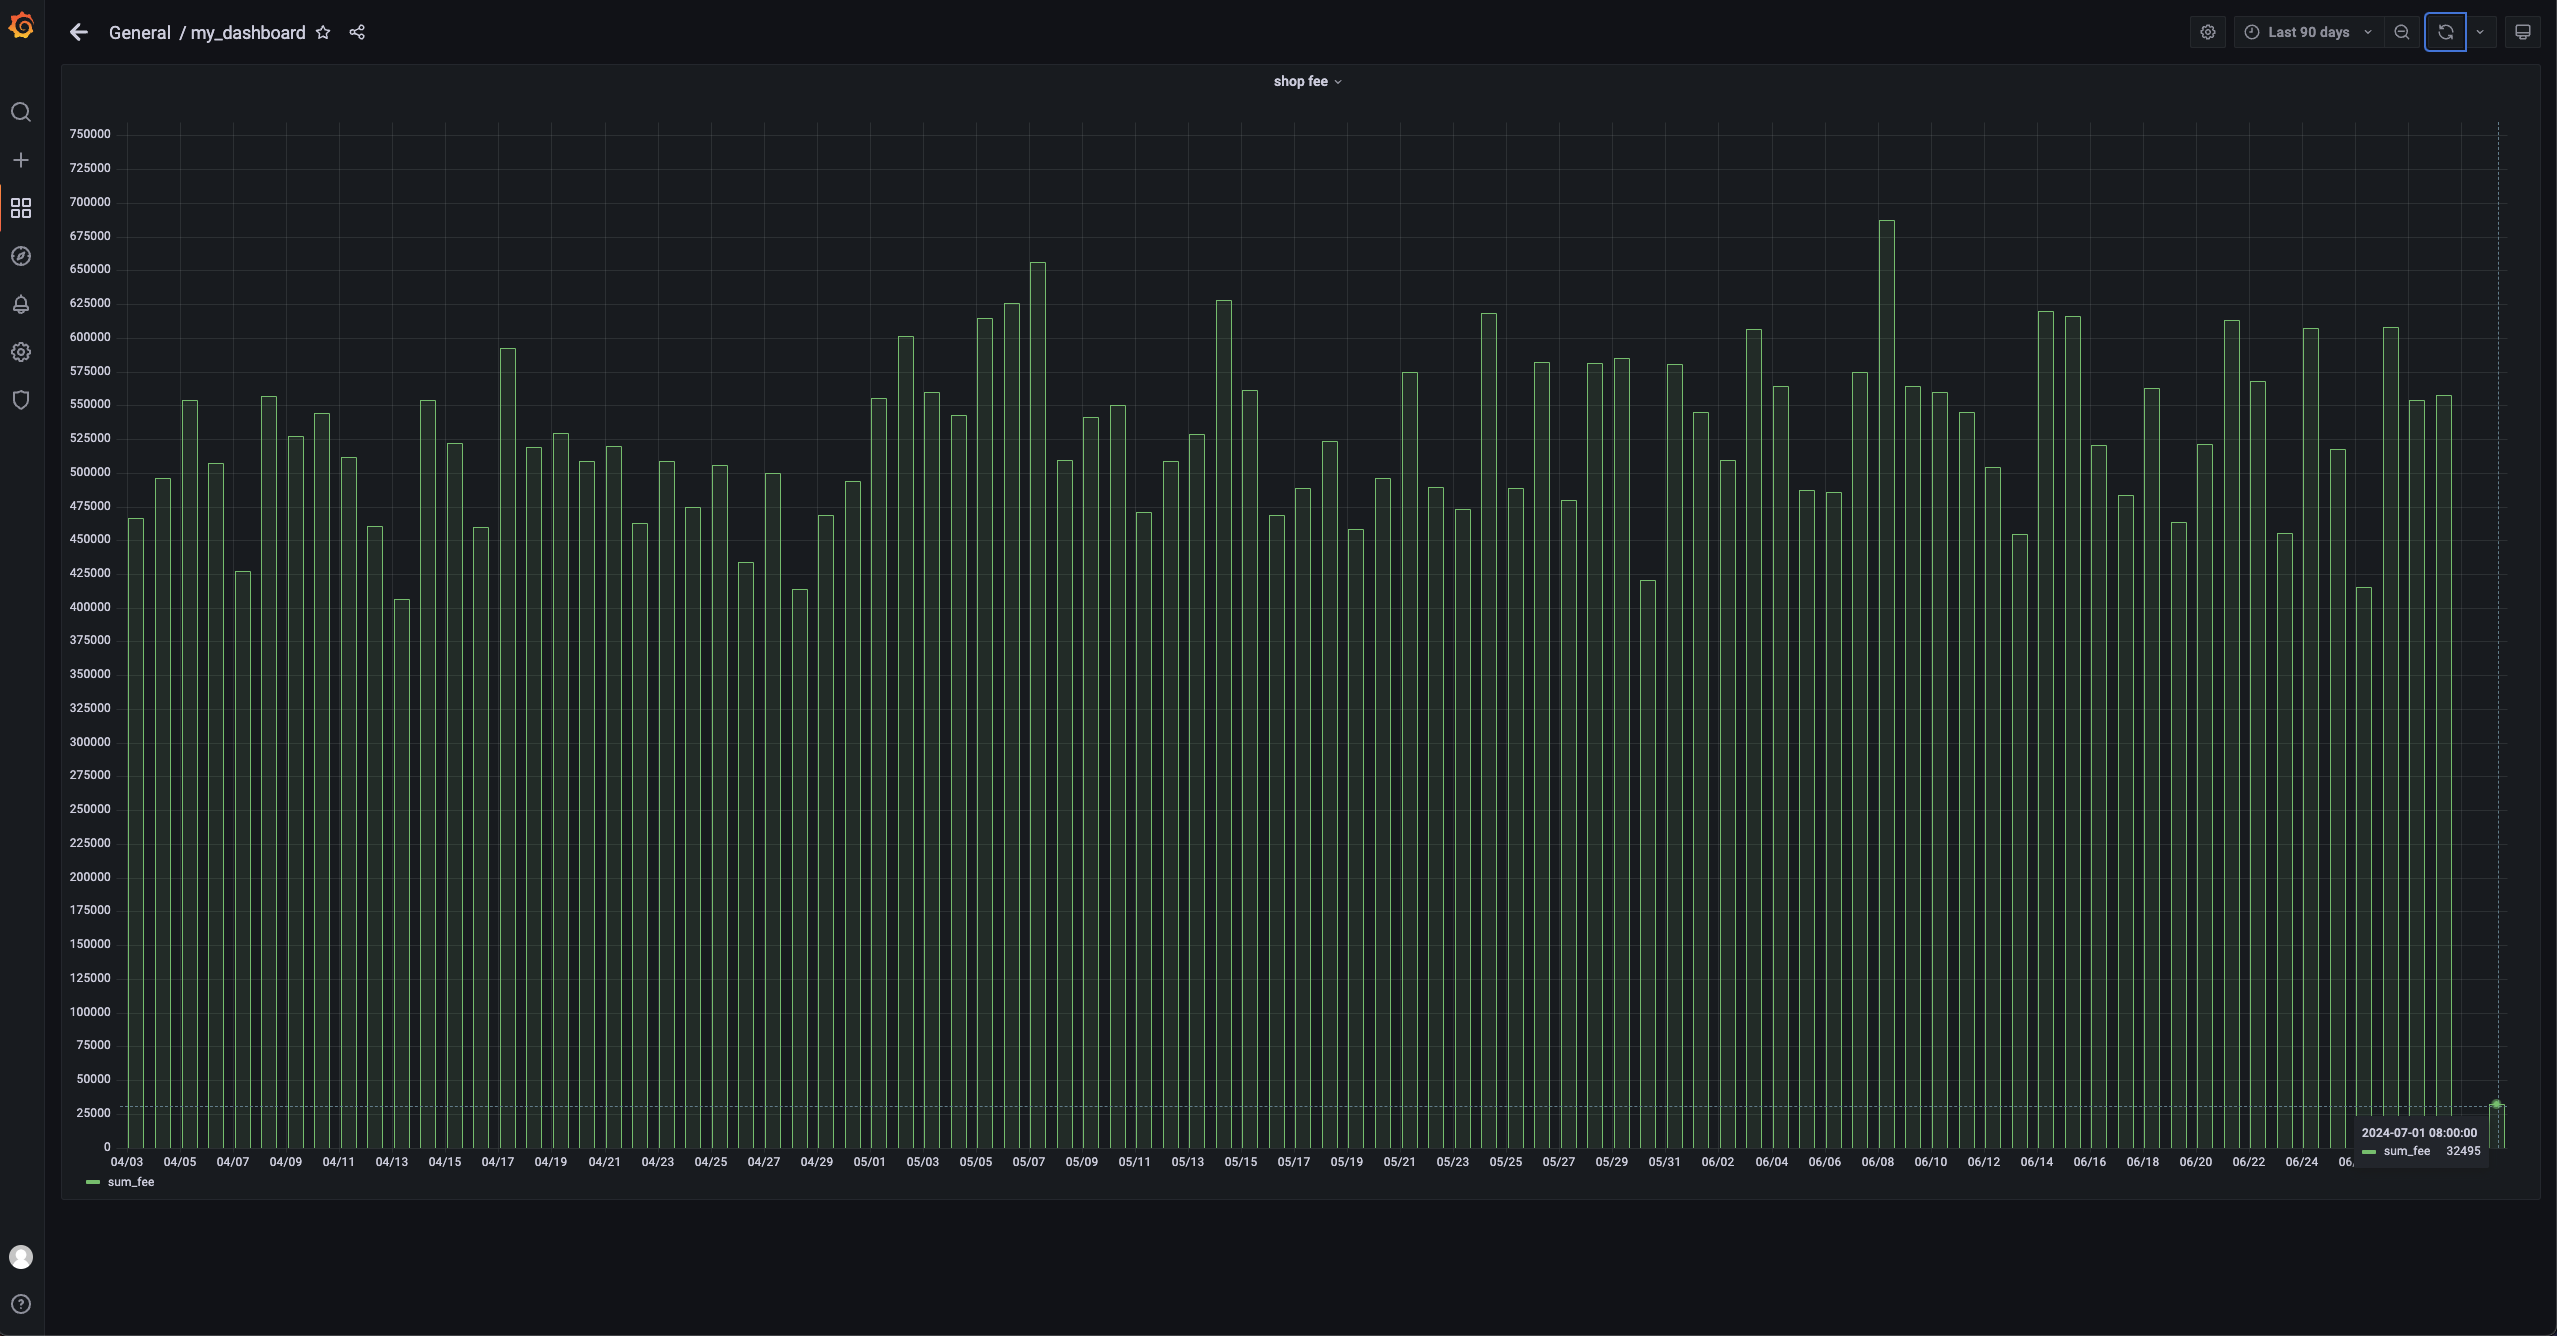
Configure a Grafana dashboard
This example displays only the daily sales of stores. You can view the daily sales of one or all stores. Therefore, you only need to configure connection information for the AP database in Grafana to enable graphical display of the SQL statement. Here is a sample SQL statement:
```sql
SELECT
    ds AS "time",
    sum_fee AS "sum_fee"
FROM dwd_shops
WHERE
    order_shop_id = 35
ORDER BY ds
```
Examples
Simulate purchases
Write a simple Python script named test.py to simulate the purchase behavior of users.
# Copyright (c) 2023 OceanBase.
#
# Licensed under the Apache License, Version 2.0 (the "License");
# you may not use this file except in compliance with the License.
# You may obtain a copy of the License at
#
#     http://www.apache.org/licenses/LICENSE-2.0
#
# Unless required by applicable law or agreed to in writing, software
# distributed under the License is distributed on an "AS IS" BASIS,
# WITHOUT WARRANTIES OR CONDITIONS OF ANY KIND, either express or implied.
# See the License for the specific language governing permissions and
# limitations under the License.
import dataclasses
from typing import Dict

import mysql.connector

PRODUCT_ID_2_FEE: Dict[int, float] = {
    1: 5399,
    2: 10099,
    3: 4599,
    4: 5499,
    5: 6499,
}

@dataclasses.dataclass
class Phone:
    product_id: int
    catalog_name: str
    buy_fee: float

def get_max_order_id(cur):
    cur.execute("select order_id from orders order by order_id desc limit 1")
    id = cur.fetchone()
    return next(iter(id))

def get_max_pay_id(cur):
    cur.execute("select pay_id from orders_pay order by pay_id desc limit 1")
    id = cur.fetchone()
    return next(iter(id))

def buy_phone(product_id: int, cursor, user_id=15, shop_id=35):
    cursor.execute("select product_id, catalog_name from product_catalog")
    tuples = cursor.fetchall()
    phones = [
        Phone(
            **{
                "product_id": p_id,
                "catalog_name": c_name,
                "buy_fee": PRODUCT_ID_2_FEE.get(p_id),
            }
        )
        for p_id, c_name in tuples
    ]
    target = next(filter(lambda p: p.product_id == product_id, phones))
    order_id = get_max_order_id(cursor) + 1
    sql = f"insert into `orders`(`order_id`, `user_id`, `shop_id`, `product_id`, `buy_fee`, `create_time`, `update_time`, `state`) values({order_id}, {user_id}, {shop_id}, {product_id}, {target.buy_fee}, now(), now(), 0)"
    cursor.execute(sql)
    pay_id = get_max_pay_id(cursor) + 1
    sql = f"insert into `orders_pay`(`pay_id`, `order_id`, `pay_platform`, `create_time`) values({pay_id}, {order_id}, 'Alipay', now())"
    cursor.execute(sql)
    sql = f"update orders set state=1 where order_id={order_id}"
    cursor.execute(sql)
    cursor.execute("commit")
    print(target)

if __name__ == "__main__":
    with mysql.connector.connect(
        **{
            "host": "******",
            "port": "3306",
            "database": "tptest",
            "user": "wktest@mysql001",
        }
    ) as conn:
        with conn.cursor() as cursor:
            buy_phone(5, cursor)
Run the sh python.py command to run the script.
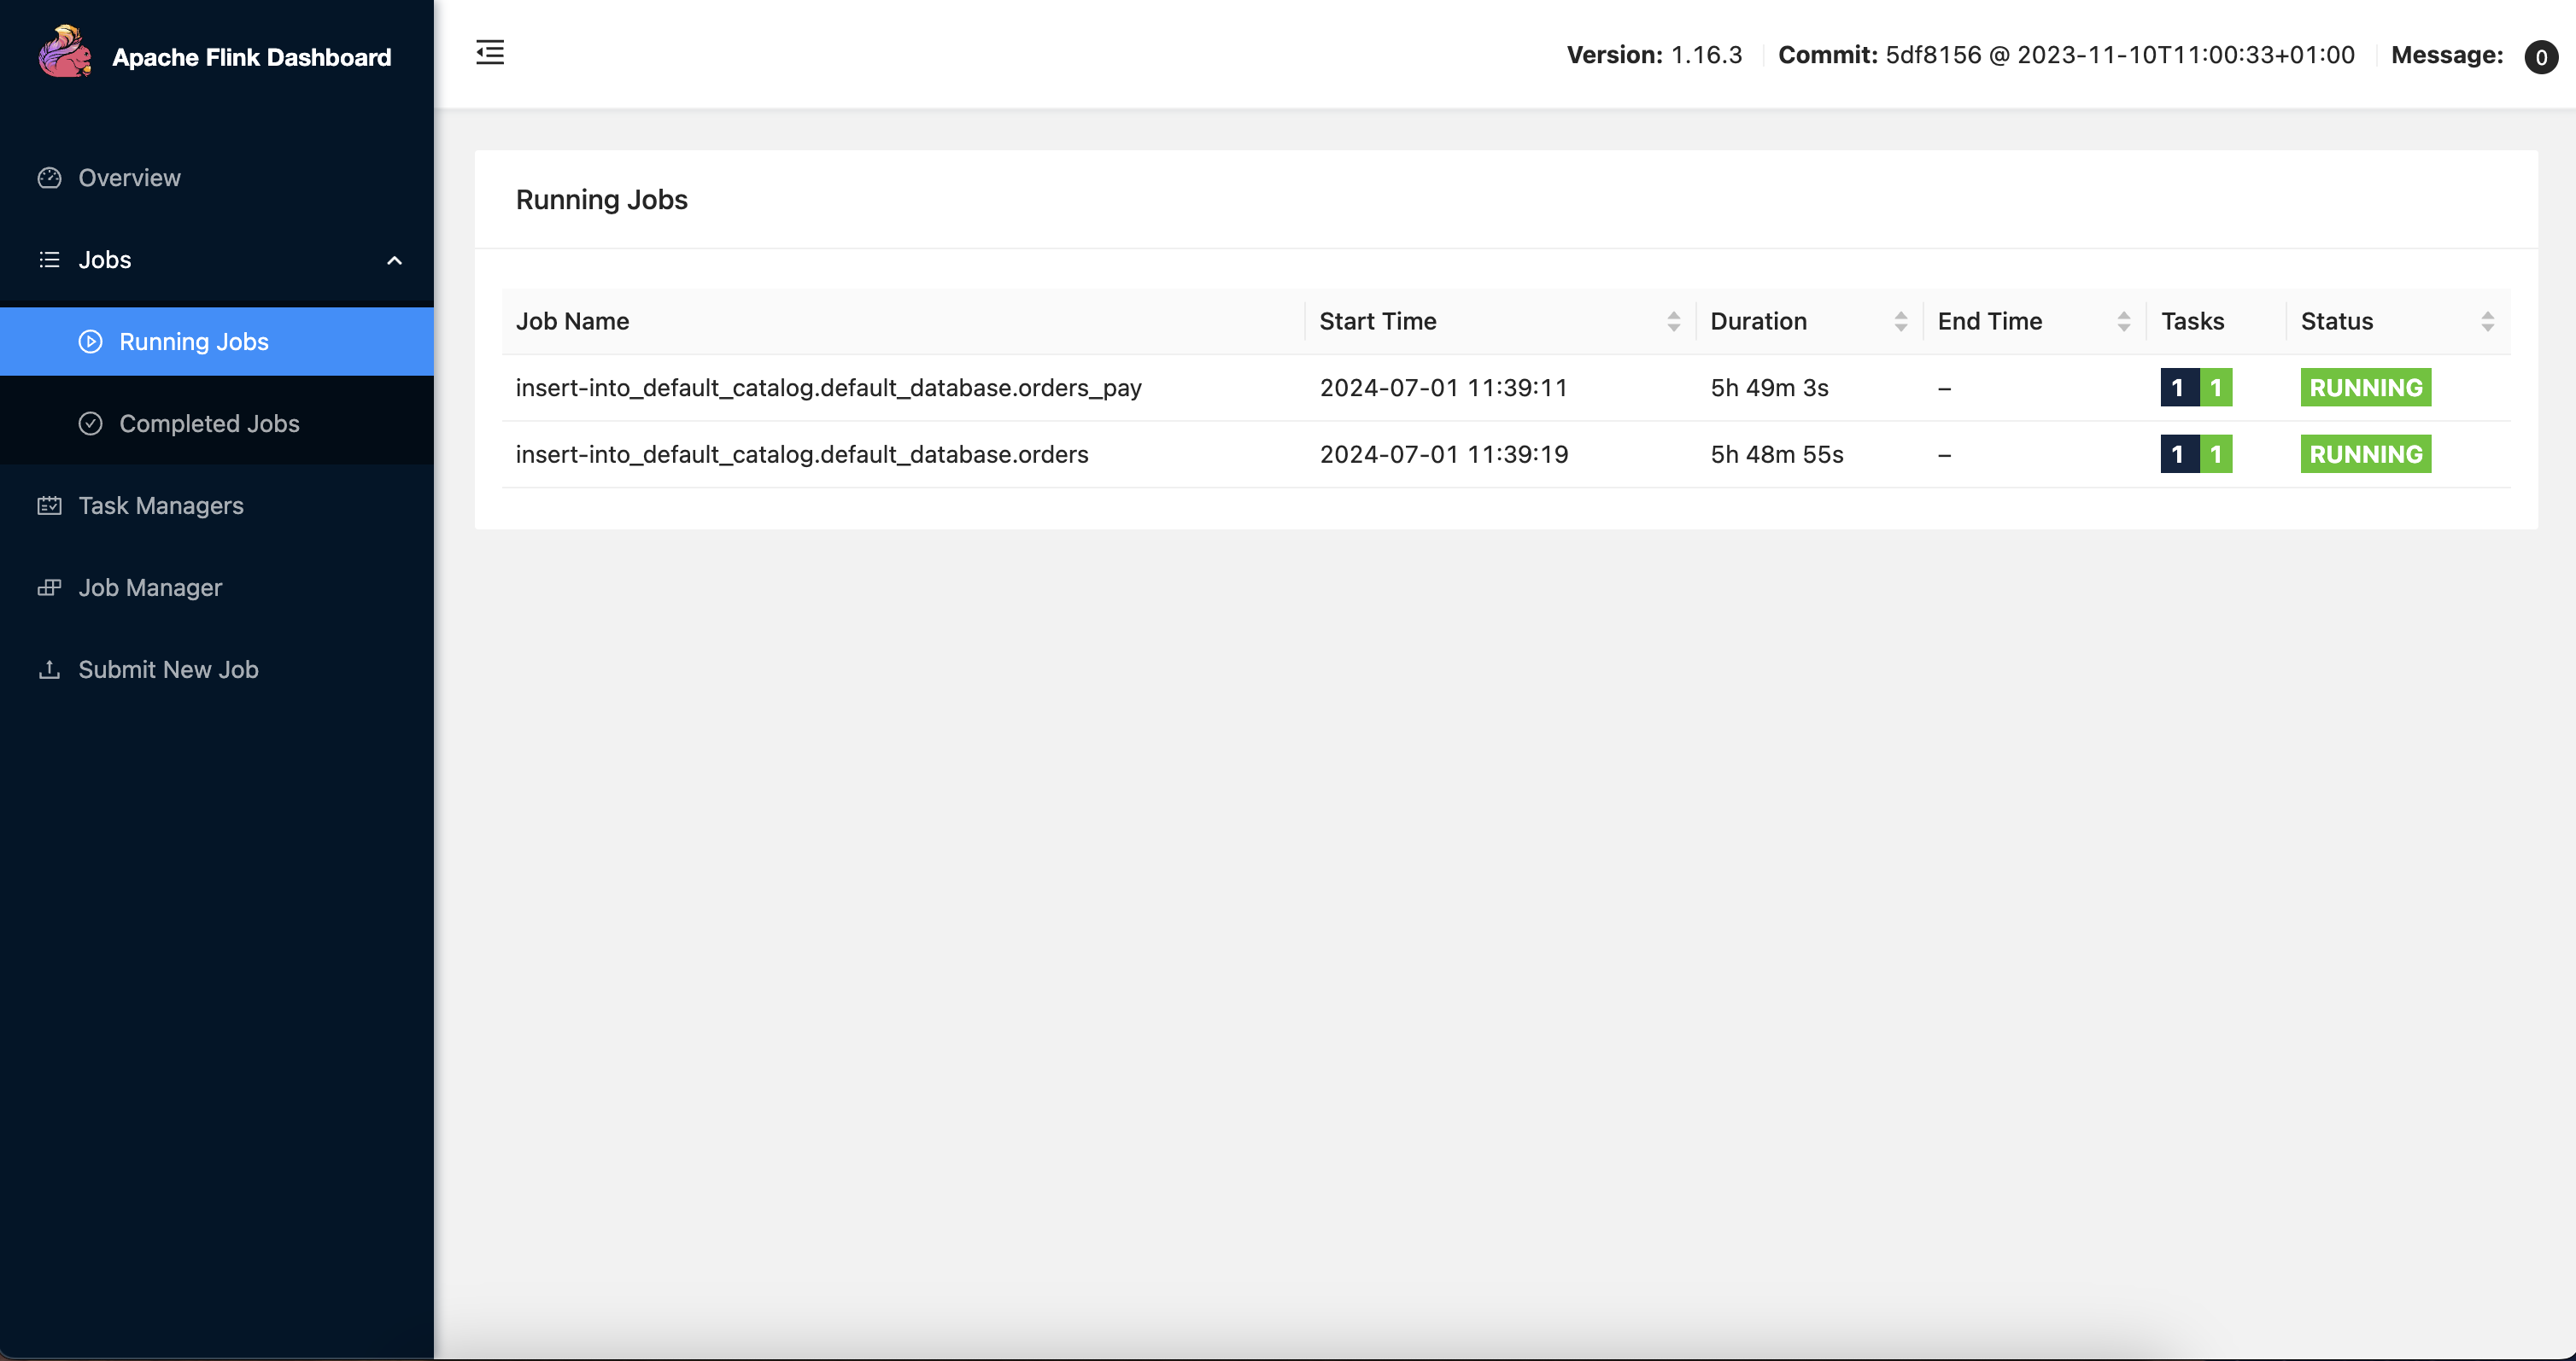
Schedule DAGs
After you run the script, wait 1 minute. Airflow will automatically schedule the DAG files. You can view the node running status and task logs on the web interface of Airflow.
View data in the dashboard
You can view the latest data in the dashboard. This example displays only the daily sales of stores. You can view the daily sales of one or all stores. The dashboard shows that the sales on July 1 have changed to 32495.