







This topic describes how to use OceanBase Migration Service (OMS) to migrate data from a PostgreSQL database to a MySQL-compatible tenant of OceanBase Database, which can be a physical data source, a public cloud OceanBase data source, or a standalone data source.
Background information
You can create a data migration task in the OMS console to seamlessly migrate the existing business data and incremental data from a PostgreSQL database to a MySQL-compatible tenant of OceanBase Database through schema migration, full migration, and incremental synchronization.
PostgreSQL databases in the following modes are supported as the sources: primary database only, standby database only, and primary/standby databases. The following table describes the data migration operations supported by each mode.
Mode |
Supported operation |
|---|---|
| Primary database only | Schema migration, full migration, incremental synchronization, full verification, and reverse increment. |
| Standby database only | Schema migration, full migration, and full verification. |
| Primary/Standby databases | Primary database: incremental synchronization and reverse increment. Standby database: schema migration, full migration, and full verification. |
Prerequisites
You have created a corresponding schema in the target MySQL-compatible tenant of OceanBase Database.
You have created dedicated database users in the source PostgreSQL database and the target MySQL-compatible tenant of OceanBase Database for data migration and granted the required privileges to the users. For more information, see Create a database user.
If you need to perform incremental synchronization, perform the following operations first:
OMS does not support automatic synchronization of DDL statements during incremental synchronization. If a DDL statement needs to be executed on the table to be migrated, manually execute the DDL statement in the target database and then execute it in the source PostgreSQL instance. To correctly parse incremental DML operations performed after the DDL statement is executed, you must create a corresponding trigger and a table for recording the DDL statement. For more information, see Create a trigger.
If you have selected *Incremental Synchronization, you must set the
wal_levelparameter tological. For more information, see Change the log level for a PostgreSQL instance.
Limitations
Limitations on the source database:
Do not perform DDL operations that modify database or table schemas during schema migration or full migration. Otherwise, the data migration task may be interrupted.
At present, PostgreSQL 10.x, 11.x, 12.x, and 13.x are supported.
OMS does not support the migration of partitioned tables, unlogged tables, and temporary tables from the PostgreSQL database.
OMS allows you to migrate tables with primary keys and tables with NOT NULL unique keys from a PostgreSQL database to a MySQL-compatible tenant of OceanBase Database.
When you use OMS to migrate data from a PostgreSQL database to a MySQL-compatible tenant of OceanBase Database, DDL synchronization is not supported.
OMS does not support triggers in the target database. If triggers exist in the target database, the data migration may fail.
Data source identifiers and user accounts must be globally unique in OMS.
OMS supports the migration of only objects whose database name, table name, and column name are ASCII-encoded and do not contain special characters. The special characters are line breaks, spaces, and the following characters:
. | " ' ` ( ) = ; / & \.
Considerations
After you enable incremental synchronization, the requirements for the table-level replication identifier
REPLICA IDENTITYare as follows:If you select migration objects by using the Specify Objects tab, the specified tables must have primary keys or the table-level replication identifier
REPLICA IDENTITYmust be set toFULL. Otherwise, the operation to update or delete the business data may fail.If you select migration objects by using the Match by Rule tab, the PostgreSQL database must subscribe to all tables in the selected database, including the selected tables, unselected tables, and new tables. All tables must have primary keys or the table-level replication identifier
REPLICA IDENTITYmust be set toFULL. Otherwise, the operation to update or delete the business data may fail.If the primary key or unique key of the source database does not align with that of the target database, the table-level replication identifier
REPLICA IDENTITYof the corresponding table must be set toFULL.In the default mode of PostgreSQL, only the current value is returned, not the full image. To ensure data quality, data migration processes the corresponding tables sequentially, which may affect the efficiency of incremental synchronization. Therefore, it is recommended to set the table-level replication identifier
REPLICA IDENTITYof all tables toFULL.
The command to modify the table-level replication identifier to
FULLis as follows.Notice
If the migration tables are filtered by rows, the tables must be set to
FULLmode.ALTER TABLE table_name REPLICA IDENTITY FULL;If a source table does not have a primary key or all columns of the table have a NOT NULL unique key, duplicate data may exist during migration to the target database.
In the reverse increment, if you migrate data by using full-column matching for the UPDATE and DELETE operations on tables without a primary key, the following issues may occur:
Poor performance
Due to the absence of primary key indexes, each
UPDATEorDELETEoperation is performed after a full-table scan.Data inconsistency
The
LIMITsyntax is not supported forUPDATEandDELETEoperations in PostgreSQL databases. Therefore, if multiple data records are matched in full-column matching mode, the data in the source database may be more than that in the target database afterUPDATEorDELETEoperations. Assume that thet1table without a primary key has two columns:c1andc2. Two data records where c1 = 1 and c2 = 2 exist in the source table. When you delete only one data record from the source table based on thewhere c1 = 1 and c2 = 2condition, the two data records that match the condition in the target table will be deleted accordingly, causing data inconsistency between the source and target tables.
OMS supports reverse increment of
tsvectorfields from OceanBase Database to an ApsaraDB RDS for PostgreSQL instance. Thetsvectorfields must be written to OceanBase Database in the supported formats. Here are some examples:Data written to OceanBase Database in the 'a b c' format will be converted into the "'a' 'b' 'c'" format in the ApsaraDB RDS for PostgreSQL instance.
Data written to OceanBase Database in the 'a:1 b:2 c:3' format will be converted into the "'a':1 'b':2 'c':3" format in the ApsaraDB RDS for PostgreSQL instance.
Data written to OceanBase Database in a non-tsvector format such as "'a':cccc" cannot be migrated to the ApsaraDB RDS for PostgreSQL instance. For more information about the supported formats, see 8.11. Text Search Types in PostgreSQL documentation.
In a task for reverse increment from a PostgreSQL database to a MySQL-compatible tenant of OceanBase Database of a version earlier than V3.2.x, if the source table is a multi-partition table with a global unique index and you update the values of the partitioning key of the table, data may be lost during migration.
If the UTF-8 character set is used in the source database, we recommend that you use a compatible character set, such as UTF-8 or UTF-16, in the target database to avoid garbled characters.
If you change the unique index in the target database, you must restart the Incr-Sync component. Otherwise, the data in the source and target databases may be inconsistent.
If the clocks between nodes or between the client and the server are out of synchronization, the latency may be inaccurate during incremental synchronization or reverse increment.
For example, if the clock is earlier than the standard time, the latency can be negative. If the clock is later than the standard time, the latency can be positive.
Take note of the following considerations if you want to perform data merge migration:
We recommend that you configure the mappings between the source and target databases by specifying matching rules.
We recommend that you manually create schemas in the target database. If you use OMS to create schemas, skip failed objects in the schema migration step.
A difference between the source and target table schemas may result in data consistency. Some known scenarios are described as follows:
When you manually create a table schema in the target database, if the data types of any columns are not supported by OMS, implicit data type conversion may occur in the target database, which causes inconsistent column types between the source and target databases.
If the length of a column in the target database is shorter than that in the source database, the data of this column may be automatically truncated, which causes data inconsistency between the source and target databases.
If you select only Incremental Synchronization when you create the data migration task, OMS requires that the archive logs in the source database be retained for more than 48 hours.
If you select Full Migration and Incremental Synchronization when you create the data migration task, OMS requires that the archive logs in the source database be retained for at least seven days. Otherwise, the data migration task may fail or the data in the source and target databases may be inconsistent because OMS cannot obtain incremental logs.
If the source and target table objects differ only in capitalization of their names, the data migration result may not be as expected because the object names in the source or target database are case-insensitive.
The current data migration task supports tables without non-null unique keys, but data duplication may occur due to task restarts or other anomalies. We recommend that you configure non-null unique keys for all tables.
Data type mappings
PostgreSQL database |
MySQL-compatible tenant of OceanBase Database |
|---|---|
| bigint | BIGINT |
| bigserial | BIGINT |
| bit [ (n) ] | BIT |
| boolean | TINYINT(1) |
| bytea | LONGBLOB |
| character [ (n) ] | CHAR LONGTEXT |
| character varying [ (n) ] | VARCHAR MEDIUMTEXT LONGTEXT |
| cidr | VARCHAR(43) |
| date | DATE |
| double precision | DOUBLE |
| inet | VARCHAR(43) |
| interval [ fields ] [ (p) ] | TIME |
| json | LONGTEXT JSON |
| jsonb | LONGTEXT JSON |
| line | LINESTRING |
| lseg | LINESTRING |
| macaddr | VARCHAR(17) |
| money | DECIMAL(19,2) |
| numeric [ (p, s) ] | DECIMAL |
| real | FLOAT |
| smallint | SMALLINT |
| smallserial | SMALLINT |
| serial | INT |
| text | LONGTEXT |
| time [ (p) ] [ without time zone ] | TIME |
| time [ (p) ] with time zone | TIME |
| timestamp [ (p) ] [ without time zone ] | DATETIME |
| timestamp [ (p) ] with time zone | DATETIME |
| tsquery | LONGTEXT |
| tsvector | LONGTEXT |
| uuid | VARCHAR(36) |
| xml | LONGTEXT |
| Geometry | GEOMETRY |
| GEOMETRY(Point) | POINT |
| GEOMETRY(LineString) | LINESTRING |
| GEOMETRY(Polygon) | POLYGON |
| GEOMETRY(MultiPoint) | MULTIPOINT |
| GEOMETRY(MultiLineString) | MULTILINESTRING |
| GEOMETRY(MultiPolygon) | MULTIPOLYGON |
| GEOMETRY(GeometryCollection) | GEOMETRYCOLLECTION |
Procedure
Create a data migration task.
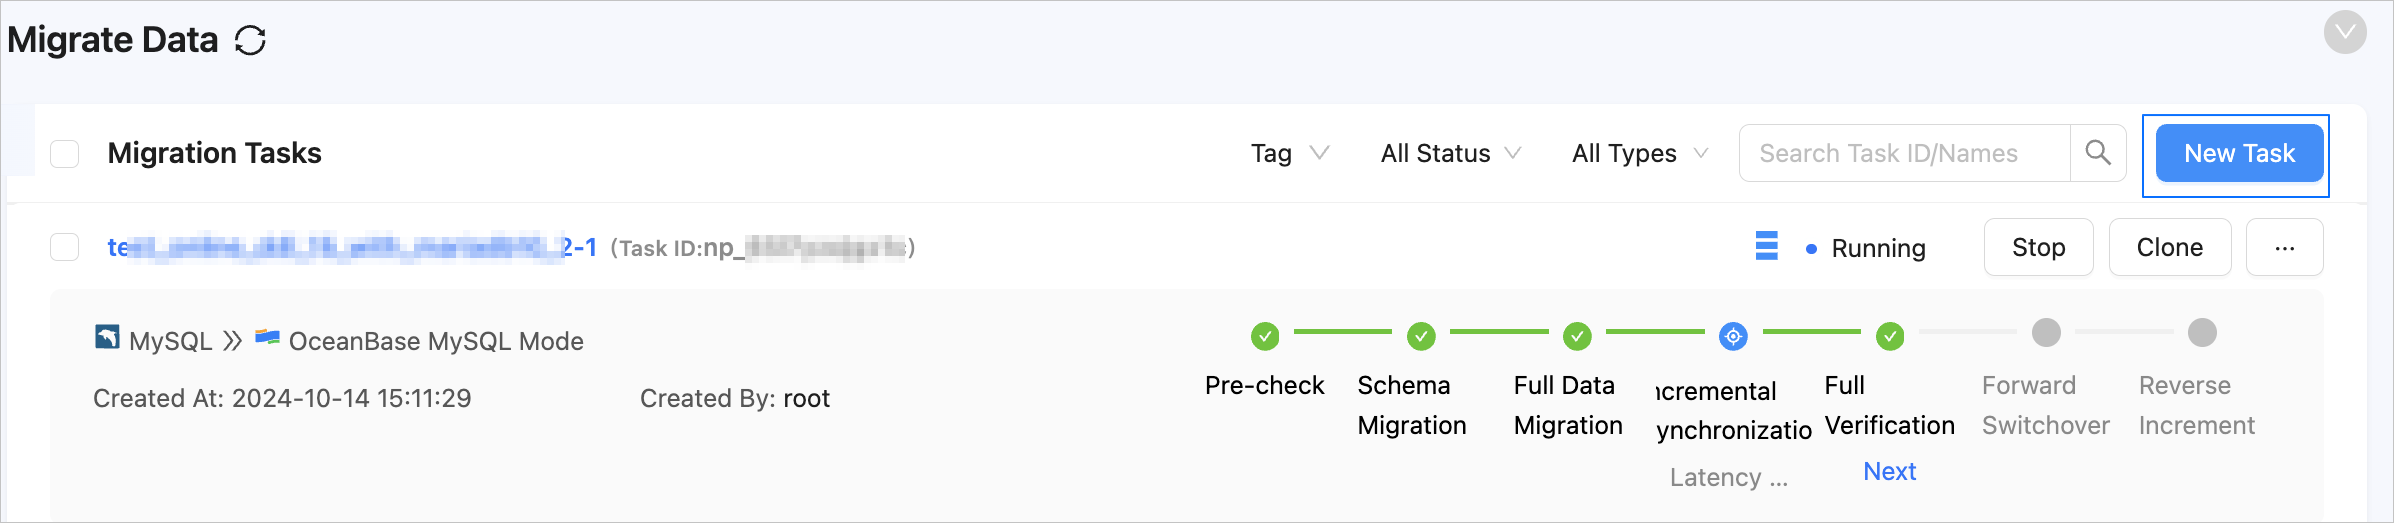
Log in to the OMS console.
In the left-side navigation pane, click Data Migration.
On the Data Migration page, click Create Task in the upper-right corner.
On the Create Task page, specify the name of the migration task.
We recommend that you set it to a combination of digits and letters. It must not contain any spaces and cannot exceed 64 characters in length.
Notice
The task name must be a unique identifier in the OMS system.
In the Select Source and Target step, configure the parameters.
 ParameterDescription
Source If you have created a PostgreSQL data source, select it from the drop-down list. If not, click New Data Source in the drop-down list and create one in the dialog box that appears on the right. For more information, see Create a PostgreSQL data source.
You can select a PostgreSQL data source in primary database only mode or primary/standby databases mode. This topic describes how to create a data migration task with a PostgreSQL data source in primary/standby databases mode.Target If you have created a data source for the MySQL-compatible tenant of OceanBase Database, which can be a physical data source, a public cloud OceanBase data source, or a standalone data source, select it from the drop-down list. If not, click New Data Source in the drop-down list and create one in the dialog box that appears on the right. For more information about the parameters, see Create a physical OceanBase data source, Create a public cloud OceanBase data source, or Create a standalone OceanBase data source. Tag (Optional) Click the text box and select a tag from the drop-down list. You can also click Manage Tags to create, modify, and delete tags. For more information, see Use tags to manage data migration tasks. Click Next. In the Select Migration Type step, specify the migration types for the migration task.
Options for Migration Type are Schema Migration, Full Migration, Incremental Synchronization, Full Verification, and Reverse Increment.
Migration typeLimitationsSchema migration The definitions of data objects, such as tables, indexes, constraints, comments, and views, are migrated from the source database to the target database. Temporary tables are automatically filtered out. Full migration After a full migration task is started, OMS migrates existing data of tables in the source database to corresponding tables in the target database. If you select Full Migration, we recommend that you use the ANALYZEstatement to collect the statistics of the PostgreSQL database before data migration.Incremental synchronization Changed data in the source database is synchronized to the corresponding tables in the target database after an incremental synchronization task starts. Supported data changes are data addition, modification, and deletion.
Options for DML synchronization in the Incremental Synchronization section includeINSERT,DELETE, andUPDATE. Select the options based on your business needs. For more information, see Configure DDL/DML synchronization.
OMS automatically creates publications and slots for incremental synchronization from a PostgreSQL database. However, you need to monitor the usage of the disk for storing archive files. By default, OMS instructs the database to update theconfirmed_flush_lsnvalue of a slot every 10 minutes. The interval can be customized. By default, archive files need to be retained for 48 hours. Therefore, OMS instructs the database to clean up only archive logs that have been retained for more than 48 hours. The retention period can be customized.
If the archive logs cannot be cleared during the migration because slots exist, you need to destroy the data migration task and then clear the archive logs.Full verification After the full migration and incremental synchronization are completed, OMS automatically initiates a full verification task to verify the data tables in the source and target databases. - If you select Full Verification, we recommend that you collect the statistics of the PostgreSQL database and the MySQL-compatible tenant of OceanBase Database before full verification. For more information about how to collect statistics of a MySQL-compatible tenant of OceanBase Database, see Manual statistics collection.
- If you have selected Incremental Synchronization but did not select all DML statements in the DML synchronization section, OMS does not support full verification.
- OMS supports full verification only for tables with a primary key or a non-null unique key.
Reverse increment When a reverse increment task starts, OMS migrates the data changed in the target database after the business switchover back to the source database in real time.
Generally, incremental synchronization configurations are reused for reverse increment. You can also customize the configurations for reverse increment as needed. You cannot select Reverse Increment in the following cases:- Multi-table aggregation is enabled.
- Multiple source schemas map to the same target schema.
(Optional) Click Next.
If you have selected Reverse Increment without configuring the related parameters for the target MySQL-compatible tenant of OceanBase Database, the Add Data Source Information dialog box appears, prompting you to configure related parameters. For more information about the parameters, see Create a physical OceanBase data source, Create a public cloud OceanBase data source, or Create a standalone OceanBase data source.
After you configure the parameters, click Test connectivity. After the test succeeds, click Save.
Click Next. In the Select Migration Objects step, specify the migration objects for the migration task.
You can select Specify Objects or Match by Rule to specify the migration objects. The following procedure describes how to specify migration objects by using the Specify Objects option. For information about the procedure for specifying migration objects by using the Match by Rule option, see Configure matching rules.
Notice
The name of a table to be migrated, as well as the names of columns in the table, must not contain Chinese characters.
If a database or table name contains double dollar signs ("$$"), you cannot create the migration task.
OMS automatically filters out unsupported tables. For information about the SQL statements for querying table objects, see SQL statements for querying table objects.

In the Select Migration Objects section, select Specify Objects.
In the Source Object(s) list, select the objects to be migrated. You can select tables and views of one or more databases as the migration objects.
Click > to add the selected objects to the Target Object(s) list.
OMS also allows you to import objects by using text, rename objects, set row filters, view column information, and remove a single object or all objects to be migrated.
Note
When you select Match by Rule to specify migration objects, object renaming is implemented based on the syntax of the specified matching rules. In the operation area, you can only set filter conditions. For more information, see Configure matching rules.
OperationDescriptionImport objects - In the Target Object(s) list, click Import Objects in the upper-right corner.
- In the dialog box that appears, click Create.
Notice
This operation will overwrite previous selections. Proceed with caution. - In the Import Objects dialog box, import the objects to be migrated.
You can import CSV files to rename databases/tables and set row filtering conditions. For more information, see Download and import the settings of migration objects. - Click Validate.
- After the validation succeeds, click OK.
Rename objects OMS allows you to rename migration objects. For more information, see Rename a migration or synchronization object. Configure settings OMS allows you to filter rows by using WHEREconditions. For more information, see Use SQL conditions to filter data.
You can also view column information of the migration objects in the View Column section.Remove one or all objects OMS allows you to remove a single object or all objects to be migrated to the target database during data mapping. - To remove a single migration object:
In the Target Object(s) list, move the pointer over the target object and click Remove. - To remove all migration objects:
In the Target Object(s) list, click Remove All in the upper-right corner. In the dialog box that appears, click OK.
Click Next. On the Migration Options page, configure the parameters.
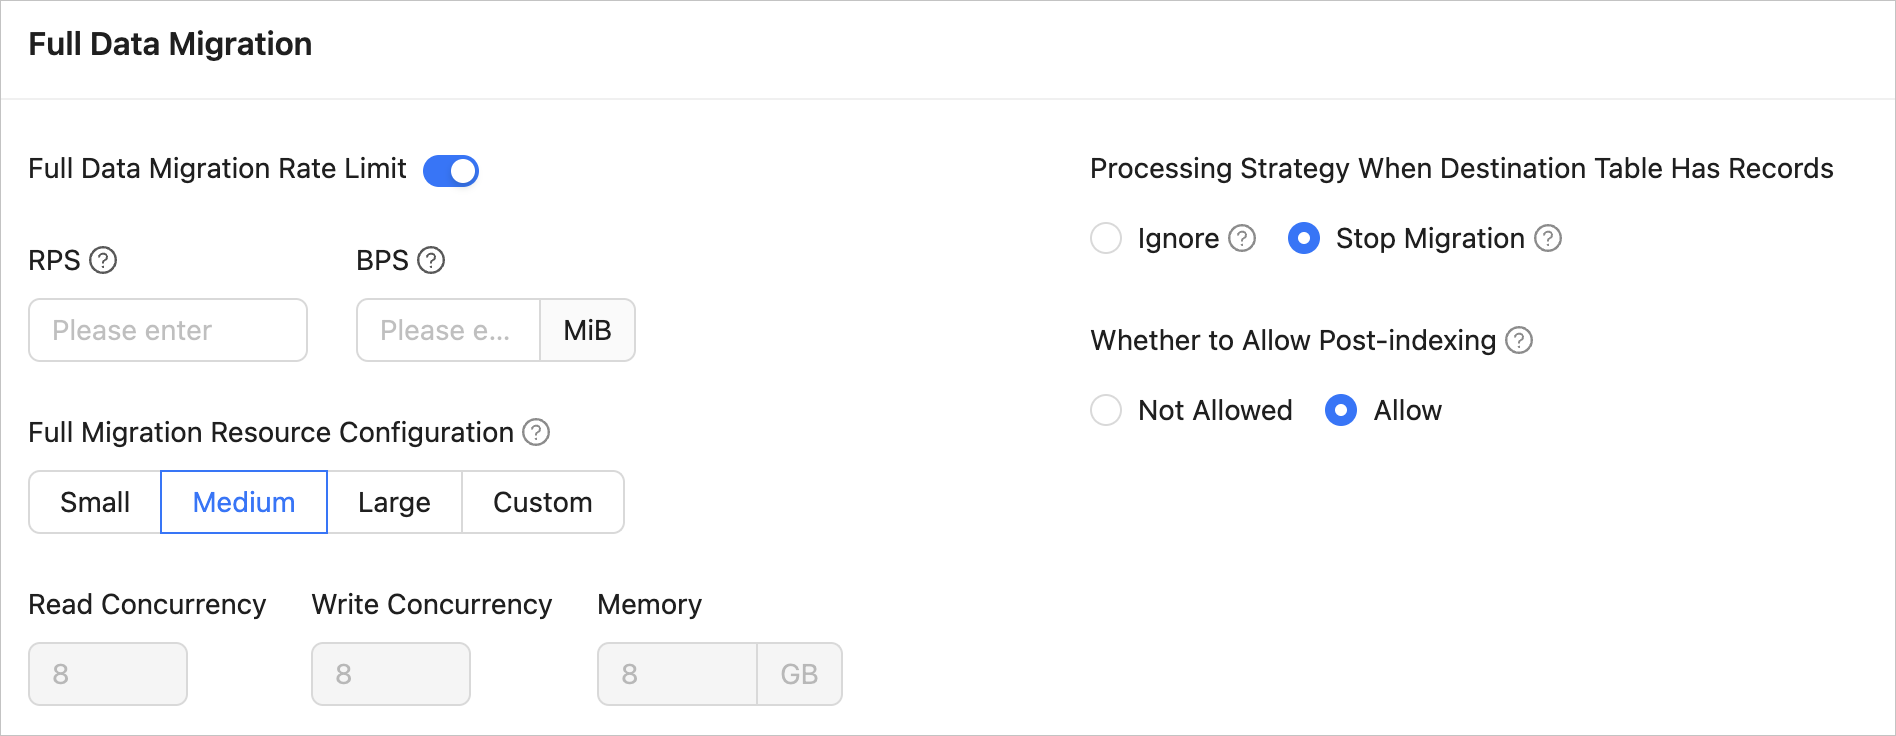
Full migration
The following parameters are displayed only if you have selected Full Migration in the Select Migration Type step.
 ParameterDescription
Full Migration Rate Limit You can choose whether to limit the full migration rate as needed. If you choose to limit the full migration rate, you must specify the records per second (RPS) and bytes per second (BPS). The RPS specifies the maximum number of data rows migrated to the target database per second during full migration, and the BPS specifies the maximum amount of data in bytes migrated to the target database per second during full migration. Note
The RPS and BPS values specified here are only for throttling. The actual full migration performance is subject to factors such as the settings of the source and target databases and the instance specifications.
Full Migration Resource Configuration You can select Small, Medium, or Large to use the corresponding default values of Read Concurrency, Write Concurrency, and Memory. You can also customize the resource configurations for full migration. By setting the resource configuration for the Full-Import component, you can limit the resource consumption of a task in the full migration phase. Notice
In the case of custom configurations, the minimum value is
1, and only integers are supported.Handle Non-empty Tables in Target Database Valid values: Ignore and Stop Migration. - If you select Ignore, when the data to be inserted conflicts with the existing data of a target table, OMS retains the existing data and records the conflict data.
Notice
If you select Ignore, data is pulled in IN mode for full verification. In this case, the scenario where the target table contains more data than the source table cannot be verified, and the verification efficiency will be decreased.
- If you select Stop Migration and a target table contains data, an error is returned during full migration, indicating that the migration is not allowed. In this case, you must clear the data in the target table before you can continue with the migration.
Notice
After an error is returned, if you click Resume in the dialog box, OMS ignores this error and continues to migrate data. Proceed with caution.
Post-Indexing Specifies whether to create indexes after the full migration is completed. Post-indexing can shorten the time required for full migration. For more information about the considerations on post-indexing, see the description below. Notice
This feature is supported only if you have selected both Schema Migration and Full Migration on the Select Migration Type page.
- Only non-unique key indexes can be created after the migration is completed.
- OceanBase Database V1.x does not support the post-indexing feature.
If post-indexing is allowed, we recommend that you adjust the parameters based on the hardware conditions of your OceanBase Database and the current business traffic.
If you use OceanBase Database V4.x, adjust the following parameters of the
systenant and business tenants by using a CLI client.Adjust the parameters of the
systenant// `parallel_servers_target` specifies the queuing conditions for parallel queries on each server. // To maximize performance, we recommend that you set this parameter to a value greater than, for example, 1.5 times, the number of physical CPU cores. In addition, make sure that the value does not exceed 64, to prevent database kernels from contending for locks. set global parallel_servers_target = 64;Adjust the parameters of a business tenant
// Specify the limit on the file memory buffer size.
alter system set _temporary_file_io_area_size = '10' tenant = 'xxx';
// Disable throttling in V4.x.
alter system set sys_bkgd_net_percentage = 100;
If you use OceanBase Database V2.x or V3.x, adjust the following parameters of the
systenant by using a CLI client.// `parallel_servers_target` specifies the queuing conditions for parallel queries on each server. // To maximize performance, we recommend that you set this parameter to a value greater than, for example, 1.5 times, the number of physical CPU cores. In addition, make sure that the value does not exceed 64, to prevent database kernels from contending for locks. set global parallel_servers_target = 64; // `data_copy_concurrency` specifies the maximum number of concurrent data migration and replication tasks allowed in the system. alter system set data_copy_concurrency = 200;
- If you select Ignore, when the data to be inserted conflicts with the existing data of a target table, OMS retains the existing data and records the conflict data.
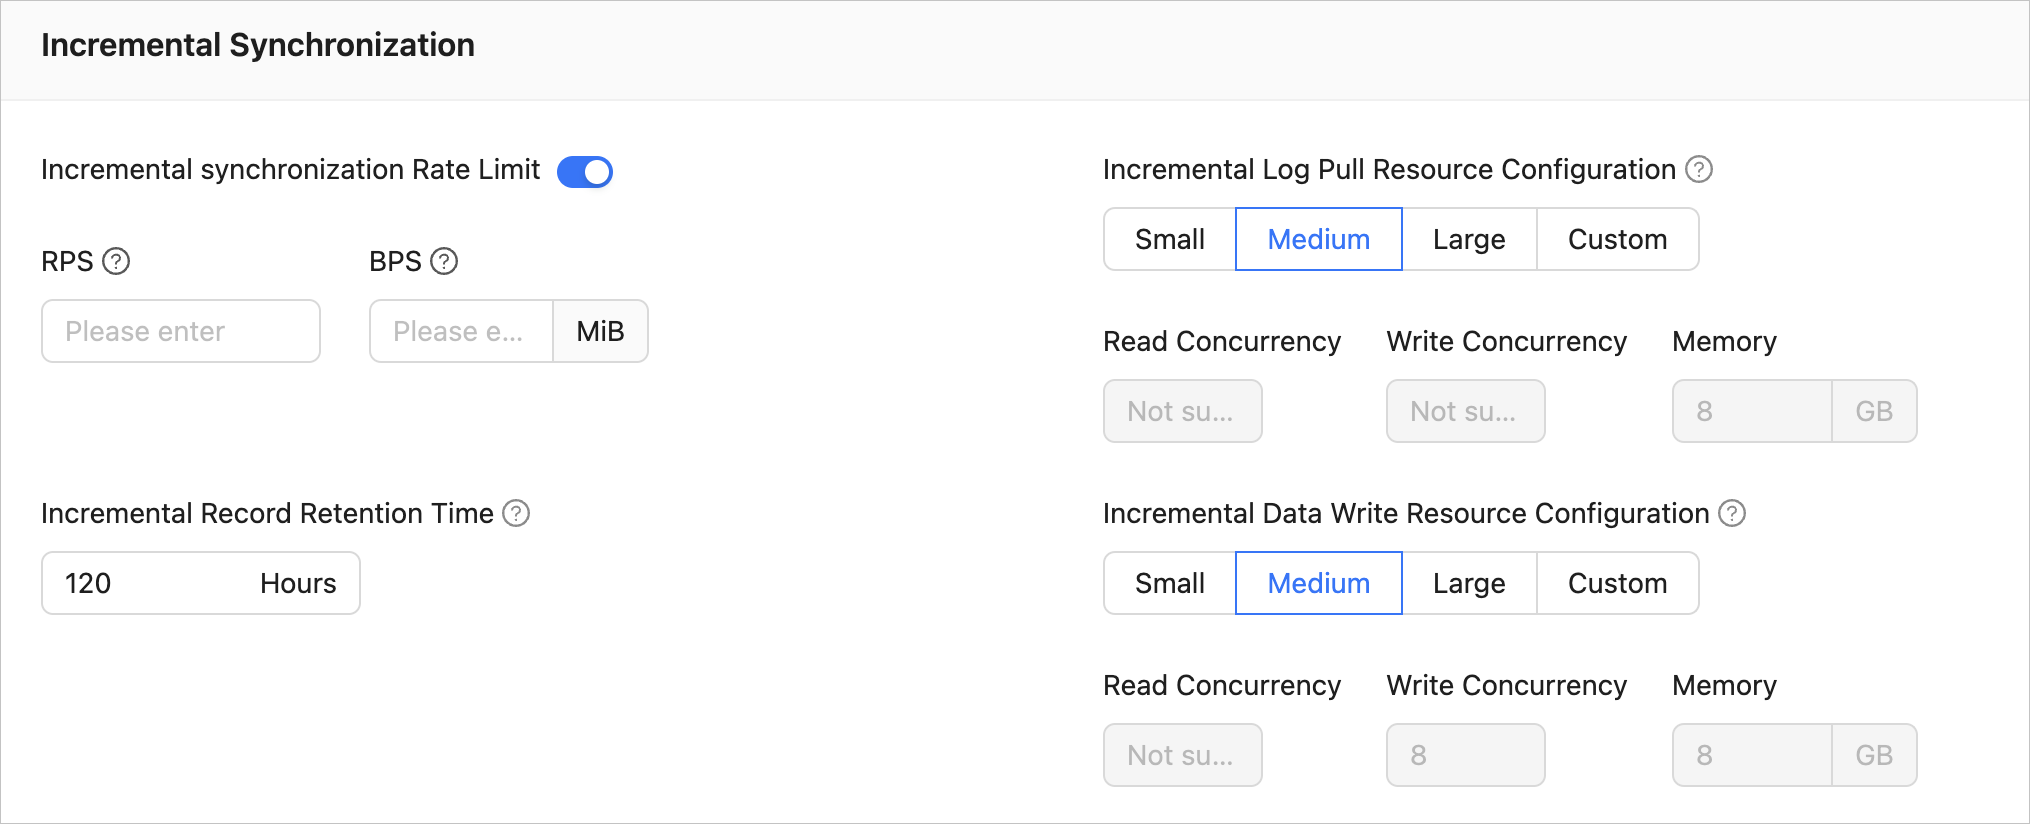
Incremental synchronization
The following parameters are displayed only if you have selected Incremental Synchronization in the Select Migration Type step.
 ParameterDescription
Incremental Synchronization Rate Limit You can choose whether to limit the incremental synchronization rate as needed. If you choose to limit the incremental synchronization rate, you must specify the records per second (RPS) and bytes per second (BPS). The RPS specifies the maximum number of data rows synchronized to the target database per second during incremental synchronization, and the BPS specifies the maximum amount of data in bytes synchronized to the target database per second during incremental synchronization. Note
The RPS and BPS values specified here are only for throttling. The actual incremental synchronization performance is subject to factors such as the settings of the source and target databases and the instance specifications.
Incremental Log Pull Resource Configuration You can select Small, Medium, or Large to use the corresponding default value of Memory. You can also customize the resource configurations for incremental log pull. By setting the resource configuration for the Store component, you can limit the resource consumption of a task in log pull in the incremental synchronization stage. Notice
In the case of custom configurations, the minimum value is
1, and only integers are supported.Incremental Data Write Resource Configuration You can select Small, Medium, or Large to use the corresponding default values of Write Concurrency and Memory. You can also customize the resource configurations for incremental data writes. By setting the resource configuration for the Incr-Sync component, you can limit the resource consumption of a task in data writes in the incremental synchronization stage. Notice
In the case of custom configurations, the minimum value is
1, and only integers are supported.Incremental Record Retention Time The duration that incremental parsed files are cached in OMS. A longer retention period results in more disk space occupied by the Store component. Incremental Synchronization Start Timestamp - If you have selected Full Migration as the migration type, this parameter is not displayed.
- If you have selected Incremental Synchronization but not Full Migration, specify a point in time after which the data is to be synchronized. The default value is the current system time. For more information, see Set an incremental synchronization timestamp.
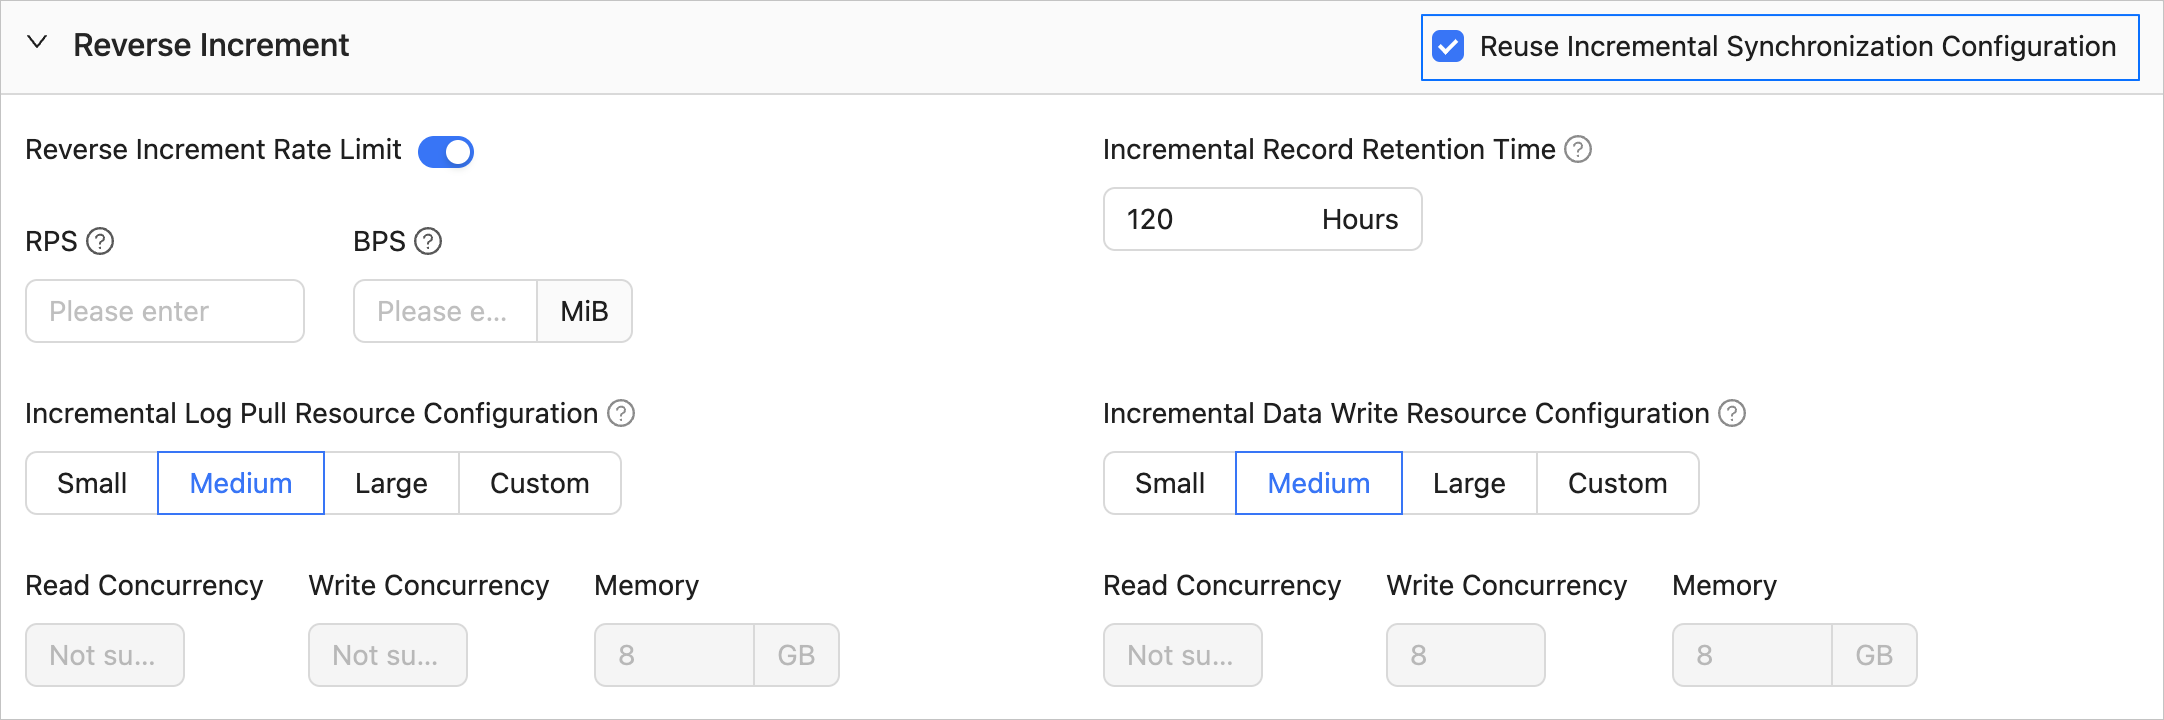
Reverse increment
The following parameters are displayed only if you have selected Reverse Increment in the Select Migration Type step. The parameters for reverse increment are consistent with those for incremental synchronization. You can select Reuse Incremental Synchronization Configuration in the upper-right corner.
Full verification
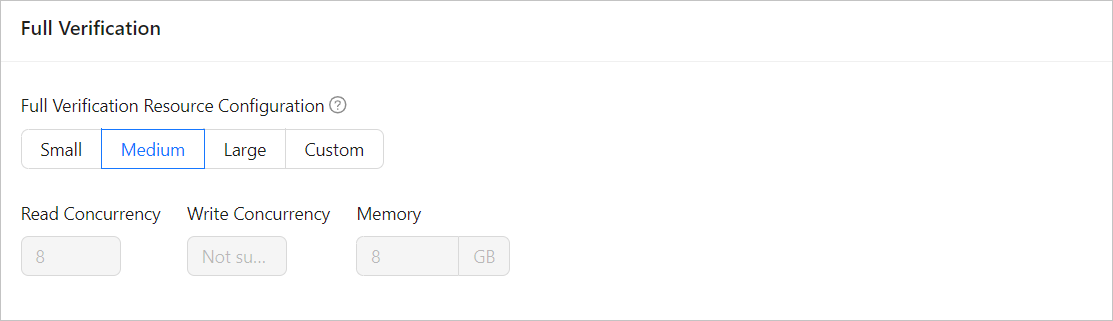
The following parameters are displayed only if you have selected Full Verification in the Select Migration Type step.
 ParameterDescription
Full Verification Resource Configuration You can select Small, Medium, or Large to use the corresponding default values of Read Concurrency and Memory. You can also customize the resource configurations for full verification. By setting the resource configuration for the Full-Verification component, you can limit the resource consumption of a task in the full verification phase. Notice
In the case of custom configurations, the minimum value is
1, and only integers are supported.Advanced options
This section is displayed only if the target is a MySQL-compatible tenant of OceanBase Database V4.3.0 or later and you have selected Schema Migration in the Select Migration Type step.
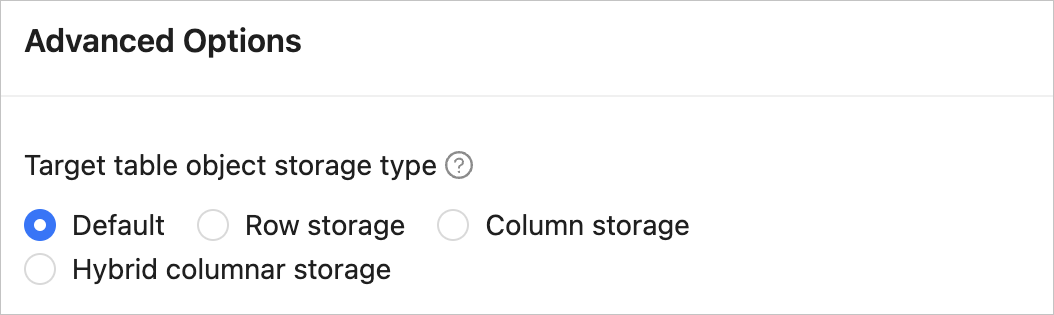
This parameter specifies the storage type for target table objects during schema migration or incremental synchronization. The storage types supported for target table objects are Default, Row Storage, Column Storage, and Hybrid Row-Column Storage. For more information, see default_table_store_format.
Note
The value Default means that other parameters are automatically set based on the parameter configurations of the target database. Table objects in schema migration are written to corresponding schemas based on the specified storage type.
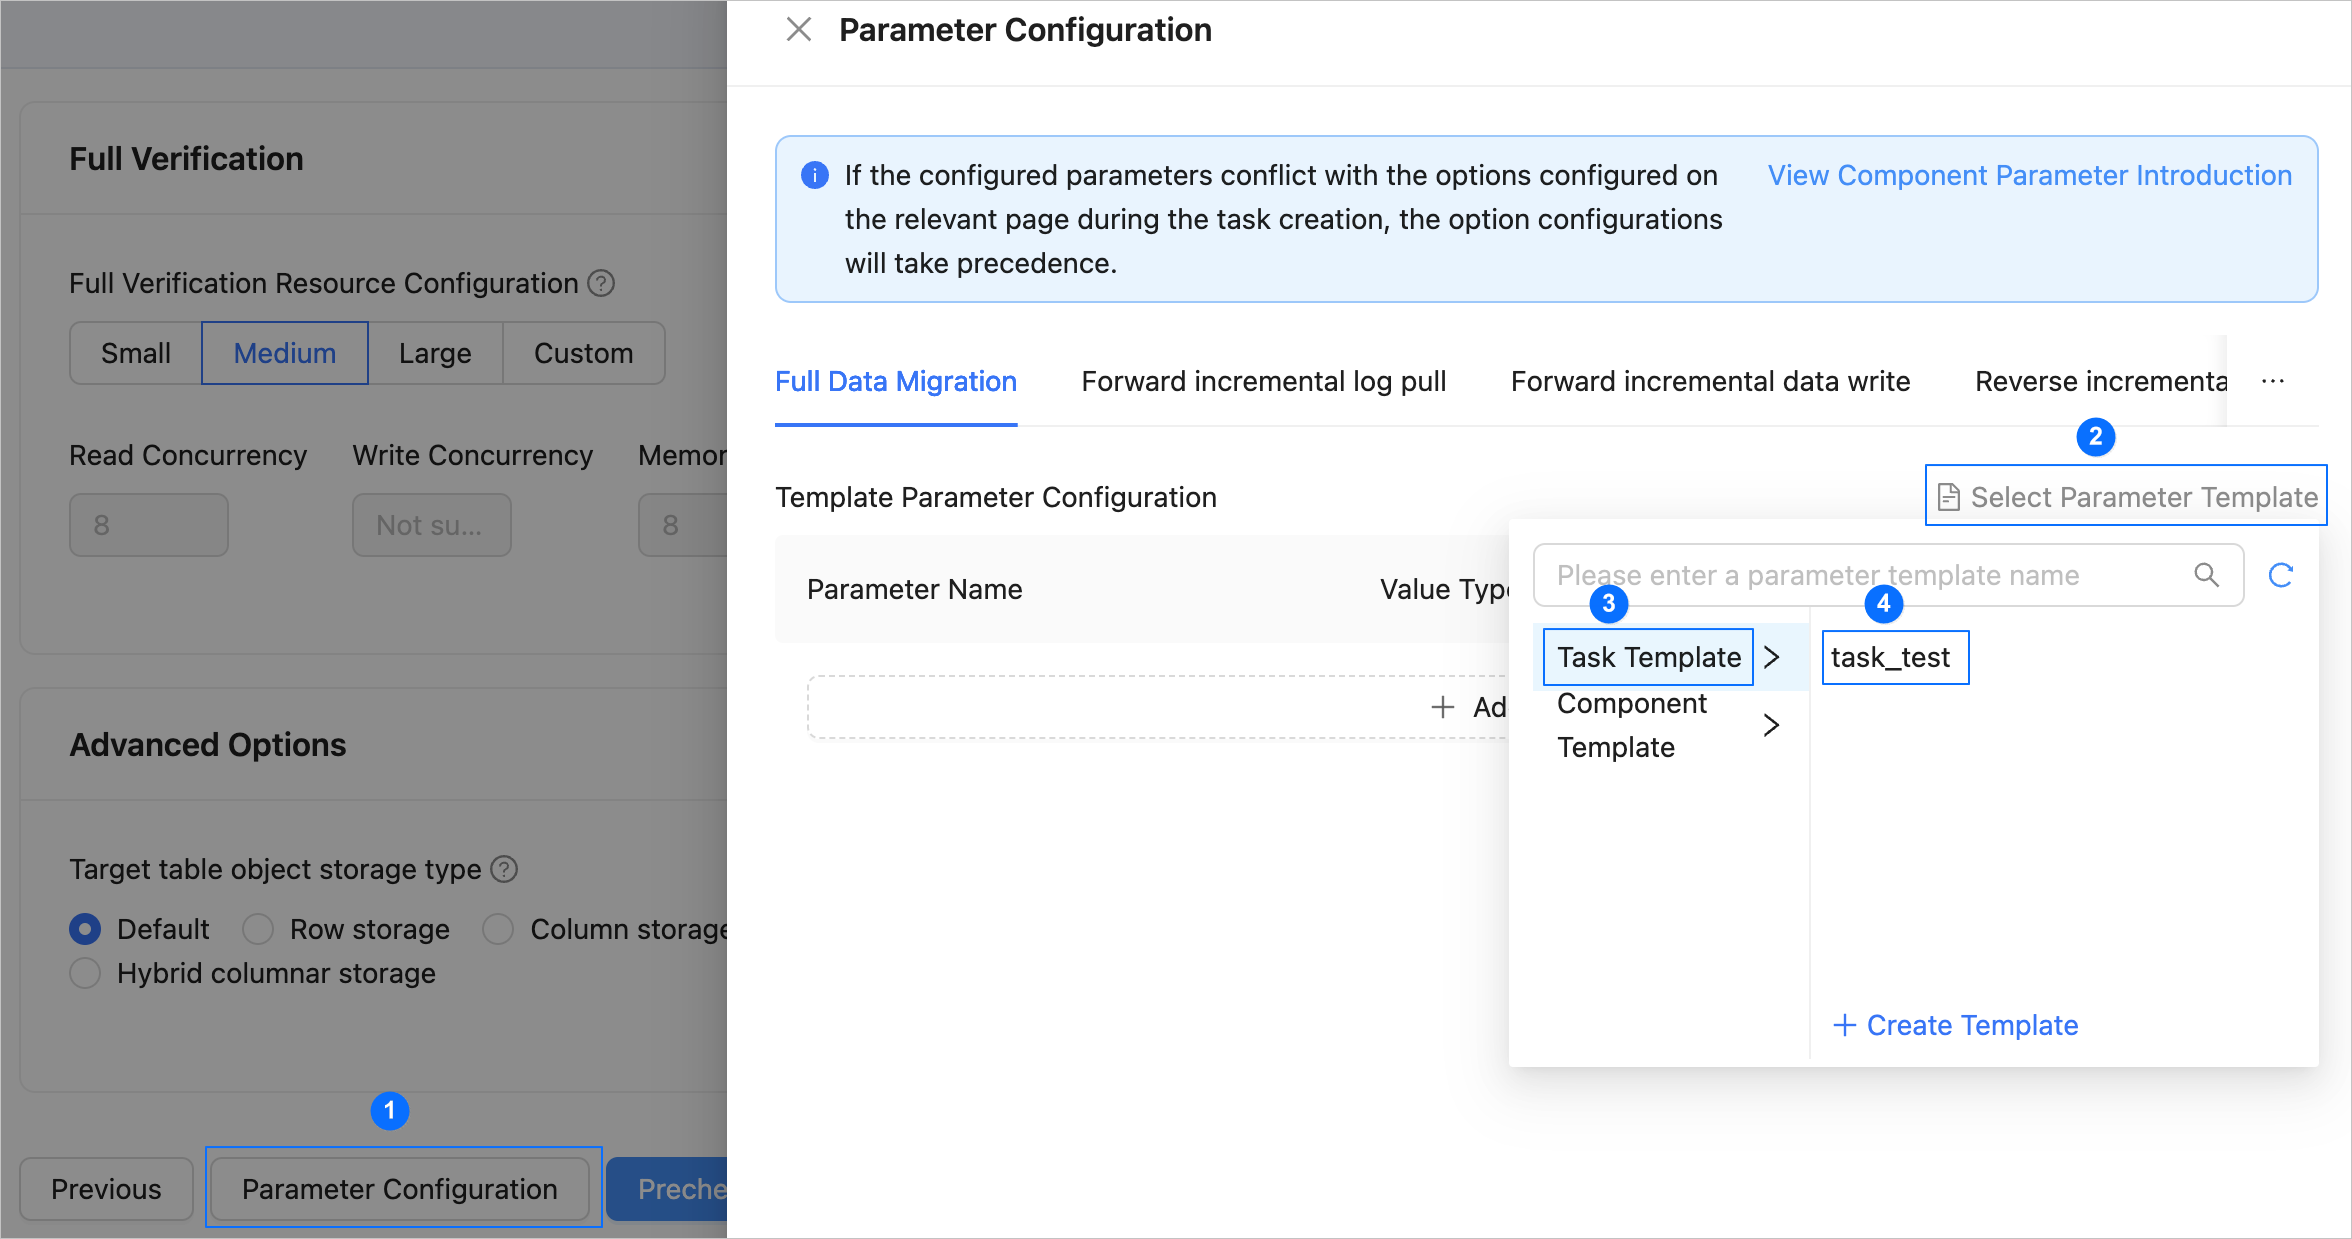
If the parameter settings on the page cannot meet your requirements, you can click Parameter Configuration in the lower part of the page to configure more specific settings. You can also reference an existing task or component template.
Click Precheck to start a precheck on the data migration task.
During the precheck, OMS checks the read and write privileges of the database users and the network connectivity of the databases. A data migration task can be started only after it passes all check items. If an error is returned during the precheck, you can perform the following operations:
Identify and troubleshoot the issue and then perform the precheck again.
Click Skip in the Actions column of a failed precheck item. In the dialog box that prompts the consequences of the operation, click OK.
Click Start Task. If you do not need to start the task now, click Save to go to the details page of the task. You can start the task later as needed.
OMS allows you to modify the migration objects when the data migration task is running. For more information, see View and modify migration objects. After the data migration task is started, it is executed based on the selected migration types. For more information, see the View migration details section in View details of a data migration task.