


This topic describes how to upgrade OMS in the graphical interface of obd.
Note
Currently, obd supports only the upgrade of OMS Community Edition.
Prerequisites
Before you start, make sure that you have installed obd V4.1.0 or later. We recommend that you install the latest version. For more information, see Install obd.
Procedure
Step 1: Obtain the installation package required for the upgrade
Note
If the OMS to be upgraded is a multi-node OMS, you need to perform the following steps on each node.
Download the installation package
Go to OceanBase Download Center, search for OceanBase Migration Service, and download the required installation package. Upload the installation package to any directory of the OBD control machine.
Load the downloaded OMS installation package to the local image repository of the Docker container
[admin@test001 ~]$ sudo docker load -i oms_4.2.12-ce.tar.gzVerify whether the loading is successful
[admin@test001 ~]$ sudo docker imagesThe output is as follows:
REPOSITORY                                    TAG                 IMAGE ID       CREATED        SIZE
reg.docker.alibaba-inc.com/oceanbase/oms-ce   feature_4.2.11_ce   26f5f1554fc5   2 months ago   12.5GB
reg.docker.alibaba-inc.com/oceanbase/oms-ce   feature_4.2.12_ce   28fddcdaf8a0   2 days ago     12.5GB
Step 2: Disable HA
HA stands for High Available, which is a module that ensures the stability and continuity of data transmission links. Before the upgrade, you need to disable the HA feature. If the HA feature is enabled, please follow the steps below to disable it:
Log in to the OMS Community Edition console.
In the left-side navigation pane, choose System Management > System Parameters.
On the System Parameters page, find
ha.config.Click the edit icon next to the value of the parameter.
In the Modify Value dialog box, set
enabletofalseto disable the HA feature.
Step 3: Start the upgrade program
Start the upgrade
[admin@test001 ~]$ obd web upgradeThe output is as follows. You can access the IP address in the output in the browser to go to the upgrade wizard page and click Start Upgrade.
start OBD WEB in 0.0.0.0:8680
please open http://10.10.10.1:8680/#/updateWelcome
Note
The default port for the GUI is 8680. You can use the
obd web upgrade -p <PORT>command to specify the port.In Alibaba Cloud or other cloud environments, the program may fail to obtain a public IP address and output an intranet IP address. In this case, you need to use the correct public IP address to access the GUI.
The
obd webcommand is bound to 0.0.0.0. In a multi-network interface deployment, you can access the GUI through any accessible IP address.
Select the product to be upgraded
On the Welcome to OceanBase Upgrade Wizard page, select the OceanBase Data Migration module and click Upgrade to start the OMS upgrade.
Step 4: Upgrade OMS
obd supports upgrading OMS deployed without obd. This section describes the upgrade process for obd-deployed OMS and non-obd-deployed OMS based on the original deployment method of the OMS to be upgraded. You can choose the appropriate upgrade method based on your actual situation.
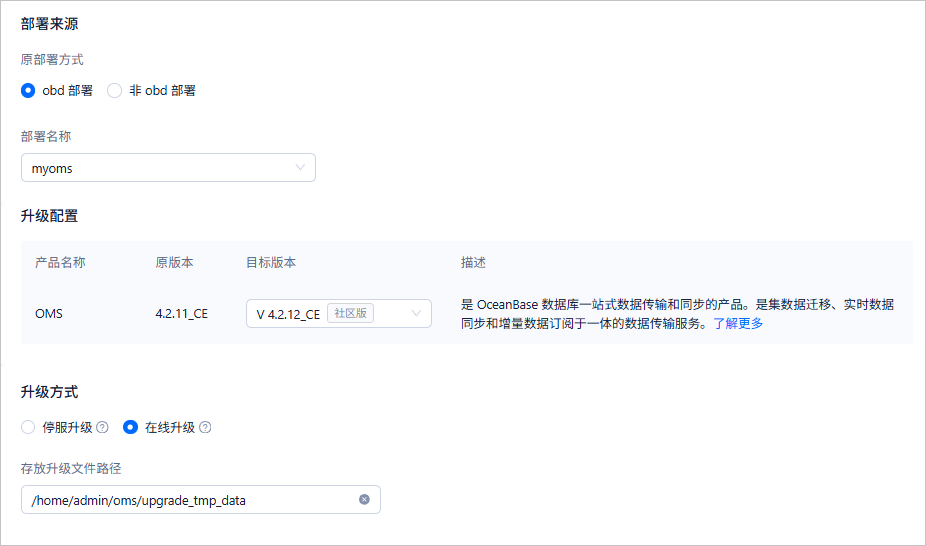
Configure the upgrade
On the Configure Upgrade page, select the deployment name of the OMS to be upgraded, the target version, and the upgrade method. The details are as follows.
 ParameterDescription
Original Deployment Method Select obd Deployment or Non-obd Deployment based on the deployment method of the OMS to be upgraded. Deployment Name Select the deployment name of the OMS to be upgraded from the drop-down list. You can execute the obd cluster listcommand in the command line to view the deployment name (theNamecolumn).Target Version Select the target version from the drop-down list. Upgrade Method Supports Downtime Upgrade and Online Upgrade. - Stop-and-Upgrade: Replaces the old container with a new container image, which may cause a brief interruption in the running chain during the upgrade.
- Online Upgrade: Replaces the component package directly in the existing container to ensure no interruption in the running chain.
Path for Storing Upgrade Files Only displayed when Online Upgrade is selected. You can customize the path. When customizing the path, configure it as an absolute path starting with /, and ensure that it contains only letters, numbers, and special characters (-_:@/.).Confirm the configuration
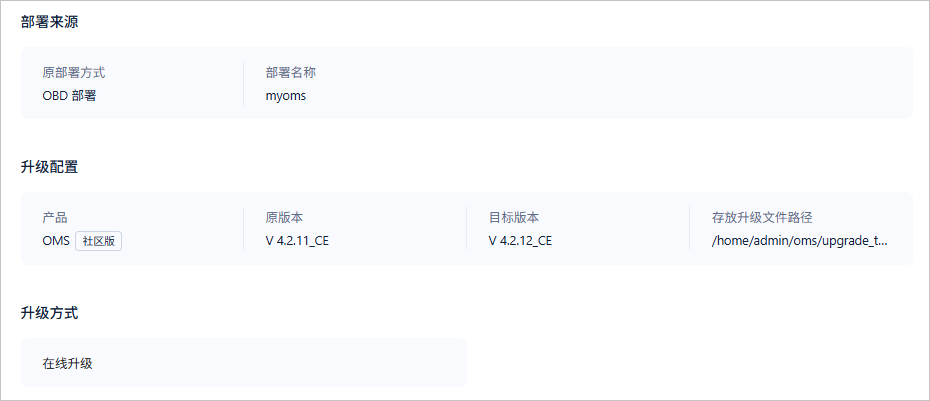
On the Confirm Configuration page, you can view the information you entered on the Configure Upgrade page. You need to check and confirm that the configuration information is correct. If there are any errors, you can click Previous to go back to the Configure Upgrade page for modification. If everything is correct, you can click Next to start the pre-check.
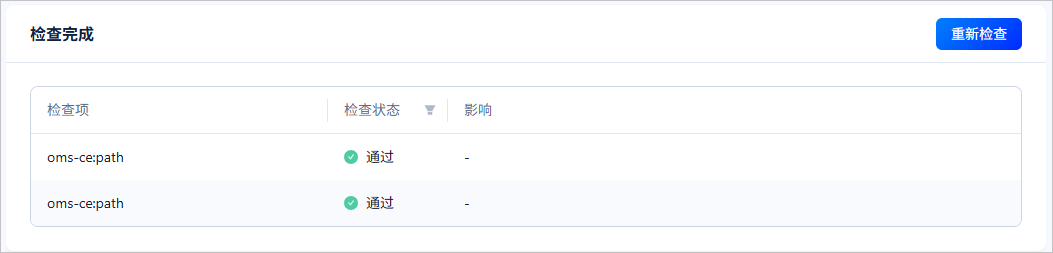
Perform a pre-check
If the pre-check is successful, you can click Next to configure the data backup information. If the pre-check fails, you can choose to fix or ignore the failed items.
If you choose to fix, after the fix is completed, click Recheck to re-execute the environment pre-check.
If you choose to ignore, click Ignore All Failed Items, and the Check Status of the failed items will change to Ignored. You can then click Next to configure the data backup information.
Notice
Ignoring all failed items may result in an upgrade failure. We recommend that you fix the failed items before proceeding.
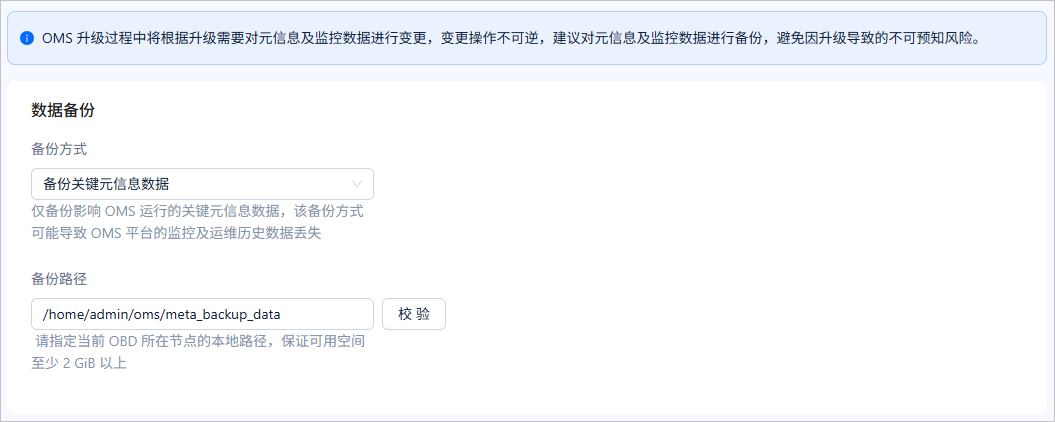
Backup data
On the Data Backup page, you can choose whether to back up key metadata and set the backup path (if needed). During the OMS upgrade, the metadata and monitoring data will be changed based on the upgrade requirements. These changes are irreversible. We recommend that you back up the metadata and monitoring data to avoid unexpected risks caused by the upgrade.
 ParameterDescription
Backup Method Select Backup Key Metadata or No Backup from the drop-down list. Backup Path Only displayed when Backup Key Metadata is selected. You need to specify the local path of the current obd node and ensure that the available space is at least 2 GiB. You can customize the path. When customizing the path, configure it as an absolute path starting with /, and ensure that it contains only letters, numbers, and special characters (-_:@/.).
After setting the path, click the Verify button next to the path to check whether it meets the requirements.Note
When you select Backup Key Metadata, you can click Next only after the backup path is verified. After you click Next, obd will pop up a window to back up the data. After the backup is completed, it will automatically enter the Upgrade OMS page.
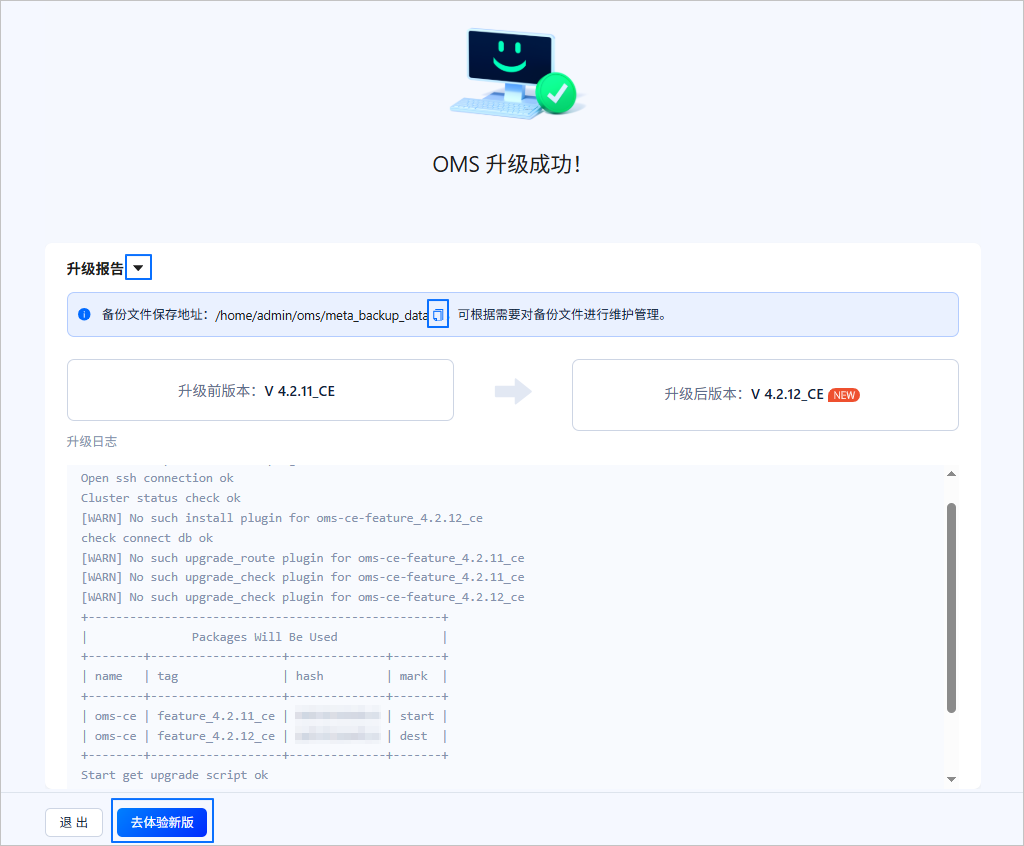
Upgrade OMS
During the upgrade, the Upgrade OMS page will display the upgrade logs. After the upgrade is successful, you can perform the following operations on the page:
Click the expand button next to Upgrade Report to view the upgrade logs.
Click the copy button next to the backup file save address to save the backup file path.
Click Go to New Version to open the OMS login page in a new tab.
Note
In Alibaba Cloud or other cloud environments, it may be impossible to obtain a public IP address, leading to access to the internal network address. In this case, the OMS login page may not be displayed normally.
Click Exit and confirm the exit to exit the OMS upgrade program.
If the deployment fails, you can click Reupgrade to attempt to re-execute the failed upgrade step. You can also click Exit Page to exit the OMS upgrade program.
Configure the upgrade
On the Configure Upgrade page, select the deployment name of the OMS to be upgraded, the target version, and the upgrade method. The details are as follows.
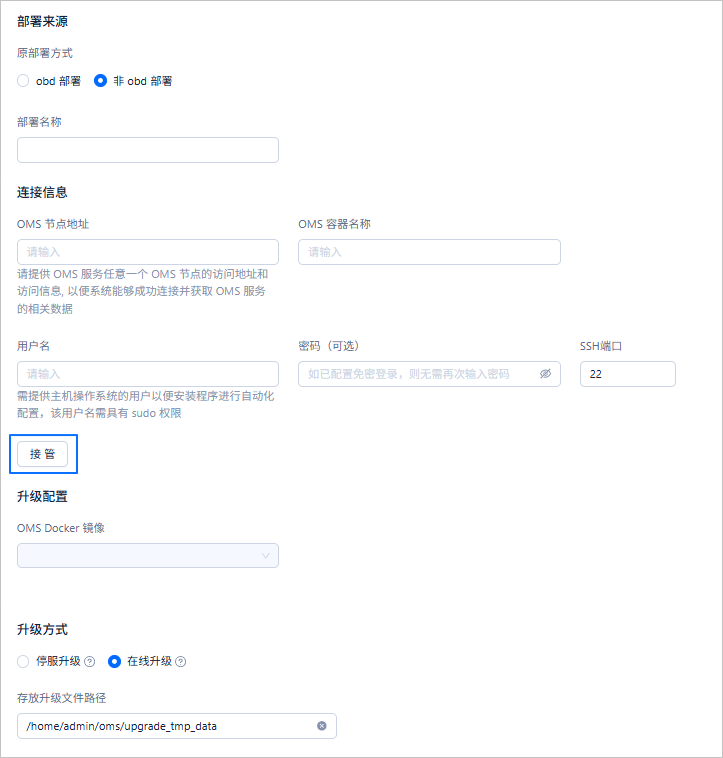 ParameterDescription
Original deployment method Select obd Deployment or Non-obd Deployment based on the deployment method of the OMS to be upgraded. Deployment name Specify a custom deployment name for the OMS. The name must start with an English letter, end with an English letter or a digit, and can contain English letters, digits, and underscores. The length must be between 2 and 32 characters. After the upgrade, obd will automatically use this deployment name to take over the upgraded OMS cluster. OMS node address Provide the IP address of any OMS node to enable the system to connect and retrieve relevant data from the OMS service. OMS container name Run the docker pscommand to view the running containers in Docker.Username Provide the username for the host operating system to enable automated configuration during installation. This username must have sudo privileges. Password (optional) The password corresponding to the username. If the user has been configured with passwordless access, this field can be ignored. SSH port The default port is 22, and custom ports are supported. Take over Click Take Over to allow obd to take over the OMS based on the connection information.
After the takeover is successful, the Connection Information section will be grayed out and cannot be modified.OMS Docker image After the takeover is successful, you can select the target version from the drop-down list. Upgrade method Two upgrade methods are supported: Downtime Upgrade and Online Upgrade: - Stop Service Upgrade: Replace the old container with the new image container. During the upgrade, the running chain will experience a brief interruption.
- Online Upgrade: Replace the component package directly within the existing container to ensure the running chain remains uninterrupted throughout the upgrade.
Path for storing upgrade files This field is displayed only when Online Upgrade is selected. You can customize the path. When customizing, configure it as an absolute path starting with /, and it can only contain letters, digits, and special characters (-_:@/.).Configuration confirmation
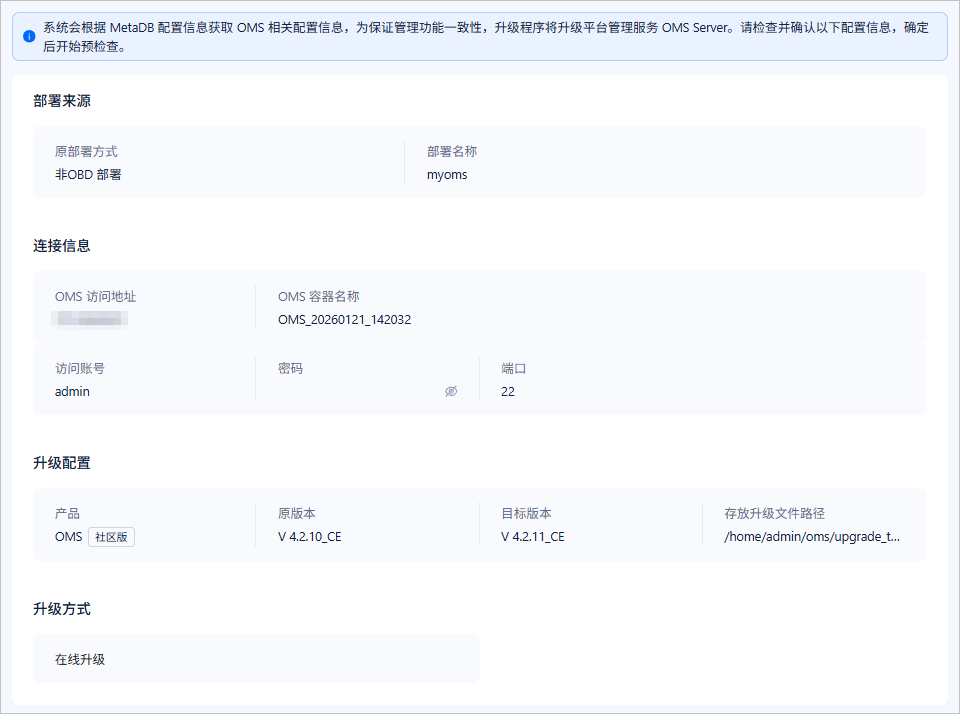
The Configuration Confirmation page displays the information you entered on the Upgrade Configuration page. You need to check and confirm that the configuration information is correct. If there are any errors, you can click Previous to return to the Upgrade Configuration page for modification. If the information is correct, you can click Next to start the pre-check.
Pre-check
If the pre-check is successful, click Next to start the OMS upgrade. If the pre-check fails, you can choose to fix the failed items or ignore them.
If you choose to fix the failed items, after the fixes are completed, click Recheck to re-execute the environment pre-check.
If you choose to ignore the failed items, click Ignore All Failed Items, and the Check Status of the failed items will change to Ignored. You can then click Next to start the OMS upgrade.
Notice
Ignoring all failed items may lead to an upgrade failure. It is recommended to fix the failed items before proceeding to the next step.
Data backup
On the Data Backup page, you can choose whether to back up critical metadata and specify the backup path (if needed). During the OMS upgrade, changes will be made to the metadata and monitoring data based on the upgrade requirements. These changes are irreversible, so it is recommended to back up the metadata and monitoring data to avoid unexpected risks caused by the upgrade.
ParameterDescriptionBackup method You can select Backup Critical Metadata or Do Not Backup from the drop-down list. Backup path This field is displayed only when Backup Critical Metadata is selected. You need to specify a local path on the current obd node and ensure that at least 2 GiB of available space is available. You can customize the path, but it must be an absolute path starting with /and can only contain letters, digits, and special characters (-_:@/.).
After setting the path, click the Test button next to the path to verify if it meets the requirements.Note
When you select Backup Critical Metadata, you can only click Next after the backup path test is successful. After clicking Next, obd will pop up a window for data backup. After the backup is completed, it will automatically navigate to the OMS Upgrade page.
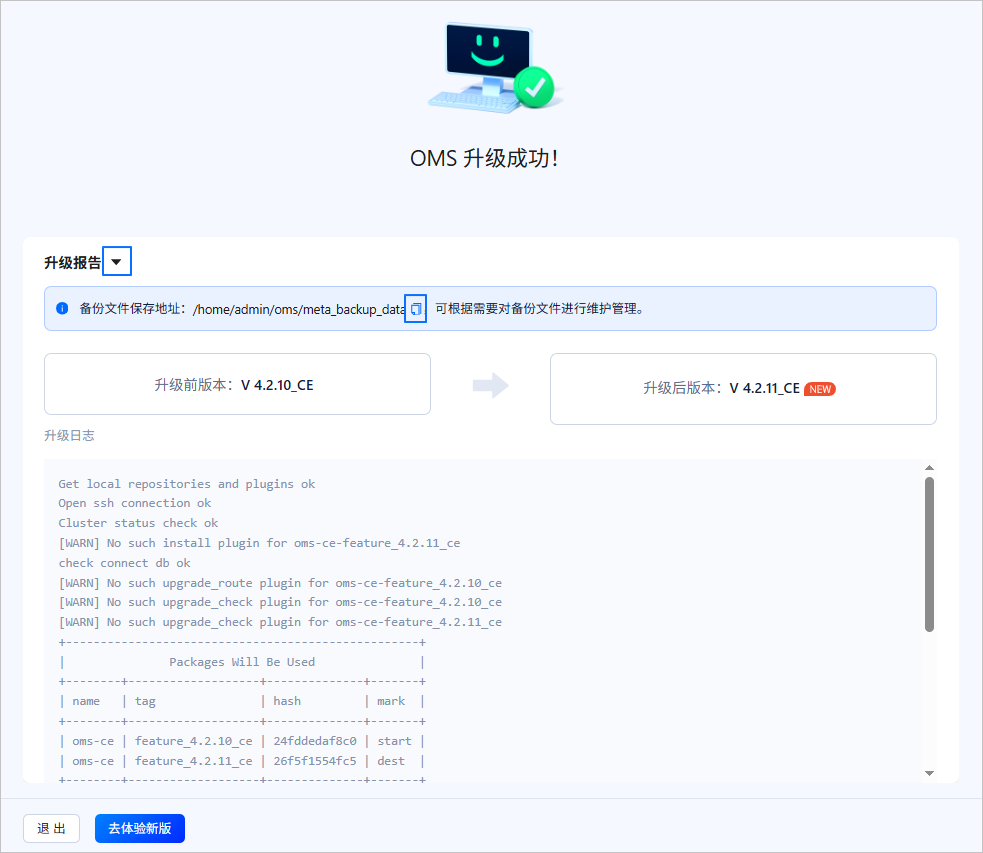
OMS Upgrade
During the upgrade, the OMS Upgrade page will display the upgrade logs. After the upgrade is successful, you can perform the following actions on the page:
Click the expand button next to Upgrade Report to view the upgrade logs.
Click the copy button next to the backup file save address to save the backup file path.
Click Go to Experience New Version to open the OMS login page in a new tab.
Note
In Alibaba Cloud or other cloud environments, it is possible for the program to be unable to obtain a public IP address, resulting in access to the internal network address. In such cases, the OMS login page may not be displayed normally.
Click Exit and confirm the exit to exit the OMS upgrade program.
If the deployment fails, you can click Re-upgrade to attempt to re-execute the failed upgrade steps. Alternatively, you can click Exit Page to exit the OMS upgrade program.
Step 5: Verify
Check the status of the servers
After the upgrade, log in to the OMS Community Edition console. In the left-side navigation pane, choose O&M Monitoring > Server. On the Server List page, check whether the server list is displayed correctly. Make sure that the status of all servers is Online.
Check the OMS version
Log in to the OMS Community Edition console. Hover the cursor over Help Center in the upper-right corner of the page and click About OMS. In the dialog box that appears, check whether the OMS version is the target version.
References
For more information about HA, see OMS Community Edition HA in the OceanBase Migration Service documentation.
After the upgrade, we recommend that you enable the HA feature. You can set the
enableparameter in theha.configfile totrueto enable HA. For more information, see Modify HA configurations in the OceanBase Migration Service documentation.