


This topic describes how to prepare resources and configure the environment before deployment and how to quickly deploy a Community Edition distributed cluster by using an obd configuration file.
Note
obd supports deploying OceanBase Database of both Community Edition and Enterprise Edition. This topic describes how to deploy OceanBase Database of Community Edition by using an obd configuration file.
Server configuration
The server configuration in this example is as follows:
Category |
Configuration |
|---|---|
| Number of servers | 4 |
| CPU | 8 cores of x86_64 |
| Operating system | CentOS Linux release 8.5.2111 |
| Kernel | 4.18.0-348.7.1 |
| Available memory | 32 GB |
| Disk | SSD storage, with 196 GB for the installation directory, 2 TB for the log directory, and 2 TB for the data directory. |
Note
In a production environment, the server must meet the minimum resource requirements (4 cores and 16 GB of memory). For long-term use, the available memory must be at least 32 GB. Note that the memory limit mentioned here refers to the value in the
availablecolumn of the output of thefree -gcommand.In an environment with a small number of CPU cores, the minimum CPU count for obd is set to 8 by default. A low CPU count will negatively impact the performance of OceanBase Database.
Deployment mode
This example uses a three-replica deployment mode. We recommend that you use four servers, and you can choose a suitable deployment mode based on your actual situation. The usage of the four servers is as follows:
Role |
Server |
Remarks |
|---|---|---|
| obd | 10.10.10.4 | The automated deployment software installed on the control server. |
| OBServer node | 10.10.10.1 | The OceanBase Database node in Zone1. |
| OBServer node | 10.10.10.2 | The OceanBase Database node in Zone2. |
| OBServer node | 10.10.10.3 | The OceanBase Database node in Zone3. |
| ODP (also known as OBProxy) | 10.10.10.1, 10.10.10.2, and 10.10.10.3 | The proxy server for OceanBase Database. |
| OBAgent | 10.10.10.1, 10.10.10.2, and 10.10.10.3 | The monitoring and data collection framework for OceanBase Database. |
| obconfigserver | 10.10.10.4 | Provides metadata registration, storage, and query services for OceanBase Database. |
| Prometheus | 10.10.10.4 | An open-source service monitoring system and time-series database that provides a general data model and quick data collection, storage, and query interfaces. |
| Grafana | 10.10.10.4 | An open-source data visualization tool that can visualize various metrics from data sources to help you better understand the system's operational status and performance metrics. |
Check the server's hardware and software configurations
Before you deploy OceanBase Database, check the server's hardware and software configurations to ensure that the deployment can be completed.
Note
Each OBServer node must be checked for the following items.
Hardware
Check whether the CPU supports the AVX instruction
Note
This check is required only for servers with the x86 architecture. If you use a server with a different architecture, you can skip this section.
OceanBase Database requires that the CPU supports the AVX instruction. You can run the following command to check whether the CPU supports the AVX instruction.
lscpu | grep Flags | grep avx
The following example shows the command output. If the avx field is present in the output, the CPU supports the AVX instruction. If the avx field is not present, the CPU does not support the AVX instruction. In this case, you must use a server that supports the AVX instruction.
Flags: fpu vme de pse tsc msr pae mce cx8 apic sep mtrr pge mca cmov pat pse36 clflush mmx fxsr sse sse2 ss ht syscall nx pdpe1gb rdtscp lm constant_tsc arch_perfmon rep_good nopl xtopology nonstop_tsc cpuid aperfmperf tsc_known_freq pni pclmulqdq monitor ssse3 fma cx16 pdcm pcid sse4_1 sse4_2 x2apic movbe popcnt aes xsave avx f16c rdrand hypervisor lahf_lm abm 3dnowprefetch cpuid_fault invpcid_single ssbd ibrs_enhanced fsgsbase tsc_adjust bmi1 hle avx2 smep bmi2 erms invpcid rtm avx512f avx512dq rdseed adx smap avx512ifma clflushopt clwb avx512cd sha_ni avx512bw avx512vl xsaveopt xsavec xgetbv1 xsaves avx_vnni avx512_bf16 wbnoinvd ida arat hwp hwp_notify hwp_act_window hwp_epp hwp_pkg_req avx512vbmi umip pku ospke waitpkg avx512_vbmi2 gfni vaes vpclmulqdq avx512_vnni avx512_bitalg avx512_vpopcntdq rdpid bus_lock_detect cldemote movdiri movdir64b enqcmd fsrm md_clear serialize tsxldtrk avx512_fp16 flush_l1d arch_capabilities
Check the memory
Run the following command to check whether the available memory of the server meets the requirements specified in the Software and hardware requirements topic of the OceanBase Database documentation.
[root@test001 ~]# free -g
The following example shows the command output. The value of the Mem column in the available column is 32, which meets the memory requirements.
              total        used        free      shared  buff/cache   available
Mem:             36           4          32           0           0          32
Swap:             0           0           0
If the memory check result does not meet the memory requirements for deploying OceanBase Database, you can run the following command to clear the Linux cache: PageCache, dentries, and inodes.
sudo sysctl -w vm.drop_caches=3
# or
sudo echo 3 > /proc/sys/vm/drop_caches
Software
Check the operating system
Run the following command to check the operating system information. The operating system must meet the requirements specified in the Software and hardware requirements topic of the OceanBase Database documentation.
[root@test001 ~]# cat /etc/os-release
The following example shows the command output. The operating system is CentOS Linux (the value of the NAME field), and the version is 8 (the value of the VERSION field).
NAME="CentOS Linux"
VERSION="8"
ID="centos"
ID_LIKE="rhel fedora"
VERSION_ID="8"
PLATFORM_ID="platform:el8"
PRETTY_NAME="CentOS Linux 8"
ANSI_COLOR="0;31"
CPE_NAME="cpe:/o:centos:centos:8"
HOME_URL="https://centos.org/"
BUG_REPORT_URL="https://bugs.centos.org/"
CENTOS_MANTISBT_PROJECT="CentOS-8"
CENTOS_MANTISBT_PROJECT_VERSION="8"
Check the kernel
OceanBase Database provides installation packages for the x86 architecture (el7 and el8) and the ARM architecture (el7 and el8). Before deployment, check the kernel of the server to obtain the correct installation package.
Run the following command to check the kernel information:
[root@test001 ~]# uname -a
The following example shows the command output. The kernel is 4.18.0-348.7.1, the operating system version is el8, and the CPU architecture is x86_64. Therefore, you must use an installation package with the el8.x86_64 suffix, for example, oceanbase-ce-4.3.5.2-102020032025070315.el8.x86_64.rpm.
Linux test001 4.18.0-348.7.1.el8_5.x86_64 #1 SMP Wed Dec 22 13:25:12 UTC 2021 x86_64 x86_64 x86_64 GNU/Linux
Pre-deployment configuration
Before you deploy OceanBase Database Community Edition, you must perform the following configurations.
Note
You must perform the following configurations on each OBServer node.
Plan the directories
To deploy OceanBase Database Community Edition, you need to plan the following three directories. The file system type must be XFS or EXT4.
- Installation directory: the directory for storing the software of OceanBase Database and the system logs generated during the running of OceanBase Database. The size of the directory must be at least 25 GB.
- Log directory: the directory for storing the logs of OceanBase Database. The size of the directory must be at least twice the size of the memory. We recommend that you configure the size of the directory to be three times the size of the memory.
- Data directory: the directory for storing data. The size of the directory must be at least twice the size of the memory. The size of the directory depends on the size of the data to be stored.
Notice
If the capacity of a directory mounted on a mount point exceeds 16 TB, only the XFS file system is supported.
To ensure the stability of the system, we recommend that you use different physical disks for the three directories. If physical resources are limited, OceanBase Database supports the use of the same physical disk for the data directory and the log directory. However, we do not recommend that you use this configuration for business scenarios with high write pressure.
The IOPS requirements for the disks are as follows:
- If the installation directory, log directory, and data directory are stored on different disks, the IOPS of each disk must be at least 1000.
- If the installation directory, log directory, and data directory are stored on the same disk, the IOPS of the disk must be at least 3000.
Mount disks
If your server does not have any disks that need to be mounted, or if all disks have been mounted, you can skip this step and proceed to the next step Prepare directories.
As the root user, perform the following steps to mount the disks:
View the disk information
Use the
fdisk -lcommand to identify the available disks and partitions.[root@test001 ~]# fdisk -lThe output is as follows:
Disk /dev/nvme0n1: 3.5 TiB, 3840755982336 bytes, 7501476528 sectors
Units: sectors of 1 * 512 = 512 bytes
Sector size (logical/physical): 512 bytes / 512 bytes
I/O size (minimum/optimal): 4096 bytes / 4096 bytes

Disk /dev/nvme1n1: 3.5 TiB, 3840755982336 bytes, 7501476528 sectors
Units: sectors of 1 * 512 = 512 bytes
Sector size (logical/physical): 512 bytes / 512 bytes
I/O size (minimum/optimal): 4096 bytes / 4096 bytes

Disk /dev/sda: 60 GiB, 64424509440 bytes, 125829120 sectors
Units: sectors of 1 * 512 = 512 bytes
Sector size (logical/physical): 512 bytes / 512 bytes
I/O size (minimum/optimal): 512 bytes / 512 bytes
Disklabel type: gpt
Disk identifier: 3DC9B58D-90DC-4B90-869A-33592EA28B9E

Device      Start       End   Sectors  Size Type
/dev/sda1    2048      6143      4096    2M BIOS boot
/dev/sda2    6144    415743    409600  200M EFI System
/dev/sda3  415744 125829086 125413343 59.8G Linux filesystem


Disk /dev/sdb: 200 GiB, 214748364800 bytes, 419430400 sectors
Units: sectors of 1 * 512 = 512 bytes
Sector size (logical/physical): 512 bytes / 512 bytes
I/O size (minimum/optimal): 512 bytes / 512 bytes
Use the
lsblkcommand to view the disk information.[root@test001 ~]# lsblkThe output is as follows:
NAME    MAJ:MIN RM  SIZE RO TYPE MOUNTPOINT
sda       8:0    0   60G  0 disk
├─sda1    8:1    0    2M  0 part
├─sda2    8:2    0  200M  0 part /boot/efi
└─sda3    8:3    0 59.8G  0 part /
sdb       8:16   0  200G  0 disk /home
sr0      11:0    1    4M  0 rom
nvme0n1 259:0    0  3.5T  0 disk
nvme1n1 259:0    0  3.5T  0 disk
Based on the above query, the disks to be mounted are
/dev/nvme0n1and/dev/nvme1n1.Install the LVM tools
[root@test001 ~]# yum install lvm2Create physical volumes (PVs)
Initialize the partitions as PVs.
Notice
When you initialize a partition as a PV, the partition will be reformatted (data will be lost). Proceed with caution.
[root@test001 ~]# pvcreate /dev/nvme0n1
[root@test001 ~]# pvcreate /dev/nvme1n1
The output is as follows:
Physical volume "/dev/nvme0n1" successfully created.
Physical volume "/dev/nvme1n1" successfully created.
Verify the PV creation result.
[root@test001 ~]# pvsThe output is as follows:
PV           VG Fmt  Attr PSize PFree
/dev/nvme0n1    lvm2 ---  3.49t 3.49t
/dev/nvme1n1    lvm2 ---  3.49t 3.49t
Create volume groups (VGs)
Merge multiple PVs into one VG.
[root@test001 ~]# vgcreate vgob1 /dev/nvme0n1
[root@test001 ~]# vgcreate vgob2 /dev/nvme1n1
The output is as follows:
Volume group "vgob1" successfully created
Volume group "vgob2" successfully created
View the VG information.
[root@test001 ~]# vgsThe output is as follows:
VG   #PV #LV #SN Attr   VSize VFree
vgob1  1   0   0 wz--n- 3.49t 3.49t
vgob2  1   0   0 wz--n- 3.49t 3.49t
Create logical volumes (LVs)
Divide the VG into logical volumes.
Create a data logical volume.
[root@test001 ~]# lvcreate -L 2t -n data vgob1The output is as follows:
Logical volume "data" created.Create a log logical volume.
[root@test001 ~]# lvcreate -L 2t -n log vgob2The output is as follows:
Logical volume "log" created.
View the LV information.
[root@test001 ~]# lvsThe output is as follows:
LV   VG    Attr       LSize Pool Origin Data%  Meta%  Move Log Cpy%Sync Convert
data vgob1 -wi-a----- 2.00t
log  vgob2 -wi-a----- 2.00t
Format and mount the disks
Format the disks as EXT4 file systems.
Format the data logical volume as an EXT4 file.
[root@test001 ~]# mkfs.ext4 /dev/vgob1/dataThe output is as follows:
mke2fs 1.46.0 (29-Jan-2020)
Discarding device blocks: done
Creating filesystem with 268435456 4k blocks and 67108864 inodes
Filesystem UUID: eb4708c8-e3e3-49b4-9444-b9c81d4be84e
Superblock backups stored on blocks:
      32768, 98304, 163840, 229376, 294912, 819200, 884736, 1605632, 2654208,
      4096000, 7962624, 11239424, 20480000, 23887872, 71663616, 78675968,
      102400000, 214990848

Allocating group tables: done
Writing inode tables: done
Creating journal (262144 blocks): done
Writing superblocks and filesystem accounting information: done
Format the log logical volume as an EXT4 file.
[root@test001 ~]# mkfs.ext4 /dev/vgob2/logThe output is as follows:
mke2fs 1.46.0 (29-Jan-2020)
Discarding device blocks: done
Creating filesystem with 536870912 4k blocks and 134217728 inodes
Filesystem UUID: c48c39cd-bdb9-4635-9304-721dcf013492
Superblock backups stored on blocks:
      32768, 98304, 163840, 229376, 294912, 819200, 884736, 1605632, 2654208,
      4096000, 7962624, 11239424, 20480000, 23887872, 71663616, 78675968,
      102400000, 214990848, 512000000

Allocating group tables: done
Writing inode tables: done
Creating journal (262144 blocks): done
Writing superblocks and filesystem accounting information: done
Create mount points.
[root@test001 ~]# mkdir -p /data/log1
[root@test001 ~]# mkdir -p /data/1
Temporarily mount the disks.
[root@test001 ~]# mount /dev/vgob2/log /data/log1
[root@test001 ~]# mount /dev/vgob1/data /data/1
Set up automatic mounting at boot.
Edit the
/etc/fstabfile and add the mount configuration.[root@test001 ~]# vim /etc/fstabAdd the following content to the configuration file:
/dev/vgob2/log /data/log1  ext4  defaults,noatime,nodiratime,nodelalloc,barrier=0  0  0
/dev/vgob1/data /data/1  ext4  defaults,noatime,nodiratime,nodelalloc,barrier=0  0  0
View the disk mounting status.
Use the following command to view the disk mounting status.
[root@test001 ~]# df -hThe output is as follows, indicating that the disks have been mounted to the directories
/data/1and/data/log1.Filesystem Size Used Avail Use% Mounted on devtmpfs 4.8G 0 4.8G 0% /dev tmpfs 4.8G 0 4.8G 0% /dev/shm tmpfs 4.8G 500K 4.8G 1% /run tmpfs 4.8G 0 4.8G 0% /sys/fs/cgroup /dev/sda3 59G 4.8G 52G 9% / /dev/sda2 200M 5.8M 195M 3% /boot/efi /dev/sdb 196G 3.2G 183G 2% /home tmpfs 970M 0 970M 0% /run/user/1001 /dev/mapper/vgob1-data 2.0T 28K 1.9T 1% /data/1 /dev/mapper/vgob2-log 2.0T 28K 1.9T 1% /data/log1
Prepare the directories
Check the file system type, which is EXT4 or XFS.
[root@test001 ~]# df -ThThe returned result is as follows:
Filesystem             Type      Size  Used Avail Use% Mounted on
devtmpfs               devtmpfs  4.8G     0  4.8G   0% /dev
tmpfs                  tmpfs     4.8G     0  4.8G   0% /dev/shm
tmpfs                  tmpfs     4.8G  512K  4.8G   1% /run
tmpfs                  tmpfs     4.8G     0  4.8G   0% /sys/fs/cgroup
/dev/sda3              ext4       59G  5.0G   52G   9% /
/dev/sdb               ext4      196G  113G   74G  61% /home
/dev/sda2              vfat      200M  5.8M  195M   3% /boot/efi
/dev/mapper/vgob2-log  ext4     2.0T  2.1G  1.9T   1% /data/log1
/dev/mapper/vgob1-data ext4      2.0T  2.1G  1.9T   1% /data/1
tmpfs                  tmpfs     970M     0  970M   0% /run/user/1001
Based on the above directory check, when you deploy the service, set the installation directory to
/home, the log storage directory to/data/log1, and the data storage directory to/data/1.Check whether the IOPS of the directory meets the requirements.
Note
Since the installation directory, log storage directory, and data storage directory are located on different disks, you need to query the IOPS of each directory. If the installation directory, log storage directory, and data storage directory are located on the same disk, you only need to switch to the mount directory of the disk and query the IOPS.
If the fio tool is not installed on the server, run the
yum install -y fiocommand to install it.
Query the IOPS of the installation directory.
Switch to the installation directory and run the following command:
[root@test001 /home]# fio -filename=./testfile -direct=1 -iodepth 1 -thread -rw=write -ioengine=psync -bs=4k -size=20G -numjobs=1 -runtime=180 -group_reporting -name=sqe_100write_4k --fsync=1 --fallocate=posixThe returned result is as follows:
sqe_100write_4k: (g=0): rw=write, bs=(R) 4096B-4096B, (W) 4096B-4096B, (T) 4096B-4096B, ioengine=psync, iodepth=1
fio-3.34
Starting 1 thread
Jobs: 1 (f=1): [W(1)][100.0%][w=6648KiB/s][w=1662 IOPS][eta 00m:00s]
sqe_100write_4k: (groupid=0, jobs=1): err= 0: pid=145805: Thu May  8 10:39:32 2025
write: IOPS=2012, BW=8051KiB/s (8244kB/s)(1415MiB/180001msec); 0 zone resets
   clat (usec): min=84, max=3732, avg=174.51, stdev=71.93
   lat (usec): min=84, max=3732, avg=174.77, stdev=71.98
   clat percentiles (usec):
   |  1.00th=[   89],  5.00th=[   90], 10.00th=[   91], 20.00th=[   95],
   | 30.00th=[  100], 40.00th=[  141], 50.00th=[  184], 60.00th=[  210],
   | 70.00th=[  221], 80.00th=[  231], 90.00th=[  265], 95.00th=[  285],
   | 99.00th=[  351], 99.50th=[  371], 99.90th=[  441], 99.95th=[  515],
   | 99.99th=[  824]
   bw (  KiB/s): min= 3432, max=17608, per=100.00%, avg=8056.18, stdev=4234.76, samples=359
   iops        : min=  858, max= 4402, avg=2014.04, stdev=1058.69, samples=359
lat (usec)   : 100=30.58%, 250=57.09%, 500=12.28%, 750=0.04%, 1000=0.02%
lat (msec)   : 2=0.01%, 4=0.01%
fsync/fdatasync/sync_file_range:
   sync (usec): min=64, max=5690, avg=319.43, stdev=230.86
   sync percentiles (usec):
   |  1.00th=[   68],  5.00th=[   69], 10.00th=[   70], 20.00th=[   72],
   | 30.00th=[   95], 40.00th=[  194], 50.00th=[  379], 60.00th=[  412],
   | 70.00th=[  457], 80.00th=[  474], 90.00th=[  578], 95.00th=[  685],
   | 99.00th=[  996], 99.50th=[ 1205], 99.90th=[ 1336], 99.95th=[ 1385],
   | 99.99th=[ 1713]
cpu          : usr=0.86%, sys=11.80%, ctx=714705, majf=0, minf=0
IO depths    : 1=200.0%, 2=0.0%, 4=0.0%, 8=0.0%, 16=0.0%, 32=0.0%, >=64=0.0%
   submit    : 0=0.0%, 4=100.0%, 8=0.0%, 16=0.0%, 32=0.0%, 64=0.0%, >=64=0.0%
   complete  : 0=0.0%, 4=100.0%, 8=0.0%, 16=0.0%, 32=0.0%, 64=0.0%, >=64=0.0%
   issued rwts: total=0,362308,0,362308 short=0,0,0,0 dropped=0,0,0,0
   latency   : target=0, window=0, percentile=100.00%, depth=1

Run status group 0 (all jobs):
WRITE: bw=8051KiB/s (8244kB/s), 8051KiB/s-8051KiB/s (8244kB/s-8244kB/s), io=1415MiB (1484MB), run=180001-180001msec

Disk stats (read/write):
sdb: ios=0/935811, merge=0/335611, ticks=0/164939, in_queue=217509, util=99.97%
After you complete the above operation, delete the testfile file in the directory to prevent the disk space from being insufficient.
[root@test001 /home]# rm -rf testfileQuery the IOPS of the log storage directory.
Switch to the log storage directory and run the following command:
[root@test001 /data/log1]# fio -filename=./testfile -direct=1 -iodepth 1 -thread -rw=write -ioengine=psync -bs=4k -size=20G -numjobs=1 -runtime=180 -group_reporting -name=sqe_100write_4k --fsync=1 --fallocate=posixThe returned result is as follows:
sqe_100write_4k: (g=0): rw=write, bs=(R) 4096B-4096B, (W) 4096B-4096B, (T) 4096B-4096B, ioengine=psync, iodepth=1
fio-3.34
Starting 1 thread
Jobs: 1 (f=1): [W(1)][100.0%][w=6648KiB/s][w=1662 IOPS][eta 00m:00s]
sqe_100write_4k: (groupid=0, jobs=1): err= 0: pid=145805: Thu May  8 10:39:32 2025
write: IOPS=2012, BW=8051KiB/s (8244kB/s)(1415MiB/180001msec); 0 zone resets
   clat (usec): min=84, max=3732, avg=174.51, stdev=71.93
   lat (usec): min=84, max=3732, avg=174.77, stdev=71.98
   clat percentiles (usec):
   |  1.00th=[   89],  5.00th=[   90], 10.00th=[   91], 20.00th=[   95],
   | 30.00th=[  100], 40.00th=[  141], 50.00th=[  184], 60.00th=[  210],
   | 70.00th=[  221], 80.00th=[  231], 90.00th=[  265], 95.00th=[  285],
   | 99.00th=[  351], 99.50th=[  371], 99.90th=[  441], 99.95th=[  515],
   | 99.99th=[  824]
   bw (  KiB/s): min= 3432, max=17608, per=100.00%, avg=8056.18, stdev=4234.76, samples=359
   iops        : min=  858, max= 4402, avg=2014.04, stdev=1058.69, samples=359
lat (usec)   : 100=30.58%, 250=57.09%, 500=12.28%, 750=0.04%, 1000=0.02%
lat (msec)   : 2=0.01%, 4=0.01%
fsync/fdatasync/sync_file_range:
   sync (usec): min=64, max=5690, avg=319.43, stdev=230.86
   sync percentiles (usec):
   |  1.00th=[   68],  5.00th=[   69], 10.00th=[   70], 20.00th=[   72],
   | 30.00th=[   95], 40.00th=[  194], 50.00th=[  379], 60.00th=[  412],
   | 70.00th=[  457], 80.00th=[  474], 90.00th=[  578], 95.00th=[  685],
   | 99.00th=[  996], 99.50th=[ 1205], 99.90th=[ 1336], 99.95th=[ 1385],
   | 99.99th=[ 1713]
cpu          : usr=0.86%, sys=11.80%, ctx=714705, majf=0, minf=0
IO depths    : 1=200.0%, 2=0.0%, 4=0.0%, 8=0.0%, 16=0.0%, 32=0.0%, >=64=0.0%
   submit    : 0=0.0%, 4=100.0%, 8=0.0%, 16=0.0%, 32=0.0%, 64=0.0%, >=64=0.0%
   complete  : 0=0.0%, 4=100.0%, 8=0.0%, 16=0.0%, 32=0.0%, 64=0.0%, >=64=0.0%
   issued rwts: total=0,362308,0,362308 short=0,0,0,0 dropped=0,0,0,0
   latency   : target=0, window=0, percentile=100.00%, depth=1

Run status group 0 (all jobs):
WRITE: bw=8051KiB/s (8244kB/s), 8051KiB/s-8051KiB/s (8244kB/s-8244kB/s), io=1415MiB (1484MB), run=180001-180001msec

Disk stats (read/write):
sdb: ios=0/935811, merge=0/335611, ticks=0/164939, in_queue=217509, util=99.97%
After you complete the above operation, delete the testfile file in the directory to prevent the disk space from being insufficient.
[root@test001 /data/log1]# rm -rf testfileQuery the IOPS of the data storage directory.
Switch to the data storage directory and run the following command:
[root@test001 /data/1]# fio -filename=./testfile -direct=1 -iodepth 1 -thread -rw=write -ioengine=psync -bs=4k -size=20G -numjobs=1 -runtime=180 -group_reporting -name=sqe_100write_4k --fsync=1 --fallocate=posixThe returned result is as follows:
sqe_100write_4k: (g=0): rw=write, bs=(R) 4096B-4096B, (W) 4096B-4096B, (T) 4096B-4096B, ioengine=psync, iodepth=1
fio-3.34
Starting 1 thread
Jobs: 1 (f=1): [W(1)][100.0%][w=6648KiB/s][w=1662 IOPS][eta 00m:00s]
sqe_100write_4k: (groupid=0, jobs=1): err= 0: pid=145805: Thu May  8 10:39:32 2025
write: IOPS=2012, BW=8051KiB/s (8244kB/s)(1415MiB/180001msec); 0 zone resets
   clat (usec): min=84, max=3732, avg=174.51, stdev=71.93
   lat (usec): min=84, max=3732, avg=174.77, stdev=71.98
   clat percentiles (usec):
   |  1.00th=[   89],  5.00th=[   90], 10.00th=[   91], 20.00th=[   95],
   | 30.00th=[  100], 40.00th=[  141], 50.00th=[  184], 60.00th=[  210],
   | 70.00th=[  221], 80.00th=[  231], 90.00th=[  265], 95.00th=[  285],
   | 99.00th=[  351], 99.50th=[  371], 99.90th=[  441], 99.95th=[  515],
   | 99.99th=[  824]
   bw (  KiB/s): min= 3432, max=17608, per=100.00%, avg=8056.18, stdev=4234.76, samples=359
   iops        : min=  858, max= 4402, avg=2014.04, stdev=1058.69, samples=359
lat (usec)   : 100=30.58%, 250=57.09%, 500=12.28%, 750=0.04%, 1000=0.02%
lat (msec)   : 2=0.01%, 4=0.01%
fsync/fdatasync/sync_file_range:
   sync (usec): min=64, max=5690, avg=319.43, stdev=230.86
   sync percentiles (usec):
   |  1.00th=[   68],  5.00th=[   69], 10.00th=[   70], 20.00th=[   72],
   | 30.00th=[   95], 40.00th=[  194], 50.00th=[  379], 60.00th=[  412],
   | 70.00th=[  457], 80.00th=[  474], 90.00th=[  578], 95.00th=[  685],
   | 99.00th=[  996], 99.50th=[ 1205], 99.90th=[ 1336], 99.95th=[ 1385],
   | 99.99th=[ 1713]
cpu          : usr=0.86%, sys=11.80%, ctx=714705, majf=0, minf=0
IO depths    : 1=200.0%, 2=0.0%, 4=0.0%, 8=0.0%, 16=0.0%, 32=0.0%, >=64=0.0%
   submit    : 0=0.0%, 4=100.0%, 8=0.0%, 16=0.0%, 32=0.0%, 64=0.0%, >=64=0.0%
   complete  : 0=0.0%, 4=100.0%, 8=0.0%, 16=0.0%, 32=0.0%, 64=0.0%, >=64=0.0%
   issued rwts: total=0,362308,0,362308 short=0,0,0,0 dropped=0,0,0,0
   latency   : target=0, window=0, percentile=100.00%, depth=1

Run status group 0 (all jobs):
WRITE: bw=8051KiB/s (8244kB/s), 8051KiB/s-8051KiB/s (8244kB/s-8244kB/s), io=1415MiB (1484MB), run=180001-180001msec

Disk stats (read/write):
sdb: ios=0/935811, merge=0/335611, ticks=0/164939, in_queue=217509, util=99.97%
After you complete the above operation, delete the testfile file in the directory to prevent the disk space from being insufficient.
[root@test001 /data/1]# rm -rf testfile
Based on the above query results, the IOPS of each disk meets the requirements.
Configure time synchronization
When you deploy a distributed OceanBase cluster, you must ensure that the time of all servers in the cluster is synchronized. Otherwise, the cluster cannot be started, and exceptions will occur when the service is running. The maximum allowed time deviation in an OceanBase cluster is 2 seconds. If the time deviation exceeds 2 seconds, no leader will be elected. After the time synchronization is restored, you can restart the OceanBase cluster to restore the normal operation.
Note
This example shows the configuration of a single server. You must configure time synchronization for all servers in the cluster.
Install the chrony service.
[root@test001 ~]# yum -y install chronyConfigure the chrony file.
[root@test001 ~]# vim /etc/chrony.confHere is an example:
# Use Alibaba NTP server
# Public NTP
# Alicloud NTP
##Use multiple NTP servers of Alibaba Cloud to synchronize time, which improves the reliability and fault tolerance of time synchronization.
##minpoll 4 specifies that the minimum synchronization interval between the NTP client and server is 16 seconds (when the time deviation is small).
##maxpoll 10 specifies that the maximum synchronization interval between the NTP client and server is 1024 seconds (when the time deviation is large).
##iburst specifies that four NTP packets are sent quickly (every 2 seconds) when the client connects to or reconnects with the server for the first time, which accelerates time synchronization and reduces the initial synchronization time deviation.
server ntp.cloud.aliyuncs.com minpoll 4 maxpoll 10 iburst
server ntp.aliyun.com minpoll 4 maxpoll 10 iburst
server ntp1.aliyun.com minpoll 4 maxpoll 10 iburst
server ntp1.cloud.aliyuncs.com minpoll 4 maxpoll 10 iburst
server ntp10.cloud.aliyuncs.com minpoll 4 maxpoll 10 iburst
server ntp11.cloud.aliyuncs.com minpoll 4 maxpoll 10 iburst
server ntp12.cloud.aliyuncs.com minpoll 4 maxpoll 10 iburst
server ntp2.aliyun.com minpoll 4 maxpoll 10 iburst
server ntp2.cloud.aliyuncs.com minpoll 4 maxpoll 10 iburst
server ntp3.aliyun.com minpoll 4 maxpoll 10 iburst
server ntp3.cloud.aliyuncs.com minpoll 4 maxpoll 10 iburst
server ntp4.aliyun.com minpoll 4 maxpoll 10 iburst
server ntp4.cloud.aliyuncs.com minpoll 4 maxpoll 10 iburst
server ntp5.aliyun.com minpoll 4 maxpoll 10 iburst
server ntp5.cloud.aliyuncs.com minpoll 4 maxpoll 10 iburst
server ntp6.aliyun.com minpoll 4 maxpoll 10 iburst
server ntp6.cloud.aliyuncs.com minpoll 4 maxpoll 10 iburst
server ntp7.cloud.aliyuncs.com minpoll 4 maxpoll 10 iburst
server ntp8.cloud.aliyuncs.com minpoll 4 maxpoll 10 iburst
server ntp9.cloud.aliyuncs.com minpoll 4 maxpoll 10 iburst

# Ignore stratum in source selection.
stratumweight 0.05

# Record the rate at which the system clock gains/losses time.
##Calculate the rate at which the server gains or loses time based on the actual time and record it to /var/lib/chrony/drift. After the system is restarted, the system makes the best time compensation adjustment.
driftfile /var/lib/chrony/drift

# Enable kernel RTC synchronization.
##Enable a kernel mode in which the system time is copied to the real-time clock (RTC) every 11 minutes.
rtcsync

# In the first three updates, the system clock is set instead of slew
# if the adjustment is larger than 10 seconds.
makestep 10 3

# Allow NTP client access from local network.
#allow 192.168/16

# Listen for commands only on localhost.
bindcmdaddress 127.0.0.1
bindcmdaddress ::1

# Disable logging of client accesses.
noclientlog

# Send a message to syslog if a clock adjustment is larger than 0.5 seconds.
logchange 0.5

##Specify the directory of the log file.
logdir /var/log/chrony
#log measurements statistics tracking
Start the chronyd service.
Set the service to start automatically:
[root@test001 ~]# systemctl enable chronydStart the chronyd service:
[root@test001 ~]# systemctl start chronydForce synchronization of time
You must execute the following command after the initial configuration.
[root@test001 ~]# chronyc makestepView the time tracking status
[root@test001 ~]# chronyc trackingThe following example shows the return result. You must pay attention to the Last offset (the time deviation of the last synchronization) and RMS offset (the root mean square of the average time deviation) fields. You can compare the values of these fields in the execution results of each server to determine the time deviation of each server.
Reference ID    : 64643D58 (xx.xx.xx.xx)
Stratum         : 2
Ref time (UTC)  : Fri Jul 18 09:44:59 2025
System time     : 0.000022816 seconds fast of NTP time
Last offset     : -0.000012218 seconds
RMS offset      : 0.000051287 seconds
Frequency       : 6.951 ppm slow
Residual freq   : -0.000 ppm
Skew            : 0.010 ppm
Root delay      : 0.000890165 seconds
Root dispersion : 0.011471443 seconds
Update interval : 1041.4 seconds
Leap status     : Normal
User and parameter configuration
Before deployment, you also need to configure the following items:
Create a user
Note
It is not recommended to deploy OceanBase Database as the root user. We recommend that you create another user for deployment. We recommend that you use the admin user. The user must be the owner of the directories related to the database.
Configure limits.conf
Configure sysctl.conf
Disable the firewall and SELinux
obd supports using the host commands to initialize the host and the corresponding user. You can choose to configure the preceding items by using the obd commands or manually. We recommend that you configure the preceding items by using the obd commands.
Install obd
Run the following command to install obd online. You can also download the obd package from OceanBase Download Center and install it by using the package. For more information about how to install obd, see Install obd.
Note
The interactive deployment command is a new feature in obd V3.4.0. You need to install obd V3.4.0 or later.
Install yum-utils:
[root@test001 ~]$ yum install -y yum-utilsAdd the OceanBase image source:
[root@test001 ~]$ yum-config-manager --add-repo https://mirrors.aliyun.com/oceanbase/OceanBase.repoInstall obd. By default, the latest version is installed:
[root@test001 ~]$ yum install -y ob-deployConfigure the application environment:
[root@test001 ~]$ source /etc/profile.d/obd.shNote
If you want to deploy OceanBase Database Enterprise Edition, contact Technical Support to obtain the installation package. Then, run the
obd mirror clonecommand to upload the installation package to the local image library of obd. After the installation package is uploaded, you can run theobd mirror list localcommand to view the installation package in the local image library.Create and initialize a user
Note
The initialization user command is a new feature in obd V3.5.0. For more information, see the
obd host user initsection in Host commands.You also need to run the following commands to deploy and initialize users on the ODP node and other components.
[root@test001 ~]$ obd host user init -u admin --host=10.10.10.1 -p ********The following example creates and initializes the
adminuser on the10.10.10.1server. You need to configure the user to be created and initialized (-u), the IP address of the host where the user is to be created (--host), and the user password (-p) based on your actual situation.When the command is executed, obd tries to log in to the target server (
10.10.10.1) by using the specified user (for example,admin). If the connection fails, you need to enter the username and password of a user with sudo privileges. obd logs in to the target server by using the specified user and performs the following initialization operations on the specified user:Set the ulimit parameter: modify the system resource limit parameters. For more information about the parameters to be modified, see Configure limits.conf in the OceanBase Database documentation. After the user is created, you can log in to the created user on the target server and run the
ulimit -acommand to check whether the configuration takes effect.Configure password-free sudo privileges: configure the specified user with password-free sudo privileges.
Note
Configuring password-free sudo privileges facilitates operations. You can manually remove the password-free sudo privileges after the cluster is deployed.
Enable password login: ensure that the user can log in to the system by using a password.
Modify the directory owner: if the
/data/1and/data/log1directories exist on the target server, change the owner of the directories to the specified user.
Initialize the host
[root@test001 ~]$ obd host init admin 10.10.10.1 -p ********The following example uses the
adminuser to log in to the10.10.10.1server and execute the initialization operation. You need to configure the login user, the IP address of the host to be initialized, and the login user password (-p) based on your actual situation. For more information about the command, see theobd host initsection in Host commands.This command automatically modifies the kernel parameters recommended for deployment of OceanBase Database, disables the firewall and SELinux, changes the owner of the
/data/1and/data/log1directories (if they exist), and installs the network component. For more information about the kernel parameters to be modified, see Configure sysctl.conf in the OceanBase Database documentation.The output is as follows:
get system config ok
+-------------------------------------------------------------------------------------------------+
|                                   System Parameter Change List                                  |
+---------------+-------------------------------------------+---------------+---------------------+
| ip            | name                                      | current_value | expected_value      |
+---------------+-------------------------------------------+---------------+---------------------+
| 10.10.10.1    | fs.aio-max-nr                             | 65536         | 1048576             |
| 10.10.10.1    | net.core.somaxconn                        | 128           | 2048                |
| 10.10.10.1    | net.core.netdev_max_backlog               | 1000          | 10000               |
| 10.10.10.1    | net.core.rmem_default                     | 212992        | 16777216            |
| 10.10.10.1    | net.core.wmem_default                     | 212992        | 16777216            |
| 10.10.10.1    | net.core.rmem_max                         | 212992        | 16777216            |
| 10.10.10.1    | net.core.wmem_max                         | 212992        | 16777216            |
| 10.10.10.1    | net.ipv4.conf.default.rp_filter           | 0             | 1                   |
| 10.10.10.1    | net.ipv4.conf.default.accept_source_route | 1             | 0                   |
| 10.10.10.1    | net.ipv4.tcp_rmem                         | 6291456       | 4096 87380 16777216 |
| 10.10.10.1    | net.ipv4.tcp_wmem                         | 16384         | 4096 65536 16777216 |
| 10.10.10.1    | net.ipv4.tcp_max_syn_backlog              | 1024          | 16384               |
| 10.10.10.1    | net.ipv4.tcp_fin_timeout                  | 60            | 15                  |
| 10.10.10.1    | vm.min_free_kbytes                        | 67584         | 2097152             |
| 10.10.10.1    | fs.file-max                               | 3205772       | 6573688             |
| 10.10.10.1    | fs.pipe-user-pages-soft                   | 16384         | 0                   |
| 10.10.10.1    | vm.max_map_count                          | 65530         | 655360              |
| 10.10.10.1    | nofile                                    | 65535         | 655350              |
+---------------+-------------------------------------------+---------------+---------------------+
chown dir ok
modify system parameters
10.10.10.1: ( fs.aio-max-nr,net.core.somaxconn,net.core.netdev_max_backlog,net.core.rmem_default,net.core.wmem_default... ) have been successfully modified!
You must reboot the following servers to ensure the ulimit parameters take effect: (10.10.10.1).
Trace ID: f9491158-71db-11f0-81f0-00163e513302
If you want to view detailed obd logs, please run: obd display-trace f9491158-71db-11f0-81f0-00163e513302
View the admin user
[root@test001 ~]$ sudo -l -U adminThe following output indicates that the admin user has password-free sudo privileges.
Matching Defaults entries for admin on test001:
    !visiblepw, always_set_home, match_group_by_gid, always_query_group_plugin, env_reset, env_keep="COLORS DISPLAY HOSTNAME HISTSIZE
    KDEDIR LS_COLORS", env_keep+="MAIL PS1 PS2 QTDIR USERNAME LANG LC_ADDRESS LC_CTYPE", env_keep+="LC_COLLATE LC_IDENTIFICATION
    LC_MEASUREMENT LC_MESSAGES", env_keep+="LC_MONETARY LC_NAME LC_NUMERIC LC_PAPER LC_TELEPHONE", env_keep+="LC_TIME LC_ALL LANGUAGE
    LINGUAS _XKB_CHARSET XAUTHORITY", secure_path=/sbin\:/bin\:/usr/sbin\:/usr/bin

User admin may run the following commands on test001:
    (ALL) NOPASSWD: ALL
Verify whether the ulimit configuration takes effect
Run the following command as the admin user to check whether the configuration takes effect.
[admin@test001 ~]# ulimit -aThe output is as follows:
core file size          (blocks, -c) unlimited
data seg size           (kbytes, -d) unlimited
scheduling priority             (-e) 0
file size               (blocks, -f) unlimited
pending signals                 (-i) 252876
max locked memory       (kbytes, -l) 64
max memory size         (kbytes, -m) unlimited
open files                      (-n) 655350
pipe size            (512 bytes, -p) 8
POSIX message queues     (bytes, -q) 819200
real-time priority              (-r) 0
stack size              (kbytes, -s) unlimited
cpu time               (seconds, -t) unlimited
max user processes              (-u) 655360
virtual memory          (kbytes, -v) unlimited
file locks                      (-x) unlimited
The following fields need to be checked in the query results:
core file sizeindicates the maximum threshold of the core file (in blocks). This value corresponds to thecoreparameter in thelimits.confconfiguration file. Check whether the value isunlimited.open filesindicates the maximum number of open file descriptors. This value corresponds to thenofileparameter in thelimits.confconfiguration file. Check whether the value is655350.stack sizeindicates the stack size (in kilobytes). This value corresponds to thestackparameter in thelimits.confconfiguration file. Check whether the value isunlimited.max user processesindicates the maximum number of user processes. This value corresponds to thenprocparameter in thelimits.confconfiguration file. Check whether the value is655360.
Verify other configurations
You can execute the
obd host precheckcommand to check whether the host meets the requirements. This command checks whether the kernel parameters in thesysctl.conffile differ from the recommended values, whether the firewall and SELinux features are disabled, and whether the owners of the/data/1and/data/log1directories are the specified users. For more information, see the obd host precheck section in Host commands.obd host precheck admin 10.10.10.1 -p ********If all the checks pass, the output is as follows:
get system config ok
No need to change system parameters
Please run `obd host user init -u admin --host=10.10.10.1` to init user.
Please run `obd host init admin 10.10.10.1 -p *******` to init host.
Trace ID: 22baecfe-71d8-11f0-9467-00163e513302
If you want to view detailed obd logs, please run: obd display-trace 22baecfe-71d8-11f0-9467-00163e513302
If any check fails, the output will display the corresponding information. You can execute the
obd host user initorobd host initcommand to initialize the host. An example of a failed check is as follows:get system config ok [WARN] The owner of the ['/data/1', '/data/log1'] directory is not admin. No need to change system parameters Please run `obd host user init -u admin --host=10.10.10.1` to init user. Please run `obd host init admin 10.10.10.1 -p *******` to init host. Trace ID: 4dcae674-7be2-11f0-a2bc-00163e53f118 If you want to view detailed obd logs, please run: obd display-trace 4dcae674-7be2-11f0-a2bc-00163e53f118
Manually configure the tab
Create a user
It is not recommended to deploy the OceanBase cluster as the root user. We recommend that you create another user for deployment. The admin user is recommended. The user must be the owner of the directories related to the database.
Note
You also need to create deployment users for the ODP node and other component nodes based on this section.
Run the following commands to create the admin user group and the admin user.
[root@test001 ~]# useradd -U admin -d /home/admin -s /bin/bashRun the following command to set a password for the
adminuser.[root@test001 ~]# passwd adminSet the sudo permissions for the
adminuser.Note
Granting the admin user sudo permissions is not mandatory. It is optional and can be done based on enterprise security standards.
Add write permissions to the
/etc/sudoersfile:[root@test001 ~]# chmod u+w /etc/sudoersRun the following command to open the
/etc/sudoersfile:[root@test001 ~]# vim /etc/sudoersAdd the following content at the end of the
/etc/sudoersfile:## Same thing without a password # %wheel ALL=(ALL) NOPASSWD: ALL admin ALL=(ALL) NOPASSWD: ALLCheck the admin user.
sudo -l -U adminIf the output is as follows, the admin user has sudo permissions without a password.
Matching Defaults entries for admin on test001:
    !visiblepw, always_set_home, match_group_by_gid, always_query_group_plugin, env_reset, env_keep="COLORS DISPLAY HOSTNAME HISTSIZE
    KDEDIR LS_COLORS", env_keep+="MAIL PS1 PS2 QTDIR USERNAME LANG LC_ADDRESS LC_CTYPE", env_keep+="LC_COLLATE LC_IDENTIFICATION
    LC_MEASUREMENT LC_MESSAGES", env_keep+="LC_MONETARY LC_NAME LC_NUMERIC LC_PAPER LC_TELEPHONE", env_keep+="LC_TIME LC_ALL LANGUAGE
    LINGUAS _XKB_CHARSET XAUTHORITY", secure_path=/sbin\:/bin\:/usr/sbin\:/usr/bin

User admin may run the following commands on test001:
    (ALL) NOPASSWD: ALL
Set the directory permissions.
The user for deploying OceanBase Database must be the owner of the directories related to the database. Run the following command to change the owner of the directory corresponding to the disk mount to admin.
[root@test001 ~]# chown -R admin:admin /data/log1
[root@test001 ~]# chown -R admin:admin /data/1
Verify the directory permissions.
Switch to the
/datadirectory to check the directory permissions.[root@test001 /data]# ls -alIf the output is as follows, the owners of the
/data/1and/data/log1directories are admin.total 20 drwxr-xr-x 5 root root 4096 Apr 29 15:39 . dr-xr-xr-x. 20 root root 4096 Apr 29 15:39 .. drwxr-xr-x 2 root root 4096 Apr 28 15:28 0 drwxr-xr-x 3 admin admin 4096 Apr 29 15:25 1 drwxr-xr-x 3 admin admin 4096 Apr 29 15:25 log1
Configure limits.conf
Configure the limits.conf file as the admin user. The specific steps are as follows:
Run the following command to open the
/etc/security/limits.conffile for configuration.[admin@test001 ~]# sudo vim /etc/security/limits.confAdd the following content to the
/etc/security/limits.conffile:* soft nofile 655350 * hard nofile 655350 * soft stack unlimited * hard stack unlimited * soft nproc 655360 * hard nproc 655360 * soft core unlimited * hard core unlimitedReboot the server.
[admin@test001 ~]# sudo rebootConnect to the server again and run the following command to check whether the configuration takes effect.
[admin@test001 ~]# ulimit -aThe output is as follows:
core file size          (blocks, -c) unlimited
data seg size           (kbytes, -d) unlimited
scheduling priority             (-e) 0
file size               (blocks, -f) unlimited
pending signals                 (-i) 252876
max locked memory       (kbytes, -l) 64
max memory size         (kbytes, -m) unlimited
open files                      (-n) 655350
pipe size            (512 bytes, -p) 8
POSIX message queues     (bytes, -q) 819200
real-time priority              (-r) 0
stack size              (kbytes, -s) unlimited
cpu time               (seconds, -t) unlimited
max user processes              (-u) 655360
virtual memory          (kbytes, -v) unlimited
file locks                      (-x) unlimited
The following fields need to be checked in the query results:
core file sizeindicates the maximum threshold of the core file (in blocks). This value corresponds to thecoreparameter in thelimits.confconfiguration file. Check whether the value isunlimited.open filesindicates the maximum number of open file descriptors. This value corresponds to thenofileparameter in thelimits.confconfiguration file. Check whether the value is655350.stack sizeindicates the stack size (in kilobytes). This value corresponds to thestackparameter in thelimits.confconfiguration file. Check whether the value isunlimited.max user processesindicates the maximum number of user processes. This value corresponds to thenprocparameter in thelimits.confconfiguration file. Check whether the value is655360.
Configure sysctl.conf
Run the following command as the admin user to open the /etc/sysctl.conf file:
[admin@test001 ~]# sudo vim /etc/sysctl.conf
Add the following content to the /etc/sysctl.conf file:
# for oceanbase

## Modify the kernel's asynchronous I/O limit

fs.aio-max-nr = 1048576

## Optimize the network

net.core.somaxconn = 2048
net.core.netdev_max_backlog = 10000
net.core.rmem_default = 16777216
net.core.wmem_default = 16777216
net.core.rmem_max = 16777216
net.core.wmem_max = 16777216

net.ipv4.ip_forward = 0
net.ipv4.conf.default.rp_filter = 1
net.ipv4.conf.default.accept_source_route = 0
net.ipv4.tcp_syncookies = 1
net.ipv4.tcp_rmem = 4096 87380 16777216
net.ipv4.tcp_wmem = 4096 65536 16777216
net.ipv4.tcp_max_syn_backlog = 16384
net.ipv4.tcp_fin_timeout = 15
net.ipv4.tcp_slow_start_after_idle=0

vm.swappiness = 0
vm.min_free_kbytes = 2097152
vm.overcommit_memory = 0

fs.file-max = 6573688
fs.pipe-user-pages-soft = 0

# Modify the number of virtual memory areas that can be allocated to a process

vm.max_map_count = 655360

# Set the file name format and directory for core files

kernel.core_pattern = /data/core-%e-%p-%t
After you change the configuration, run the following command to load the configuration and make it take effect.
[admin@test001 ~]# sudo sysctl -p
Note
When the kernel parameter net.ipv4.ip_forward is set to 0, the IP forwarding feature of the system is disabled. When OceanBase Database is deployed together with other Docker containers on the same host, this setting will block communication between the containers and the external network, as Docker containers rely on the host's IP forwarding for network connectivity. We recommend that you enable IP forwarding by running the following commands:
- Temporarily enable IP forwarding:
sysctl -w net.ipv4.ip_forward=1 - Permanently enable IP forwarding: Add the line
net.ipv4.ip_forward=1to the/etc/sysctl.conffile, save the changes, and then runsysctl -pto apply the configuration.
Disable the firewall and SELinux
Continue to perform the following operations as the admin user to disable the firewall and SELinux.
Disable the firewall
Run the following commands in sequence to disable the firewall:
[admin@test001 ~]# sudo systemctl disable firewalld
[admin@test001 ~]# sudo systemctl stop firewalld
After the firewall is disabled, run the
systemctl status firewalldcommand to check the firewall status. The output is as follows:firewalld.service - firewalld - dynamic firewall daemon Loaded: loaded (/usr/lib/systemd/system/firewalld.service; disabled; vendor preset: enabled) Active: inactive (dead) Docs: man:firewalld(1)Disable SELinux
Run the following command to open the
/etc/selinux/configconfiguration file:[admin@test001 ~]# sudo vim /etc/selinux/configModify the corresponding configuration item in the
/etc/selinux/configconfiguration file to the following content:SELINUX=disabledRun the following command or restart the server to make the changes take effect:
[admin@test001 ~]# setenforce 0Run the following command to check whether the changes take effect:
sestatusIf the return result is as follows, SELinux is disabled.
SELinux status: disabled
Configure password-free SSH login
As the admin user, configure password-free SSH login from the host where obd is located (the control node) to the local host and to each component node.
Note
ODP nodes and other component nodes also need to configure password-free SSH login from the control node to each node.
Configuring password-free SSH login is for convenience. If the admin user passwords on all nodes are the same, you can skip this step and log in by using the password.
Check whether the key exists on the control node.
[admin@test001 ~]# ls ~/.ssh/id_rsa.pub(Optional) Generate an SSH public key and private key
If no key exists on the host where obd is located, run the following command to generate an SSH public key and private key. Press the keyboard Enter key to use the default values.
[admin@test001 ~]# ssh-keygen -t rsaCopy the public key to the
authorized_keysfile on the OBServer node host.[admin@test001 ~]# ssh-copy-id -i ~/.ssh/id_rsa.pub admin@10.10.10.1You need to copy the public key to the control node host and to the host of each cluster node. In this example, the public key is copied to the
10.10.10.1host.
Configure load balancing
Starting from V3.3.0, obd supports configuring load balancing (VIP/DNS) when deploying ODP through the graphical interface. If you plan to deploy multiple ODP nodes, you can configure load balancing for ODP as described in this section.
F5 BIG-IP Local Traffic Manager (LTM) is an application traffic management system that allows you to connect multiple ODP nodes to F5 to achieve load balancing for ODP. Follow the steps below to use LTM's Layer 4 functionality to configure the port for ODP's external service.
Note
Before you perform the operations in this section, make sure that you have completed the configuration of F5 BIG-IP and activated the license. You have confirmed the IP address of F5 (the default IP address is 192.168.1.245). You have also confirmed the IP address and port of the ODP server.
Log in to F5 BIG-IP by entering the username and password. The default username and password are
admin/admin.
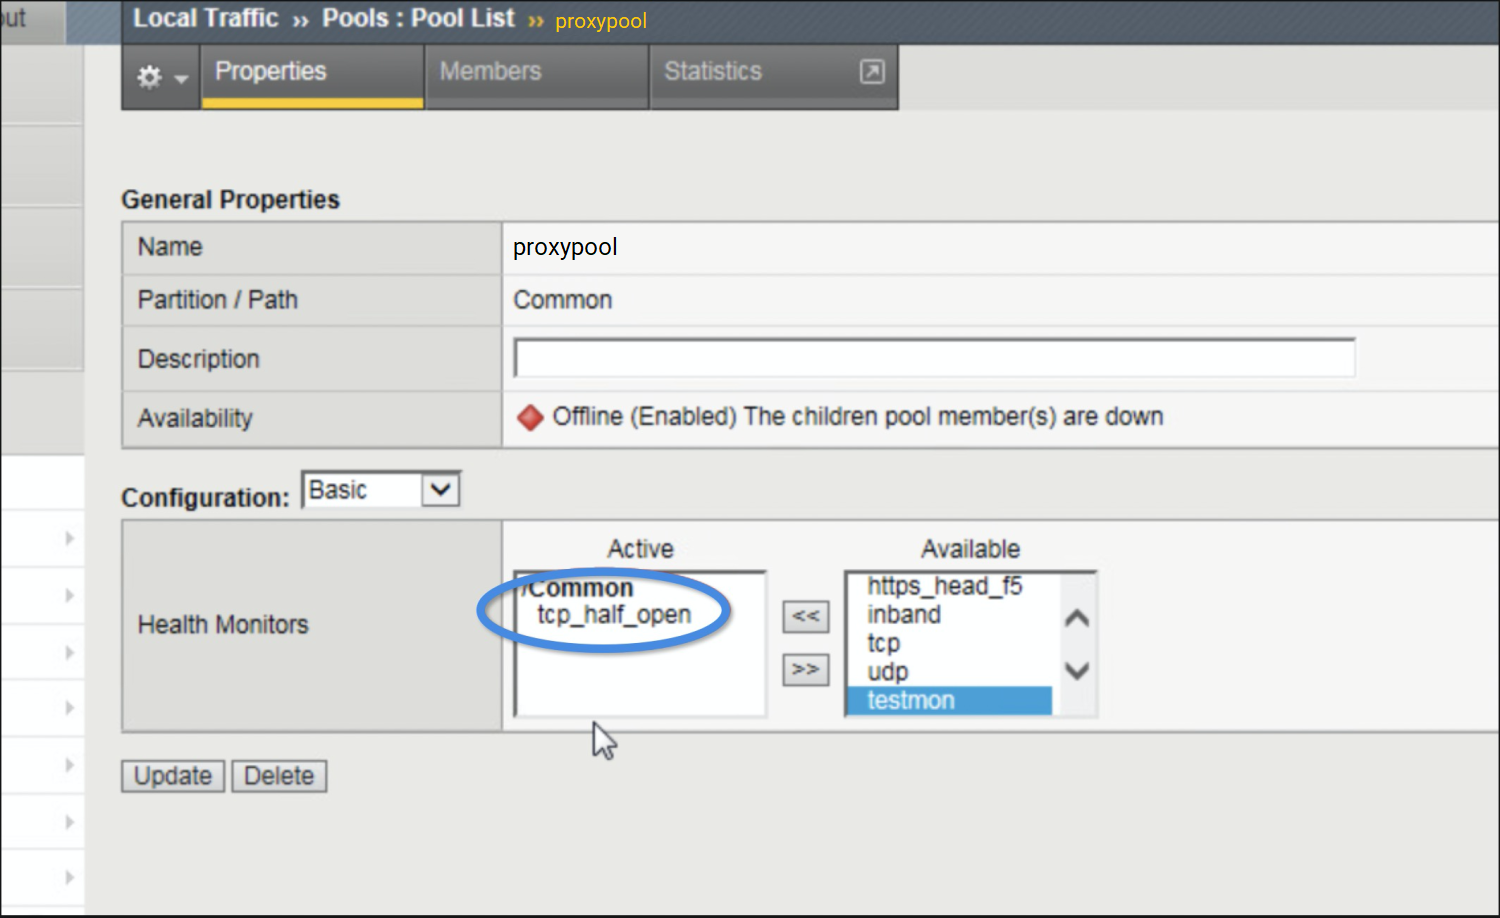
Create Pools :
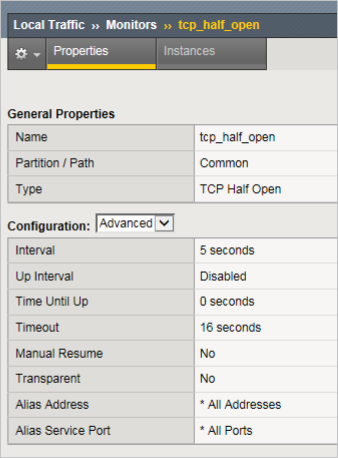
Click Local Traffic>Monitors and add a Monitor of the TCP Half Open type.
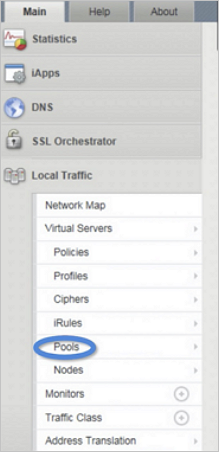
Click Local Traffic>Pools and click + to create a new Pool.
In the Available list, select the Monitor created in step a and add it to the Active list.
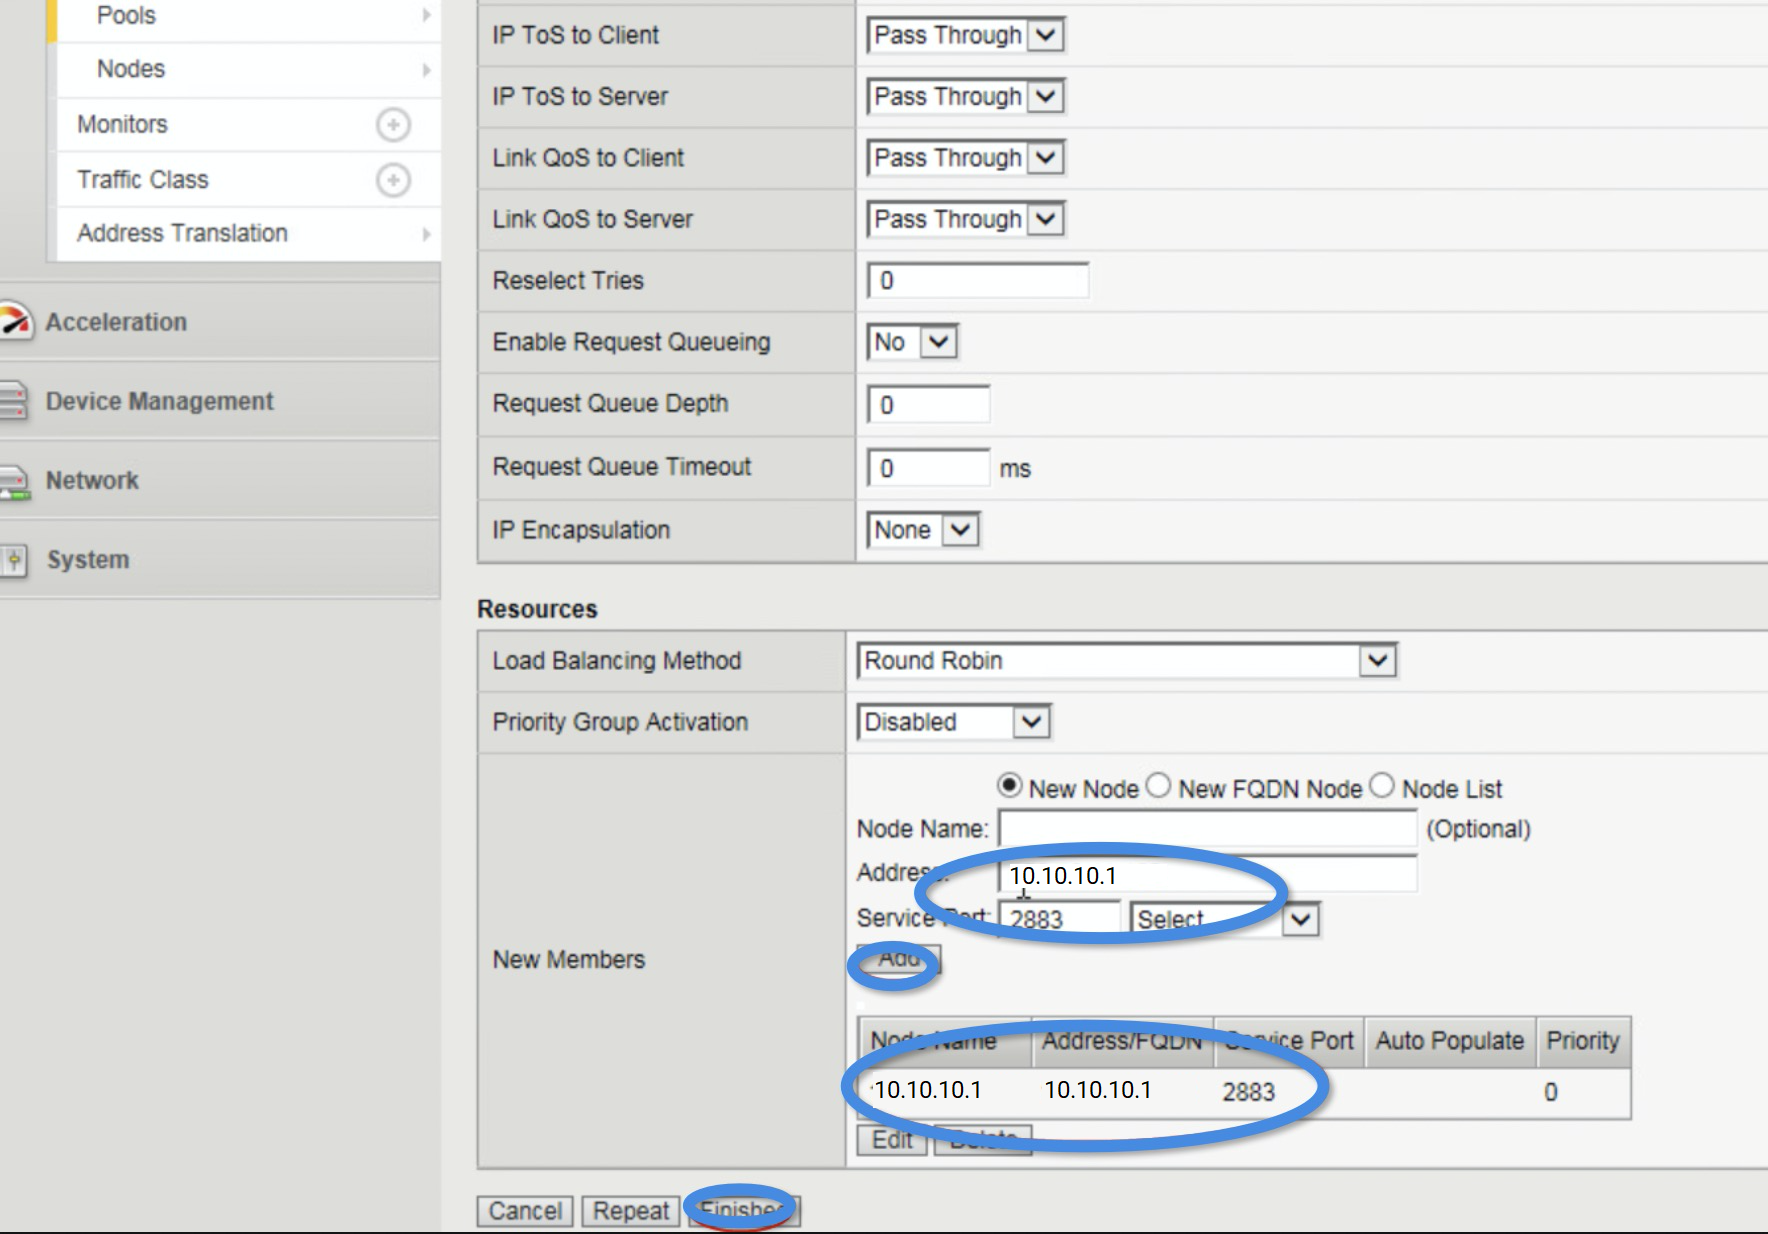
Scroll down and click New Node. Enter the IP address and port of the ODP server in the Address and Service Port fields, respectively.
Click Add to add multiple nodes. After you add all the nodes, click Finished.
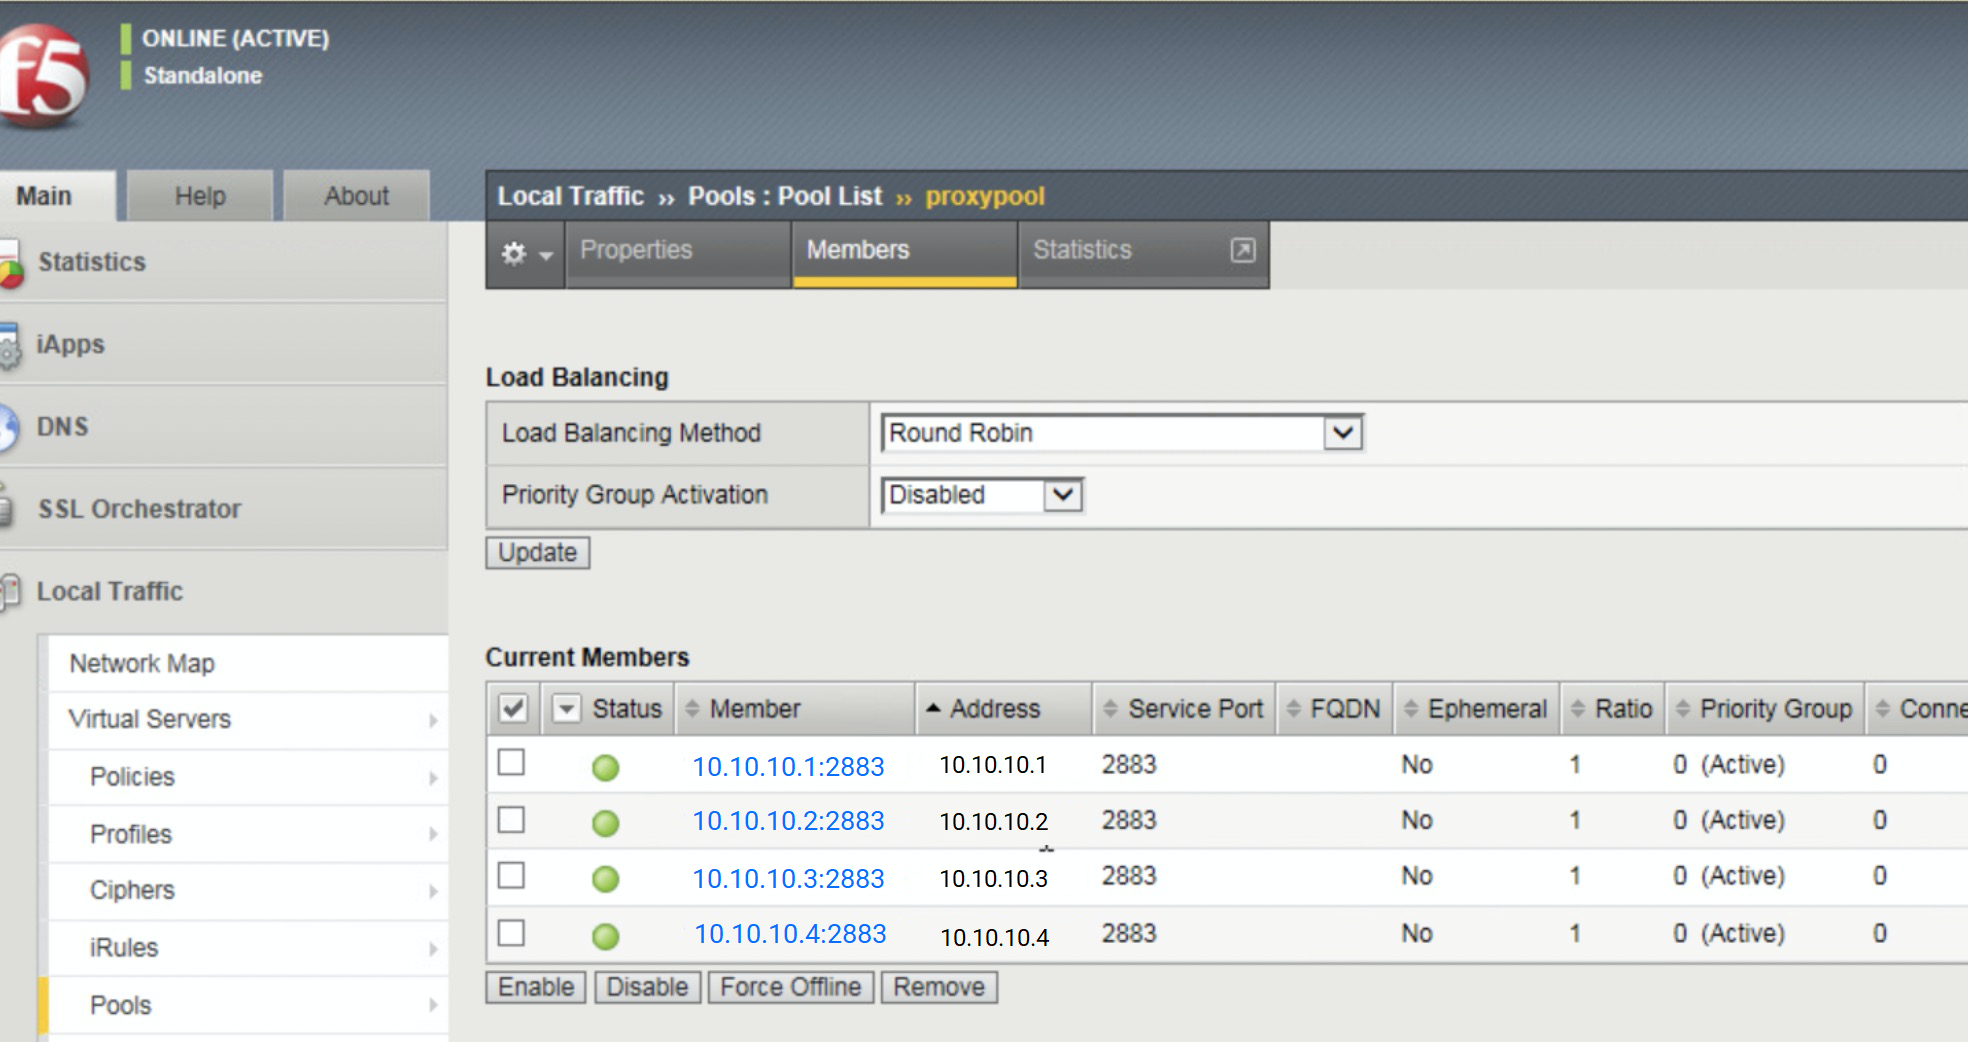
On the Local Traffic>Pools>Pool List page, check whether the Status column of each Member is green. If so, the nodes are added successfully.
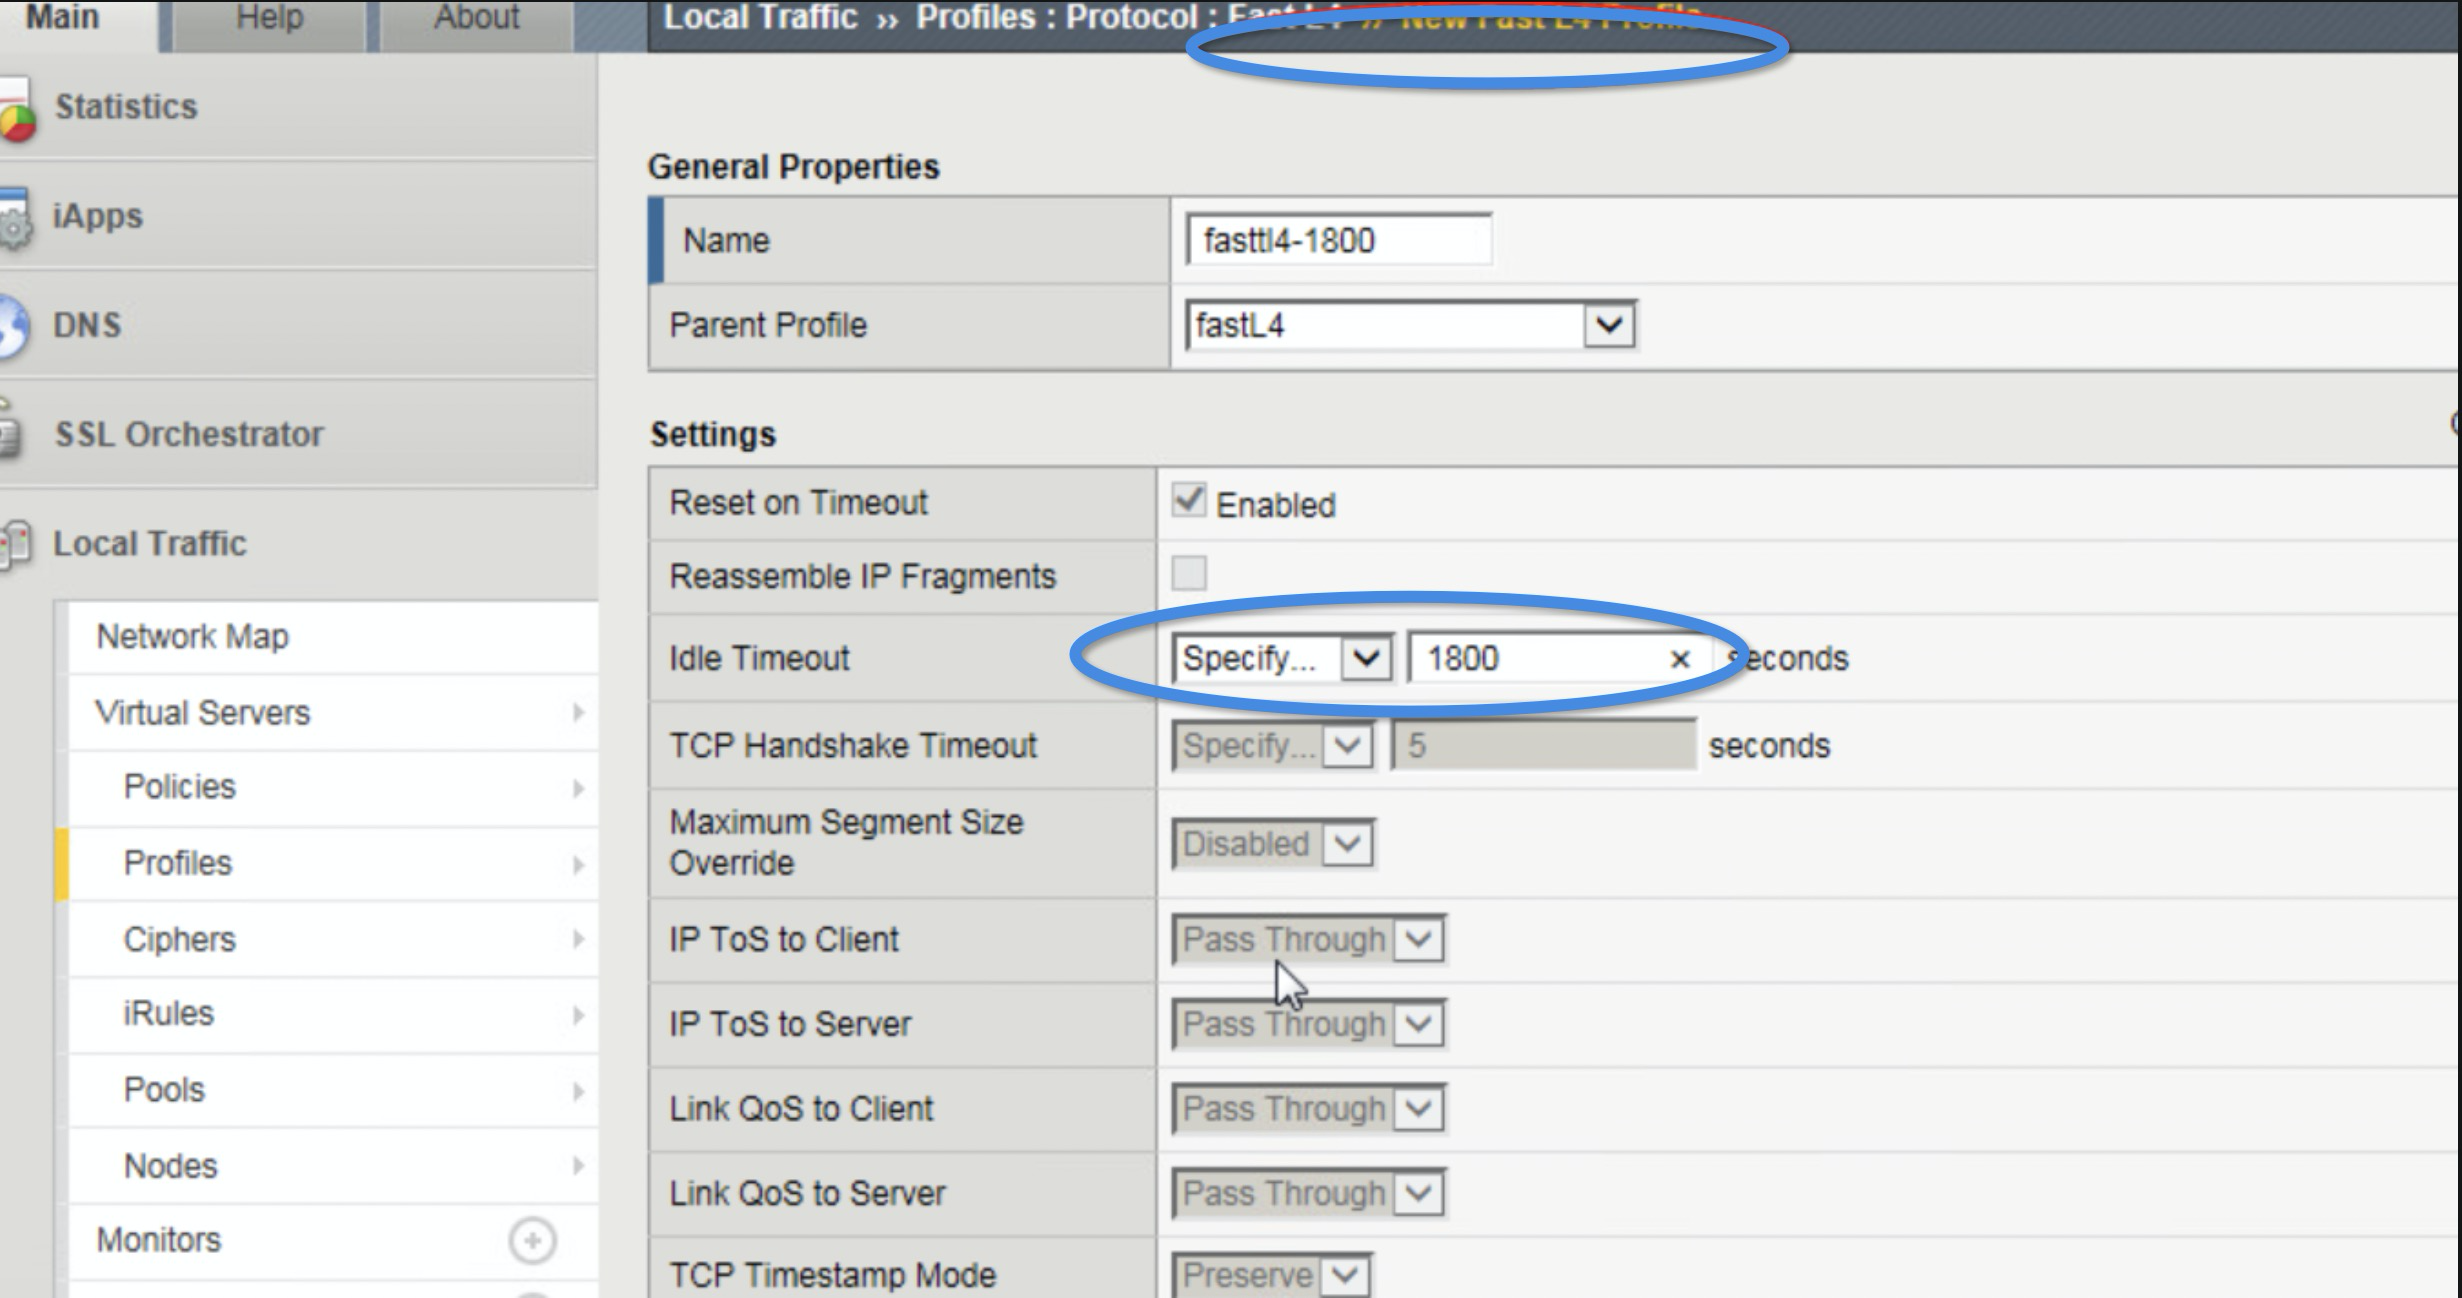
Click Local Traffic>Profiles>FastL4 and add a new Profile. Set the Type to Performance(Layer 4) for the Layer 4 mode. Do not enable session persistence. Set Idle Timeout to a value greater than or equal to 1800 seconds.
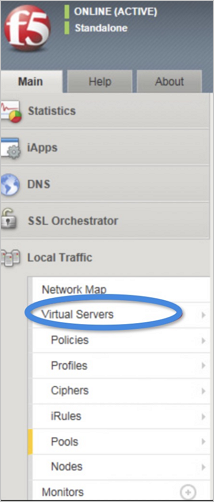
Click Local Traffic>Virtual Servers and add a new Server.
Enter the following information.
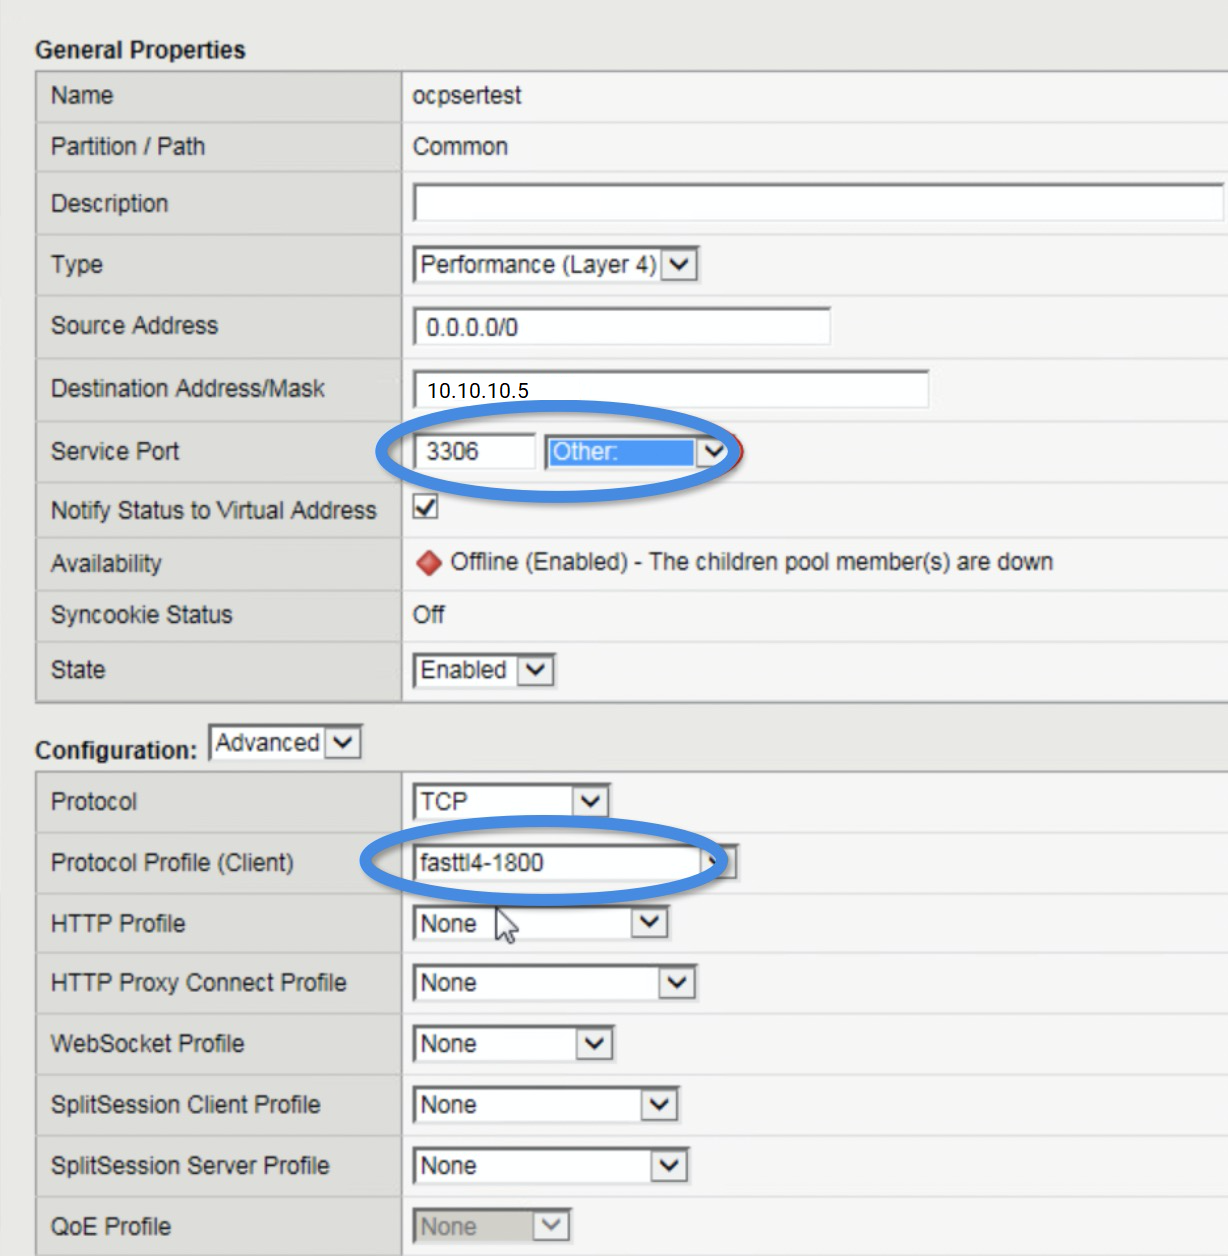 ParameterDescription
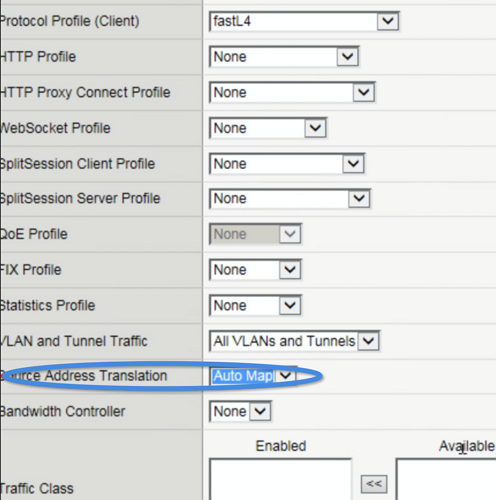
Type Performance(Layer 4) Source Address 0.0.0.0/0 Destination Address/Mask F5 VIP or Self IP, for example, 10.10.10.5 Service Port Port, which is customer-defined. Protocol Profile(Client) The profile added in step 3. In the drop-down list, select Auto Map for Source Address Translation.
In the Default Pool drop-down list, select the pool created in step 2.
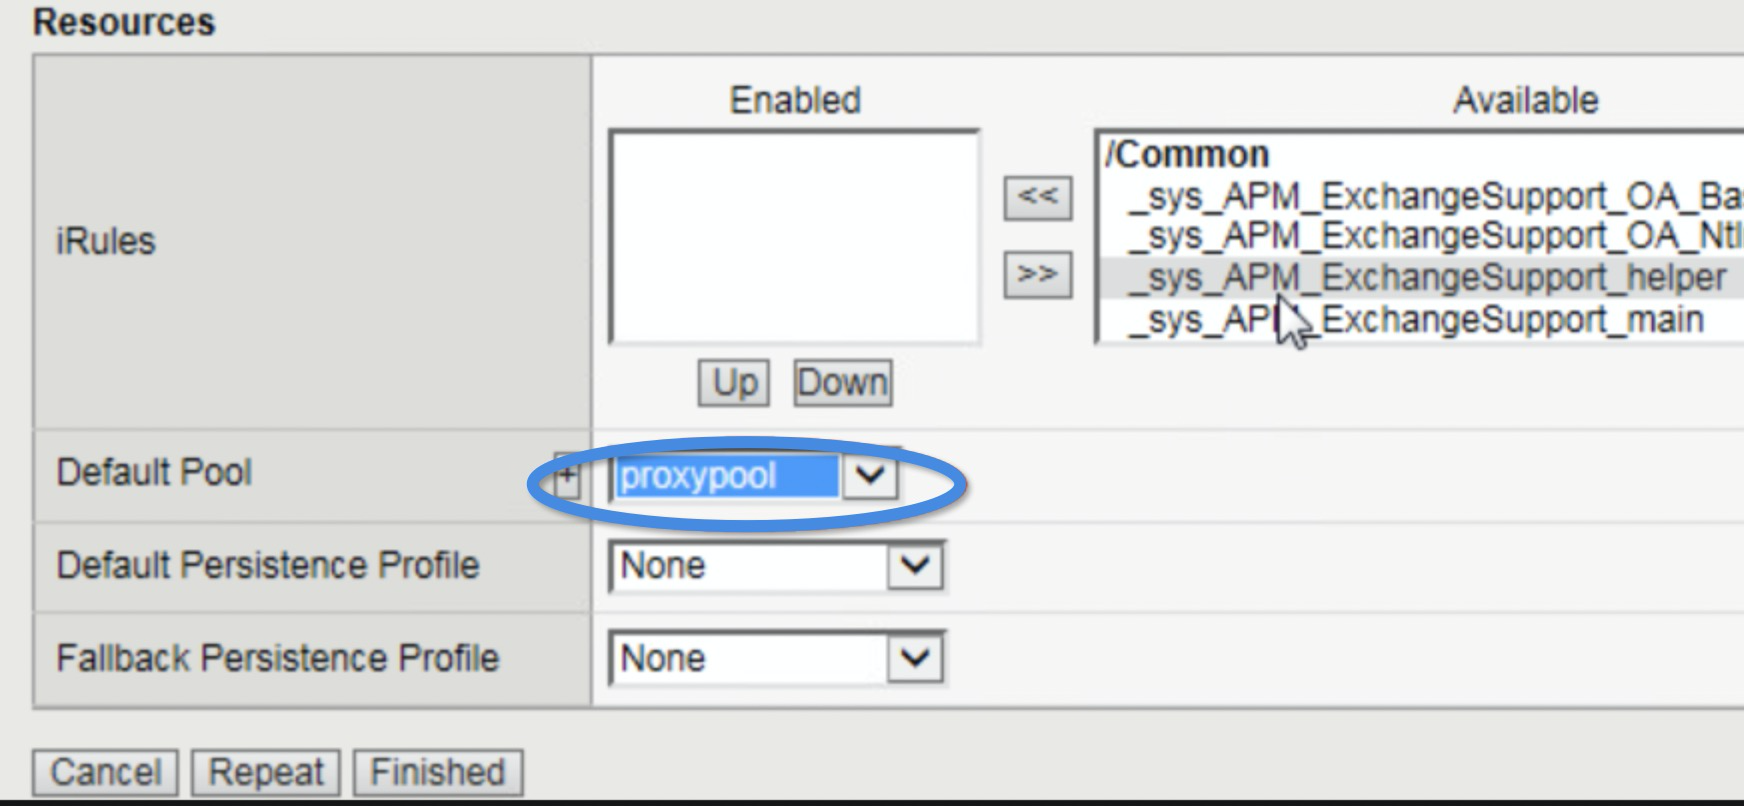
Click Finished.
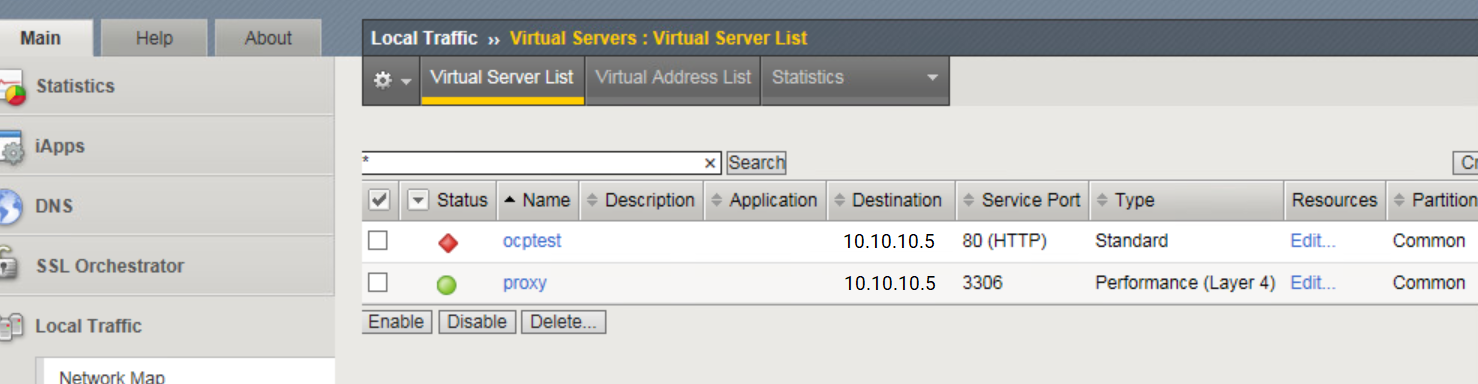
On the Local Traffic>Virtual Servers page, check whether the icon in the Status column of the Virtual Server List tab is green. If so, the virtual server is created.
After the cluster is created, select a host that is connected to the network of F5 and ODP. Run the
telnet 10.10.10.1 2883andtelnet 10.10.10.5 3306commands. If the following content is returned, ODP is successfully connected to F5.Connected to xx.xx.x.xxx.Escape character is '^]'.
Deploy the cluster by using the obd configuration file
(Optional) Install obd.
Note
If the user and parameter configuration section is configured manually, you must install obd by following this step.
Run the following command to install obd online. You can also download the obd package from OceanBase Download Center and install it from the package. For more information about how to install obd, see Install obd.
Install yum-utils:
[admin@test001 ~]$ sudo yum install -y yum-utilsAdd the OceanBase image source:
[admin@test001 ~]$ sudo yum-config-manager --add-repo https://mirrors.aliyun.com/oceanbase/OceanBase.repoInstall obd. By default, the latest version is installed:
[admin@test001 ~]$ sudo yum install -y ob-deployConfigure the application environment:
[admin@test001 ~]$ source /etc/profile.d/obd.shNote
If you want to deploy OceanBase Database Enterprise Edition, contact Technical Support to obtain the installation package and run the
obd mirror clonecommand to upload it to the local image library of obd. After the package is uploaded, you can run theobd mirror list localcommand to view the installation packages in the local image library.Create a configuration file.
[admin@test001 ~]$ vim obtest.yamlEnter the following content in the configuration file:
user:
  username: admin
  # password: ********
  key_file: /home/admin/.ssh/id_rsa
oceanbase-ce:
  # version: 4.3.4.2
  # package_hash: 0778757f3625ec77948e28c741829d60ea89e29b3292986dd087350955306669
  servers:
    - name: server1
      # Please don't use hostname, only IP can be supported
      ip: 10.10.10.1
    - name: server2
      ip: 10.10.10.2
    - name: server3
      ip: 10.10.10.3
  global:
    memory_limit: 32G # The maximum running memory for an observer
    system_memory: 10G
    datafile_size: 200G # Size of the data file.
    datafile_next: 200G # the auto extend step. Please enter an capacity, such as 2G
    datafile_maxsize: 1T # the auto extend max size. Please enter an capacity, such as 20G
    log_disk_size: 1T # The size of disk space used by the clog files.
    scenario: htap
    production_mode: true
    enable_syslog_wf: false # Print system logs whose levels are higher than WARNING to a separate log file. The default value is true.
    max_syslog_file_count: 16 # The maximum number of reserved log files before enabling auto recycling. The default value is 0.
    enable_auto_start: true
    install_utils: true
    root_password: ****** # root user password
    proxyro_password: ****** # proxyro user password, consistent with obproxy's observer_sys_password, can be empty
  server1:
    mysql_port: 2881 # External port for OceanBase Database. The default value is 2881. DO NOT change this value after the cluster is started.
    rpc_port: 2882 # Internal port for OceanBase Database. The default value is 2882. DO NOT change this value after the cluster is started.
    obshell_port: 2886 # Operation and maintenance port for OceanBase Database.
    # The working directory for OceanBase Database. OceanBase Database is started under this directory. This is a required field.
    home_path: /home/admin/obtest/observer
    # The directory for data storage. The default value is $home_path/store.
    data_dir: /data/1/obtest
    # The directory for clog, ilog, and slog. The default value is the same as the data_dir value.
    redo_dir: /data/log1/obtest
    zone: zone1
  server2:
    mysql_port: 2881 # External port for OceanBase Database. The default value is 2881. DO NOT change this value after the cluster is started.
    rpc_port: 2882 # Internal port for OceanBase Database. The default value is 2882. DO NOT change this value after the cluster is started.
    #  The working directory for OceanBase Database. OceanBase Database is started under this directory. This is a required field.
    home_path: /home/admin/obtest/observer
    # The directory for data storage. The default value is $home_path/store.
    data_dir: /data/1/obtest
    # The directory for clog, ilog, and slog. The default value is the same as the data_dir value.
    redo_dir: /data/log1/obtest
    zone: zone2
  server3:
    mysql_port: 2881 # External port for OceanBase Database. The default value is 2881. DO NOT change this value after the cluster is started.
    rpc_port: 2882 # Internal port for OceanBase Database. The default value is 2882. DO NOT change this value after the cluster is started.
    #  The working directory for OceanBase Database. OceanBase Database is started under this directory. This is a required field.
    home_path: /home/admin/obtest/observer
    # The directory for data storage. The default value is $home_path/store.
    data_dir: /data/1/obtest
    # The directory for clog, ilog, and slog. The default value is the same as the data_dir value.
    redo_dir: /data/log1/obtest
    zone: zone3
obproxy-ce:
  # version: 4.3.4.0
  # package_hash: 5c5dca3a355cc7286146ed978ebb26a6342e42e02cd3ca8b9739d300519a449f
  depends:
    - oceanbase-ce
  servers:
    - name: server1
      # Please don't use hostname, only IP can be supported
      ip: 10.10.10.1
    - name: server2
      ip: 10.10.10.2
    - name: server3
      ip: 10.10.10.3
  global:
    prometheus_listen_port: 2884
    listen_port: 2883
    rpc_listen_port: 2885
    # vip_address: "10.10.10.5"
    # vip_port: 3306
    enable_obproxy_rpc_service: true
    home_path: /home/admin/obtest/obproxy
    obproxy_sys_password: ********
    observer_sys_password: ********
    skip_proxy_sys_private_check: true
    enable_strict_kernel_release: false
    enable_cluster_checkout: false
    proxy_id: 822
    client_session_id_version: 2
obagent:
  depends:
    - oceanbase-ce
  # The list of servers to be monitored. This list is consistent with the servers in oceanbase-ce.
  servers:
    - name: server1
      ip: 10.10.10.1
    - name: server2
      ip: 10.10.10.2
    - name: server3
      ip: 10.10.10.3
  global:
    monagent_http_port: 8088
    mgragent_http_port: 8089
    home_path: /home/admin/obagent
    http_basic_auth_password: ********
prometheus:
  servers:
    - 10.10.10.4
  depends:
    - obagent
  global:
    port: 9090
    # The working directory for prometheus. prometheus is started under this directory. This is a required field.
    home_path: /home/admin/prometheus
    basic_auth_users: #<username>: <password>, the key is the user name and the value is the password.
      admin: ********
grafana:
  servers:
    - 10.10.10.4
  depends:
    - prometheus
  global:
    port: 3000
    login_password: ********
    home_path: /home/admin/grafana
During the deployment, pay attention to the following configurations:
ModuleParameterRequiredDefault valueDescriptionGeneral version Optional The latest version in the image library. If you want to deploy a specific version of the component, you can specify the component version through this parameter. package_hash Optional The latest version in the image library. If you want to deploy a specific component installation package, you can specify the hash of the component installation package through this parameter. depends Optional N/A Specify the dependencies of the component. If the component has dependencies, this parameter is required. servers Required N/A For each server, specify - name: server name (press Enter) ip: server IP address. If you specify multiple servers, specify this parameter multiple times. Server names must be unique.
If server IP addresses are unique, you can also specify- <ip> (press Enter) - <ip>. In this case,- <ip>is equivalent to- name: server IP address (press Enter) ip: server IP address.Notice
If you plan to deploy the obagent component, the
serversparameter under the obagent component must be consistent with those of OceanBase Database.home Required N/A Specify the installation path of each component. user username Required N/A Specify the username for deployment. The obd tool uses this username to deploy the component on the planned OBServer node. Make sure that the username exists on the OBServer node and has execution and read/write permissions on all directories specified in the configuration file. password Optional N/A passwordandkey_fileare both used to verify the user. Only one of them can be specified. If you specifypassword, make sure that the password of the corresponding user on the planned OBServer node is the same as the specified one.key_file Optional N/A passwordandkey_fileare both used to verify the user. Only one of them can be specified. If you specifykey_file, make sure that the SSH password-free login from the central control server to the corresponding user on the OBServer node is configured.oceanbase-ce memory_limit Optional 0 Specify the maximum memory that the observer process can obtain from the environment. If this parameter is not specified, the value of the memory_limit_percentageparameter is used. For more information, see memory_limit and memory_limit_percentage.system_memory Optional 0M Specify the reserved memory capacity for the system. The reserved memory cannot be allocated to ordinary tenants. The value of this parameter occupies the memory specified by memory_limit. If this parameter is not specified, OceanBase Database automatically adapts to the system.datafile_size Optional 0 Specify the size of the data file (block_file) of the corresponding node. If this parameter is not specified, the value of the datafile_disk_percentageparameter is used. For more information, see datafile_size and datafile_disk_percentage.Note
OceanBase Database supports automatic expansion of disk data files. To use this feature, you must set
datafile_next(the expansion step) anddatafile_maxsize(the maximum space for expansion). For more information, see Configure dynamic expansion of disk data files.log_disk_size Optional 0 Specify the size of the Redo log disk, that is, the total space available for the OBServer node. If this parameter is not specified, the value of the log_disk_percentageparameter is used. For more information, see log_disk_size and log_disk_percentage.production_mode Required true Specify whether to set the cluster to production mode. The default value is true, indicating that the cluster is in production mode. If you set this parameter totrue, the value ofmemory_limitmust be at least16G, and the value of__min_full_resource_pool_memory(the minimum memory limit for resource pools) must be at least2147483648. If the resources of the server cannot meet the requirements, set this parameter tofalse.enable_auto_start Optional 0 Specify whether to enable the auto-start feature of the observer process. If you set this parameter to true, the observer process is automatically started when the OBServer node restarts.Note
To enable the auto-start feature of the observer process, make sure that the deployment user has sudo privileges.
install_utils Optional false Specify whether to install the oceanbase-ce-utils package. After you install the oceanbase-ce-utils package, you can view the directories of OceanBase Utils (such as ob_admin,ob_error, andoblogminer) in thebindirectory of the installation directory of OceanBase Database. If you set this parameter totrue, you cannot modify it tofalseby using theobd cluster edit-configcommand. In other words, you cannot uninstall the oceanbase-ce-utils package by using the obd command.root_password Optional A random string The password of the super administrator (root@sys) of the OceanBase cluster. We recommend that you set a complex password. If you deploy OceanBase Database by using obd V2.1.0 or later, a random string is automatically generated if this parameter is not specified. After the deployment is completed, you can run the obd cluster edit-configcommand to view the corresponding parameter in the configuration file and obtain the password.proxyro_password Optional A random string The password of the account (proxyro@sys) used to connect to the OceanBase cluster by using ODP. After you specify this parameter, a proxyrouser is created in the sys tenant of OceanBase Database. If you deploy OceanBase Database by using obd V2.1.0 or later, a random string is automatically generated if this parameter is not specified. After the deployment is completed, you can run theobd cluster edit-configcommand to view the corresponding parameter in the configuration file and obtain the password.mysql_port Required 2881 Specify the port number of the SQL service protocol. The value ranges from [1025, 65535]. The default value is 2881. If you want each OBServer node to use the same port, you can directly specify this parameter in theglobalmodule. Otherwise, you can specify this parameter separately for each OBServer node, as shown in the example in this topic.rpc_port Required 2882 Specify the port number of the remote access protocol. This is the RPC communication port between the observer process and the processes of other nodes. The value ranges from [1025, 65535]. The default value is 2882. If you want each OBServer node to use the same port, you can directly specify this parameter in theglobalmodule. Otherwise, you can specify this parameter separately for each OBServer node, as shown in the example in this topic.obshell_port Required 2886 Specify the port number of the OceanBase Database O&M service. The value ranges from [1025, 65535]. The default value is 2886. If you want each OBServer node to use the same port, you can directly specify this parameter in theglobalmodule. Otherwise, you can specify this parameter separately for each OBServer node, as shown in the example in this topic.data_dir Optional $home_path/store Specify the directory for storing data such as SSTables. We recommend that you configure an independent disk for this parameter and make sure that the deployment user has execution and read/write permissions on the directory. If you want each OBServer node to use the same directory, you can directly specify this parameter in the globalmodule. Otherwise, you can specify this parameter separately for each OBServer node, as shown in the example in this topic.redo_dir Optional The same as data_dirby defaultSpecify the directory for storing clogs. We recommend that you configure an independent disk for this parameter and make sure that the deployment user has execution and read/write permissions on the directory. If you want each OBServer node to use the same directory, you can directly specify this parameter in the globalmodule. Otherwise, you can specify this parameter separately for each OBServer node, as shown in the example in this topic.obproxy-ce listen_port Required 2883 Specify the listening port of ODP. The value ranges from [1025, 65535]. The default value is 2883.prometheus_listen_port Required 2884 Specify the listening port of ODP for Prometheus. The value ranges from [1025, 65535]. The default value is 2884.rpc_listen_port Required 2885 Specify the listening port of the RPC service of ODP. The value ranges from [1025, 65535]. The default value is 2885.Note
This parameter takes effect only when you deploy ODP V4.3.0 or later and set
enable_obproxy_rpc_servicetotrue.vip_address Optional N/A If you deploy multiple ODP nodes, you can specify the IP address of the VIP through this parameter. Notice
obd does not support load balancing. If you want to set up load balancing, deploy and configure the corresponding load balancer in advance.
vip_port Optional N/A If you deploy multiple ODP nodes, you can specify the access port of the VIP through this parameter. Notice
obd does not support load balancing. If you want to set up load balancing, deploy and configure the corresponding load balancer in advance.
enable_obproxy_rpc_service Optional true Specify whether to enable the RPC service of ODP. The default value is true, indicating that the RPC service is enabled.Note
This parameter takes effect only when you deploy ODP V4.3.0 or later.
- If you do not specify this parameter, the default value of this parameter is set to
falseafter ODP is upgraded.
obproxy_sys_password Optional A random string The password of the ODP administrator account (root@proxysys). If you deploy OceanBase Database by using obd V2.1.0 or later, a random string is automatically generated if this parameter is not specified. After the deployment is completed, you can run the obd cluster edit-configcommand to view the corresponding parameter in the configuration file and obtain the password.observer_sys_password Optional When OceanBase Database is deployed together with ODP, the default value is the same as that of proxyro_password. When ODP is deployed separately, the default value is a random string.The password of the account (proxyro@sys) used to connect to the OceanBase cluster by using ODP. The password must be the same as the value of proxyro_passwordin OceanBase Database. If the password is different from that ofproxyro_password, ODP cannot connect to OceanBase Database after the cluster is deployed.proxy_id Optional 0 Specify the ID of ODP to ensure that the Client Session IDs generated by different ODPs do not conflict. If multiple ODPs connect to the same OceanBase cluster, the proxy_idparameters of different ODPs cannot be set to the same value.- If the value of the
client_session_id_versionparameter is1, the value of this parameter ranges from [0,255]. - If the value of the
client_session_id_versionparameter is2, the value of this parameter ranges from [0,8191].
client_session_id_version Optional 2 Specify whether to use the new Client Session ID generation logic. The value can be set to 1or2. If you set this parameter to2, the new Client Session ID generation logic is used.Deploy an OceanBase cluster
obd cluster deploy obtest -c obtest.yamlStart the OceanBase cluster
obd cluster start obtestAfter the cluster is started, the information of each component in the cluster is output. Here is an example:
Connect to observer 10.10.10.1:2881 ok
Wait for observer init ok
+------------------------------------------------+
|                  oceanbase-ce                  |
+--------------+---------+------+-------+--------+
| ip           | version | port | zone  | status |
+--------------+---------+------+-------+--------+
| 10.10.10.1   | 4.3.5.2 | 2881 | zone1 | ACTIVE |
| 10.10.10.2   | 4.3.5.2 | 2881 | zone2 | ACTIVE |
| 10.10.10.3   | 4.3.5.2 | 2881 | zone3 | ACTIVE |
+--------------+---------+------+-------+--------+
obclient -h10.10.10.1 -P2881 -uroot@sys -p'********' -Doceanbase -A

cluster unique id: 5a2629da-50e6-5b61-b326-113b4874dc12-1981c9dd30d-02050304

Connect to obproxy ok
+------------------------------------------------------------------+
|                            obproxy-ce                            |
+--------------+------+-----------------+-----------------+--------+
| ip           | port | prometheus_port | rpc_listen_port | status |
+--------------+------+-----------------+-----------------+--------+
| 10.10.10.1   | 2883 | 2884            | 2885            | active |
| 10.10.10.2   | 2883 | 2884            | 2885            | active |
| 10.10.10.3   | 2883 | 2884            | 2885            | active |
+--------------+------+-----------------+-----------------+--------+
obclient -h10.10.10.1 -P2883 -uroot@proxysys -p'********' -Doceanbase -A

Connect to Obagent ok
+-----------------------------------------------------------------+
|                             obagent                             |
+--------------+--------------------+--------------------+--------+
| ip           | mgragent_http_port | monagent_http_port | status |
+--------------+--------------------+--------------------+--------+
| 10.10.10.1   | 8089               | 8088               | active |
| 10.10.10.2   | 8089               | 8088               | active |
| 10.10.10.3   | 8089               | 8088               | active |
+--------------+--------------------+--------------------+--------+
Connect to Prometheus ok
+----------------------------------------------------------+
|                        prometheus                        |
+--------------------------+-------+--------------+--------+
| url                      | user  | password     | status |
+--------------------------+-------+--------------+--------+
| http://10.10.10.4:9090   | admin | '********'   | active |
+--------------------------+-------+--------------+--------+
Connect to grafana ok
+----------------------------------------------------------------------+
|                               grafana                                |
+--------------------------------------+-------+--------------+--------+
| url                                  | user  | password     | status |
+--------------------------------------+-------+--------------+--------+
| http://10.10.10.4:3000/d/oceanbase   | admin | '********'   | active |
+--------------------------------------+-------+--------------+--------+
obtest running
Trace ID: d9d62110-63af-11f0-948d-00163e1c7562
If you want to view detailed obd logs, please run: obd display-trace d9d62110-63af-11f0-948d-00163e1c7562
Verify the deployment result
Connect to the OceanBase cluster by using the connection string in the output result:
obclient -h10.10.10.1 -P2881 -uroot@sys -p'********' -Doceanbase -AIf the following result is returned, it indicates that the OceanBase cluster is connected normally, and the deployment is completed.
Welcome to the OceanBase.  Commands end with ; or \g.
Your OceanBase connection id is 3221544680
Server version: OceanBase_CE 4.3.5.2 (r102020032025070315-563ee271f78ff8521c8e0e09ae682065b065a046) (Built Jul  3 2025 15:53:52)

Copyright (c) 2000, 2018, OceanBase and/or its affiliates. All rights reserved.

Type 'help;' or '\h' for help. Type '\c' to clear the current input statement.

obclient(root@sys)[oceanbase]>
Note
After you deploy an OceanBase cluster, we recommend that you create a business tenant for business operations. The sys tenant is used only for cluster management and is not suitable for business scenarios. You can execute the obd cluster tenant create command to create a tenant, or connect to OceanBase Database and execute an SQL command to create a tenant. For more information about the obd commands, see Cluster commands. For more information about how to create a tenant by using an SQL command, see the topic Create a tenant in the documentation of OceanBase Database on the official website.
References
For more information about the configuration file, see Configuration file description.
For more information about how to connect to OceanBase Database, see the Connect to OceanBase Database chapter.