







This topic describes how to deploy an OceanBase cluster in a Kubernetes environment, which can serve as a reference for production deployment. For more information on custom deployment and configuration methods, see OceanBase Kubernetes O&M Tools Documentation.
Prerequisites
Before you begin deployment, ensure your environment meets the following requirements.
Hardware resources
To ensure the stability and performance of the production environment, it is recommended that the remaining Kubernetes resources meet the following suggested configurations:
CPU: More than 24 available CPUs.
Memory: More than 72 GB of available memory.
Storage: Use SSD storage with more than 400 GB of available space.
Software dependencies
Kubernetes cluster: The version must be v1.18 or later.
helm: Used to deploy ob-operator and OceanBase Dashboard. Refer to the helm installation documentation to complete the installation.
cert-manager: ob-operator depends on cert-manager for certificate management. Refer to the cert-manager installation documentation to complete the installation.
Storage: The cluster must have an available storage class. We have tested some common storage systems, as shown in the following table. You can refer to the test results in Storage Compatibility to determine if the requirements are met. This article uses local-path-provisioner as an example.
Storage solutionTest versionCompatible?Descriptionlocal-path-provisioner 0.0.23 ✅ Recommended for development and test environments Rook CephFS v1.6.7 ❌ CephFS does not support the fallocate system call Rook RBD (Block) v1.6.7 ✅ OpenEBS (cStor) v3.6.0 ✅ GlusterFS v1.2.0 ✅ Compatible when the kernel version is 5.14 or later Longhorn v1.6.0 ✅ JuiceFS v1.1.2 ✅ NFS v5.5.0 ❌ Clusters can be started with NFS protocol >= 4.2, but tenant resources cannot be reclaimed MySQL client or OBClient: Used to connect to the OceanBase cluster.
Procedure
Note
This procedure uses ob-operator V2.3.3 and OceanBase Dashboard V0.5.0 as examples. Other versions may differ slightly.
Step 1: Deploy ob-operator
ob-operator is the core management component of OceanBase in Kubernetes. It is recommended to deploy it using Helm.
Add the ob-operator repository
helm repo add ob-operator https://oceanbase.github.io/ob-operator/ helm repo update ob-operatorInstall ob-operator
helm install ob-operator ob-operator/ob-operator --namespace=oceanbase-system --create-namespace--namespaceis used to set the installation namespace, which can be customized as needed. It is recommended to useoceanbase-system.Verify successful installation
kubectl get pod -n oceanbase-systemThe expected output is as follows, with the pod's
STATUSbeingRunning.NAME READY STATUS RESTARTS AGE oceanbase-controller-manager-644b489fcc-6hlwf 2/2 Running 0 1m
Step 2: Deploy OceanBase Dashboard
OceanBase Dashboard provides visual cluster management and monitoring capabilities.
Install OceanBase Dashboard
helm install oceanbase-dashboard ob-operator/oceanbase-dashboard --namespace=oceanbase-system --set service.type=NodePortNote
The default value of
service.typeisNodePort. If your environment supports LoadBalancer, you can setservice.typetoLoadBalancerto obtain an external IP.Obtain the access address
# View Service Port kubectl get svc -n oceanbase-system oceanbase-dashboard-oceanbase-dashboardLog in to OceanBase Dashboard
You can use the service port obtained in the previous step to access OceanBase Dashboard via a browser. The default account and password are both
admin. You must change the password upon first login.If
service.typeis specified as NodePort, you can access it viahttp://<any-node-IP>:<NodePort-port>.If
service.typeis specified as LoadBalancer, you can access it viahttp://<External-IP>:<port>.
Step 3: Deploy an OceanBase cluster
After logging in to the OceanBase Dashboard, you can click Cluster in the left navigation pane. On the cluster page, click Clusters and then click Create Cluster in the upper-right corner to go to the Create Cluster page.
Configure basic information
On this page, you can configure the cluster's Namespace, Cluster Name, Cluster Mode, root Password, and other information.
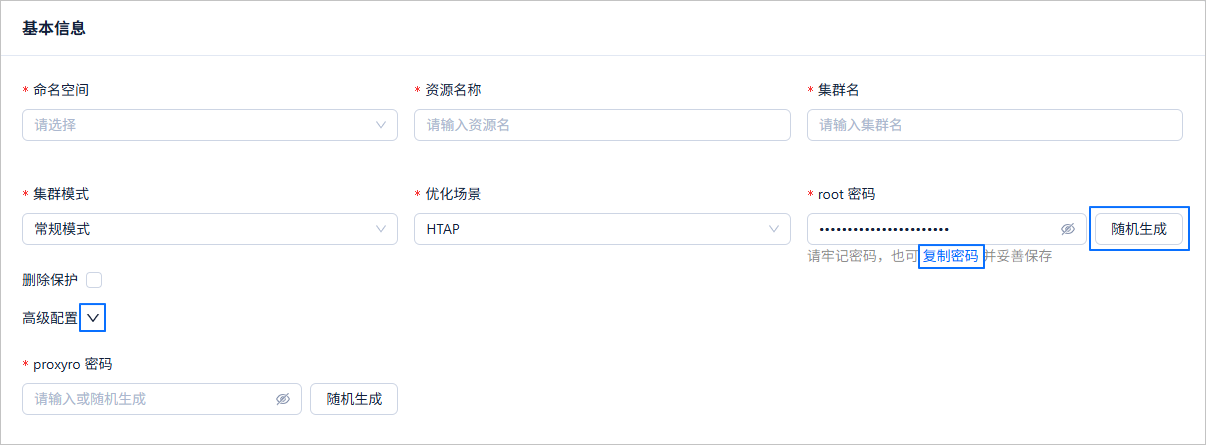 ParameterDescription
Namespace Select a namespace for creating the OceanBase cluster from the drop-down list. You can also click + Create Namespace in the list to create a new one. When creating a new namespace, it must start with a lowercase letter and end with a lowercase letter or number, can contain lowercase letters, numbers, and -, and be no longer than 63 characters long.Resource Name The custom resource name for the OceanBase cluster in Kubernetes, which must not duplicate the name of any existing OceanBase cluster resource in the same namespace. The custom resource name must start with a lowercase letter and end with a lowercase letter or number, can contain lowercase letters, numbers, and -, and be no longer than 63 characters long.Cluster Name Set the OceanBase cluster name. The name must start with a letter and end with a letter or number, can contain letters, numbers, and underscores, and be between 2 and 32 characters long. Cluster Mode Select the cluster deployment mode from the drop-down list. Different modes have version requirements for OceanBase Database and affect the recovery strategy in case of failure. Choose the mode based on your actual environment and cluster version. - Normal Mode: No special processing is done; bootstrapping uses the pod IP address directly. Currently recognizes calico and kube-ovn plugins, using the pre-failure IP address when rebuilding a pod after a failure. It is recommended to allocate a dedicated IP range for the OceanBase cluster to avoid being occupied by other pods. If the Kubernetes cluster uses other network plugins, a scale-out then scale-in failure recovery strategy is applied, which often takes longer to replicate large amounts of data and cannot recover from majority node failures.
- Standalone Mode: Uses
127.0.0.1for bootstrapping, limited to single-node cluster deployments. Since127.0.0.1is specified as the OBServer service address, original data can be reused for quick recovery when the pod is rebuilt. - Service Mode: Creates a separate service for each OBServer service and uses the service's cluster IP address for bootstrapping. Original data can also be reused for quick recovery when the pod is rebuilt. This mode is generally recommended.
Optimization Scenario Provides parameter templates for common OceanBase cluster usage scenarios. Selecting a scenario automatically configures the parameters. For detailed introductions to optimization scenarios, see Configuration Best Practices. root Password The password for the root user of the sys tenant. You can click Randomly generated to have the Dashboard automatically generate a random string, or set it manually. When setting a custom password, the password must meet the following requirements: - Be 8 to 32 characters long
- Can only contain letters, numbers, and special characters (
~!@#%^&*_-+=|()[]:;,.?/) - Contain at least two uppercase letters, two lowercase letters, and two special characters
Delete Protection You can enable delete protection by checking the box. Once enabled, deleting this OceanBase cluster will be intercepted by a webhook. You need to disable it before you can delete the cluster. Advanced Configuration Click the expand icon next to Advanced Configuration to configure the proxyro password. If Advanced Configuration is not enabled, the Dashboard automatically generates a random string as the proxyro password.
The proxyro password is for the proxyro user of the sys tenant. ODP can access the corresponding OceanBase cluster only if the proxyro password in the OceanBase cluster matches the one in ODP. You can click Randomly generated to have the Dashboard generate a random string, or set it manually. When setting a custom password, the password must meet the following requirements:- Be 8 to 32 characters long
- Can only contain letters, numbers, and special characters (
~!@#%^&*_-+=|()[]:;,.?/) - Contain at least two uppercase letters, two lowercase letters, and two special characters
Configure the cluster topology
The cluster topology primarily configures all Zone information for the cluster. Generally, at least three Zones are required. You can click + Add Zone or the delete icon next to a Zone to add or remove a Zone.
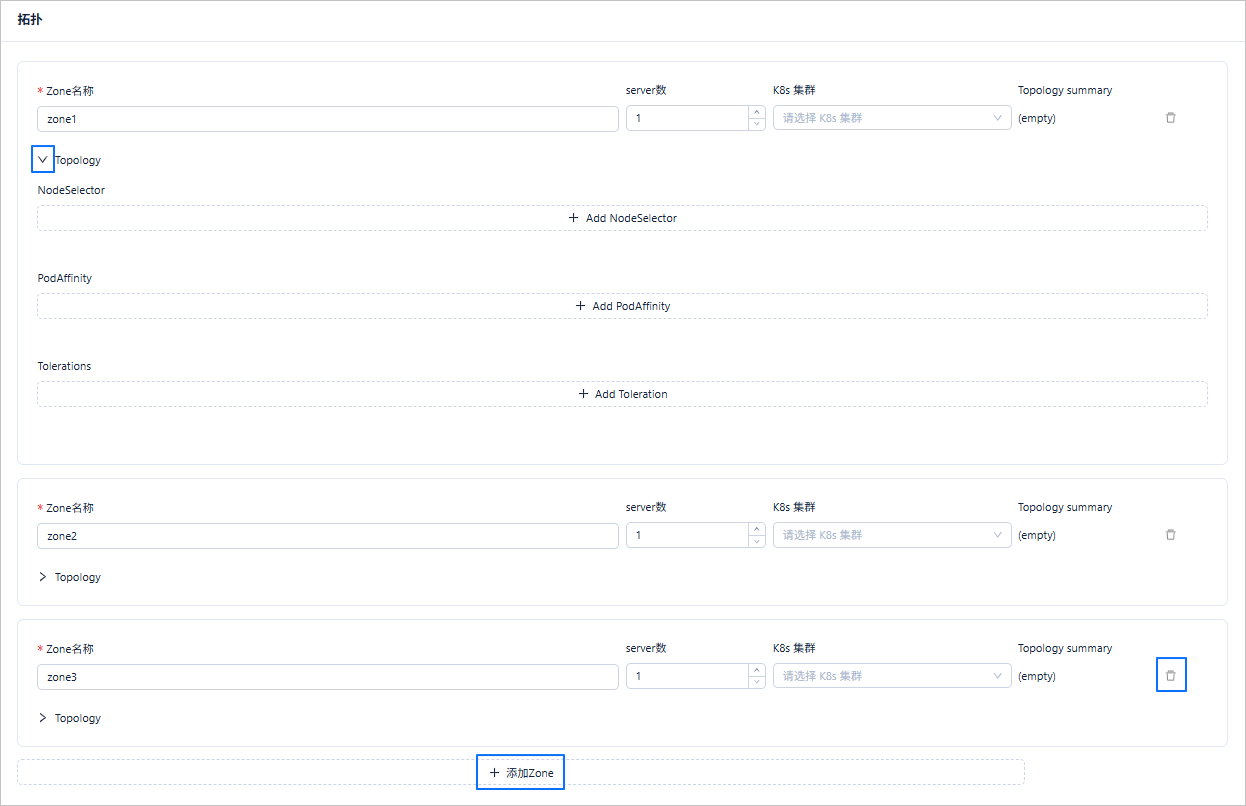 ParameterDescription
Zone Name Configure the Zone name in OceanBase Database. It is customizable. The Zone name must start with a letter and end with a letter or number, can contain letters, numbers, and underscores, and be between 2 and 32 characters long. Number of Servers Set how many OBServer services are contained in the current Zone. K8s Cluster This parameter applies only to multi-K8s cluster deployment scenarios. It specifies which K8s cluster this Zone will be deployed into. For single-K8s cluster deployment, you can leave it empty. For more information on multi-K8s cluster deployment, see Multi-K8s Cluster Deployment. Topology You can click the expand button before Topology to configure affinity settings, supporting configurations for node selector, pod affinity, and toleration. The configuration only takes effect for the pods of the OBServer services in the current Zone. Configure OBServer resources
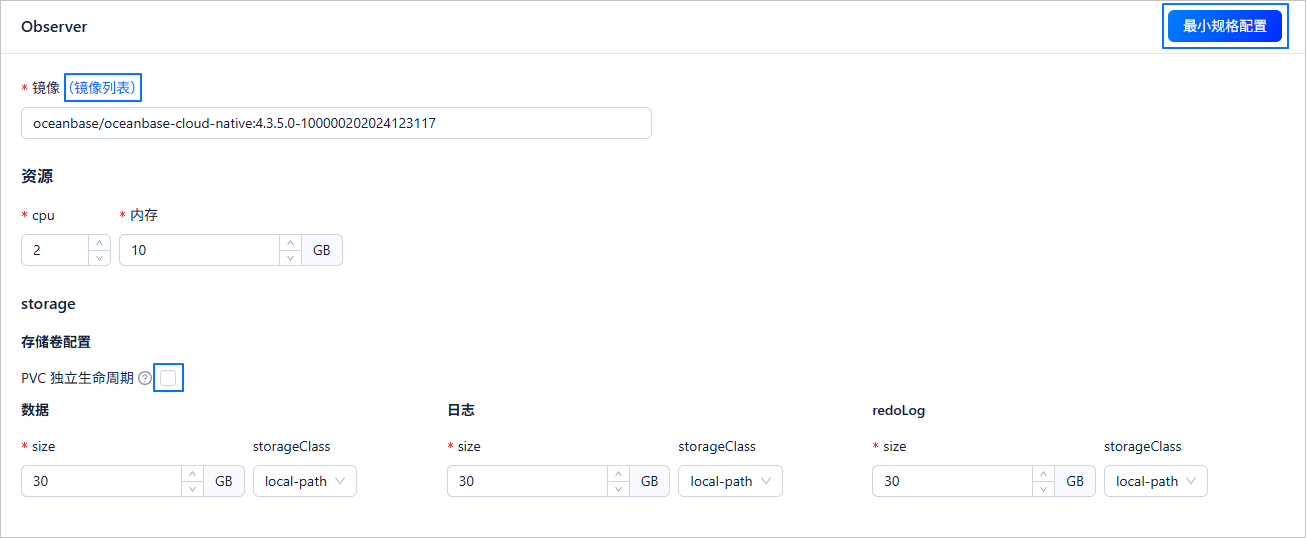 ParameterDescription
Image Configure the image used to deploy the OceanBase cluster. You can click Image List to view all images. The image tag corresponds to the OceanBase Database version number. It is recommended to use an LTS version image. The image should be written in full as registry/image:tag, for example,oceanbase/oceanbase-cloud-native:4.2.0.0-101000032023091319.Resources Includes CPU, memory, and storage resources. For storage, three independent PVCs will be created to hold data, runtime logs, and redo logs. The configuration for data, runtime logs, and redo logs must be at least three times the size configured for Memory. Independent lifecycle support is available for PVCs. After selecting PVC Independent Lifecycle, deleting the OBServer resource will not cascade delete the PVC; you need to delete it manually.
You can click the Minimum Specification Configuration button in the upper-right corner of the OBserver module, and the Dashboard will automatically fill in the resources according to the minimum specification.Optional configurations
You can click the buttons next to Monitoring, Parameter Settings, and Mount NFS Backup Volume to configure the corresponding content.
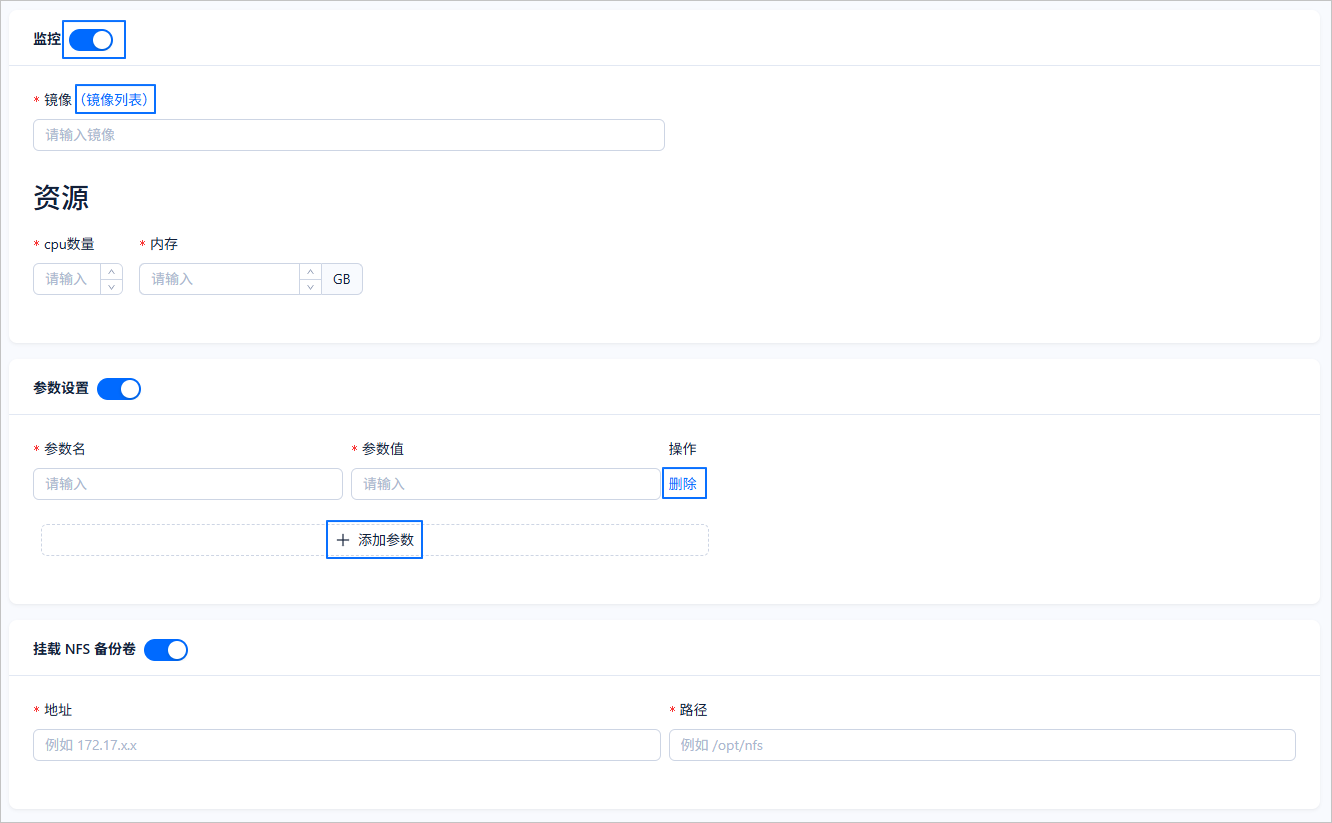 ModuleParameterNote
Monitoring Image After monitoring is enabled, you can configure ObAgent as a sidecar container to provide monitoring features. This parameter specifies the image used to deploy ObAgent. You can click Image List to view all images. The image tag corresponds to the ObAgent version number. The image should be written in the full registry/image:tagformat, for example,oceanbase/obagent:4.2.0-100000062023080210.Resources Specify the number of CPU cores and memory required to deploy ObAgent. Enter positive integers. Parameter Settings Parameter Name Enter the parameters for the OceanBase cluster. Parameter Value Set a reasonable value for the corresponding parameter. The set parameter values take effect on all OBServer services. Action You can click the Delete field to delete the corresponding parameter. Note
You can click + Add Parameter to add a new row for parameter configuration.
Mount NFS Backup Volume Address If you need to use NFS for backup and recovery, you can configure the NFS service address here. Path Enter the backup path. The NFS path will be mounted into the container of the OBServer service. Submit and wait for successful creation
After completing the above configurations, click Submit. Wait until the Status in the Clusters changes to Running, indicating the cluster has been successfully created.
Note
Under normal circumstances, creation is expected to complete within two to three minutes.

Step 4: Create a tenant
After the cluster is deployed, it is recommended to create a business tenant for application use. You can click Tenant in the left navigation bar. On the Tenants page, click Create Tenant in the upper-right corner of the Tenants page to go to the Create Tenant page.
Specify tenant basic information
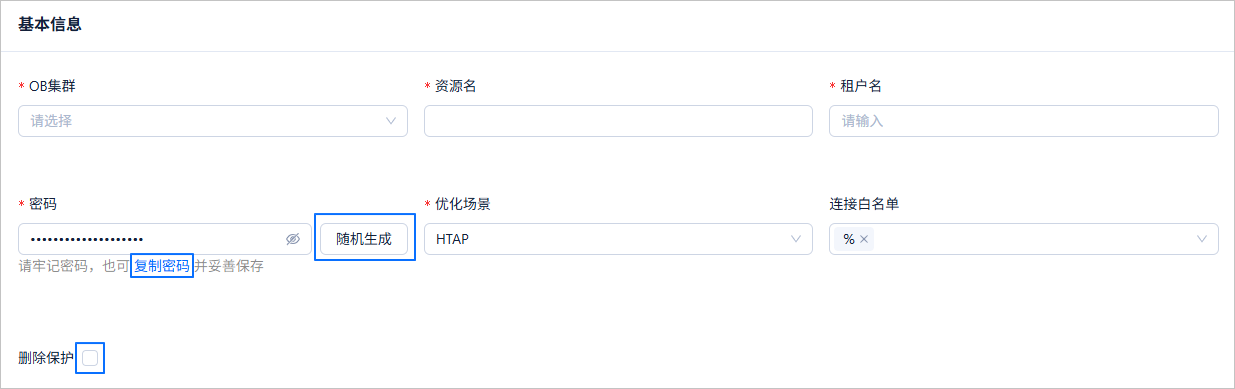 ParameterDescription
OB Cluster Select the OceanBase cluster where the tenant will be created from the drop-down list. Resource Name The name of the custom resource for the tenant in Kubernetes. The tenant will be created under the same namespace as the cluster. Tenant Name The name of the tenant to be created. Password The password for the tenant's root account. You can click Randomly generated to have the dashboard automatically generate a random string, or you can set it manually. When setting a custom password, the password must meet the following requirements: - Be 8 to 32 characters long.
- Can only contain letters, numbers, and special characters (
~!@#%^&*_-+=|()[]:;,.?/). - Must contain at least 2 uppercase letters, 2 lowercase letters, 2 numbers, and 2 special characters.
Optimization Scenario Provides parameter templates for common OceanBase Database usage scenarios. Selecting a scenario automatically configures the parameters. For detailed descriptions of optimization scenarios, see Configuration Best Practices. Connection Allowlist The allowlist of addresses that can connect to the tenant. By default, %represents any address.Deletion Protection You can enable or disable deletion protection by checking the corresponding box. If enabled, deleting the tenant will be intercepted by a webhook, and the tenant can only be deleted after the protection is disabled. Configure the tenant resource pool
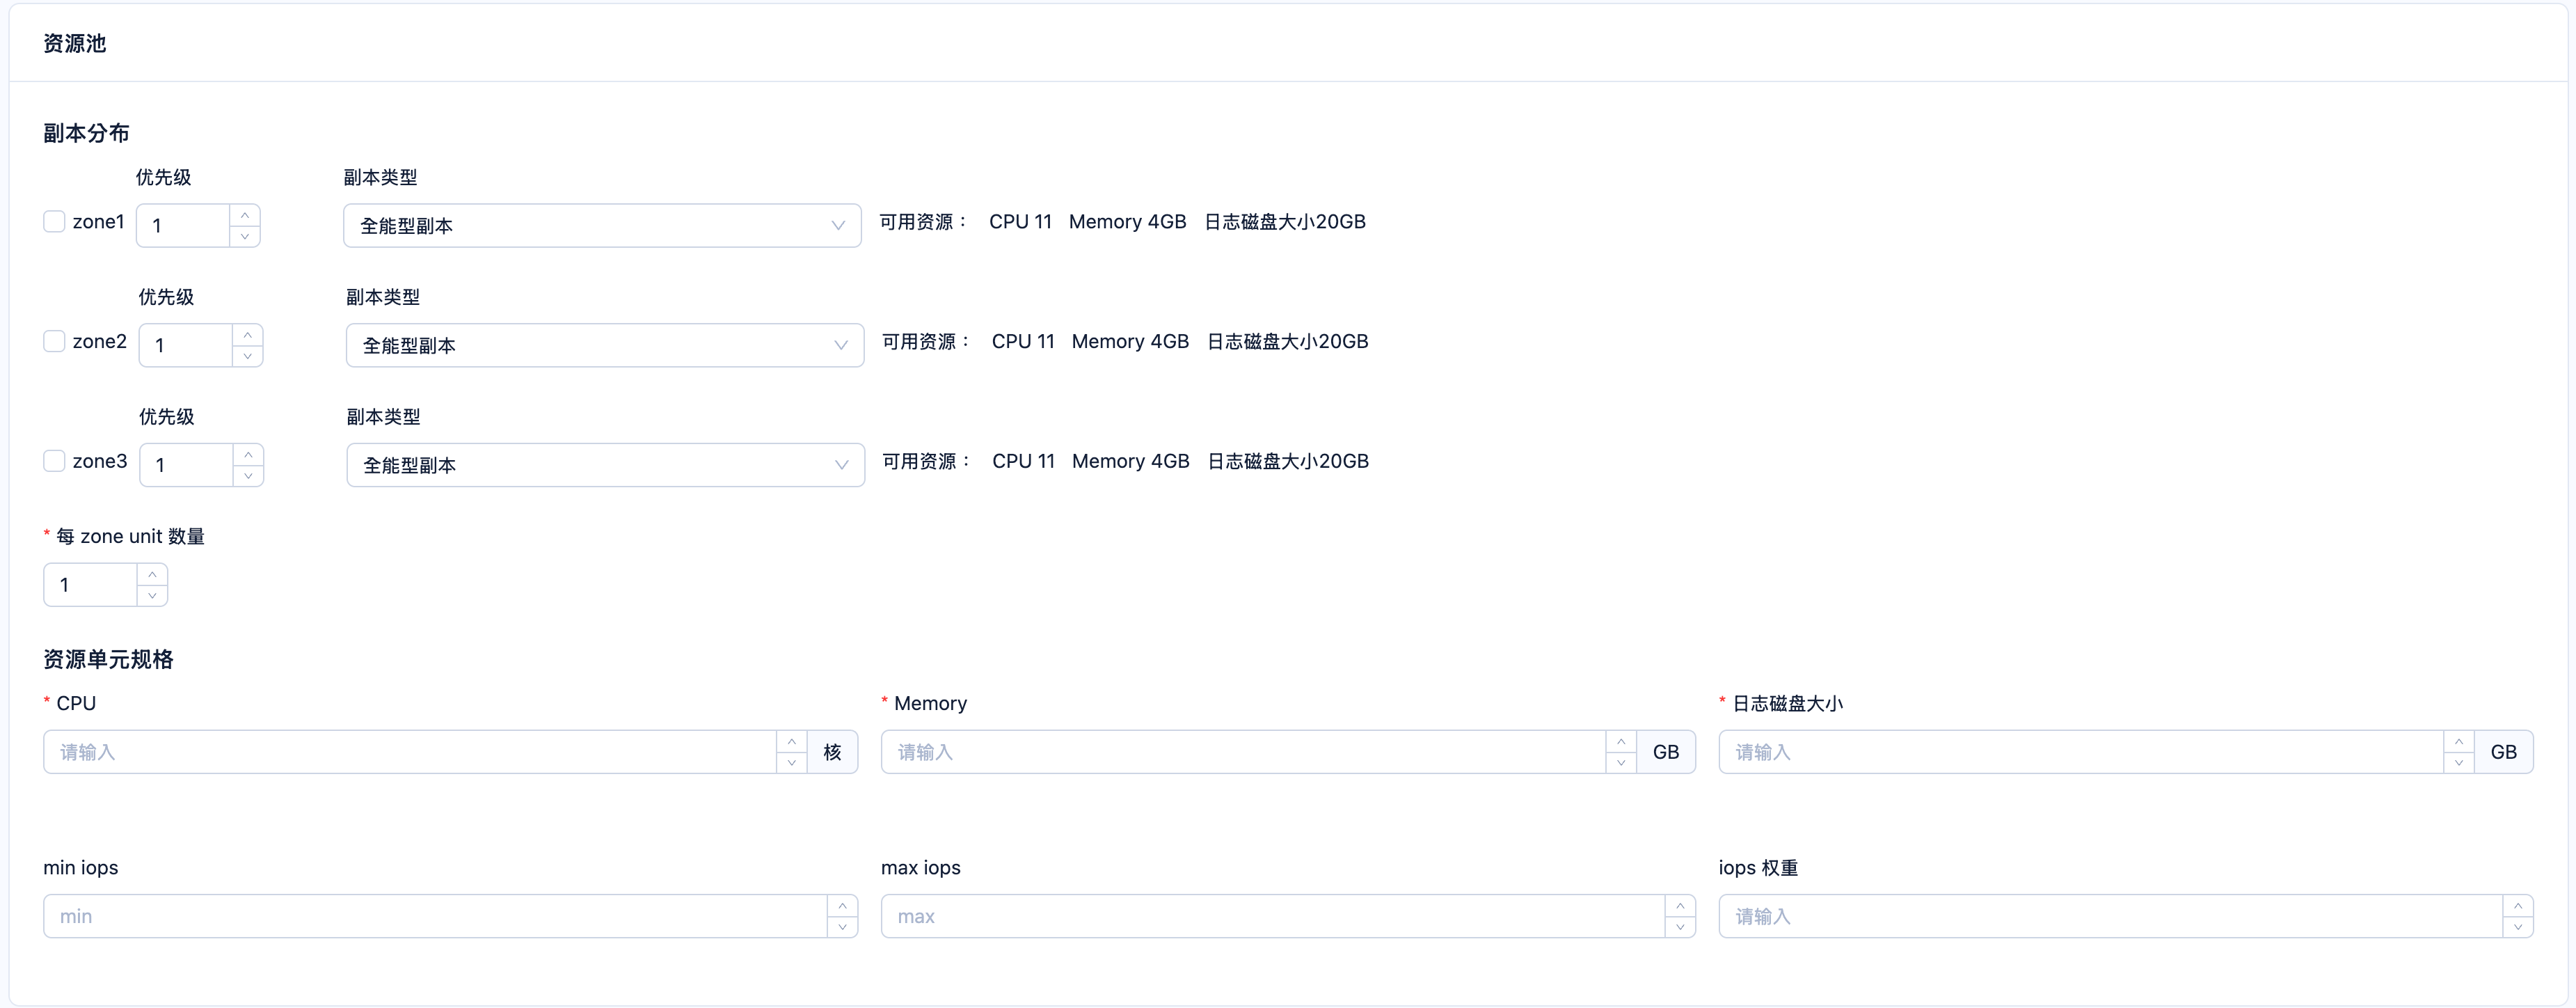 ParameterDescription
Replica Distribution You can configure which zones the tenant will be distributed to by clicking the checkbox before each zone, and set the priority, replica type, and number of units in the corresponding zone. Unit Specification Configure the resources for each unit of the tenant. It is recommended to configure according to the Available resources displayed in the Replica Distribution section. Submit and wait for successful creation
After configuration, click Submit. Wait for the Status in the Tenants to change to Running, indicating the tenant has been successfully created.

Step 5: Deploy ODP
ODP (also known as OBProxy) is a necessary component for applications to connect to distributed OceanBase clusters, as it routes requests to the correct OBServer node. You can click OBProxy in the left navigation bar. On the OBProxy page, click Create OBProxy Cluster in the upper-right corner of the Clusters page to go to the Create OBProxy Cluster page.
Configure basic information
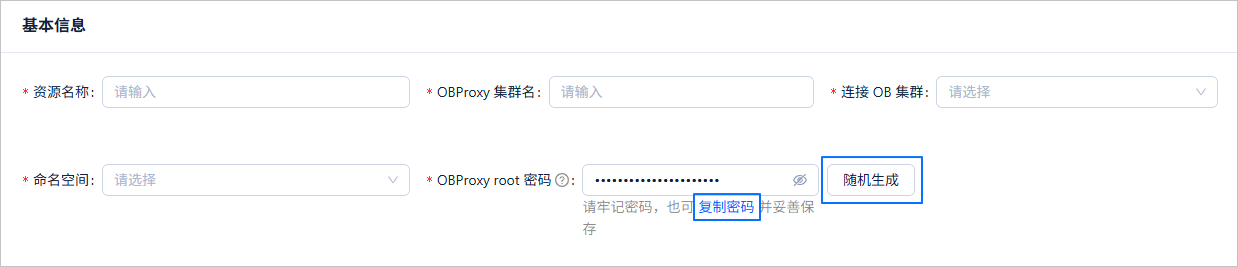 ParameterDescription
Resource Name The name of the deployment created in Kubernetes. The configured name must start with a lowercase letter and end with a lowercase letter or number, can contain lowercase letters, numbers, and -, and must not exceed 63 characters in length.OBProxy Cluster Name The application name for ODP. Connect to OB Cluster Select the OceanBase cluster to connect from the drop-down list. By default, the selected OceanBase cluster is connected using the rs_list method. Namespace The namespace in Kubernetes where ODP is deployed. After selecting an OceanBase cluster, the namespace of the selected OceanBase cluster is automatically filled in by default. OBProxy root Password The password for the rootuser of the ODP management tenant (proxysys). You can click Randomly generated to have the dashboard automatically generate a random string, or you can set it manually. When setting a custom password, the password must meet the following requirements:- Be 8 to 32 characters long.
- Can only contain letters, numbers, and special characters (
~!@#%^&*_-+=|()[]:;,.?/). - Must contain at least 2 uppercase letters, 2 lowercase letters, 2 numbers, and 2 special characters.
More configurations
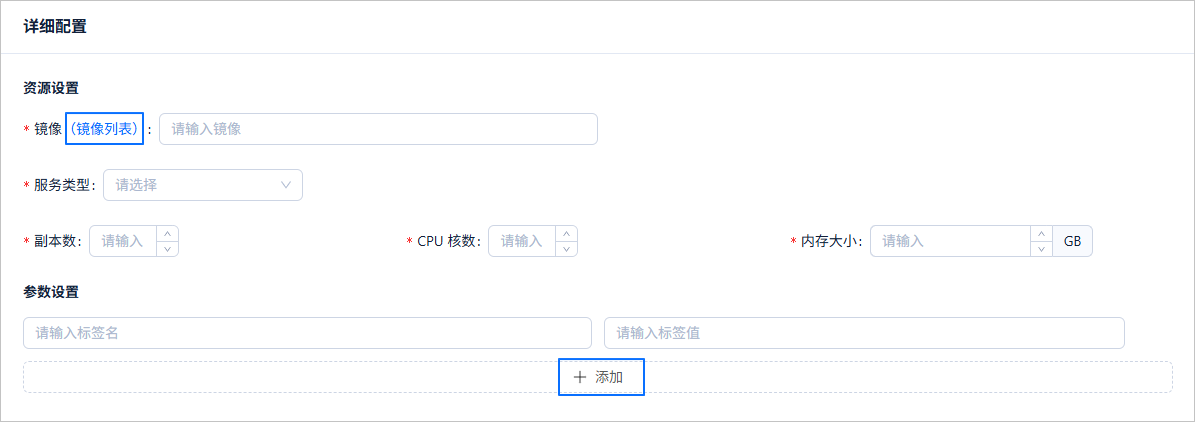 ParameterDescription
Image Configure the image used to deploy ODP. You can click Image list to view all images. It is recommended to deploy the latest version. The image tag corresponds to the ODP version number. The image should be written in full as registry/image:tag, for example,oceanbase/obproxy-ce:4.3.3.0-5.Service type Select the service type for the ODP deployment from the drop-down list. If access is only required within the Kubernetes cluster, you can choose to use ClusterIP; if access outside the cluster is needed, you can select NodePort or LoadBalancer based on your situation. Number of replicas Configure the number of replicas for ODP. CPU cores Configure the number of CPU cores allocated to ODP. Memory size Configure the memory resources allocated to ODP. Parameter settings You can click + Add to configure ODP parameters in KV format. Submit and wait for successful creation
After completing the above configuration, click Submit. Wait for the Status in the Clusters to change to Running, indicating that ODP has been created successfully.

Step 6: Connection verification
After deployment is complete, you can view the Service address on the OBProxy details page and use this address to connect to the cluster.
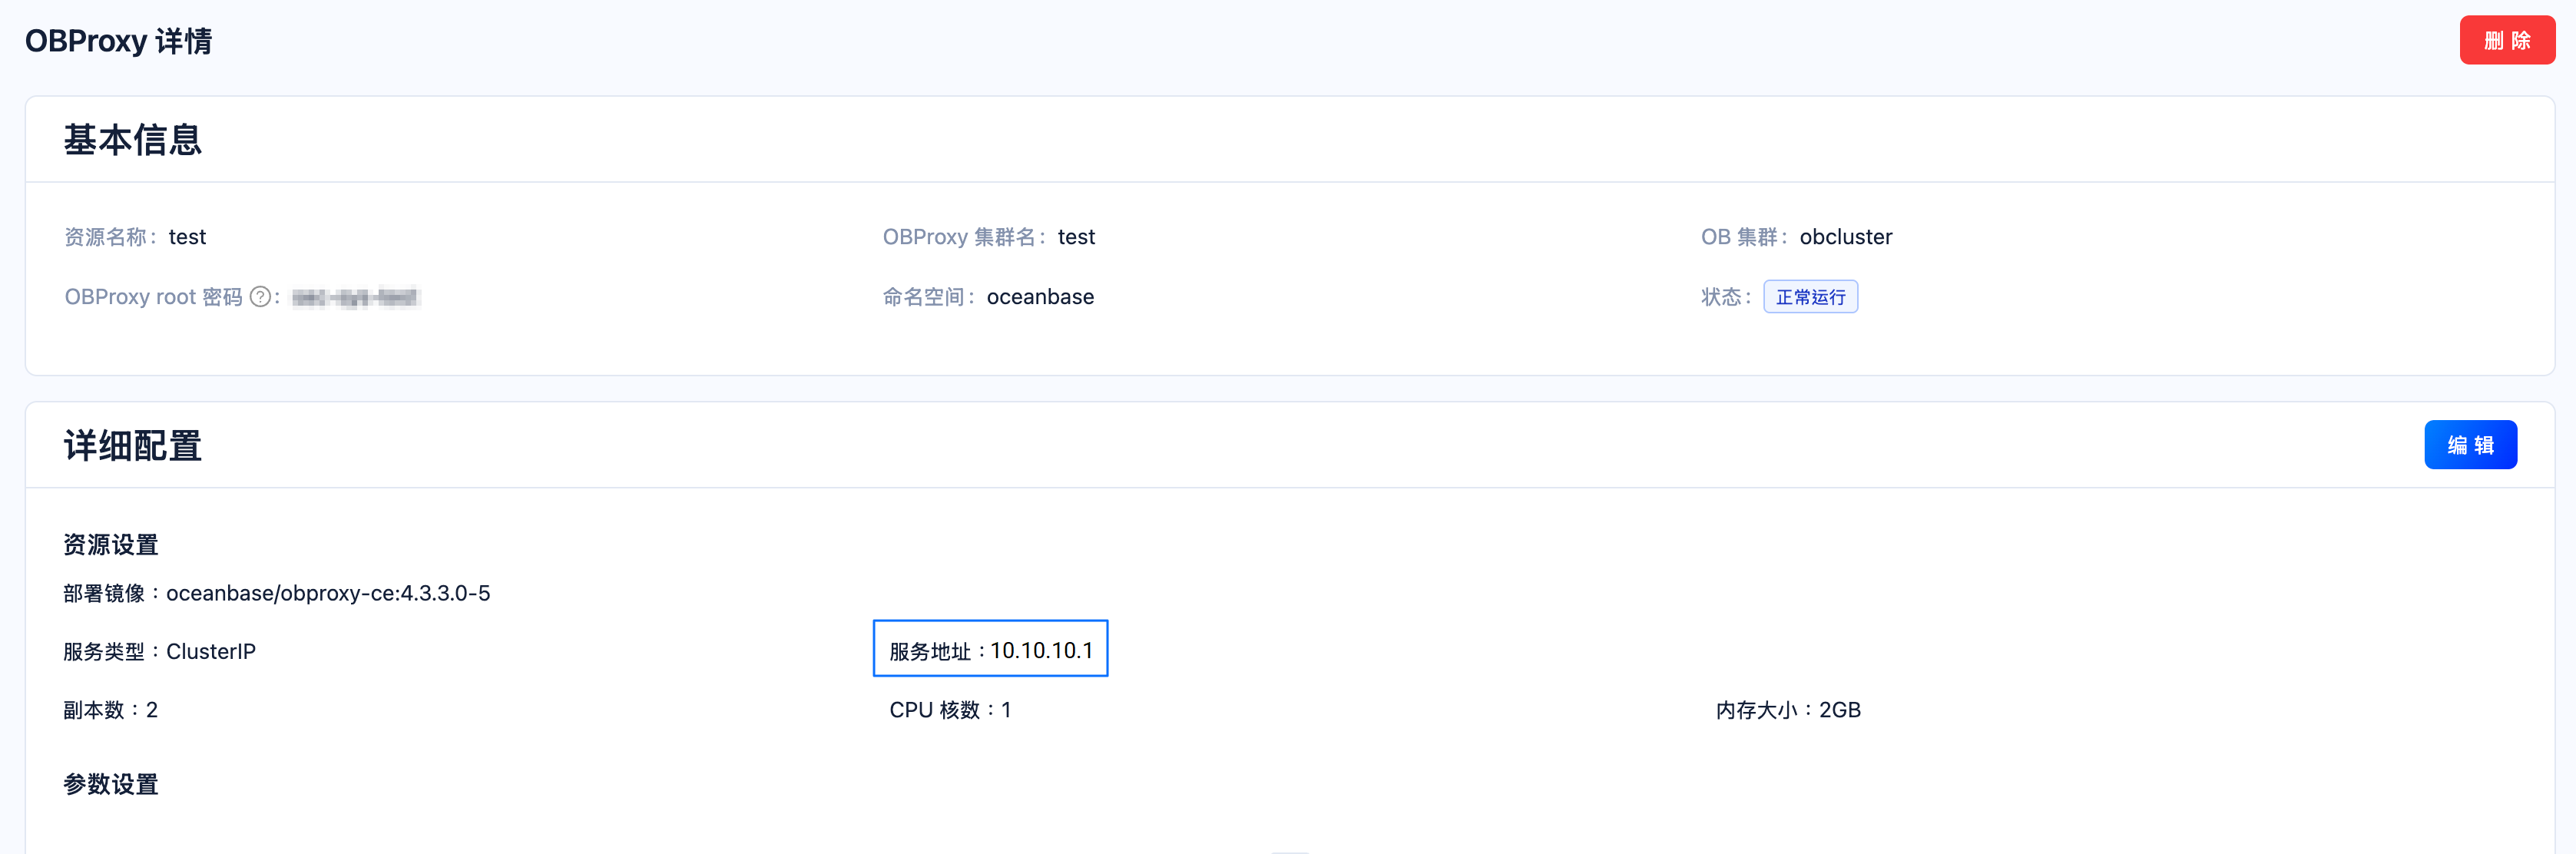
Run the following command to connect to the obtenant2 tenant in the obcluster cluster through ODP. For detailed information about connecting to a tenant, see Overview of connection methods.
mysql -h10.10.10.1 -P2883 -uroot@obtenant2#obcluster -p****** oceanbase
The output is as follows:
Welcome to the MariaDB monitor. Commands end with ; or \g.
Your MySQL connection id is 7
Server version: 5.6.25 OceanBase_CE 4.3.5.3 (r103000092025080818-e8da5f0afb288ed0add0613740c6ccf2a3c6830b) (Built Aug 8 2025 18:43:02)
Copyright (c) 2000, 2018, Oracle, MariaDB Corporation Ab and others.
Type 'help;' or '\h' for help. Type '\c' to clear the current input statement.
MySQL [oceanbase]>
References
This topic describes only the basic deployment method, which is suitable for initial environment setup. We also support comprehensive O&M and monitoring features, as well as deployment modes in multi-Kubernetes clusters for higher high-availability requirements. You can explore these features further on the Dashboard page or refer to the links below.