







This topic describes how to deploy OceanBase Database by using the GUI of OBD on an x86-based CentOS Linux 7.9 image.
Terms
OceanBase Database
A fully self-developed enterprise-level native distributed database. For more information, see OceanBase Database documentation.
obd
OceanBase Deployer, a tool for installing and deploying OceanBase Database. For more information, see OceanBase Deployer documentation.
ODP
OceanBase Database Proxy, a dedicated proxy server for OceanBase Database. For more information, see OceanBase Database Proxy documentation.
OBAgent
OBAgent is a framework for monitoring and data collection in OceanBase Database. It supports both push and pull data collection modes to meet different application requirements.
obconfigserver
OceanBase Configserver provides metadata registration, storage, and query services for OceanBase Database. For more information, see ob-configserver.
Grafana
Grafana is an open-source data visualization tool that visualizes various metrics from data sources to help you understand system performance and status more intuitively. For more information, visit the official website of Grafana.
Prometheus
Prometheus is an open-source service monitoring system and time series database. It provides a common data model and fast data collection, storage, and query interfaces. For more information, visit the official website of Prometheus.
Alertmanager
Alertmanager is an open-source alert manager that processes alerts from monitoring systems such as Prometheus. It provides features like alert deduplication, grouping, routing, and muting. For more information, visit the official website of Prometheus.
Prerequisites
Before you begin, ensure the following prerequisites are met:
Your machine meets the software and hardware requirements. For details, see Software and hardware requirements.
In a production environment, you need to perform an environment and configuration check. For specific operations, refer to the Pre-deployment configuration section.
To deploy only OceanBase Database, at least 2 vCPU cores, 6 GB of memory, and 20 GB of disk space are required. Note that the memory requirement refers to the value in the
availablecolumn of the output from running thefree -gcommand.To deploy OceanBase Database and all its components, at least 4 vCPU cores, 10 GB of memory, and 25 GB of disk space are required. A memory size of 16 GB or more is recommended. Note that the memory requirement refers to the value in the
availablecolumn of the output from running thefree -gcommand.
Note
In an environment with fewer CPU cores, the default minimum CPU_Count set by OBD is 8. Configuring a lower CPU core count will negatively impact the performance of OceanBase Database.
Prepare software
When using OBD for graphical OceanBase Database deployment, you can choose between online or offline deployment methods.
Online deployment: The machine where OBD is located must have access to the external network. No need to pre-configure the installation packages required for deployment; OBD will obtain them from the remote image repository during the process.
Offline deployment: No external network access is required during deployment. You must upload the necessary installation packages to OBD's local image library in advance. When choosing offline deployment, it is recommended to directly download the required version of the OceanBase All-in-One installation package.
Different preparation methods apply based on the deployment method chosen. Select the appropriate method according to your actual situation.
Online deployment
If you choose online deployment, you can refer to the commands in this section to install OBD on the central control server.
[admin@test001 ~]$ sudo yum install -y yum-utils
[admin@test001 ~]$ sudo yum-config-manager --add-repo https://mirrors.aliyun.com/oceanbase/OceanBase.repo
[admin@test001 ~]$ sudo yum install -y ob-deploy
[admin@test001 ~]$ source /etc/profile.d/obd.sh
Offline deployment
If you choose offline deployment, you can refer to the commands in this section to download and install OceanBase All-in-One.
You can download the latest OceanBase All-in-One from the OceanBase Download Center and copy it to the central control server. Execute the following commands to decompress and install it:
[admin@test001 ~]$ tar -xzf oceanbase-all-in-one-*.tar.gz
[admin@test001 ~]$ cd oceanbase-all-in-one/bin/
[admin@test001 bin]$ ./install.sh
[admin@test001 bin]$ source ~/.oceanbase-all-in-one/bin/env.sh
Procedure
Note
This procedure uses OBD V3.6.0 as an example. The operation interface may vary depending on the OBD version; refer to the actual interface for your version. For more information about OBD, see OceanBase Installation and Deployment Tool Documentation.
Step 1: Start the graphical interface
Start the graphical interface
Run the
obd webcommand in the command line to start the graphical interface, and click the output address to access it.[admin@test001 ~]$ obd web start OBD WEB in 0.0.0.0:8680 please open http://10.10.10.1:8680Note
The graphical interface uses port 8680 by default. You can use the
obd web -pcommand to specify a port.In Alibaba Cloud or other cloud environments, the program may not be able to obtain a public IP address, resulting in an intranet address being displayed. This IP is not a public address, and you must use the correct address to access the graphical interface.
The
obd webcommand binds to0.0.0.0. In multi-NIC deployments, you can access the graphical interface from any accessible IP address.You can use the nohup or screen command to run the
obd webcommand in the background.
(Optional) Hover your mouse over the Chinese text in the upper-right corner of the graphical interface, and click the displayed language to switch between Chinese and English interfaces.
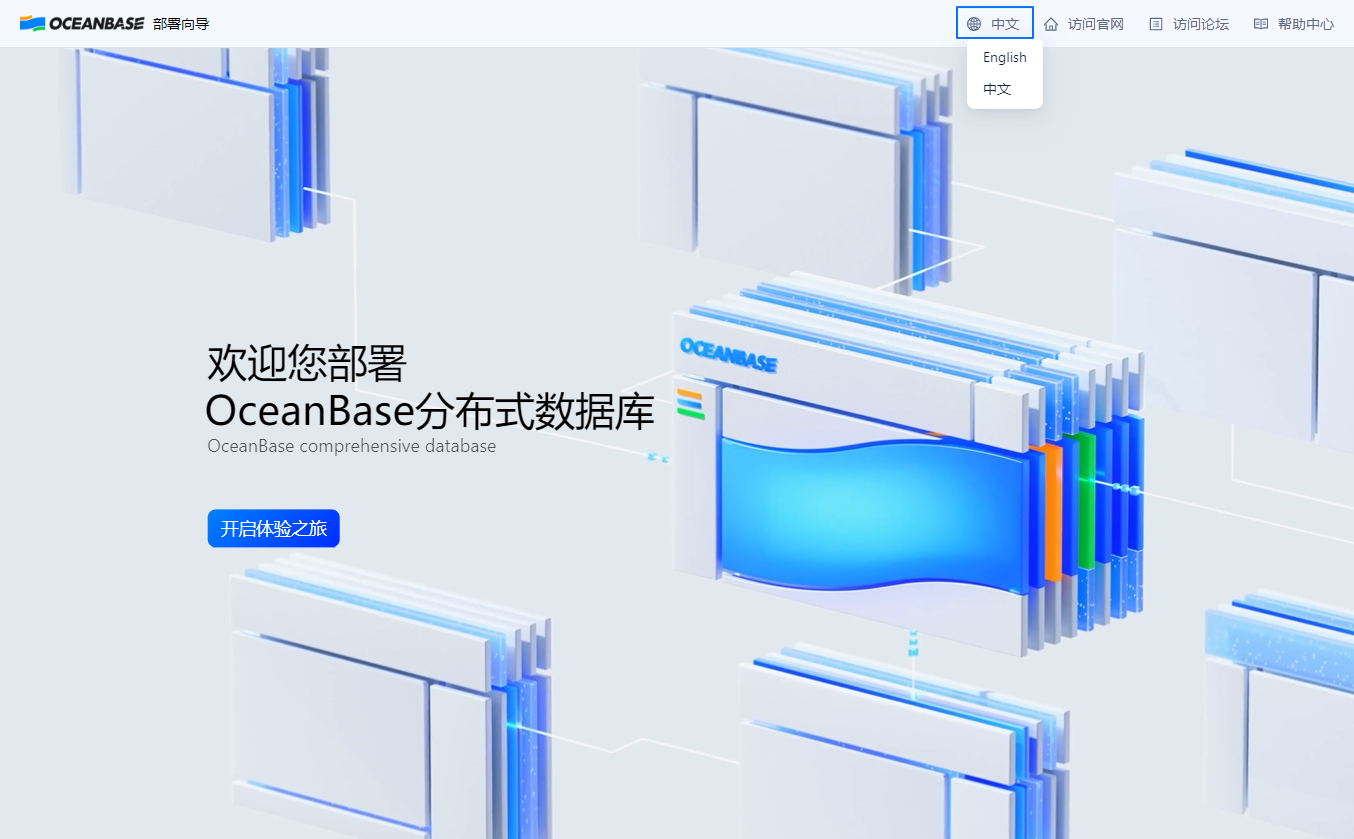
In the graphical interface, click Start the experience, then select the OceanBase and its tools module on the displayed Welcome to the OceanBase Deployment Wizard page, and click Install to enter the OceanBase database deployment interface.
Step 2: Configure the deployment
You can configure the cluster name, load type, and deployment components on the Deployment Configuration page. The content of the Deployment Configuration page is as follows.
Cluster configuration
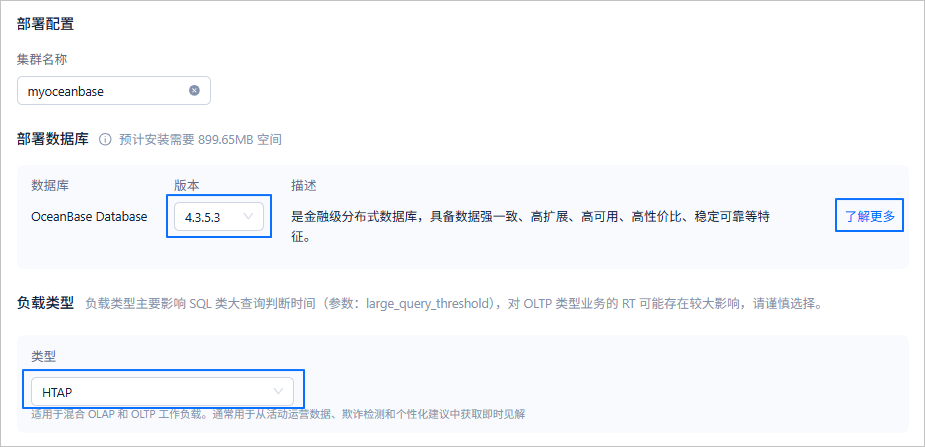 ModuleDescription
Deployment Configuration The cluster name is the unique name for the OBD-specific deployment product. It defaults to myoceanbaseand can be customized, but must not duplicate an existing deployment name. The cluster name must start with a letter and end with a letter or number, can contain letters, numbers, and underscores, and must be 2 to 32 characters long. You can view the clusters managed by OBD using theobd cluster listcommand.Deploy OceanBase Database Click the drop-down list under Version to select the version of OceanBase Database. Click Learn more next to the corresponding component to view its documentation. Load Type Click the drop-down list under Type to select the load type for the OceanBase cluster. Different load types are described below to help you understand their application scenarios. Note
This module is only displayed if the version of OceanBase Database to be deployed is V4.2.5 or later.
Component selection
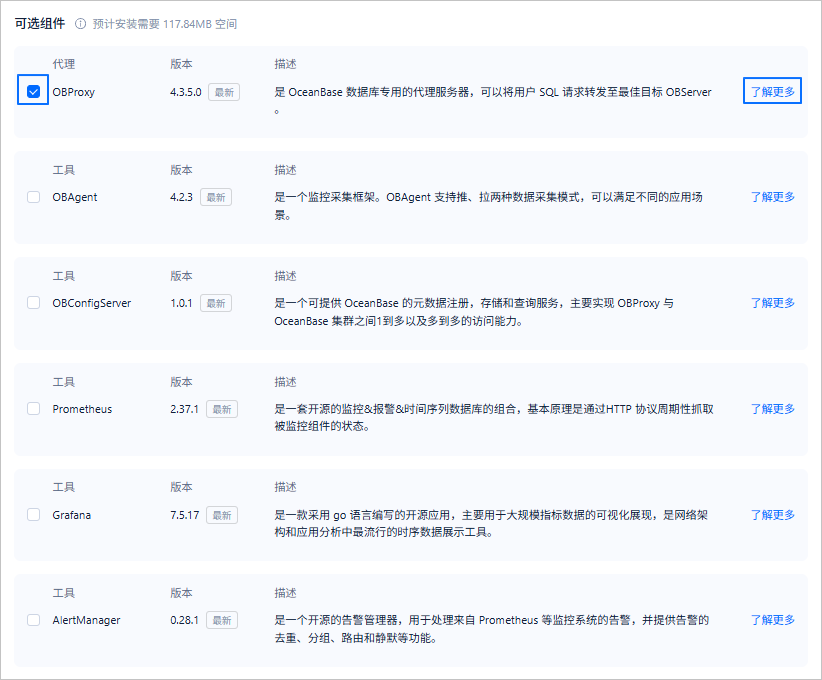
By default, only the OBProxy component is selected. You can click the checkbox before the corresponding component under Optional components to specify whether to deploy it. The component version is fixed as the latest version. Click Learn more next to a component to view its documentation.
Note
The deployment of the Grafana and AlertManager components depends on the OBAgent and Prometheus components, and the deployment of the Prometheus component depends on the OBAgent component. Specifically, when you select the Grafana or AlertManager component, the OBAgent and Prometheus components are automatically selected. When you deselect the OBAgent component, the Grafana, AlertManager, and Prometheus components are automatically deselected.
After completing the configuration, click Next to go to the Node Configuration page.
Step 3: Configure nodes
On the Node Configuration page, you can configure database and component nodes, deployment users, and software installation paths. The content of the Node Configuration page is as follows.
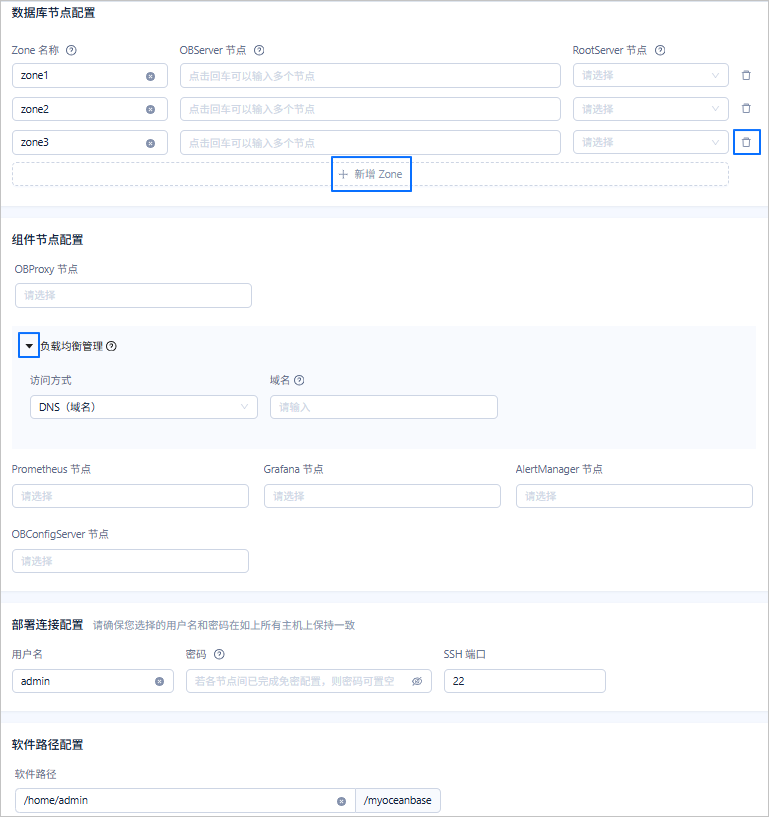
Module |
Parameter |
Note |
|---|---|---|
| Database node configuration | Zone Name | The name of a zone in OceanBase Database. It can be customized. The zone name must start with a letter and end with a letter or number. It can contain letters, numbers, and underscores, and must be 2 to 32 characters long. In an OceanBase cluster with multiple zones, one zone must have the same region as the primary zone. You can click + Add Zone or the delete icon next to a zone to add or delete a zone. |
| OBServer Node | The IP address of the OBServer node in the OceanBase cluster. To configure multiple node IPs, enter an IP address and press Enter on the keyboard.
Notice
|
|
| RootServer Node | You can select an IP address from the drop-down list of IP addresses configured for the OBServer node to set it as the RootServer node for the OceanBase cluster. For an OceanBase cluster with multiple replicas, you must specify a RootServer for each zone. | |
| Component node configuration | OBProxy Node | You can configure multiple nodes. You can either select an OBServer node IP address from the drop-down list or enter a new node IP address. It is recommended to use an IP address other than 127.0.0.1. To configure multiple node IPs, enter an IP address and press Enter on the keyboard. |
| Load balancing management | Click the expand button to set up load balancing for business access to the OceanBase cluster. It is recommended to provide a VIP/DNS address when deploying multi-node OBProxy to avoid changing the OBProxy access address later. If not configured, the system will default to using the first IP address configured in the OBProxy node to set the connection string. You can select whether to use VIP access or DNS (domain name) access through the drop-down list under Access Method:
Noticeobd does not provide load balancing deployment. If you need to set up load balancing, please deploy and configure the corresponding load balancing in advance. |
|
| Prometheus Node | You can configure multiple nodes. You can either select an OBServer node IP address from the drop-down list or enter a new node IP address. It is recommended to use an IP address other than 127.0.0.1. To configure multiple node IPs, enter an IP address and press Enter on the keyboard. |
|
| Grafana Node | You can configure multiple nodes. You can either select an OBServer node IP address from the drop-down list or enter a new node IP address. It is recommended to use an IP address other than 127.0.0.1. To configure multiple node IPs, enter an IP address and press Enter on the keyboard. |
|
| AlertManager Node | Only a single node can be configured. It is recommended to use an IP address other than 127.0.0.1. |
|
| obconfigserver Node | You can configure multiple nodes by either selecting an OBServer node IP from the drop-down list or entering a new node IP. It is recommended to use an IP address other than 127.0.0.1. To configure multiple node IPs, enter an IP and press Enter on your keyboard.
NoteWhen configuring multiple nodes for obconfigserver, you must configure load balancing in advance and enable the More Configurations button in the Component Configuration section of the Cluster Configuration page to configure |
|
| Deployment connection configuration | Username | The username for deploying the OceanBase cluster. By default, it is the startup user of the current process. You can customize the username, which must be 20 characters or less and can only contain letters, numbers, and dots (-_:@/.). Ensure the selected username exists on all hosts. |
| Password | The login password for the user corresponding to the Username. If password-free login is configured between nodes, you can skip entering the password. | |
| SSH Port | The default port is 22. You can customize the SSH port. | |
| Software path configuration | Software Path | The default is the home directory of the deployment user. It can be customized and modified. It must be an absolute path starting with / and can only contain letters, numbers, and special characters (-_:@/.). After configuration, a folder named after the cluster name will be created in the corresponding directory. |
After configuration, click Next to go to the Cluster Configuration page.
Step 4: Configure the cluster
On the Cluster Configuration page, you can configure the cluster settings, including the administrator password for the sys tenant (root@sys), data and log directories, and the ports and parameters for databases and components. This section describes these settings in detail.
Cluster configuration
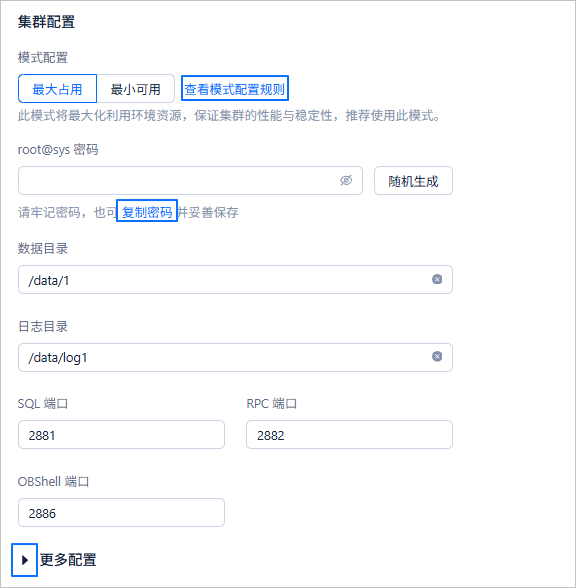 ParameterDescription
Mode configuration You can select Maximum Usage or Minimum Availability. Maximum Usage mode maximizes the use of environment resources to ensure cluster performance and stability. It is recommended. Minimum Availability mode configures the resource parameters required for normal cluster operation. For more information about the two modes, see Mode configuration rules. root@sys Password You can click Randomly generated to have obd automatically generate a random string, or you can set it manually. If you set it manually, the password must meet the following complexity requirements: - 8 to 32 characters in length
- Contains at least three of the following four types of characters: digits (0~9), uppercase letters (A~Z), lowercase letters (a~z), and special characters (
~!@#%^&*_-+=|(){}[]:;,.?/)
Data directory The default value is /data/1. You can set it to a custom path that starts with/. The path can contain only letters, digits, and special characters (-_:@/.), and the directory must be empty.Log directory The default value is /data/log1. You can set it to a custom path that starts with/. The path can contain only letters, digits, and special characters (-_:@/.), and the directory must be empty.SQL port The port number for the SQL service protocol. The default value is 2881. You can set it to a custom value within the range 1025 to 65535. Ensure the specified port is not occupied.RPC port The port number for the remote access protocol. The default value is 2882. You can set it to a custom value within the range 1025 to 65535. Ensure the specified port is not occupied.OBShell port The port for OceanBase Database O&M. The default value is 2886. You can set it to a custom value within the range 1025 to 65535. Ensure the specified port is not occupied.More configurations You can click the expand icon before More Settings to view and configure the corresponding cluster parameters. You can use the automatically assigned values or customize each parameter. Note
You can control whether to enable the auto-start feature for the observer process by using the
enable_auto_startparameter in More Configurations. To enable this feature, ensure the deployment user has sudo privileges and the deployment environment is not a container environment.Component configuration
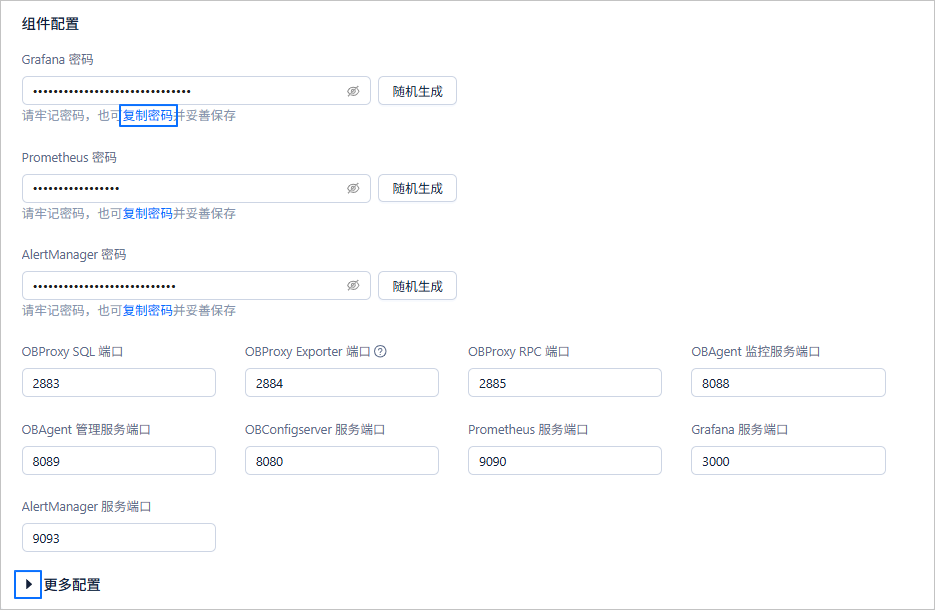 ParameterDescription
Grafana password The login password for the Grafana administrator account. You can click Randomly generated to have obd automatically generate a random string, or you can set it manually. If you set it manually, the password must meet the following complexity requirements: - 8 to 32 characters in length
- Contains at least two characters from each of the following four types: digits (0~9), uppercase letters (A~Z), lowercase letters (a~z), and special characters (
~!@#%^&*_-+=|(){}[]:;,.?/`$"<>\)
Prometheus password The login password for the Prometheus service. You can click Randomly generated to have obd automatically generate a random string, or you can set it manually. If you set it manually, the password must meet the following complexity requirements: - 8 to 32 characters in length
- Contains at least two characters from each of the following four types: digits (0~9), uppercase letters (A~Z), lowercase letters (a~z), and special characters (
~!@#%^&*_-+=|(){}[]:;,.?/`$"<>\)
AlertManager password The login password for the Alertmanager service. You can click Randomly generated to have obd automatically generate a random string, or you can set it manually. If you set it manually, the password must meet the following complexity requirements: - 8 to 32 characters in length
- Contains at least two characters from each of the following four types: digits (0~9), uppercase letters (A~Z), lowercase letters (a~z), and special characters (
~!@#%^&*_-+=|(){}[]:;,.?/`$"<>\)
OBProxy SQL port The ODP listening port. The default value is 2883. You can set it to a custom value within the range 1025 to 65535. Ensure the specified port is not occupied.OBProxy Exporter port The Exporter port of OBProxy, used by Prometheus to pull OBProxy monitoring data. The default value is 2884. You can set it to a custom value within the range 1025 to 65535. Ensure the specified port is not occupied.OBProxy RPC port The default value is 2885. You can set it to a custom value within the range 1025 to 65535. Ensure the specified port is not occupied.OBAgent monitoring service port The default value is 8088. You can set it to a custom value within the range 1025 to 65535. Ensure the specified port is not occupied.OBAgent management service port The default value is 8089. You can set it to a custom value within the range 1025 to 65535. Ensure the specified port is not occupied.obconfigserver service port The port listened on by the obconfigserver service. The default value is 8080. You can set it to a custom value within the range 1025 to 65535. Ensure the specified port is not occupied.Prometheus service port The port listened on by the Prometheus service. The default value is 9090. You can set it to a custom value within the range 1025 to 65535. Ensure the specified port is not occupied.Grafana service port The HTTP port used to access the Grafana page. The default value is 3000. You can set it to a custom value within the range 1025 to 65535. Ensure the specified port is not occupied.AlertManager service port The HTTP port used to access the Alertmanager page. The default value is 9093. You can set it to a custom value within the range 1025 to 65535. Ensure the specified port is not occupied.More configurations You can click the expand icon before More Settings to view and configure the corresponding component parameters. You can use the automatically assigned values or customize each parameter. Note
If you have configured multiple nodes in the obconfigserver node section of Node Configuration, you need to configure
vip_addressandvip_portin More Configurations. Otherwise, an error will be reported during the pre-check.
After completing all configurations, click Next to go to the Pre-check page.
Step 5: Perform a pre-check
On the Pre-check page, review all configurations. If any issues are found, click Previous to modify them. After confirming everything is correct, click Pre-check to proceed with the check.
If the pre-check reports an error, you can choose Auto Repair as suggested on the page (for check items that can be automatically fixed), or click Learn More Solutions to navigate to the error code documentation and modify the configuration yourself. After fixing all errors, you can click Recheck to perform the pre-check again.
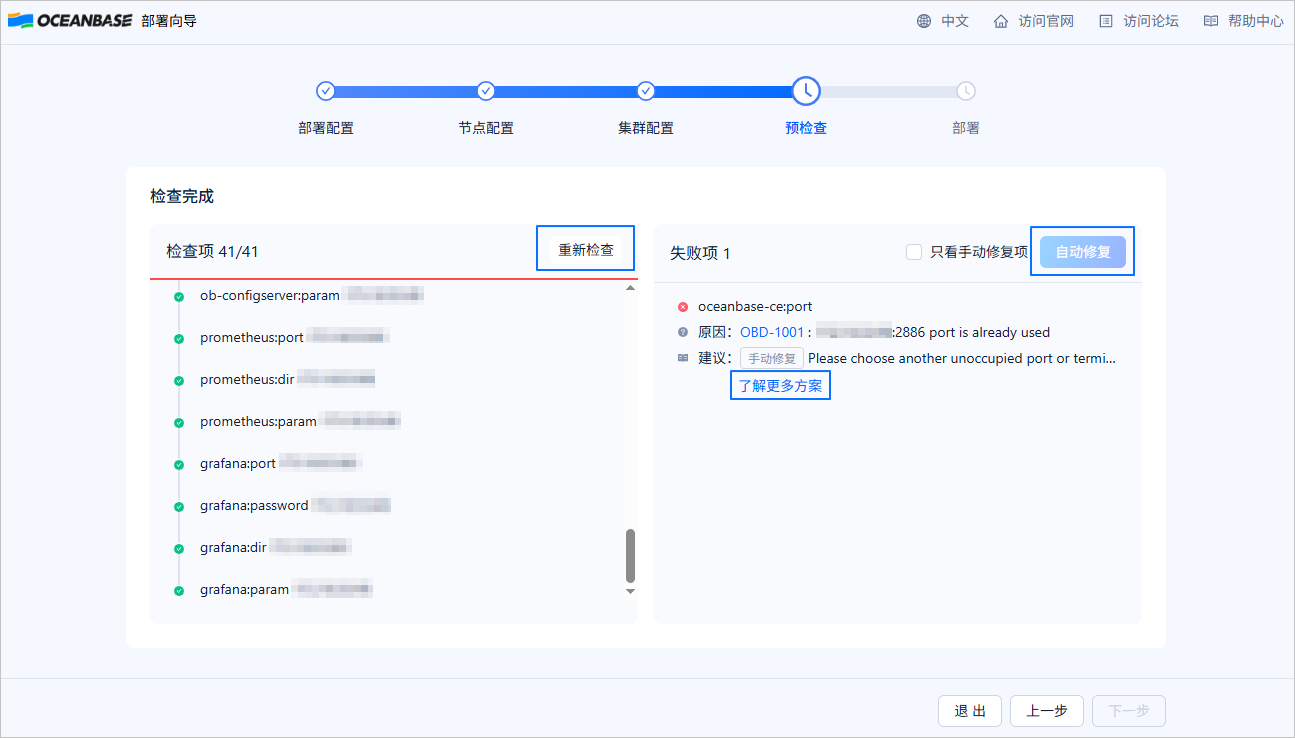
If the pre-check passes, click Deploy to start deploying OceanBase Database.
Step 6: Deploy
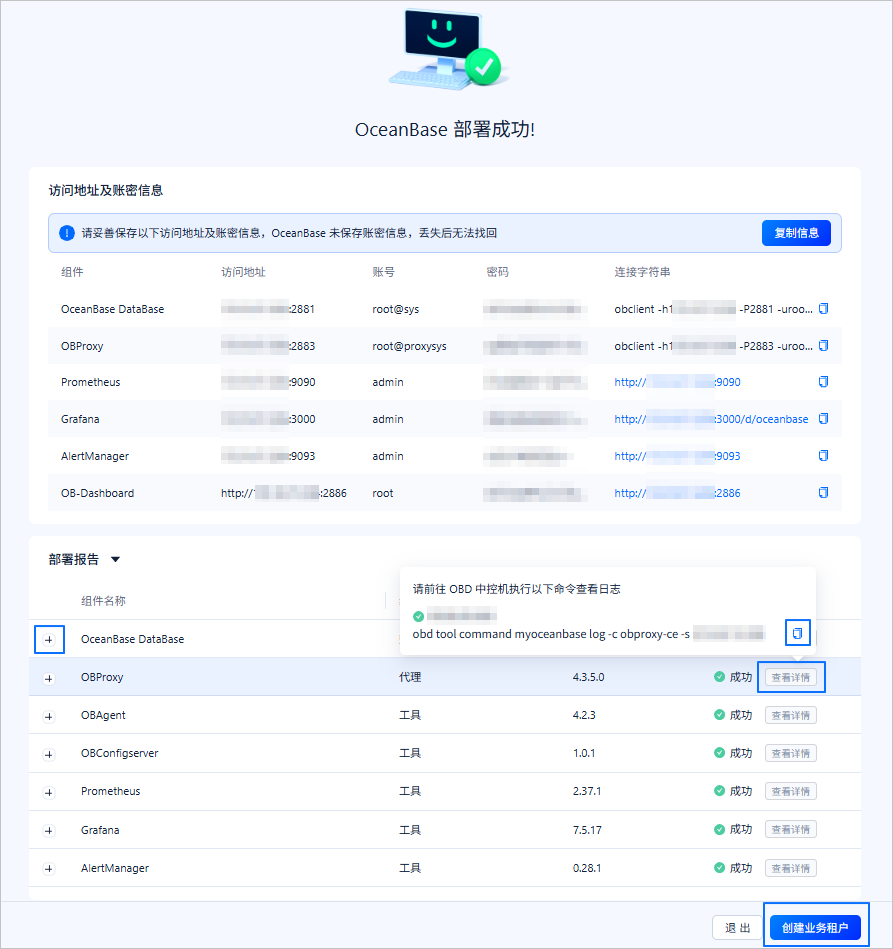
Where:
After successful deployment, you can copy the displayed connection string to connect to the corresponding component. When executing the OceanBase Database component on the command line, the connection string will use the root@sys user to connect to the OceanBase cluster. When executing the OBProxy component, the connection string will use the root@proxysys user to connect to ODP.
Clicking the connection string for the Prometheus, Grafana, AlertManager, or obshell Dashboard component will redirect you to their respective login pages. You can log in using the account and password displayed on the deployment page.
Note
In Alibaba Cloud or other cloud environments, the program may not be able to obtain a public IP address, resulting in an internal network address being output. This IP is not a public address, and you need to use the correct address to access the graphical interface.
In the Deployment Report, click the expand icon before the corresponding component to view its deployment logs. To copy a command, click the copy icon next to it. You can then execute the command on your central control server to view the log location of the corresponding component.
Click Copy Info. After copying and saving all account and password information for the OceanBase cluster, you can choose to click Exit to exit the deployment program, or click Create Business Tenant to create a business tenant through the graphical interface.
Note
If you need to deploy multiple clusters, you must click Exit in the graphical interface to end the current obd process before running the
obd webcommand to deploy the next cluster.We recommend creating a business tenant for the OceanBase cluster. The sys tenant is only used for managing the cluster. Using it as a business tenant may cause system runtime anomalies.
(Optional) Step 7: Create a business tenant
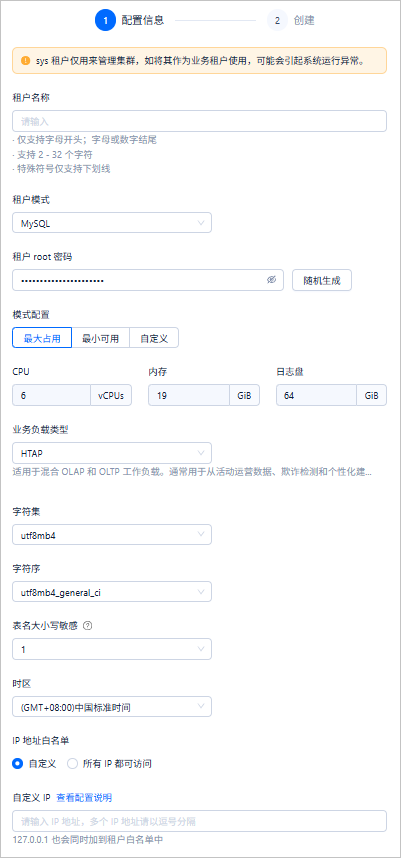
After the OceanBase cluster is successfully deployed, click the Create Business Tenant button in the lower-right corner of the deployment success page to enter the business tenant creation process. You can refer to the following table to configure the tenant information.
Parameter |
Description |
|
|---|---|---|
| Tenant Name | Set the name for the new tenant. The name must meet the following requirements:
|
|
| Tenant Mode | You can select the MySQL-compatible mode or Oracle-compatible mode from the drop-down list.
ApplicabilityOceanBase Database Community Edition does not support creating tenants in Oracle-compatible mode. |
|
| Tenant Root Password | You can click Randomly Generate to have OBD automatically generate a random string, or you can set it manually. When setting it manually, the password complexity must meet the following requirements:
|
(){}[]:;,.?/). |
| Schema Configuration | You can select the Maximum Occupancy, Minimum Available, or Custom mode.
|
|
| Business Workload Type | You can select the business workload type of the tenant from the drop-down list. When you select a different workload type, the description of its applicable scenarios is displayed below the list.
NoteThis parameter is displayed only when the deployed OceanBase Database version is V4.2.5 or later. |
|
| Character set | The default value isutf8mb4, you can select other character sets from the drop-down list. |
|
| Collation | Default isutf8mb4_general_ci, you can select another collation from the drop-down list. |
|
| Table names are case-sensitive. | You can set the value from the drop-down list. Valid values:0 1or2.
|
|
| Time zone | The default is (GMT+08:00) China Standard Time. You can select other time zones from the drop-down list. | |
| IP Address Allowlist | You can choose to customize the accessible IPs or set it to allow access from all IPs. When choosing custom settings, you can specify the client IPs allowed for login in the input box under Custom IP, then press Enter on the keyboard or enter a comma (,You can configure multiple node IPs. Hover your cursor over View configuration instructions to see the description of the configured IPs.
NoteWhen you set the IP address to |
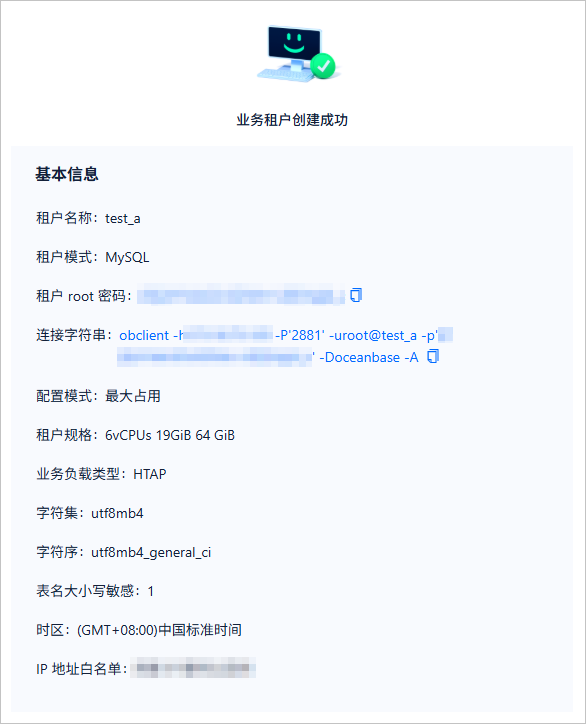
After configuration, click Next: Create Business Tenant. The system will create the corresponding tenant. After creation, the page displays the business tenant information, including the tenant name, root user password, connection string, and other details. Click the Exit button in the lower-left corner to exit the tenant creation process. Afterwards, you can click the Exit button on the deployment result page to exit the deployment program, or continue clicking Create Business Tenant to create the next business tenant.
Related operations
Manage a deployed cluster
You can run the following commands to manage a cluster deployed by OBD. For more operations, see Cluster commands.
# View Cluster List
[admin@test001 ~]$ obd cluster list
# Check the cluster status. Take the deployment named myoceanbase as an example.
[admin@test001 ~]$ obd cluster display myoceanbase
# Stop the running cluster. Take the deployment named myoceanbase as an example.
[admin@test001 ~]$ obd cluster stop myoceanbase
# Destroy the deployed cluster. Take myoceanbase as an example.
[admin@test001 ~]$ obd cluster destroy myoceanbase
Deploy specific version components
When deploying with OceanBase All in One, the packages of OceanBase All in One are updated based on the version of OceanBase Database. If other components in the package have newer versions, you can download the latest versions from the OceanBase Download Center and follow these steps to upload them to your local image repository. OBD will automatically retrieve the latest version from the local image repository during deployment.
Navigate to the directory where the component installation packages are located and add them to the local image repository.
[admin@test001 rpm]$ obd mirror clone *.rpmView the list of installation packages in the local image repository.
[admin@test001 rpm]$ obd mirror list local