The Model Context Protocol (MCP) was introduced and open-sourced by Anthropic in November 2024. It lets large language models interact with external tools and data sources. With MCP, you don't have to copy model output and run it manually—the model can instruct tools to perform actions directly.
The OceanBase MCP Server uses MCP to give LLMs access to OceanBase Database so they can run SQL. With an MCP-capable client you can quickly prototype applications. The server is open source on GitHub.
Continue is an IDE extension that supports MCP Server integration. It works with Visual Studio Code and IntelliJ IDEA.
This topic shows how to integrate the OceanBase MCP Server with Continue to build a backend application quickly.
Prerequisites
You have deployed OceanBase Database and created a MySQL-compatible tenant. For details, see Create a tenant.
You have Python 3.11 or later and pip installed. If your system Python is older, use Miniconda to create a Python 3.11+ environment.
You have Git installed for your OS.
You have the Python package manager uv installed. Verify with:
pip install uv uv --versionYou have installed the Continue extension in Visual Studio Code or IntelliJ IDEA.
After installation, click Add Models to configure the LLM API for Continue. Example configuration:

Example config file:
name: Local Assistant version: 1.0.0 schema: v1 models: - name: DeepSeek-R1-671B provider: deepseek model: DeepSeek-R1-671B apiBase: ********* apiKey: ******** context: - provider: code - provider: docs - provider: diff - provider: terminal - provider: problems - provider: folder - provider: codebase
Step 1: Get database connection details
Obtain the database connection string from your OceanBase deployment team or administrator. For example:
obclient -h$host -P$port -u$user_name -p$password -D$database_name
Parameters:
$host: The IP for connecting to OceanBase. Use an ODP address when connecting via OceanBase Database Proxy (ODP), or an OBServer IP for direct connection.$port: The connection port. ODP default is2883; direct connection default is2881. Both can be customized at deployment.$database_name: The database to use.Notice
The user connecting to the tenant must have
CREATE,INSERT,DROP, andSELECTprivileges on that database. For more on privileges, see Privilege types in MySQL-compatible mode.$user_name: The tenant account. ODP:username@tenant#clusterorcluster:tenant:username. Direct:username@tenant.$password: The account password.
For more on connection strings, see Connect to an OceanBase tenant by using OBClient.
Step 2: Configure the OceanBase MCP Server
Clone the OceanBase MCP Server repository
Download the source:
git clone https://github.com/oceanbase/mcp-oceanbase.git
Change into the project directory:
cd mcp-oceanbase
Install dependencies
From the mcp-oceanbase directory:
uv venv
source .venv/bin/activate
uv pip install .
Add and configure MCP servers
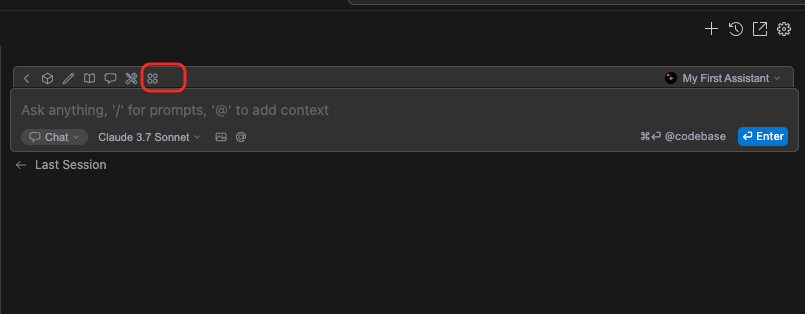
Click the rightmost button in the menu bar above the chat to open the MCP panel.
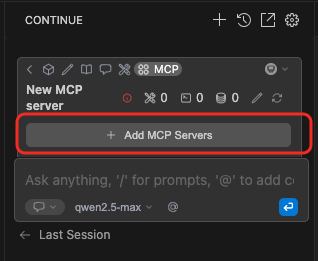
Click to add MCP Servers.
Notice
MCP is only available when Continue is in Agent mode.
Enter the configuration and confirm. Replace
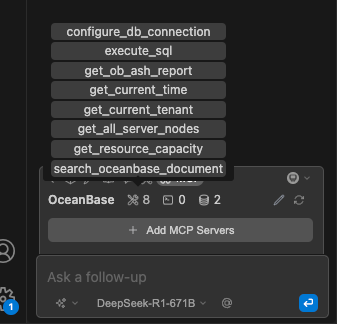
/path/to/your/mcp-oceanbase/src/oceanbase_mcp_serverwith the absolute path to theoceanbase_mcp_serverfolder, and setOB_HOST,OB_PORT,OB_USER,OB_PASSWORD, andOB_DATABASEto your database values.name: OceanBase version: 0.0.1 schema: v1 mcpServers: - name: OceanBase command: uv args: - --directory - /path/to/your/mcp-oceanbase/src/oceanbase_mcp_server - run - oceanbase_mcp_server env: OB_HOST: "****" OB_PORT: "***" OB_USER: "***" OB_PASSWORD: "***" OB_DATABASE: "***"When configuration succeeds, you will see the following: