







This topic introduces how to build an application by using a Tomcat connection pool, OceanBase Connector/J, and OceanBase Database. It also covers the use of the application for fundamental database operations, including table creation, data insertion, data deletion, data updating, and data query.
 Download the tomcat-mysql-client sample project
  Connect to OceanBase Database by using a Tomcat connection pool (MySQL mode)
 Prerequisites
- You have installed OceanBase Database.
- You have installed JDK 1.8 and Maven.
- You have installed IntelliJ IDEA.
Note
The tool used to run the sample code in this topic is IntelliJ IDEA 2021.3.2 (Community Edition). You can also choose a tool that suits your personal preference to run the code.
Procedure
Note
The steps outlined in this topic are for the Windows environment. If you are using a different operating system or compiler, the steps may vary slightly.
- Import the
tomcat-mysql-clientproject into IntelliJ IDEA. - Obtain the connection information of OceanBase Database.
- Modify the database connection information in the
tomcat-mysql-clientproject. - Set up the Tomcat runtime environment of the
tomcat-mysql-clientproject. - Run the
tomcat-mysql-clientproject.
Step 1: Import the tomcat-mysql-client project into IntelliJ IDEA
Start IntelliJ IDEA and choose File > Open....

In the Open File or Project window, select the project files and click OK to import the files.
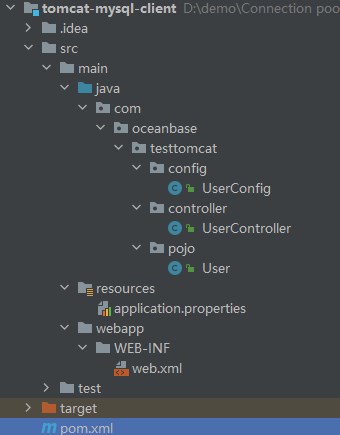
IntelliJ IDEA automatically recognizes the files and displays the project's directory structure, file list, module list, dependency relationships, and other details in the Project window. The Project window is typically positioned on the left side of the IntelliJ IDEA interface and is generally open by default. If the Project window is closed, you can reopen it by choosing View > Tool Windows > Project in the menu bar or by using the shortcut Alt + 1.
Note
When you import a project using IntelliJ IDEA, it will automatically detect the pom.xml file in the project, download the required dependency libraries based on the described dependencies in the file, and add them to the project.
View the project.
Step 2: Obtain the connection information of OceanBase Database
Contact the deployment personnel or administrator of OceanBase Database to obtain the database connection string.
obclient -hxx.xx.xx.xx -P2883 -uroot@sys#cluster -p**** -AFill in the URL below based on the OceanBase Database connection string.
Note
The URL is required in the
application.propertiesfile.jdbc:oceanbase://host:port/schema_name?user=$user_name&password=$password&characterEncoding=UTF-8The parameters are described as follows:
host: the IP address for connecting to OceanBase Database. For connection through ODP, this parameter is the IP address of an ODP. For direct connection, this parameter is the IP address of an OBServer node.port: the port for connecting to OceanBase Database. For connection through ODP, the default value is2883, which can be customized when ODP is deployed. For direct connection, the default value is2881, which can be customized when OceanBase Database is deployed.schema_name: the name of the schema to be accessed.user_name: the tenant account. For connection through ODP, the tenant account can be in theusername@tenant name#cluster nameorcluster name:tenant name:usernameformat. For direction connection, the tenant account is in theusername@tenant nameformat.password: the password of the account.characterEncoding: the character encoding format for the URL of the database. Default value:utf8.
For more information about URL parameters, see Database URL.
Step 3: Modify the database connection information in the tomcat-mysql-client project
Modify the database connection information in the application.properties file based on the OceanBase Database connection information obtained in Step 2: Obtain the connection information of OceanBase Database.
Here is an example:
- The name of the database driver is:
com.oceanbase.jdbc.Driver. - The IP address of the OBServer node is
10.10.10.1. - The port is 2881.
- The name of the database to be accessed is
TEST. - The tenant account is
root@xymysql.xymysqlis a MySQL user tenant created in OceanBase Database, androotis the username of thexymysqltenant. - The password is
******.
The sample code is as follows:
#Apache Commons DBCP2 Connection Pool
#Database Connection Pool Driver Class Name
db.app.pool.driverClassName=com.oceanbase.jdbc.Driver
#Database URL
db.app.pool.url=jdbc:oceanbase://10.10.10.1/TEST?characterEncoding=UTF-8
#Database username
db.app.pool.username=root@xymysqll
#Database password
db.app.pool.password=******
#Initial size of connection pool
db.app.pool.initialSize=3
#Maximum number of connections in the connection pool
db.app.pool.maxTotal=10
#Maximum number of idle connections in the connection pool
db.app.pool.maxIdle=20
#Minimum number of idle connections in the connection pool
db.app.pool.minIdle=5
#Maximum wait time for obtaining connections (in milliseconds)
db.app.pool.maxWaitMillis=5000
#Verify the connection's query statement
db.app.pool.validationQuery=select 1 from dual
Step 4: Set up the Tomcat runtime environment of the tomcat-mysql-client project
Download Tomcat 8.5.95.
Download the compressed file of Tomcat 8.5.95 from the official website of Apache Tomcat and decompress it to the installation directory.
Configure Tomcat in IntelliJ IDEA.
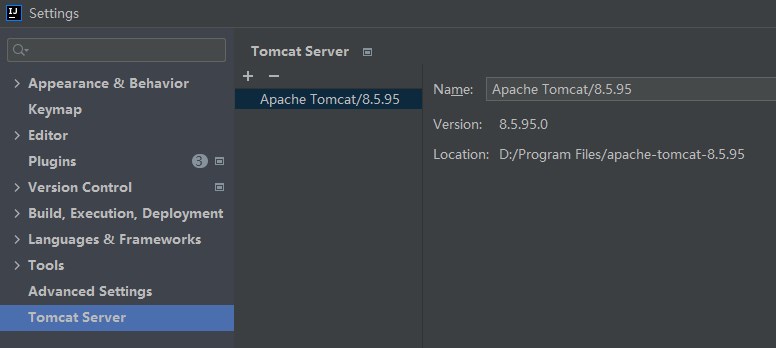
Open IntelliJ IDEA and choose File > Settings > Plugins. In the search box in the middle of the Settings window, search for Smart Tomcat, download it, and choose Apply. The Tomcat Server tab will appear at the bottom of the Settings window. Go to the Tomcat Server tab and click + on the right side to browse and select the decompressed Tomcat, and then click Apply and OK.
Create a Tomcat run configuration.
In the top toolbar of IntelliJ IDEA, choose Run > Edit Configurations. In the Run/Debug Configurations window, click + and select Tomcat Server. Specify the server name Name in the dialog box that appears. In the Configuration drop-down list, select Tomcat sever for the installed version. Modify the value of Context path to
/. Specify8080for the value of SSL port. In the Before launch section, click + and select Launch Web Browser. Click Edit and specify the URL ashttp://localhost:8080/hello/getData. Click Apply and then OK.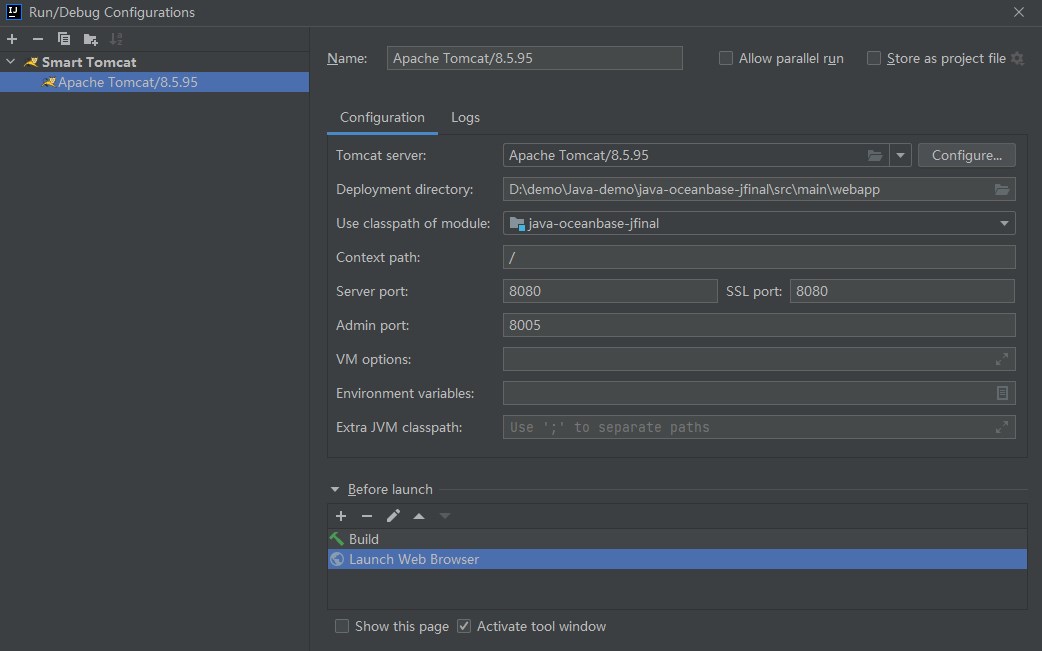
Run the Tomcat server.
In the top toolbar of IntelliJ IDEA, select the Tomcat run configuration that you created and click the run buttongreen triangle to start the Tomcat server. You can view the startup log of the Tomcat server in the Run window of IntelliJ IDEA.
Step 5: Run the tomcat-mysql-client project
Determine the running path.
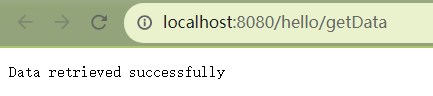
In the top toolbar of IDEA, select the Tomcat run configuration that you created earlier. Click the green triangle to start the Tomcat server. In the Chrome or IE browser, open the
http://localhost:8080/hello/getDatapath to view the running result.View the running result.
In the console window of IDEA, view the log information and output results of the project.
The result after data is inserted.
tomcat connection pool test0
tomcat connection pool test1
tomcat connection pool test2
tomcat connection pool test3
tomcat connection pool test4
tomcat connection pool test5
tomcat connection pool test6
tomcat connection pool test7
tomcat connection pool test8
tomcat connection pool test9
The result after data is modified.
-----After modification-----
POOl connection pool test0
POOl connection pool test1
POOl connection pool test2
POOl connection pool test3
POOl connection pool test4
POOl connection pool test5
POOl connection pool test6
POOl connection pool test7
POOl connection pool test8
POOl connection pool test9
The result returned to the web interface.
Project code introduction
Click tomcat-mysql-client to download the project code, which is a compressed file named tomcat-mysql-client.
After decompressing it, you will find a folder named tomcat-mysql-client. The directory structure is as follows:
│--pom.xml
│
├─.idea
│
├─src
│  ├─main
│  │  ├─java
│  │  │  └─com
│  │  │      └─oceanbase
│  │  │          └─testtomcat
│  │  │              ├─config
│  │  │              │   └─UserConfig.java
│  │  │              │
│  │  │              ├─controller
│  │  │              │   └─UserController.java
│  │  │              │
│  │  │              └─pojo
│  │  │                  └─User.java
│  │  │
│  │  ├─resources
│  │  │    └─application.properties
│  │  │
│  │  └─webapp
│  │      └─WEB-INF
│  │          └─web.xml
│  │
│  │
│  │
│  └─test
│      └─java
│
│
└─target
Here is a breakdown of the files and directories:
pom.xml: the configuration file of the Maven project, which contains the dependencies, plug-ins, and build details of the project..idea: the directory for storing project-related configuration information used in the Integrated Development Environment (IDE).src: the directory for storing the source code in the project.main: the directory for storing the main source code and resource files.java: the directory for storing the Java source code.com: the root directory for storing the Java package.oceanbase: the root directory for storing the project.testtomcat: the directory for storing code of the JFinal framework.config: the directory for storing configuration files, including the configuration classes of the application.UserConfig.java: the user configuration file.controller: the controller directory for storing the controller classes of the application.UserController.java: the controller class file.pojo: the directory for storing JavaBean or entity classes.User.java: a file for storing user entity classes.resources: the directory for storing resource files, such as configuration files and SQL files.application.properties: the configuration file for storing database connection information.webapp: the directory for storing the static resources and configuration file of the web application.WEB-INF: the directory for storing the configuration file and other protected resource files of the web application.web.xml: the deployment descriptor file of the web application.test: the directory for storing the test code and resource files.target: the directory for storing compiled class files and .jar packages.
Code in the pom.xml file
Note
If you only want to verify the example, use the default code without making any modifications. Alternatively, you can follow the instructions below to customize the pom.xml file to suit your specific requirements.
The pom.xml configuration file is as follows:
The file declaration statement.
Declare this file to be an XML file that uses XML standard
1.0and character encodingUTF-8.**The sample code is as follows: **
<?xml version="1.0" encoding="UTF-8"?>Configure the namespaces and the POM model version in the POM.
- Use
xmlnsto set the POM namespace tohttp://maven.apache.org/POM/4.0.0. - Use
xmlns:xsito set the XML namespace tohttp://www.w3.org/2001/XMLSchema-instance. - Use
xsi:schemaLocationto set the POM namespace tohttp://maven.apache.org/POM/4.0.0, and the URI of the corresponding XSD file tohttp://maven.apache.org/xsd/maven-4.0.0.xsd. - Use the
<modelVersion>element to set the POM model version used by the POM file to4.0.0.
The sample code is as follows:
<project xmlns="http://maven.apache.org/POM/4.0.0" xmlns:xsi="http://www.w3.org/2001/XMLSchema-instance" xsi:schemaLocation="http://maven.apache.org/POM/4.0.0 http://maven.apache.org/xsd/maven-4.0.0.xsd"> <modelVersion>4.0.0</modelVersion> </project>- Use
Configure basic information.
- Set the project group ID to
com.oceanbaseby using<groupId>. - Set the project dependency to
tomcat-mysql-clientby using<artifactId>. - Set the project version to
1.0-SNAPSHOTby using<version>. - Set the packaging mode of the project to WAR file (Web application archive) by using
<packaging>.
**The sample code is as follows: **
<groupId>com.oceanbase</groupId> <artifactId>tomcat-mysql-client</artifactId> <version>1.0-SNAPSHOT</version> <!-- Packaging method (default to jar) --> <packaging>war</packaging>- Set the project group ID to
Configure the Maven version.
The <maven.compiler.source> and <maven.compiler.target> parameters are set to Java 8, which specifies both the source code version and target code version of the compiler.
**The sample code is as follows: **
 <properties>
     <maven.compiler.source>8</maven.compiler.source>
     <maven.compiler.target>8</maven.compiler.target>
 </properties>
Configure core dependencies.
Specify the dependency group as com.jfinal, name as jfinal, and version as 5.0.6. With this dependency, you can use the features of the JFinal framework.
**The sample code is as follows: **
<dependency>
    <groupId>com.jfinal</groupId>
    <artifactId>jfinal</artifactId>
    <version>5.0.6</version>
</dependency>
Specify the dependency group as
com.alibaba, the dependency name asdruid, and the dependency version as1.2.8. With this dependency, you can use the Druid library to manage and optimize the establishment and release of database connections.The sample code is as follows:
<dependency>
    <groupId>com.alibaba</groupId>
    <artifactId>druid</artifactId>
    <version>1.2.8</version>
</dependency>
Specify the dependency group as
org.apache.commons, the dependency name ascommons-dbcp2, and the dependency version as2.9.0. With this dependency, you can use the Apache Commons DBCP2 library to manage and optimize the establishment and release of database connections.**The sample code is as follows: **
<dependency>
    <groupId>org.apache.commons</groupId>
    <artifactId>commons-dbcp2</artifactId>
    <version>2.9.0</version>
</dependency>
Specify the dependency group as
mysql, the dependency name asmysql-connector-java, and the dependency version as5.1.40. With this dependency, you can use the client features, such as connections, queries, and transactions, provided by OceanBase Database.The sample code is as follows:
<dependency>
    <groupId>mysql</groupId>
    <artifactId>mysql-connector-java</artifactId>
    <version>5.1.40</version>
</dependency>
application.properties
The application.properties file configures the connection information for connecting to OceanBase Database. The configuration parameters include the class name of the database driver, the connection URL, the username, the password, and the connection pool parameters. These parameters are used to obtain and manage database connections in applications for database operations.
Set the database driver to
com.mysql.jdbc.Driverby specifyingdb.app.pool.driverClassNameso as to connect to OceanBase Database.Specify the URL of connecting to the database by using
db.app.pool.url.Specify the username of connecting to the database by using
db.app.pool.username.Specify the password of connecting to the database by using
db.app.pool.password.Set the initial size of the connection pool to
3by specifyingdb.app.pool.initialSize.Set the maximum size of the connection pool to
10by specifyingdb.app.pool.maxTotal.Set the maximum number of idle connections in the connection pool to
20.Set the minimum number of idle connections in the connection pool to
5.Set the timeout period for obtaining a database connection to
5000msby specifyingdb.app.pool.maxWaitMillis. If no connection is available in the pool after 5000ms, a timeout exception is thrown.Specify the SQL verification statement for validating a database connection by using
db.app.pool.validationQuery. The statement format isselect 1.The sample code is as follows:
  #Apache Commons DBCP2 Connection Pool
  #Database Connection Pool Driver Class Name
  db.app.pool.driverClassName=com.mysql.jdbc.Driver
  #Database URL
  db.app.pool.url=jdbc:mysql:////host:port/schema_name?characterEncoding=UTF-8
  #Database username
  db.app.pool.username=user_name
  #Database password
  db.app.pool.password=******
  #Initial size of connection pool
  db.app.pool.initialSize=3
  #Maximum number of connections in the connection pool
  db.app.pool.maxTotal=10
  #Maximum number of idle connections in the connection pool
  db.app.pool.maxIdle=20
  #Minimum number of idle connections in the connection pool
  db.app.pool.minIdle=5
  #Maximum wait time for obtaining connections (in milliseconds)
  db.app.pool.maxWaitMillis=5000
  #Verify the connection's query statement
  db.app.pool.validationQuery=select 1
Common configurations for the DBCP connection pool in Tomcat:
Notice
The specific attribute (parameter) configurations depend on the project requirements and database characteristics. We recommend that you customize the configurations according to the actual situation.
Attribute |
Default value |
Description |
|---|---|---|
| username | N/A | The username for connecting to the database. |
| password | N/A | The password for connecting to the database. |
| url | N/A | The URL for connecting to the database. |
| driverClassName | N/A | The standard Java class name of the database driver. |
| connectionProperties | N/A | The connection properties that are sent to the JDBC driver when establishing a new connection. The properties are in the [propertyName=property;] format. |
| defaultAutoCommit | driver default | The default auto-commit status of connections created by the connection pool. If this attribute is not set, the setAutoCommit method is not called. |
| defaultReadOnly | driver default | The default read-only status of connections created by the connection pool. If this attribute is not set, the setReadOnly method is not called. |
| defaultTransactionIsolation | driver default | The default transaction isolation level of connections created by the connection pool. |
| defaultCatalog | N/A | The default connection catalog created by the connection pool. |
| cacheState | true | Specifies whether to cache the readOnly and autoCommit settings of connections. If set to True, the readOnly and autoCommit settings of connections are cached after the first read or write operation and before all subsequent write operations on the connections. This eliminates the need for additional database queries when calling getter methods. |
| defaultQueryTimeout | null | The query timeout period in seconds for statements created by connections in the connection pool. If the value is a non-null positive integer, this attribute specifies the query timeout period in seconds for managing connections in the pool; if the value is null, the default value of the JDBC driver is used. |
| enableAutoCommitOnReturn | true | Specifies whether to check and configure the auto-commit status of a connection after it is returned to the pool. |
| rollbackOnReturn | true | Specifies whether to roll back a non-read-only connection that has auto-commit disabled when it is returned to the pool. If set to True, a connection will be rolled back when it is returned to the pool if the connection is not read-only and auto-commit is disabled. |
| initialSize | 0 | The initial number of connections created when the connection pool is started. |
| maxTotal | 8 | The maximum number of active connections allocated from the connection pool. |
| maxIdle | 8 | The maximum number of idle connections retained in the connection pool. A negative value indicates no limit. |
| minIdle | 0 | The minimum number of idle connections retained in the connection pool. The value 0 indicates no connections. |
| maxWaitMillis | indefinitely | The maximum milliseconds to wait for a connection to be returned from the pool when no available connection is available. The value -1 indicates indefinite waiting. |
| validationQuery | N/A | The SQL verification statement. If this attribute is specified, the SQL statement must be an SQL SELECT statement that returns at least one row; otherwise, the connection is verified by calling the isValid method. |
| validationQueryTimeout | no timeout | The timeout period in seconds for a verification query to fail. The unit is seconds. If set to a positive value, the setQueryTimeout method of the driver Statement is called with the specified value as the parameter. |
| testOnCreate | false | Specifies whether to verify an object after it is created. If the object cannot be verified, the attempt that triggers the object creation fails. |
| testOnBorrow | true | Specifies whether to verify an object before it is borrowed from the pool. If the object cannot be verified, the object is removed from the pool and another object is borrowed. |
| testOnReturn | false | Specifies whether to verify an object before it is returned to the pool. |
| testWhileIdle | false | Specifies whether to verify an object that is idle in the pool. If the object cannot be verified, it is removed from the pool. |
| timeBetweenEvictionRunsMillis | -1 | The idle time in milliseconds between runs of the thread that runs the idle object eviction task. When the value is a non-positive number, the idle object eviction thread is not run. |
| numTestsPerEvictionRun | 3 | The number of objects checked during each run of the idle object eviction thread. |
| minEvictableIdleTimeMillis | 1000 * 60 * 30 | The minimum idle time in milliseconds for an object in the connection pool. |
| softMinEvictableIdleTimeMillis | -1 | The minimum idle time in milliseconds for an object in the pool, including the time required to establish a minimum number of connections. The value -1 indicates no minimum idle time. |
| logExpiredConnections | true | Specifies whether to log connections that are closed by the pool after exceeding their maximum lifetime. A value of False indicates that logging of expired connections is disabled. |
| logExpiredConnections | true | Specifies whether to record connections that are closed due to reaching the maximum lifetime. The value false indicates to disable logging of expired connections. |
| connectionInitSqls | null | The SQL statements that initialize the connection when it is first created. These statements are executed only when the connection is established by the configured connection factory. |
| lifo | true | Specifies whether the borrowObject method returns the most recently used connection in the pool. The value true means that the borrowObject method returns the last in connection (if any idle connections are available) in the pool; the value false means that the connections are returned in the order of their return to the pool, namely, the first-in-first-out (FIFO) order. |
| poolPreparedStatements | false | Specifies whether to enable the prepared statement pool. |
| maxOpenPreparedStatements | unlimited | The maximum number of open statements allocated from the connection pool. A negative value indicates no limit. |
| accessToUnderlyingConnectionAllowed | false | Specifies whether to allow access to underlying database connections. |
| removeAbandonedOnMaintenance | false | Specifies whether to disconnect abandoned connections during pool maintenance. If set to true, abandoned connections are disconnected at the end of the maintenance period. If maintenance is not enabled (timeBetweenEvictionRunsMillis is set to a positive value), this attribute is ignored. |
| removeAbandonedOnBorrow | false | Specifies whether to disconnect abandoned connections when a connection is borrowed from the pool. If set to true, an abandoned connection is disconnected each time it is borrowed from the pool. In addition, the following requirements must be met:
|
| removeAbandonedTimeout | 300 | The timeout period in seconds for disconnecting an abandoned connection. The unit is seconds. This attribute specifies the longest idle time of a connection before it is considered abandoned and can be disconnected. |
| logAbandoned | false | Specifies whether to record stack traces of application code that causes the disconnection of abandoned connections. Stack traces must be generated, and therefore the recording of abandoned statements and connections increases the overhead of opening each connection or executing each statement. |
| abandonedUsageTracking | false | Specifies whether to record stack traces of abandoned connections. The value true means that stack traces of connections are recorded each time the connections are called in the pool, and the most recent stack trace is retained to help debug abandoned connections. This setting increases a great deal of overhead. |
| fastFailValidation | false | Specifies whether to quickly fail the validation for connections that throw fatal SQLExceptions. The value true means that a request to disconnect a connection will fail immediately, without calling the isValid method of the driver or attempting to execute a verification query. By default, the following SQL_STATE codes are considered fatal error signals:
|
| disconnectionSqlCodes | null | A comma-separated list of SQL_STATE codes. These codes are considered fatal disconnect error signals. When the fastFailValidation attribute is set to true, the disconnectionSqlCodes attribute takes effect. |
Code in web.xml
The web.xml file is used to configure filters for web applications.
The content of the web.xml configuration file is as follows:
The declaration statement.
Declare this file to be an XML file that uses XML standard
1.0and character encodingUTF-8.The sample code is as follows:
<?xml version="1.0" encoding="UTF-8"?>The configuration of the XML namespace and the XML model version.
- Use
xmlns:xsito set the XML namespace tohttp://www.w3.org/2001/XMLSchema-instance. - Use
xmlnsto set the XML namespace tohttp://java.sun.com/xml/ns/javaee. - Use
xsi:schemaLocationto set the XML namespace tohttp://java.sun.com/xml/ns/javaee, and the URI of the corresponding XSD file tohttp://java.sun.com/xml/ns/javaee/web-app_3_0.xsd. - Use
<id>and<version>to set the ID of the web application toWebApp_IDand the version number to3.0.
The sample code is as follows:
<web-app xmlns:xsi="http://www.w3.org/2001/XMLSchema-instance" xmlns="http://java.sun.com/xml/ns/javaee" xsi:schemaLocation="http://java.sun.com/xml/ns/javaee http://java.sun.com/xml/ns/javaee/web-app_3_0.xsd" id="WebApp_ID" version="3.0">- Use
The configuration of a JFinal filter.
Configure a filter named
jfinalfor the web application to use the JFinal framework. Set the class of the filter tocom.jfinal.core.JFinalFilter. Use the initialization parameterconfigClassto set the location of the configuration class of the JFinal framework tocom.oceanbase.testtomcat.config.UserConfig. The JFinal filter allows you to use the JFinal framework in the web application and configure the behavior of the JFinal framework based on the specified configuration class.The sample code is as follows:
 <filter>
     <filter-name>jfinal</filter-name>
     <filter-class>com.jfinal.core.JFinalFilter</filter-class>
     <init-param>
         <param-name>configClass</param-name>
         <!-- your jfinal configuration location -->
         <param-value>com.oceanbase.testtomcat.config.UserConfig</param-value>
     </init-param>
 </filter>
The configuration of mappings for the JFinal filter.
Apply the
jfinalfilter to all request paths, namely, to all requests in the application.The sample code is as follows:
 <filter-mapping>
     <filter-name>jfinal</filter-name>
     <url-pattern>/*</url-pattern>
 </filter-mapping>
Introduction to the UserConfig.java file
The UserConfig.java file is used to configure the routing, plug-ins, database connections, and other related information of an application.
The code in the UserConfig.java file mainly includes the following parts:
Reference other classes and APIs.
Declare the current file to contain the following APIs and classes:
StatFilterclass: used to statistics the performance of database access.JdbcConstantsclass: used to define constant values of database types.WallFilterclass: used to prevent SQL injection attacks.PropKitclass: used to read configuration files.ActiveRecordPluginclass: used to operate databases.Dbclass: used to execute database operations.MysqlDialectclass: used to specify the dialect of the database.DruidPluginclass: used to connect to databases.Engineclass: used to configure the template engine.UserControllerclass: used to process requests related to users.Userclass: used to transmit and store user data.
The sample code is as follows:
import com.alibaba.druid.filter.stat.StatFilter;
import com.alibaba.druid.util.JdbcConstants;
import com.alibaba.druid.wall.WallFilter;
import com.jfinal.config.*;
import com.jfinal.kit.PropKit;
import com.jfinal.plugin.activerecord.ActiveRecordPlugin;
import com.jfinal.plugin.activerecord.Db;
import com.jfinal.plugin.activerecord.dialect.MysqlDialect;
import com.jfinal.plugin.druid.DruidPlugin;
import com.jfinal.template.Engine;
import com.oceanbase.testjfinal.controller.UserController;
import com.oceanbase.testjfinal.pojo.User;
Define the
UserConfigclass.You can rewrite the
JFinalConfigclass methods to configure the constants, routing, plug-ins, and database connections.Define the
configConstantmethod.Use this method to configure the constants of the JFinal framework and read the configuration values from the configuration file by using
PropKit.The sample code is as follows:
@Override
public void configConstant(Constants constants) {
    PropKit.use("application.properties");
}
Define the
configRoutemethod.Use this method to configure the routing mappings. Use the
routes.addmethod to map the"/hello"path to the default access page of theUserControllerclass.The sample code is as follows:
@Override
public void configRoute(Routes routes) {
    routes.add("/hello", UserController.class, "/");
}
Define the
configEnginemethod.Use this method to configure the template engine.
The sample code is as follows:
@Override
public void configEngine(Engine engine) {
}
Define the
configPluginmethod.Use this method to configure plug-ins of the application. Call the
initmethod to initialize the database connection and table structure, create theDruidPluginandActiveRecordPluginplug-ins, and add them to thepluginscollection. Additionally, call theaddMappingmethod of theactiveRecordPluginto add mappings between database tables and entity classes. In this way, theTEST_USERtable is mapped to theUserclass.The sample code is as follows:
@Override
public void configPlugin(Plugins plugins) {
    init();
    DruidPlugin druidPlugin = createDruidPlugin();
    plugins.add(druidPlugin);

    ActiveRecordPlugin activeRecordPlugin = createActiveRecordPlugin(druidPlugin);
    activeRecordPlugin.addMapping("TOMCAT_TEST", User.class);
    plugins.add(activeRecordPlugin);
}
Define the
createDruidPluginmethod.Use this method to create a
DruidPluginplug-in and configure the relevant parameters, including the size of the connection pool, SQL firewall, and error handling for connections.Use the
getmethod ofPropKitto obtain the database connection-related attribute values from the configuration file. These attributes include the URL, username, password, and driver class. Then create aDruidPluginobject and initialize it with these attribute values.Use the
addFiltermethod to add aStatFilterinstance to theDruidPluginfor performance statistics of database access. Create aWallFilterinstance, set the database type to OceanBase by using thesetDbTypemethod, and add theWallFilterinstance to theDruidPluginfor SQL firewall filtering.Use the
setInitialSizemethod to set the initial size of the connection pool; thesetMaxPoolPreparedStatementPerConnectionSizemethod to set the maximum number of preprocessed statements per connection in the pool; thesetTimeBetweenConnectErrorMillismethod to set the time interval between two connection errors; and thesetValidationQuerymethod to set the validation query statement for connections. Finally, return the createdDruidPlugininstance.The sample code is as follows:
private DruidPlugin createDruidPlugin() {
    DruidPlugin druidPlugin = new DruidPlugin(
        PropKit.get("db.app.pool.url"),
        PropKit.get("db.app.pool.username"),
        PropKit.get("db.app.pool.password"),
        PropKit.get("db.app.pool.driverClassName")
    );

    druidPlugin.addFilter(new StatFilter());
    WallFilter wallFilter = new WallFilter();
    wallFilter.setDbType(JdbcConstants.OCEANBASE);
    druidPlugin.addFilter(wallFilter);

    druidPlugin.setInitialSize(PropKit.getInt("db.app.pool.initialSize"));
    druidPlugin.setMaxPoolPreparedStatementPerConnectionSize(PropKit.getInt("db.app.pool.maxTotal"));
    druidPlugin.setTimeBetweenConnectErrorMillis(PropKit.getInt("db.app.pool.maxWaitMillis"));
    druidPlugin.setValidationQuery("select 1");

    return druidPlugin;
}
Define the
initmethod.Use this method to initialize the database connection and create a database table. Call the
initDbConnectionmethod to initialize the database connection and return anActiveRecordPlugininstance. Then execute an SQL statement to check whether the user table namedTOMCAT_TESTexists. If theTOMCAT_TESTtable exists, execute the SQL statementDROP TABLE TOMCAT_TESTto drop the table. After that, execute theCREATE TABLEstatement to create a database table namedTOMCAT_TEST. This table contains theIDandUSERNAMEfields. Finally, disconnect from theActiveRecordPluginplug-in and release the database connection.The sample code is as follows:
public void init() {
    ActiveRecordPlugin arp = initDbConnection();

    // Check if table exists
    boolean tableExists = Db.queryInt("SELECT COUNT(*) FROM information_schema.TABLES WHERE TABLE_SCHEMA = 'TEST' AND TABLE_NAME = 'TOMCAT_TEST'") > 0;

    // Drop table if it exists
    if (tableExists) {
        Db.update("DROP TABLE TOMCAT_TEST");
    }

    // Create table
    String sql = "CREATE TABLE TOMCAT_TEST (ID int, USERNAME varchar(50))";
    Db.update(sql);

    arp.stop();
}
Define the
initDbConnectionmethod.Use this method to initialize the database connection. First, call the
createDruidPluginmethod to create aDruidPluginobject and assign it to thedruidPluginvariable. ThecreateDruidPluginmethod is responsible for creating and configuring theDruidPluginfor managing the database connection pool. Then call thecreateActiveRecordPluginmethod to create anActiveRecordPluginobject and pass thedruidPluginobject as a parameter to this method. ThecreateActiveRecordPluginmethod is responsible for creating and configuring theActiveRecordPluginfor managing database operations. After that, call thedruidPlugin.startmethod to start theDruidPluginand initialize the database connection pool. Finally, call theactiveRecordPlugin.startmethod to start theActiveRecordPlugin, which will initialize the relevant database operation settings based on the configuration.The sample code is as follows:
private ActiveRecordPlugin initDbConnection() {
    DruidPlugin druidPlugin = createDruidPlugin();
    ActiveRecordPlugin activeRecordPlugin = createActiveRecordPlugin(druidPlugin);

    druidPlugin.start();
    activeRecordPlugin.start();

    return activeRecordPlugin;
}
Define the
ConfigInterceptorandConfigHandlermethods.Use these methods to perform global configurations during system initialization.
The sample code is as follows:
@Override
public void configInterceptor(Interceptors interceptors) {
}

@Override
public void configHandler(Handlers handlers) {
}
UserController.java
The UserController.java file uses the getData method to insert data into the database, query data from the database, and return the query result to the client in the JSON format. Use the Db class of the JFinal framework for database operations, and use the custom User class for data mappings so as to return data.
The code in the UserController.java file mainly includes the following parts:
Reference other classes and APIs.
Declare this file to contain the following APIs and classes:
Controllerclass: processes requests and responses.Dbclass: executes database operations.Recordclass: performs database operations, such as querying, inserting, updating, and deleting data.ArrayListclass: creates an empty list.Userclass: maps database tables.ListAPI: operates the query result set.
The sample code is as follows:
import com.jfinal.core.Controller;
import com.jfinal.plugin.activerecord.Db;
import com.jfinal.plugin.activerecord.Record;

import java.util.ArrayList;
import java.util.List;
Define the
UserControllerclass.Use this class to provide a controller for the JFinal framework, and use the
getDatamethod to insert data into and query data from the database.Insert data. Create a
dataListlist that contains 10Recordobjects. EachRecordobject has uniqueIDandUSERNAMEvalues. Use theDb.batchSavemethod to save the records in thedataListlist to a database table namedTOMCAT_TEST.The sample code is as follows:
        for (int i = 0; i < 10; i++) {
            Record record = new Record().set("ID", i).set("USERNAME", "Tomcat connection pool test" + i);
            dataList.add(record);
        }
        Db.batchSave("TOMCAT_TEST", dataList, dataList.size());
Query data. Use the
Db.findmethod to execute an SQL query and store the query result in theresultListlist. Use an enhancedFORloop to traverse eachRecordobject in theresultListlist. Use thegetStrmethod to obtain values of specified fields in aRecordobject and use theSystem.out.printlnmethod to return these values.The sample code is as follows:
    List<Record> resultList = Db.find("SELECT * FROM TOMCAT_TEST");
    for (Record result : resultList) {
        System.out.println(result.getStr("USERNAME"));
    }
Modify data. Use a loop to perform 10 rounds of iterations and execute an update statement in each iteration. Call the
Db.updatemethod to update records in theTOMCAT_TESTtable based on specified conditions.The sample code is as follows:
    for (int i = 0; i < 10; i++) {
        Db.update("UPDATE TOMCAT_TEST SET USERNAME = 'Connection pool test" + i + "' WHERE ID = " + i);
    }
Query the modified data. Query the
TOMCAT_TESTtable and save the query result inmodifiedList. Return the information in the-----After modification-----section. TraversemodifiedListand return theUSERNAMEvalue of each record. Use therenderJsonmethod to render the response messageData retrieved successfullyinto the JSON format and return it to the client.The sample code is as follows:
        List<Record> modifiedList = Db.find("SELECT * FROM TOMCAT_TEST");
        System.out.println("-----After modification-----");
        for (Record modified : modifiedList) {
            System.out.println(modified.getStr("USERNAME"));
        }
        renderJson("Data retrieved successfully");
Introduction to the User.java file
The User.java file is used to map database tables and Java objects.
The code in the User.java file mainly includes the following parts:
Reference the
Modelclass.Use the
Modelclass to map database tables and operate data.Define the
Userclass.Use the
Userclass to inherit the methods provided in theModelclass for database operations.The sample code is as follows:
import com.jfinal.plugin.activerecord.Model;


    public class User extends Model<User> {
        public static final User dao = new User();
}
Full code
<?xml version="1.0" encoding="UTF-8"?>
<project xmlns="http://maven.apache.org/POM/4.0.0"
         xmlns:xsi="http://www.w3.org/2001/XMLSchema-instance"
         xsi:schemaLocation="http://maven.apache.org/POM/4.0.0 http://maven.apache.org/xsd/maven-4.0.0.xsd">
    <modelVersion>4.0.0</modelVersion>

    <groupId>com.oceanbase</groupId>
    <artifactId>tomcat-mysql-client</artifactId>
    <version>1.0-SNAPSHOT</version>
    <!-- Packaging method (default to jar) -->
    <packaging>war</packaging>

    <properties>
        <maven.compiler.source>8</maven.compiler.source>
        <maven.compiler.target>8</maven.compiler.target>
    </properties>
    <dependencies>
        <dependency>
            <groupId>com.jfinal</groupId>
            <artifactId>jfinal</artifactId>
            <version>5.0.6</version>
        </dependency>


        <dependency>
            <groupId>com.alibaba</groupId>
            <artifactId>druid</artifactId>
            <version>1.2.8</version>
        </dependency>

        <dependency>
            <groupId>org.apache.commons</groupId>
            <artifactId>commons-dbcp2</artifactId>
            <version>2.9.0</version>
        </dependency>
            <dependency>
                <groupId>mysql</groupId>
                <artifactId>mysql-connector-java</artifactId>
                <version>5.1.40</version>
            </dependency>

    </dependencies>
</project>
    #Apache Commons DBCP2 Connection Pool
    #Database Connection Pool Driver Class Name
    db.app.pool.driverClassName=com.mysql.jdbc.Driver
    #Database URL
    db.app.pool.url=jdbc:mysql:////host:port/schema_name?characterEncoding=UTF-8
    #Database username
    db.app.pool.username=user_name
    #Database password
    db.app.pool.password=******
    #Initial size of connection pool
    db.app.pool.initialSize=3
    #Maximum number of connections in the connection pool
    db.app.pool.maxTotal=10
    #Maximum number of idle connections in the connection pool
    db.app.pool.maxIdle=20
    #Minimum number of idle connections in the connection pool
    db.app.pool.minIdle=5
    #Maximum wait time for obtaining connections (in milliseconds)
    db.app.pool.maxWaitMillis=5000
    #Verify the connection's query statement
    db.app.pool.validationQuery=select 1
<?xml version="1.0" encoding="UTF-8"?>
<web-app xmlns:xsi="http://www.w3.org/2001/XMLSchema-instance" xmlns="http://java.sun.com/xml/ns/javaee" xsi:schemaLocation="http://java.sun.com/xml/ns/javaee http://java.sun.com/xml/ns/javaee/web-app_3_0.xsd" id="WebApp_ID" version="3.0">
    <filter>
        <filter-name>jfinal</filter-name>
        <filter-class>com.jfinal.core.JFinalFilter</filter-class>
        <init-param>
            <param-name>configClass</param-name>
            <!-- your jfinal configuration location -->
            <param-value>com.oceanbase.testjfinal.config.UserConfig</param-value>
        </init-param>
    </filter>

    <filter-mapping>
        <filter-name>jfinal</filter-name>
        <url-pattern>/*</url-pattern>
    </filter-mapping>
</web-app>
package com.oceanbase.testtomcat.config;

import com.alibaba.druid.filter.stat.StatFilter;
import com.alibaba.druid.util.JdbcConstants;
import com.alibaba.druid.wall.WallFilter;
import com.jfinal.config.*;
import com.jfinal.kit.PropKit;
import com.jfinal.plugin.activerecord.ActiveRecordPlugin;
import com.jfinal.plugin.activerecord.Db;
import com.jfinal.plugin.activerecord.dialect.MysqlDialect;
import com.jfinal.plugin.druid.DruidPlugin;
import com.jfinal.template.Engine;
import com.oceanbase.testtomcat.controller.UserController;
import com.oceanbase.testtomcat.pojo.User;

public class UserConfig extends JFinalConfig {
    @Override
    public void configConstant(Constants constants) {
        // Read properties configuration
        PropKit.use("application.properties");
    }

    @Override
    public void configRoute(Routes routes) {
        // Set the default access page for project startup, which does not need to be set in the web.
        routes.add("/hello", UserController.class);

    }

    @Override
    public void configEngine(Engine engine) {
    }

    @Override
    public void configPlugin(Plugins plugins) {
        init();
        DruidPlugin druidPlugin = createDruidPlugin();
        plugins.add(druidPlugin);

        ActiveRecordPlugin activeRecordPlugin = createActiveRecordPlugin(druidPlugin);
        activeRecordPlugin.addMapping("TOMCAT_TEST", User.class);
        plugins.add(activeRecordPlugin);
    }

    private DruidPlugin createDruidPlugin() {
        DruidPlugin druidPlugin = new DruidPlugin(
                PropKit.get("db.app.pool.url"),
                PropKit.get("db.app.pool.username"),
                PropKit.get("db.app.pool.password"),
                PropKit.get("db.app.pool.driverClassName")
        );

        druidPlugin.addFilter(new StatFilter());
        WallFilter wallFilter = new WallFilter();
        wallFilter.setDbType(JdbcConstants.OCEANBASE);
        druidPlugin.addFilter(wallFilter);

        druidPlugin.setInitialSize(PropKit.getInt("db.app.pool.initialSize"));
        druidPlugin.setMaxPoolPreparedStatementPerConnectionSize(PropKit.getInt("db.app.pool.maxTotal"));
        druidPlugin.setTimeBetweenConnectErrorMillis(PropKit.getInt("db.app.pool.maxWaitMillis"));
        druidPlugin.setValidationQuery("select 1 from dual");

        return druidPlugin;
    }

    private ActiveRecordPlugin createActiveRecordPlugin(DruidPlugin druidPlugin) {
        ActiveRecordPlugin activeRecordPlugin = new ActiveRecordPlugin(druidPlugin);
        activeRecordPlugin.setDialect(new MysqlDialect());

        return activeRecordPlugin;
    }

    public void init() {
        ActiveRecordPlugin arp = initDbConnection();

        // Check if table exists
        boolean tableExists = Db.queryInt("SELECT COUNT(*) FROM information_schema.TABLES WHERE TABLE_SCHEMA = 'TEST' AND TABLE_NAME = 'TOMCAT_TEST'") > 0;

        // Drop table if it exists
        if (tableExists) {
            Db.update("DROP TABLE TOMCAT_TEST");
        }

        // Create table
        String sql = "CREATE TABLE TOMCAT_TEST (ID int, USERNAME varchar(50))";
        Db.update(sql);

        arp.stop();
    }
    private ActiveRecordPlugin initDbConnection() {
        DruidPlugin druidPlugin = createDruidPlugin();
        ActiveRecordPlugin activeRecordPlugin = createActiveRecordPlugin(druidPlugin);

        druidPlugin.start();
        activeRecordPlugin.start();

        return activeRecordPlugin;
    }

    @Override
    public void configInterceptor(Interceptors interceptors) {
    }

    @Override
    public void configHandler(Handlers handlers) {
    }
}
package com.oceanbase.testtomcat.controller;

import com.jfinal.core.Controller;
import com.jfinal.plugin.activerecord.Db;
import com.jfinal.plugin.activerecord.Record;

import java.util.ArrayList;
import java.util.List;

public class UserController extends Controller {

    public void getData() {
        try {
            List<Record> dataList = new ArrayList<>();
            // Insert data
            for (int i = 0; i < 10; i++) {
                Record record = new Record().set("ID", i).set("USERNAME", "Tomcat connection pool test" + i);
                dataList.add(record);
            }
            Db.batchSave("TOMCAT_TEST", dataList, dataList.size());
            // Query data
            List<Record> resultList = Db.find("SELECT * FROM TOMCAT_TEST");
            for (Record result : resultList) {
                System.out.println(result.getStr("USERNAME"));
            }
            // Modify data
            for (int i = 0; i < 10; i++) {
                Db.update("UPDATE TOMCAT_TEST SET USERNAME = 'Connection pool test" + i + "' WHERE ID = " + i);
            }
            // Query the modified data
            List<Record> modifiedList = Db.find("SELECT * FROM TOMCAT_TEST");
            System.out.println("-----After modification-----");
            for (Record modified : modifiedList) {
                System.out.println(modified.getStr("USERNAME"));
            }
            renderJson("Data retrieved successfully");
        } catch (Exception e) {
            e.printStackTrace();
            renderJson("Error occurred");
        }
    }
}
package com.oceanbase.testtomcat.pojo;

import com.jfinal.plugin.activerecord.Model;


    public class User extends Model<User> {
        public static final User dao = new User();

}
References
For more information about OceanBase Connector/J, see OceanBase JDBC driver.