


Application Scenarios
- End-to-end SSL Authentication: The entire connection and data transmission between the business application, OBProxy, and OceanBase Database are encrypted using SSL authentication.
- OBProxy SSL Authentication: SSL authentication is enabled only for the OBProxy cluster, so that the connection and data transmission between the business application and OBProxy are encrypted using SSL authentication.
- OceanBase SSL Authentication: SSL authentication is enabled only for the OceanBase cluster. In scenarios without OBProxy, the connection and data transmission between the business application and the OceanBase cluster are encrypted using SSL authentication.
Prerequisites
Certificate Application and Issuance
- Apply for a CA root certificate from a trusted CA institution in advance and ensure it has not expired.
- Use the CA root certificate to issue a server certificate in advance. Ensure the server certificate has not expired and keep the certificate and its private key.
- After performing the above operations, three PEM format files are generated (the file type must be PEM, and the file names are arbitrary): CA root certificate (ca.pem), server certificate (server.pem), and server private key (server-key.pem).
When using the CA root certificate to issue a server certificate, pay close attention to the relevant Considerations.
Enable SSL Link Encryption
- Both the OceanBase and OBProxy clusters must be in the RUNNING state.
- The OceanBase cluster must be of version V4.0.0.0 or later.
Technical Principles
Enable SSL Authentication in OceanBase Database
Step 1: Upload Certificate Files
Before enabling SSL authentication in OceanBase Database, place the CA root certificate, server certificate, and server private key in the ${run_path}/wallet directory on each OBServer node. After SSL authentication is enabled in OceanBase Database, when adding an OBServer node, reinstalling an OBServer node, replacing an OBServer node, or adding a zone, OCP automatically places the certificate files on the new OBServer node.
Notice
After OCP takes over a cluster with SSL authentication enabled, the new OCP instance may not have the cluster's certificate files. In such cases, OCP cannot upload the certificate files to the new OBServer node during the aforementioned operations. You can resolve this issue by re-uploading the certificate files to OCP and updating the SSL certificate.
Step 2: Enable the SSL Switch
SSL authentication in OceanBase Database is divided into RPC SSL authentication and SQL SSL authentication, which respectively control whether RPC connections and SQL connections between OceanBase Database and OBServer nodes are encrypted using SSL authentication. Both protocols share the same set of certificates.
The SQL statement to enable RPC SSL authentication is as follows:
# Specifies the method for obtaining the SSL certificate. Only 'file' is supported, which retrieves from a local file. If disabled, the value is an empty string.
ALTER SYSTEM SET ssl_external_kms_info = '{"ssl_mode":"file"}';

# Sets the RPC authentication method for OceanBase as both server and client:
# As an RPC server, it can establish both SSL and non-SSL connections. If disabled, the value is ALL.
ALTER SYSTEM SET rpc_server_authentication_method = 'ALL';

# As an RPC client, it only establishes SSL connections. If disabled, the value is NONE.
ALTER SYSTEM SET rpc_client_authentication_method = 'SSL_NO_ENCRYPT';

# Enables SQL RPC authentication.
ALTER SYSTEM SET ssl_client_authentication = True;

# Sets the TLS protocol version.
ALTER SYSTEM SET sql_protocol_min_tls_version = "TLSv1.1";
Enable SSL authentication in OBProxy
Step 1: Upload the certificate files
Similar to OceanBase, you need to upload three files to the ${run_path}/wallet directory on all OBProxy Servers. In the scenario of adding an OBProxy Server, OCP will also place the certificate files on the new OBProxy Server.
Step 2: Enable SSL authentication
Use the OBProxy administrator user root@proxysys to connect to OBProxy and execute the following SQL to configure the absolute path of the certificate.
update proxyconfig.security_config set CONFIG_VAL= '{"sourceType" : "FILE", "CA" : "/xxx/wallet/ca.pem", "publicKey": "/xxx/wallet/proxy-cert.pem", "privateKey" : "/xxx/wallet/proxy-key.pem"}' where APP_NAME = 'obprox
' and VERSION = '1';
Enable SSL authentication.
# Enable client SSL authentication. After enabling, business applications can connect to OBProxy through SSL authentication.
alter proxyconfig set enable_client_ssl=true;

# Enable server SSL authentication. After enabling, OBProxy can connect to OceanBase through SSL authentication.
alter proxyconfig set enable_server_ssl=true;
SSL authentication between the client and OBProxy is not mandatory; connections can be established using both SSL and non-SSL authentication methods. If SSL authentication is enabled in OBProxy, it can support connecting to OceanBase clusters with and without SSL authentication enabled. When OBProxy establishes a connection, it first negotiates with OceanBase the method to use for establishing the connection.
Note
Typically, OBProxy and all its associated OceanBase clusters should use the same set of certificates. Considering that an enterprise's CA certificate generally exists only once, when associating OBProxy with an OceanBase cluster, OCP will not perform additional checks. This scenario must be ensured by the user.
Considerations
Server certificate issuance
When using a CA root certificate to issue server certificates, OceanBase and OBProxy have the following specific requirements for the certificate issuance process.
When issuing a server certificate with a private key, you must specify a key length of 2048. Example:
openssl genkey -algorithm RSA -out server-key.pem -pkeyopt rsa_keygen_bits:2048When both OBProxy and OceanBase have SSL authentication enabled, if they use the same set of server certificates, these certificates serve as both client and server certificates. The certificate's Extended Key Usage must include both
Client AuthenticationandServer Authentication. You can confirm this with the following command:openssl x509 -in Server Certificate File Path -text -noout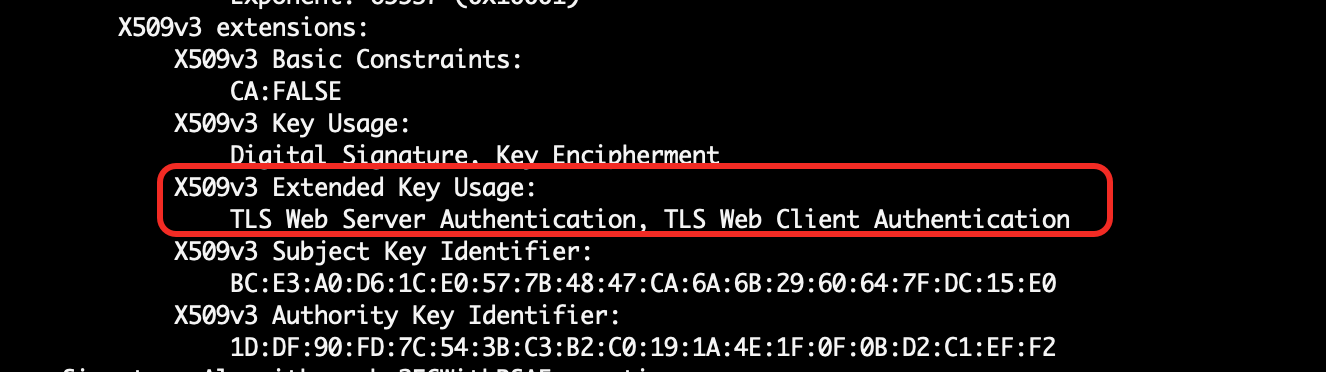
If you need subordinate certificates, note that when using a CA root certificate to issue subordinate certificates, you must specify that the subordinate certificate is a CA certificate. You can confirm the issued subordinate certificate with the following command:
openssl x509 -in Subordinate Certificate File Path -text -nooutCA:TRUEindicates the subordinate certificate is a CA certificate, which can be used to issue other certificates.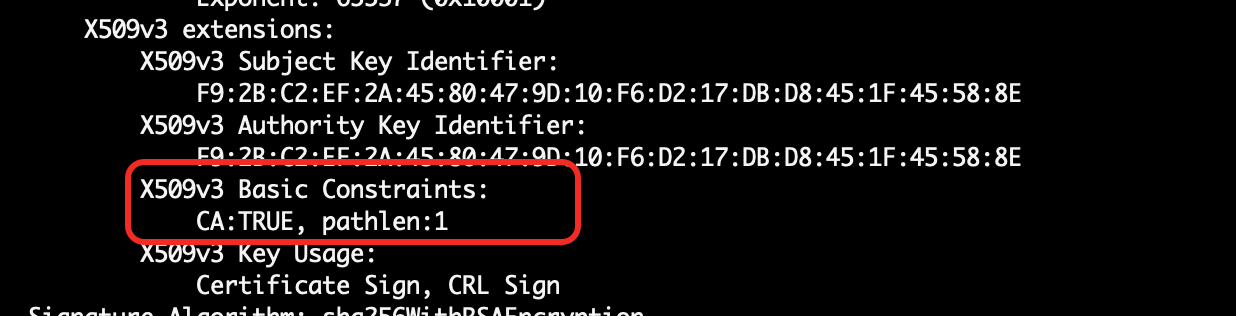
End-to-end SSL authentication
When both OceanBase and OBProxy have SSL authentication enabled, they will use mutual SSL authentication. On the OceanBase side, you need to manually set the tenant parameter ob_ssl_invited_common_names by appending the cn field from the subject of the OBProxy certificate to this parameter. Otherwise, OBProxy will not be able to access the tenant.
For details, see ob_ssl_invited_common_names.
Procedure
Step 1: Upload the certificate group
On the OCP certificate management page, upload the CA root certificate, server certificate, and server private key as a certificate group.
Step 2: Enable SSL encryption
Go to the security configuration page for OceanBase/OBProxy and enable SSL encryption for OceanBase/OBProxy.