


This topic introduces how to build an application by using a C3P0 connection pool, OceanBase Connector/J, and OceanBase Database. It also covers the use of the application for fundamental database operations, including table creation, data insertion, data deletion, data updating, and data query.
 Download the c3p0-oceanbase-jdbc sample project
  Connect to OceanBase Database by using a C3P0 connection pool (Oracle mode)
Prerequisites
You have installed OceanBase Database and created an Oracle tenant.
You have installed JDK 1.8 and Maven.
You have installed Eclipse.
Note
The tool used to run the sample code in this topic is Eclipse IDE for Java Developers 2022-03, but you can also choose a tool of your preference to run the sample code.
Procedure
Note
The steps outlined in this topic are for the Windows environment. If you are using a different operating system or compiler, the steps may vary slightly.
- Import the
c3p0-oceanbase-jdbcproject into Eclipse. - Obtain the URL of OceanBase Database.
- Modify the database connection information in the
c3p0-oceanbase-jdbcproject. - Run the
c3p0-oceanbase-jdbcproject.
Step 1: Import the c3p0-oceanbase-jdbc project into Eclipse
Start Eclipse and choose File > Open Projects from File System from the menu bar.
In the dialog box that appears, click Directory to browse and select the project, and then click Finish.
Note
When you import a Maven project using Eclipse, it will automatically detect the
pom.xmlfile in the project, download the required dependency libraries based on the described dependencies in the file, and add them to the project.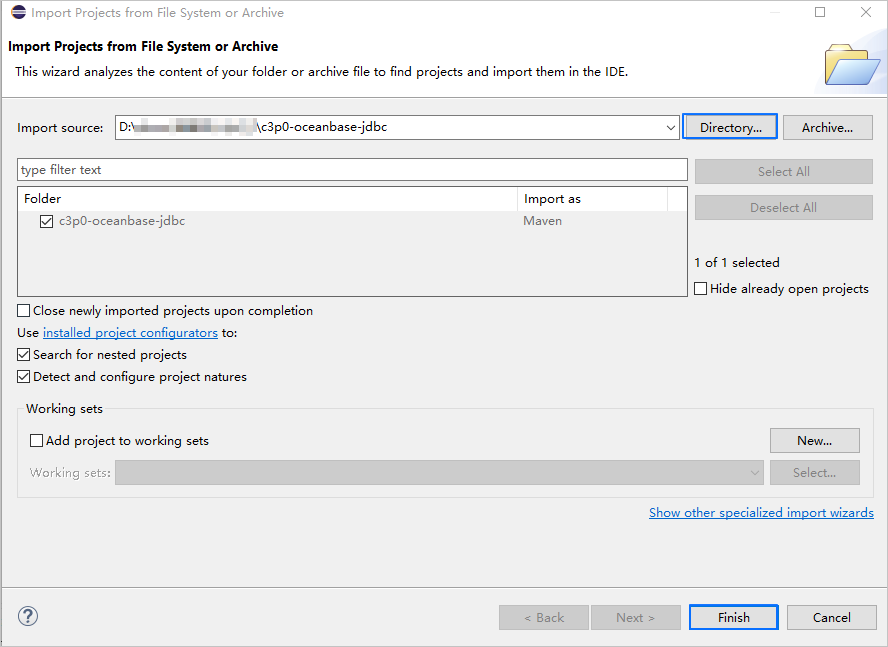
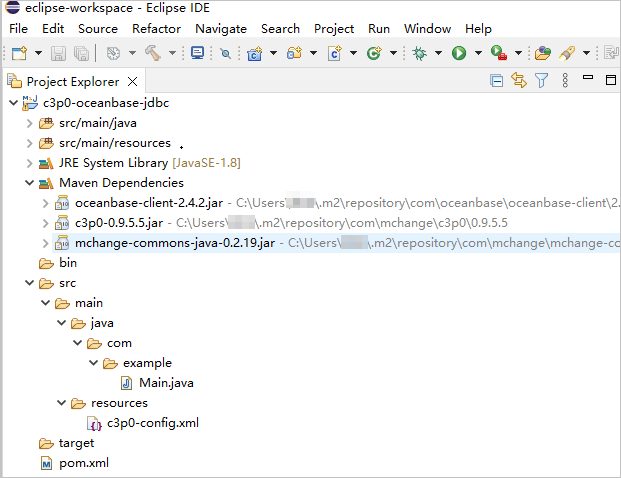
View the project.
Step 2: Obtain the URL of OceanBase Database
Contact the deployment personnel or administrator of OceanBase Database to obtain the corresponding database connection string.
Here is an example:
obclient -hxxx.xxx.xxx.xxx -P2881 -utest_user001@oracel001 -p******For more information about the connection string, see Connect to an OceanBase tenant by using OBClient.
Fill in the URL based on the OceanBase Database connection string, as shown below:
jdbc:oceanbase://$host:$port/$schema_name?user=$user_name&password=$passwordParameter description:
$host: the IP address for connecting to OceanBase Database. For connection through OceanBase Database Proxy (ODP), use the IP address of an ODP. For direct connection, use the IP address of an OBServer node.$port: the port for connecting to OceanBase Database. For connection through ODP, the default value is2883, which can be customized when ODP is deployed. For direct connection, the default value is2881, which can be customized when OceanBase Database is deployed.$schema_name: the name of the schema to be accessed.Note
The user used to connect to the tenant must have the
CREATE SESSIONprivilege and theCREATE TABLE,INSERT,DELETE,UPDATE, andSELECTprivileges on the schema. For more information about user privileges, see Privilege types in Oracle mode.$user_name: the tenant connection account. For connection through ODP, the format isusername@tenant name#cluster nameorcluster name:tenant name:username. For direct connection, the format isusername@tenant name.$password: the password of the account.
For more information about URL parameters of OceanBase Connector/J, see Database URL.
Here is an example:
jdbc:oceanbase://xxx.xxx.xxx.xxx:2881/test_schema001?user=test_user001@oracel001&password=******
Step 3: Modify the database connection information in the c3p0-oceanbase-jdbc project
Modify the database connection information in the c3p0-oceanbase-jdbc/src/main/resources/c3p0-config.xml file based on the information obtained in Step 2: Obtain the URL of OceanBase Database.
Here is an example:
- The IP address of the OBServer node is
xxx.xxx.xxx.xxx. - The port is 2881.
- The name of the database to be accessed is
test_schema001. - The tenant account is
test_user001@oracle001, whereoracle001is an Oracle user tenant created in OceanBase Database, andtest_user001is the username of theoracle001tenant. - The password is
******.
Sample code:
...
<property name="jdbcUrl">jdbc:oceanbase://xxx.xxx.xxx.xxx:2881/test_schema001?useSSL=false&useUnicode=true&characterEncoding=utf8</property>
<property name="user">test_user001@oracle001</property>
<property name="password">******</property>
...
Step 4: Run the c3p0-oceanbase-jdbc project
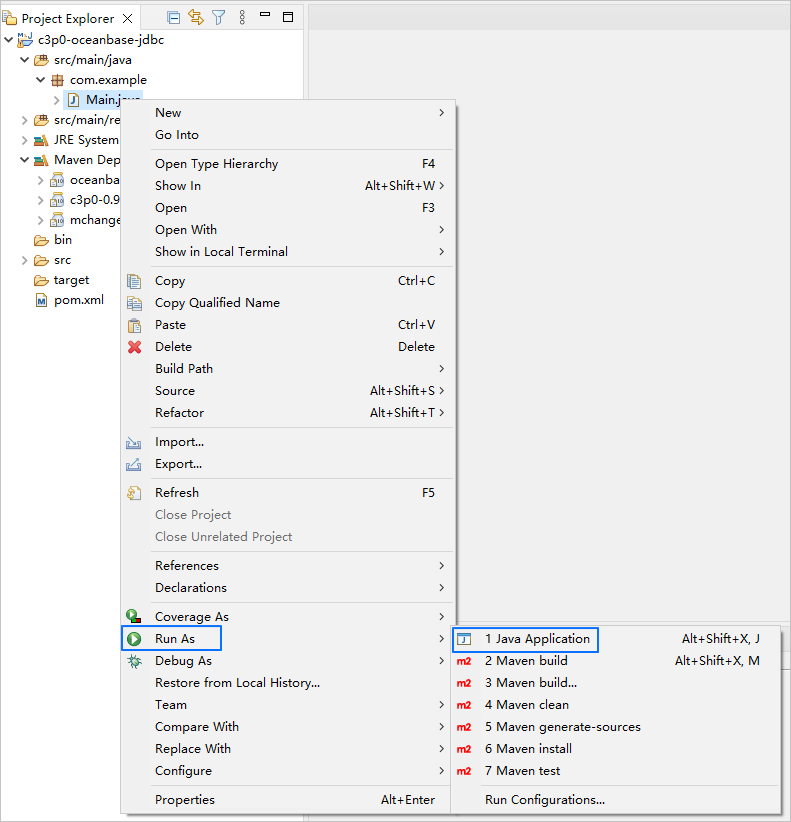
In the project navigation view, locate and expand the src/main/java directory.
Right-click the Main.java file and choose Run As > Java Application.
In the console window of Eclipse, view the project logs and output results.

You can also execute the following SQL statement in OBClient to view the result.
obclient [SYS]> SELECT * FROM test_schema001.test_c3p0;The return result is as follows:
+------+--------------+ | ID | NAME | +------+--------------+ | 5 | test_update | | 6 | test_insert6 | | 7 | test_insert7 | | 8 | test_insert8 | | 9 | test_insert9 | +------+--------------+ 5 rows in set
Project code introduction
Click c3p0-oceanbase-jdbc to download the project code, which is a compressed package named c3p0-oceanbase-jdbc.zip.
After decompressing it, you will find a folder named c3p0-oceanbase-jdbc. The directory structure is as follows:
c3p0-oceanbase-jdbc
├── src
│ └── main
│ ├── java
│ │ └── com
│ │ └── example
│ │ └── Main.java
│ └── resources
│ └── c3p0-config.xml
└── pom.xml
File description:
src: the root directory for source code.main: the main code directory, containing the core logic of the application.java: the directory for storing the Java source code.com: the directory for storing the Java package.example: the directory for storing the packages of the sample project.Main.java: the main class that contains logic such as table creation and data insertion.resources: the directory for storing resource files, including configuration files.c3p0-config.xml: the configuration file of the C3P0 connection pool.pom.xml: the configuration file of the Maven project, which is used to manage project dependencies and build settings.
Introduction to pom.xml
The pom.xml file is the configuration file of the Maven project, which defines the dependencies, plugins, and build rules of the project. Maven is a Java project management tool that can automatically download dependencies, compile, and package the project.
The pom.xml file in this topic is mainly composed of the following parts:
Declaration statements.
Declare that this file is an XML file that uses XML standard
1.0and character encodingUTF-8.Sample code:
<?xml version="1.0" encoding="UTF-8"?>Configure namespaces and the POM model version.
- Use
xmlnsto specify the POM namespace ashttp://maven.apache.org/POM/4.0.0. - Use
xmlns:xsito specify the XML namespace ashttp://www.w3.org/2001/XMLSchema-instance. - Use
xsi:schemaLocationto specify the POM namespace ashttp://maven.apache.org/POM/4.0.0, and the location of the corresponding XSD file ashttp://maven.apache.org/xsd/maven-4.0.0.xsd. - Use
<modelVersion>to specify the POM model version as4.0.0.
Sample code:
<project xmlns="http://maven.apache.org/POM/4.0.0" xmlns:xsi="http://www.w3.org/2001/XMLSchema-instance" xsi:schemaLocation="http://maven.apache.org/POM/4.0.0 http://maven.apache.org/xsd/maven-4.0.0.xsd"> <modelVersion>4.0.0</modelVersion> <!-- Other configurations --> </project>- Use
Configure basic information.
- Use
<groupId>to specify the project group ascom.example. - Use
<artifactId>to specify the project name astestc3p0. - Use
<version>to specify the project version as1.0-SNAPSHOT.
Sample code:
<groupId>com.example</groupId> <artifactId>testc3p0</artifactId> <version>1.0-SNAPSHOT</version>- Use
Configure the properties of the project's source file.
Specify the Maven compiler plugin as
maven-compiler-plugin, and set both the source code and target Java versions to 8. This means that the project's source code is written using Java 8 features, and the compiled bytecode will also be compatible with the Java 8 runtime environment. This setup ensures that the project can correctly handle Java 8 syntax and features during compilation and runtime.Note
Java 1.8 and Java 8 are different names for the same version.
Sample code:
<build> <plugins> <plugin> <groupId>org.apache.maven.plugins</groupId> <artifactId>maven-compiler-plugin</artifactId> <configuration> <source>8</source> <target>8</target> </configuration> </plugin> </plugins> </build>Configure the components on which the project depends.
Note
The following code defines that the project depends on OceanBase Connector/J V2.4.2. For more information about other versions, see OceanBase Connector/J.
Use
<dependency>to define a dependency:OceanBase Client dependency:
- Use
<groupId>to specify the dependency group ascom.oceanbase. - Use
<artifactId>to specify the dependency name asoceanbase-client. - Use
<version>to specify the dependency version as2.4.2.
- Use
C3P0 dependency:
- Use
<groupId>to specify the dependency group ascom.mchange. - Use
<artifactId>to specify the dependency name asc3p0. - Use
<version>to specify the dependency version as0.9.5.5.
- Use
Sample code:
<dependencies> <dependency> <groupId>com.oceanbase</groupId> <artifactId>oceanbase-client</artifactId> <version>2.4.2</version> </dependency> <dependency> <groupId>com.mchange</groupId> <artifactId>c3p0</artifactId> <version>0.9.5.5</version> </dependency> </dependencies>
c3p0-config.xml code introduction
The c3p0-config.xml file is a C3P0 connection pool configuration file used to configure attributes related to database connections. You can configure database drivers, connection URLs, usernames, passwords, and connection pool sizes by setting the values of various <property> elements.
The code of the c3p0-config.xml file in this topic consists of the following sections:
A file declaration statement.
Declare this file as an XML file, use XML standard
1.0, and the character encoding isUTF-8.Code as follows:
<?xml version="1.0" encoding="UTF-8"?>Configure basic information.
- Use the
<c3p0-config>element to include the configuration information of the c3p0 connection pool. - A named configuration named
oceanbaseis defined by using the<named-config name="oceanbase">tag. In the code, you can reference this named configuration using its name to obtain connection information and connection pool properties related to OceanBase Database.
Code as follows:
<c3p0-config> <named-config name="oceanbase"> // Configure the values of the <property> elements. </named-config> </c3p0-config>- Use the
Configure the database driver.
You can use the
<property>element to specify the class name of the JDBC driver used to connect to OceanBase Database ascom.oceanbase.jdbc.Driver.Note
For information about the names of the OceanBase Connector/J implementation classes, see OceanBase Java Database Connector.
Code as follows:
<property name="driverClass">com.oceanbase.jdbc.Driver</property>Configure the database connection information.
- Set the URL of the database connection, including the host IP address, port number, schema to be accessed, and URL parameters.
- Configure the database username.
- Configure the database password.
Code as follows:
<property name="jdbcUrl">jdbc:oceanbase://$host:$port/$schema_name?useSSL=false&useUnicode=true&characterEncoding=utf8</property> <property name="user">$user_name</property> <property name="password">$password</property>Parameter description:
$host: the IP address for connecting to OceanBase Database. It is the IP address of an ODP for connection through ODP, or the IP address of an OBServer node for direct connection.$port: the port for OceanBase Database to connect to. For ODP, the default connection port is2883, which can be customized during ODP deployment. For direct connection, the default port is2881, which can be customized during OceanBase Database deployment.$schema_name: the name of the schema to be accessed.Other parameters are as follows:
useSSL=false: Disables SSL encryption, indicating that the Secure Sockets Layer is not used to protect data transmission.seUnicode=true: enables Unicode character encoding to ensure proper handling of various character sets.characterEncoding=utf8: specifies to use the UTF-8 character encoding.&: is an XML entity reference that represents the&character. In XML,&is a special character that must be represented using an entity reference to avoid conflicts with XML syntax.
For more information about URL parameters, see Database URL.
$user_name: specifies the tenant account for connecting to the database. The format of the ODP connection string is:username@tenant name#cluster nameorcluster name:tenant name:username. The format of the direct connection string is:username@tenant name.$password: the password of the account.
Configure other c3p0 database connection pool parameters.
- Set the number of connections to be added at a time when the connection pool needs more connections to 20.
- Set the initial size of the connection pool to 10. This means that the connection pool will create 10 connections when it starts.
- Set the minimum number of connections in the connection pool to 5.
- Set the maximum number of connections in the connection pool to 30.
- Set the maximum number of cached statements for each connection to 0. In other words, statements are not cached.
- Set the maximum number of cached statements for each connection in the connection pool to 0. In other words, no statements are cached for each connection.
- Set the number of auxiliary threads used by c3p0 to 3. These auxiliary threads are used to perform slow JDBC operations.
- Set the connection attribute check period of c3p0 to 3 seconds. In other words, the connection attribute is checked every 3 seconds.
- Set the timeout period for obtaining a connection to 1000 ms. In other words, if a connection cannot be obtained within 1000 ms, a timeout exception is thrown.
- Set the check period of idle connections in the connection pool to 3 seconds. In other words, the status of idle connections is checked every 3 seconds.
- Set the maximum idle time of connections in the connection pool to 10 seconds. In other words, a connection will be closed if it is not used within 10 seconds.
- Set the maximum idle time of connections in the connection pool that exceed the maximum number of connections to 5 seconds. In other words, if the number of idle connections in the connection pool exceeds the maximum number of connections, these connections will be closed.
- Set the retry delay to 1000 ms when attempting to obtain a connection. In other words, if obtaining a connection fails, it will retry after 1000 ms.
- Set the c3p0 automatic test table to "test". This is a special table used to test the validity of connections.
- Specifies whether to test the validity of a connection when the connection is returned to the connection pool. If you set this parameter to true, the validity of the connection is tested when the connection is returned to the connection pool.
Code as follows:
<property name="acquireIncrement">20</property> <property name="initialPoolSize">10</property> <property name="minPoolSize">5</property> <property name="maxPoolSize">30</property> <property name="maxStatements">0</property> <property name="maxStatementsPerConnection">0</property> <property name="numHelperThreads">3</property> <property name="propertyCycle">3</property> <property name="checkoutTimeout">1000</property> <property name="idleConnectionTestPeriod">3</property> <property name="maxIdleTime">10</property> <property name="maxIdleTimeExcessConnections">5</property> <property name="acquireRetryDelay">1000</property> <property name="automaticTestTable">test</property> <property name="testConnectionOnCheckin">true</property>
Notice
Specific attribute (parameter) configurations depend on project requirements and database characteristics. We recommend that you adjust and configure the parameters based on your actual situation. For more information about C3P0 connection pool parameters, see C3P0.
Basic configurations of the c3p0 connection pool:
Category |
Attribute |
Default value |
Description |
|---|---|---|---|
| Required | driverClass | N/A | Driver class name |
| jdbcUrl | N/A | Specifies the URL for connecting to the database. | |
| user | N/A | The username to be used when connecting to the database. | |
| password | N/A | Specifies the password used to connect to the database. | |
| Basic configuration | acquireIncrement | 3 | Specifies the number of connections to be obtained from the connection pool at one time when the connection pool needs more connections. For example, if the value of acquireIncrement is 20 and the connection pool currently has only five idle connections, the connection pool creates 20 new connections at one time to meet the application requirements when connections are requested. |
| acquireRetryAttempts | 30 | The number of retries when a connection is retrieved from the connection pool. If the value is less than or equal to zero, c3p0 will continue to attempt to obtain a connection infinitely. | |
| maxIdleTime | 0 | The maximum idle time of a connection in the connection pool. The value 0 specifies that idle connections never expire. For example, if you set maxIdleTime to 10 seconds, the connections in the connection pool that have been idle for more than 10 seconds will be closed and removed from the connection pool. In this case, the application must request a new connection from the connection pool. |
|
| maxPoolSize | 15 | Specifies the maximum number of connections in the connection pool. When the number of connections in the connection pool reaches the value specified by maxPoolSize, new connection requests will be blocked until connections are released back to the connection pool. |
|
| MinPoolSize | 3 | Specifies the minimum number of connections in the connection pool. The connection pool retains at least the number of connections specified by minPoolSize, even if no connections are being used. |
|
| initialPoolSize | 3 | Specifies the number of connections that are created when the connection pool is initialized. The value of this parameter must be greater than or equal to the value of minPoolSize and less than or equal to the value of maxPoolSize. |
|
| Optional configuration items | acquireRetryDelay | 1000 | The retry delay time in milliseconds when a connection is being obtained. If no available connection is available in the connection pool when an application is obtaining a connection from the connection pool, the connection pool retries the operation based on the configuration of acquireRetryDelay. |
| autoCommitOnClose | false | Specifies whether to automatically commit transactions when a connection is closed. The default value is false, which means that transactions are not automatically committed when connections are closed. If your application needs to explicitly commit a transaction before a connection is closed, set autoCommitOnClose to true.
NoticeAutomatic transaction commit can lead to data inconsistency or loss. Therefore, use the |
|
| automaticTestTable | null | Specifies the name of the test table for the connection pool. C3P0 creates an empty table with the specified name and tests the connection by querying the table. The default value is null, which specifies not to execute any test statements. For example, if you set automaticTestTable to test, C3P0 will create an empty table named test and use its own query statement to test the connection.
NoteIf you configure both |
|
| idleConnectionTestPeriod | 0 | Specifies the time interval, in milliseconds, for the connection pool to check idle connections. The connection pool tests idle connections at specified time intervals. The default value is 0, which specifies not to check idle connections. | |
| maxStatements | 0 | Specifies the maximum number of preprocessed statements allowed in the connection pool.
Note
|
|
| maxStatementsPerConnection | 0 | Specifies the maximum number of preprocessed statements allowed for each connection. | |
| numHelperThreads | 3 | Specifies the number of helper threads used for asynchronous task processing.
Note
|
|
| preferredTestQuery | null | Specifies the test statements to be executed for all connections during a connection test. This can significantly speed up the test process when connection tests are used.
NoticeThe table to be tested must exist when the initial data source is configured. |
|
| checkoutTimeout | 0 | The timeout period of obtaining a connection from the connection pool, in milliseconds. The default value is 0, which means no timeout limit. When the connection pool is exhausted, the client will wait for a new connection after calling getConnection(). If the timeout is reached, a SQLException will be thrown. |
|
| Not recommended | breakAfterAcquireFailure | false | Specifies whether to interrupt the connection pool operation when a connection acquisition failure occurs. A failure in acquiring a connection will cause all threads waiting for the connection pool to acquire a connection to throw an exception. However, the data source is still retained and the connection pool will continue to attempt to acquire a connection the next time getConnection() is called.
|
| testConnectionOnCheckout | false | Specifies whether to test a connection when it is retrieved from the connection pool.
NoteAlthough connection testing ensures the validity of connections, it also introduces additional overhead. Therefore, you must determine whether to enable connection testing based on your application requirements and performance considerations. If your application requires high availability of connections, you can enable connection testing. However, if connections in the connection pool are frequently retrieved and released, frequent connection testing can negatively impact performance. |
|
| testConnectionOnCheckin | false | Specifies whether to test a connection when it is returned to the connection pool.
NoteAlthough connection testing ensures that the connection is valid, it also introduces additional overhead. Therefore, you must determine whether to enable connection testing based on your business requirements and performance considerations. If your application requires high availability of connections, you can enable connection testing. However, if connections in the connection pool are frequently obtained and returned, frequent connection testing may negatively impact performance. |
Introduction to Main.java
The Main.java file is part of the sample application. It demonstrates how to obtain a database connection through the c3p0 connection pool and execute a series of database operations within a transaction. These operations include creating a table, inserting data, deleting data, updating data, querying data, and printing the query results. The code showcases how to use the c3p0 connection pool to manage database connections and perform transactional operations, thereby enhancing the efficiency and performance of database operations.
The code in the Main.java file of this topic is divided into the following sections:
Define the package and import
java.sqlinterfaces.- Declare the current code to belong to the
com.examplepackage. - Import the
java.sql.Connectionclass for representing database connections. - Import the
java.sql.PreparedStatementclass for executing precompiled database operations. - Import the
java.sql.ResultSetclass for representing database query result sets. - Import the
com.mchange.v2.c3p0.ComboPooledDataSourceclass for using the c3p0 connection pool.
Sample code:
package com.example; import java.sql.Connection; import java.sql.PreparedStatement; import java.sql.ResultSet; import com.mchange.v2.c3p0.ComboPooledDataSource;- Declare the current code to belong to the
Define class names and methods.
- Define a public class named
Main. The class name must be the same as the file name. The class serves as the entry point of the program. - Define a public static method named
main. The method serves as the starting execution point of the program. - Use the
try-with-resourcesstatement to obtain a database connection and create a precompiled SQL statement. - Perform database transaction operations.
- Capture possible exceptions and print the exception stack information.
- Define a private static method named
getConnectionfor obtaining database connections from the c3p0 connection pool. First, create aComboPooledDataSourceobject namedcpds. The object is configured by using theoceanbaseparameter. Then, call thecpds.getConnection()method to request a database connection from the connection pool and return the connection.
Sample code:
public class Main { public static void main(String[] args) { try ( // Obtain a database connection. // Create a precompiled SQL statement. ) { // Perform database transaction operations: start a transaction, create a table, insert data, delete data, update data, query data, and commit the transaction. } catch (Exception e) { e.printStackTrace(); } } private static Connection getConnection() throws Exception { ComboPooledDataSource cpds = new ComboPooledDataSource("oceanbase"); return cpds.getConnection(); } }- Define a public class named
Obtain a database connection.
Obtain a database connection and assign it to the
connvariable.Sample code:
Connection conn = getConnection();Create precompiled SQL statements.
- Create a precompiled SQL statement for creating a database table named
test_c3p0. - Create a precompiled SQL statement for inserting data into the
test_c3p0table. - Create a precompiled SQL statement for deleting data from the
test_c3p0table. - Create a precompiled SQL statement for updating data in the
test_c3p0table. - Create a precompiled SQL statement for querying data from the
test_c3p0table.
Sample code:
PreparedStatement stmtCreate = conn.prepareStatement("CREATE TABLE test_c3p0 (id NUMBER, name VARCHAR2(32))"); PreparedStatement stmtInsert = conn.prepareStatement("INSERT INTO test_c3p0 VALUES (?, ?)"); PreparedStatement stmtDelete = conn.prepareStatement("DELETE FROM test_c3p0 WHERE id < ?"); PreparedStatement stmtUpdate = conn.prepareStatement("UPDATE test_c3p0 SET name = ? WHERE id = ?"); PreparedStatement stmtSelect = conn.prepareStatement("SELECT * FROM test_c3p0")- Create a precompiled SQL statement for creating a database table named
Start a transaction.
Set the auto-commit mode of the database connection to
falseto enable the transaction mechanism.Sample code:
conn.setAutoCommit(false);Create a table.
Execute the SQL statement for creating a table.
Sample code:
stmtCreate.execute();Insert data.
Use the
forloop to insert 10 records into thetest_c3p0table. The value of the first column is the value of theivariable. The value of the second column is the value of thetest_insertstring followed by the value of theivariable.Sample code:
for (int i = 0; i < 10; i++) { stmtInsert.setInt(1, i); stmtInsert.setString(2, "test_insert" + i); stmtInsert.executeUpdate(); }Delete data.
Set the value of the parameter in the delete statement to 5 and execute the delete statement.
Sample code:
stmtDelete.setInt(1, 5); stmtDelete.executeUpdate();Update data.
Set the first parameter of the update statement to
test_updateand the second parameter to 5, and execute the update statement.Sample code:
stmtUpdate.setString(1, "test_update"); stmtUpdate.setInt(2, 5); stmtUpdate.executeUpdate();Query data.
- Execute the query statement and save the query result in the
ResultSetobjectrs. - Use the while loop to check whether the result set contains another row by calling the
rs.next()method. If yes, execute the code in the loop. - The code in the loop prints the values of the
idandnamecolumns in each row. - Close the result set and release the resources.
Sample code:
ResultSet rs = stmtSelect.executeQuery(); while (rs.next()) { System.out.println(rs.getInt("id") + " " + rs.getString("name")); } rs.close();- Execute the query statement and save the query result in the
Commit the transaction.
Sample code:
conn.commit();
Complete code
<?xml version="1.0" encoding="UTF-8"?>
<project xmlns="http://maven.apache.org/POM/4.0.0"
xmlns:xsi="http://www.w3.org/2001/XMLSchema-instance"
xsi:schemaLocation="http://maven.apache.org/POM/4.0.0 http://maven.apache.org/xsd/maven-4.0.0.xsd">
<modelVersion>4.0.0</modelVersion>
<groupId>com.example</groupId>
<artifactId>testc3p0</artifactId>
<version>1.0-SNAPSHOT</version>
<build>
<plugins>
<plugin>
<groupId>org.apache.maven.plugins</groupId>
<artifactId>maven-compiler-plugin</artifactId>
<configuration>
<source>8</source>
<target>8</target>
</configuration>
</plugin>
</plugins>
</build>
<dependencies>
<dependency>
<groupId>com.oceanbase</groupId>
<artifactId>oceanbase-client</artifactId>
<version>2.4.2</version>
</dependency>
<dependency>
<groupId>com.mchange</groupId>
<artifactId>c3p0</artifactId>
<version>0.9.5.5</version>
</dependency>
</dependencies>
</project>
<?xml version="1.0" encoding="UTF-8"?>
<c3p0-config>
<named-config name="oceanbase">
<!-- Configure Database Driver -->
<property name="driverClass">com.oceanbase.jdbc.Driver</property>
<!-- Configure Database Link Address -->
<property name="jdbcUrl">jdbc:oceanbase://$host:$port/$schema_name?useSSL=false&useUnicode=true&characterEncoding=utf8</property>
<!-- Configure database username -->
<property name="user">$user_name</property>
<!-- Configure database password -->
<property name="password">$password</property>
<!-- How many connection objects does the database Connection pool want from the database at one time -->
<property name="acquireIncrement">20</property>
<!-- Initialize connections -->
<property name="initialPoolSize">10</property>
<!-- Minimum number of connections -->
<property name="minPoolSize">5</property>
<!-- The maximum number of connections reserved in the Connection pool. Default: 15 -->
<property name="maxPoolSize">30</property>
<!-- JDBC standard parameter used to control the number of PreparedStatements loaded within the data source. However, the pre cached statements belong to a single connection rather than the entire Connection pool. So setting this parameter requires considering multiple factors. If both maxStatements and maxStatementsPerConnection are 0, the cache is turned off. Default:0 -->
<property name="maxStatements">0</property>
<!-- MaxStatementsPerConnection defines the maximum number of cached statements owned by a single connection in the Connection pool. Default: 0 -->
<property name="maxStatementsPerConnection">0</property>
<!-- C3p0 is an asynchronous operation, and slow JDBC operations are completed by the helper process. Expanding these operations can effectively improve performance by enabling multiple operations to be executed simultaneously through multithreading. Default:3 -->
<property name="numHelperThreads">3</property>
<!-- The user can wait up to 300 seconds before modifying the system configuration parameters. Default: 300 -->
<property name="propertyCycle">3</property>
<!-- The default setting for obtaining the connection timeout is to wait for a unit of milliseconds -->
<property name="checkoutTimeout">1000</property>
<!-- Check all free connections in the Connection pool every few seconds. Default: 0 -->
<property name="idleConnectionTestPeriod">3</property>
<!-- The maximum idle time, within seconds, if not used, the connection will be discarded. If it is 0, it will never be discarded. Default: 0 -->
<property name="maxIdleTime">10</property>
<!-- Configure the lifetime of the connection. Connections beyond this time will be automatically disconnected and discarded by the Connection pool. Of course, the connection being used will not be immediately disconnected, but will wait for it to close before disconnecting. When configured to 0, there is no restriction on the lifetime of the connection. -->
<property name="maxIdleTimeExcessConnections">5</property>
<!-- The interval time between two connections, in milliseconds. Default: 1000 -->
<property name="acquireRetryDelay">1000</property>
<!-- C3p0 will create an empty table called Test and use its built-in query statement for testing. If this parameter is defined, the property preferredTestQuery will be ignored. You cannot perform any operations on this Test table, it will only be used for c3p0 testing. Default: null -->
<property name="automaticTestTable">test</property>
<!-- Test if the connection is valid when obtaining it -->
<property name="testConnectionOnCheckin">true</property>
</named-config>
</c3p0-config>
package com.example;
import java.sql.Connection;
import java.sql.PreparedStatement;
import java.sql.ResultSet;
import com.mchange.v2.c3p0.ComboPooledDataSource;
public class Main {
public static void main(String[] args) {
try (Connection conn = getConnection();
PreparedStatement stmtCreate = conn.prepareStatement("CREATE TABLE test_c3p0 (id NUMBER, name VARCHAR2(32))");
PreparedStatement stmtInsert = conn.prepareStatement("INSERT INTO test_c3p0 VALUES (?, ?)");
PreparedStatement stmtDelete = conn.prepareStatement("DELETE FROM test_c3p0 WHERE id < ?");
PreparedStatement stmtUpdate = conn.prepareStatement("UPDATE test_c3p0 SET name = ? WHERE id = ?");
PreparedStatement stmtSelect = conn.prepareStatement("SELECT * FROM test_c3p0")) {
conn.setAutoCommit(false);
stmtCreate.execute();
for (int i = 0; i < 10; i++) {
stmtInsert.setInt(1, i);
stmtInsert.setString(2, "test_insert" + i);
stmtInsert.executeUpdate();
}
stmtDelete.setInt(1, 5);
stmtDelete.executeUpdate();
stmtUpdate.setString(1, "test_update");
stmtUpdate.setInt(2, 5);
stmtUpdate.executeUpdate();
ResultSet rs = stmtSelect.executeQuery();
while (rs.next()) {
System.out.println(rs.getInt("id") + " " + rs.getString("name"));
}
rs.close();
conn.commit();
} catch (Exception e) {
e.printStackTrace();
}
}
private static Connection getConnection() throws Exception {
ComboPooledDataSource cpds = new ComboPooledDataSource("oceanbase");
return cpds.getConnection();
}
}
References
For more information about OceanBase Connector/J, see OceanBase Connector/J.