


This topic introduces how to build an application by using the Spring Data JPA framework and OceanBase Database. It also covers the use of the application for fundamental database operations, including table creation, data insertion, and data query.
 Download the java-oceanbase-springdatajpa sample project
 Prerequisites
- You have installed OceanBase Database.
- You have installed JDK 1.8 and Maven.
- You have installed IntelliJ IDEA.
Note
The tool used to run the sample code in this topic is IntelliJ IDEA 2021.3.2 (Community Edition), but you can also choose a tool that suits your personal preference to run the code.
Procedure
Note
The steps outlined in this topic are for the Windows environment. If you are using a different operating system or compiler, the steps may vary slightly.
- Obtain the OceanBase Database connection string.
- Import the
java-oceanbase-springdatajpaproject into IDEA. - Modify the database connection information in the
java-oceanbase-springdatajpaproject. - Run the
java-oceanbase-springdatajpaproject.
Step 1: Obtain the OceanBase Database connection string
Contact the deployment personnel or administrator of OceanBase Database to obtain the database connection string.
obclient -hxx.xx.xx.xx -P2883 -uroot@sys#cluster -p**** -AFill in the URL below based on the deployed OceanBase database.
Note
The URL here is required in the
application.ymlfile.jdbc:oceanbase://host:port/schema_name?user=$user_name&password=$password&characterEncoding=utf-8&useSSL=false&serverTimezone=GMT%2B8Parameters in the URL are described as follows:
host: the IP address for connecting to OceanBase Database. For connection through OceanBase Database Proxy (ODP), this parameter is the IP address of an ODP. For direct connection, this parameter is the IP address of an OBServer node.port: the port for connecting to OceanBase Database. For connection through ODP, the default value is2883, which can be customized when ODP is deployed. For direct connection, the default value is2881, which can be customized when OceanBase Database is deployed.schema_name: the name of the schema to access.user_name: the tenant account. For connection through ODP, the tenant account can be in theusername@tenant name#cluster nameorcluster name:tenant name:usernameformat. For direct connection, the tenant account is in theusername@tenant nameformat.password: the account password.characterEncoding=utf-8&useSSL=false&serverTimezone=GMT%2B8: the additional connection properties.characterEncoding: the character encoding method that supports the database URL options. The default value isutf8.useSSL: specifies whether to useSSL/TLSduring forced connections. The default value isfalse.serverTimezone: the server time zone. The default value is China Standard Time (CST).
For more information about URL parameters, see Database URL.
Step 2: Import the java-oceanbase-springdatajpa project into IDEA
Start IntelliJ IDEA and choose File > Open....

In the Open File or Project window that appears, select the corresponding project file and click OK to import the project file.
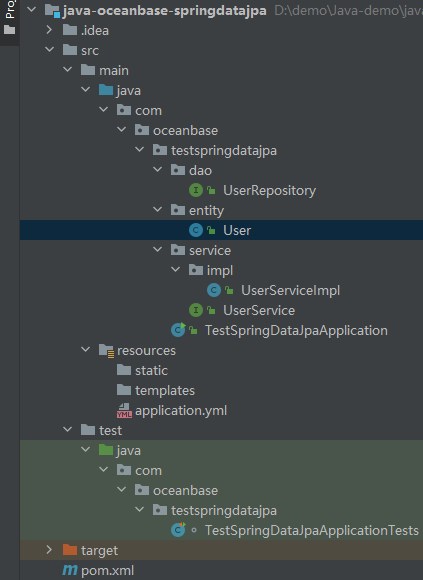
IntelliJ IDEA automatically identifies all types of files in the project. In the Project window, you can view the directory structure, list of files, list of modules, and dependencies of the project. The Project window is usually on the far left side in IntelliJ IDEA and is displayed by default. If the Project window is closed, you can choose View > Tool Windows > Project from the menu or use the Alt + 1 shortcut to open the window.
Note
When you use IntelliJ IDEA to import a project, IntelliJ IDEA automatically detects the
pom.xmlfile in the project, downloads the required libraries based on the dependencies defined in the file, and adds the libraries to the project.View the project.
Step 3: Modify the database connection information in the java-oceanbase-springdatajpa project
Modify the database connection information in the application.yml file based on the information obtained in Step 1: Obtain the OceanBase Database connection string.
Here is an example:
- The name of the database driver is
com.oceanbase.jdbc.Driver. - The IP address of the OBServer node is
10.10.10.1. - The port is 2881.
- The name of the schema to access is
sys. - The tenant account is
sys@xyoracle, wherexyoracleis a user tenant created in the Oracle mode of OceanBase Database, andsysis a username in thexyoracletenant. - The password is
******.
The sample code is as follows:
spring:
datasource:
driver-class-name: com.oceanbase.jdbc.Driver
url: jdbc:oceanbase://10.10.10.1:2881/sys?characterEncoding=utf-8&useSSL=false&serverTimezone=GMT%2B8
username: sys@xyoracle
password:******
type: com.alibaba.druid.pool.DruidDataSource
Step 4: Run the java-oceanbase-springdatajpa project
Run path
- Find the
TestSpringDataJpaApplicationTests.javafile under src > test > java in the project package. - Choose Run > Run... > TestSpringDataJpaApplicationTests.contextLoads in the menu bar or click the green triangle in the upper-right corner to run the project.
- View the logs and output of the project in the IDEA console.
Output
User{id=4, username='insert4'}
User{id=5, username='insert5'}
User{id=6, username='insert6'}
User{id=7, username='insert7'}
User{id=8, username='insert8'}
Project code introduction
Click java-oceanbase-springdatajpa to download the project code, which is a compressed file named java-oceanbase-springdatajpa.zip.
After decompressing it, you will find a folder named java-oceanbase-springdatajpa. The directory structure is as follows:
│--pom.xml
│
├─.idea
│
├─src
│ ├─main
│ │ ├─java
│ │ │ └─com
│ │ │ └─oceanbase
│ │ │ └─testspringdatajpa
│ │ │ │--TestSpringDataJpaApplication.java
│ │ │ │
│ │ │ ├─dao
│ │ │ │ └─UserRepository.java
│ │ │ │
│ │ │ ├─entity
│ │ │ │ └─User.java
│ │ │ │
│ │ │ └─service
│ │ │ │--UserService.java
│ │ │ │
│ │ │ └─impl
│ │ │ └─--UserServiceImpl.java
│ │ │
│ │ └─resources
│ │ │--application.yml
│ │ │
│ │ ├─static
│ │ └─templates
│ └─test
│ └─java
│ └─com
│ └─oceanbase
│ └─testspringdatajpa
│ └─--TestSpringDataJpaApplicationTests.java
│
└─target
Here is a breakdown of the files and directories:
pom.xml: the configuration file of the Maven project, which contains the dependencies, plug-ins, and build information of the project..idea: the directory used in the Integrated Development Environment (IDE) for storing project-related configurations.src: the directory for storing source code of the project.main: the directory for storing main source code and resource files.java: the directory for storing Java source code.com: the root directory for storing the Java package.oceanbase: the root directory for storing the project.testspringdatajpa: the root directory of the Java package, which contains all the Java classes of the project.TestSpringDataJpaApplication.java: the entry class for the Spring Boot application.dao: stores the data access object (DAO) package for accessing databases or other data storage services.UserRepository.java: the user data access interface, which defines the add, delete, modify, and query operations on user data.entity: the entity class directory that stores the Java classes corresponding to the database tables.User.java: the user persistent object that is mapped to fields in a user data table.service: the service interface directory that defines business logic interfaces.UserService.java: the user service interface that defines operations on user data.impl: the service implementation directory that stores the implementation classes of business logic.UserServiceImpl.java: the user service implementation class that implements the methods defined in theUserServiceinterface.resources: the directory that stores resource files, such as configuration files and SQL files.application.yml: the application configuration file that contains configurations such as the database connection information.static: stores static files, such as CSS and JavaScript files.templates: stores template files, such as HTML templates.test: the directory that stores the test code and resource files.TestSpringDataJpaApplicationTests.java: stores classes that implement and verify features related to Spring Data JPA.target: the directory that stores compiled class files and JAR packages.
Code in pom.xml
Note
If you just want to verify the sample project, use the default code without modification. You can also modify the pom.xml file as required based on the following instructions.
To configure the pom.xml file, perform the following steps:
Declare the file.
Declare the file to be an XML file that uses XML standard
1.0and character encodingUTF-8.The sample code is as follows:
<?xml version="1.0" encoding="UTF-8"?>Configure the namespaces and the POM model version.
- Use
xmlnsto specifyhttp://maven.apache.org/POM/4.0.0as the default XML namespace for the POM. - Use
xmlns:xsito specifyhttp://www.w3.org/2001/XMLSchema-instanceas the XML namespace for xsi-prefixed elements. - Use
xsi:schemaLocationto provide a mapping from the default XML namespace for the POM (http://maven.apache.org/POM/4.0.0) to the location of the POM's XML schema definition (XSD) file (https://maven.apache.org/xsd/maven-4.0.0.xsd). - Use
<modelVersion>to specify4.0.0as the model version used by the POM.
The sample code is as follows:
<project xmlns="http://maven.apache.org/POM/4.0.0" xmlns:xsi="http://www.w3.org/2001/XMLSchema-instance" xsi:schemaLocation="http://maven.apache.org/POM/4.0.0 https://maven.apache.org/xsd/maven-4.0.0.xsd"> <modelVersion>4.0.0</modelVersion>- Use
Configure parent project information.
- Use
<groupId>to specifyorg.springframework.bootas the ID of the parent project group. - Use
<artifactId>to specifyspring-boot-starter-parentas the ID of the parent project. - Use
<version>to specify2.7.0as the version of the parent project. - Use
<relativePath>to specify an empty path for the parent project.
The sample code is as follows:
<parent> <groupId>org.springframework.boot</groupId> <artifactId>spring-boot-starter-parent</artifactId> <version>2.7.0</version> <relativePath/> </parent>- Use
Configure basic project information.
- Use
<groupId>to specifycom.oceanbaseas the ID of the project group. - Use
<artifactId>to specifyjava-oceanbase-springdatajpaas the ID of the project. - Use
<version>to specify0.0.1-SNAPSHOTas the version of the project. - Use
<description>to describe the project asDemo project for Spring Boot.
The sample code is as follows:
<groupId>com.oceanbase</groupId> <artifactId>java-oceanbase-springdatajpa</artifactId> <version>0.0.1-SNAPSHOT</version> <name>java-oceanbase-springdatajpa</name> <description>Demo project for Spring Boot</description>- Use
Configure the Java version.
Specify to use Java 1.8 for the project.
The sample code is as follows:
<properties> <java.version>1.8</java.version> </properties>Configure core dependencies.
Specify
org.springframework.bootas the ID of the group that the dependency belongs to, andspring-boot-starter-data-jpaas the dependency ID. This dependency contains necessary dependencies and configurations for JPA-based database accesses, and is a Spring Boot starter.The sample code is as follows:
<dependency> <groupId>org.springframework.boot</groupId> <artifactId>spring-boot-starter-data-jpa</artifactId> </dependency>Specify
org.springframework.bootas the ID of the group that the dependency belongs to, andspring-boot-starter-webas the dependency ID. This dependency contains necessary dependencies and configurations for Spring Boot-based web development, and is a Spring Boot starter.The sample code is as follows:
<dependency> <groupId>org.springframework.boot</groupId> <artifactId>spring-boot-starter-web</artifactId> </dependency>Specify
org.springframework.bootas the ID of the group that the dependency belongs to, andspring-boot-starter-testas the dependency ID. This dependency takes effect ontestand provides test frameworks and tools of Spring Boot, such as JUnit, Mockito, and Hamcrest.The sample code is as follows:
<dependency> <groupId>org.springframework.boot</groupId> <artifactId>spring-boot-starter-test</artifactId> <scope>test</scope> </dependency>Specify
com.alibabaas the ID of the group that the dependency belongs to,druidas the dependency ID, and1.2.8as the dependency version. This dependency allows the project to use the Druid library to manage and optimize the acquisition and release of database connections.The sample code is as follows:
<dependency> <groupId>com.alibaba</groupId> <artifactId>druid</artifactId> <version>1.2.8</version> </dependency>Specify
com.oceanbaseas the ID of the group that the dependency belongs to,oceanbase-clientas the dependency ID, and2.4.3as the dependency version. This dependency allows the project to use the client features, such as connection, query, and transaction, provided by OceanBase.The sample code is as follows:
<dependencies> <dependency> <groupId>com.oceanbase</groupId> <artifactId>oceanbase-client</artifactId> <version>2.4.2</version> </dependency> </dependencies>
Configure the Maven plug-in.
Specify
org.springframework.bootas the ID of the group that the plug-in belongs to, andspring-boot-maven-pluginas the plug-in ID. This plug-in is used to package Spring Boot applications into executable JAR or WAR files, which can be directly executed. To avoid conflicts with other plug-ins or tools during the build process, thelombokdependency is included.The sample code is as follows:
<build> <plugins> <plugin> <groupId>org.springframework.boot</groupId> <artifactId>spring-boot-maven-plugin</artifactId> <configuration> <excludes> <exclude> <groupId>org.projectlombok</groupId> <artifactId>lombok</artifactId> </exclude> </excludes> </configuration> </plugin> </plugins> </build>
Code in application.yml
The application.yml file is the configuration file of a Spring Boot application, which contains some key parameters. The file configures the context path and listening port number of the application, database connection information, and JPA-related properties.
The application.yml file contains the following parts:
serverpartservlet: the servlet properties.context-path: the context path of the application, which is set totestspringdatajpa.port: the listening port of the application, which is set to 8890.
The sample code is as follows:
server: servlet: context-path: /testspringdatajpa port: 8890springpartdatasource: the data source properties, that is, the database connection information.driver-class-name: the class name of the database driver, which is set tocom.oceanbase.jdbc.Driver.url: the connection URL of the database, which consists of the IP address, port number, and name of the database.username: the username for connecting to the database.password: the password for connecting to the database.type: specifies to use the Druid connection pool as the data source.
The sample code is as follows:
spring: datasource: driver-class-name: com.oceanbase.jdbc.Driver url: jdbc:oceanbase://host:port/schema_name?characterEncoding=utf-8&useSSL=false&serverTimezone=GMT%2B8 username: user_name password: ****** type: com.alibaba.druid.pool.DruidDataSourcejpaparthibernate: the Hibernate-related properties.ddl-auto: the valueupdatespecifies that Hibernate automatically updates the database schema upon startup.show-sql: specifies whether to print SQL statements to the console. The value istrue.format-sql: specifies whether to format the printed SQL statements. The value istrue.
open-in-view: specifies whether to enable theOpen-in-Viewmode. The value isfalse.
The sample code is as follows:
jpa: hibernate: ddl-auto: update show-sql: true format-sql: true open-in-view: false
Code in UserRepository.java
The UserRepository.java file defines a DAO interface that contains methods of performing database operations on User. The file contains custom update and query operation methods that use SQL statements and Hibernate Query Language (HQL) statements.
To configure the UserRepository.java file, perform the following steps:
Reference other classes and interfaces.
Declare that the current file contains the following interfaces and classes:
Userclass: used for operating and processing user objects in the service class.JpaRepositoryinterface: provides basic CRUD operation methods for interfaces that inherit it.Modifyingannotation: marks modification operation methods.Queryannotation: defines custom query methods.Paramannotation: maps method parameters to parameters in query statements.Repositoryannotation: marks a DAO interface as a Spring repository.
The sample code is as follows:
import com.oceanbase.testspringdatajpa.entity.User; import org.springframework.data.jpa.repository.JpaRepository; import org.springframework.data.jpa.repository.Modifying; import org.springframework.data.jpa.repository.Query; import org.springframework.data.repository.query.Param; import org.springframework.stereotype.Repository;Define the
UserRepositoryinterface.The
UserRepositoryinterface is used to access user data. Mark theUserRepositoryinterface as a Spring repository and specifyuserRepositoryas the bean name.- Use the
@Queryannotation withnativeQuery = trueto specify a native SQL statement. - Use the
@Modifyingannotation to mark a custom method that uses a native SQL statement for update. - Use the
@Queryannotation to specify an HQL statement, and use the@Paramannotation to map method parameters to parameters in the HQL statement.
The sample code is as follows:
@Repository("userRepository") public interface UserRepository extends JpaRepository<User, Integer> { @Query(value = "update test_springdatajpa_2 set username=?1 where id=?2", nativeQuery = true) @Modifying int updateById(String name, String id); @Query("SELECT u FROM User u WHERE u.username = :username") User findUser(@Param("username") String username); }- Use the
Code in User.java
The User.java file defines the User class to represent user objects.
To configure the User.java file, perform the following steps:
Import other classes.
javax.persistence.*specifies to import all classes in thejavax.persistencepackage.javax.persistenceis a standard Java Persistence API (JPA) package that provides a set of interfaces and annotations for object-relational mapping (ORM).The sample code is as follows:
import javax.persistence.*;Define a
Userobject.Use JPA annotations to map an entity class to a table, including the table name, primary key, and field names. Use the
@Entityannotation to mark a class as an entity class. Use the@Tableannotation to specify the name of the mapped table. Use the@Idannotation to mark the primary key of the entity class. Use the@GeneratedValueannotation to specify the primary key generation strategy. Use the@Columnannotation to specify field names and constraints. The class has two attributes:idandusername, which represent the unique identifier and name of a user, respectively. The class also provides a default constructor for creating an emptyUserobject.The sample code is as follows:
@Entity @Table(name = "test_springdatajpa_2") public class User { @Id @GeneratedValue(strategy = GenerationType.TABLE) @Column(name = "id", nullable = false) private Integer id; @Column(name = "username") private String username; public User() { } }Get and set the
idandusernamevalues.The entity class provides a constructor with parameters for creating entity class objects and initializing the
idandusernameattributes. Define four methods to get and set the values of theidandusernameattributes.- The
getIdmethod gets theidvalue. - The
setIdmethod sets theidvalue. - The
getUsernamemethod gets theusernamevalue. - The
setUsernamemethod sets theusernamevalue.
The sample code is as follows:
public User(Integer id, String username) { this.id = id; this.username = username; } public Integer getId() { return id; } public void setId(Integer id) { this.id = id; } public String getUsername() { return username; } public void setUsername(String username) { this.username = username; }- The
Return a string that represents the
Userobject.Override the
toStringmethod in theUserclass to return a string that represents theUserobject. Use the@Overrideannotation to override the method of the same name in the parent class. Define thetoStringmethod that returns a string representation of theUserobject. Concatenate theidandnamevalues to generate a string and return it to the caller.The sample code is as follows:
@Override public String toString() { return "User{" + "id=" + id + ", username='" + username + '\'' + '}'; }
Code in UserServiceImpl.java
The UserServiceImpl.java file implements the add, delete, modify, and query operations on user data in the database by using JPA.
To configure the UserServiceImpl.java file, perform the following steps:
Reference other classes and interfaces.
Declare that the current file contains the following interfaces and classes:
UserRepositoryclass: injects the methods defined in the data access object (DAO) to the service class and calls these methods.Userclass: used for operating and processing user objects in the service class.UserServiceclass: injects methods defined in the service class to other classes and calls these methods.Autowiredannotation: automatically injects dependent objects.Pageclass: encapsulates results of pagination queries.PageRequestclass: creates pagination request objects.Pageableinterface: defines pagination requests.Sortclass: defines sorting rules.Serviceannotation: marks a class as a service class.Transactionalannotation: marks a class as transactional.Iteratorclass: traverses a collection.Optionalclass: processes objects that may be empty.
The sample code is as follows:
import com.oceanbase.testspringdatajpa.dao.UserRepository; import com.oceanbase.testspringdatajpa.entity.User; import com.oceanbase.testspringdatajpa.service.UserService; import org.springframework.beans.factory.annotation.Autowired; import org.springframework.data.domain.Page; import org.springframework.data.domain.PageRequest; import org.springframework.data.domain.Pageable; import org.springframework.data.domain.Sort; import org.springframework.stereotype.Service; import org.springframework.transaction.annotation.Transactional; import java.util.Iterator; import java.util.Optional;Use the
UserServiceImplclass to implement the methods declared inUserService.Inject the
UserRepositorydependency to implement access to the database. Specifically, implement the methods to insert, delete, update, and query user data, and support pagination queries. Use the@Transactionalannotation to enable transaction support, which ensures that database operations are performed in transactions.Construct a
UserRepositoryattribute.Define a private
UserRepositoryattribute nameduserRepositoryand use the@Autowiredannotation on the constructor to inject theUserRepositorydependency, so that theuserRepositoryattribute can be used to access and operate user data.The sample code is as follows:
private final UserRepository userRepository; @Autowired public UserServiceImpl(UserRepository userRepository) { this.userRepository = userRepository; }Insert user data.
In the
insertUsermethod, accept aUserobject as a parameter and save the object to the database by calling thesavemethod ofUserRepository.The sample code is as follows:
@Override public void insertUser(User user) { userRepository.save(user); }Delete user data.
In the
deleteUsermethod, call theexistsByIdmethod ofUserRepositoryto check whether the user with the specified ID exists. If the user exists, the method deletes the user. If the user does not exist, the method exits.The sample code is as follows:
@Override public void deleteUser(Integer id) { if (!userRepository.existsById(id)) { return; } }Modify user data.
In the
updateUsermethod, call thesavemethod ofUserRepositoryto save the updates of a user object to the database. Then, return1to indicate that the user object is updated successfully. In addition, define a method that updates user data based on the name and ID of a user by calling theupdateByIdmethod ofUserRepository, and return the operation result.The sample code is as follows:
@Override public int updateUser(User user) { userRepository.save(user); return 1; } //update based on name and id @Override public int updateUserById(String name, String id) { return userRepository.updateById(name, id); }Query user data.
- Query user data by user ID. In the
selectUserByIdmethod, call thefindByIdmethod ofUserRepositoryto query data and encapsulate the result as anOptionalobject. Then, call theorElsemethod ofOptionalto get the value in theOptionalobject and assign it to theuservariable. Finally, return the queried user object. - Query user data by user name. In the
selectUserByNamemethod, call thefindUsermethod ofUserRepositoryto query user data by user name, and directly return the queried user object.
The sample code is as follows:
@Override public User selectUserById(Integer id) { Optional<User> optional = userRepository.findById(id); User user = optional.orElse(null); return user; } @Override public User selectUserByName(String username) { return userRepository.findUser(username); }- Query user data by user ID. In the
Query all user data by pagination.
In the
selectUserAllmethod, create aSortobject to specify sorting rules, create aPageableobject to specify the pagination parameters, call thefindAllmethod ofUserRepositoryto query user data, and return aPageobject. Then, get a user data iterator by calling theiteratormethod of thePageobject. Finally, return the user data iterator.The sample code is as follows:
@Override public Iterator<User> selectUserAll(Integer pageNum, Integer pageSize) { Sort sort = Sort.by(Sort.Direction.ASC, "id"); Pageable pageable = PageRequest.of(pageNum, pageSize, sort); Page<User> users = userRepository.findAll(pageable); Iterator<User> userIterator = users.iterator(); return userIterator; }
Code in UserService.java
The UserService.java file defines the add, delete, modify, and query operations on user data in the database by using JPA.
To configure the UserService.java file, perform the following steps:
Reference other classes and interfaces.
Declare that the current file contains the following classes:
Userclass: used for operating and processing user objects in the service class.Iteratorclass: traverses a collection.
The sample code is as follows:
import com.oceanbase.testspringdatajpa.entity.User; import java.util.Iterator;Define the
UserServiceinterface.Define methods in the
UserServiceinterface to insert, delete, update, and query user data. The interface contains the following methods and classes:insertUsermethod: inserts user data.deleteUsermethod: deletes user data.updateUsermethod: updates user data.updateUserByIdmethod: modifies thenamevalue for a user of the specifiedid.selectUserByIdmethod: queries user data byid.selectUserByNamemethod: queries user data by user name.selectUserAllmethod: queries all user data by pagination.Userclass: used for operating and processing user objects in the service class.Iteratorclass: traverses a collection.
The sample code is as follows:
public interface UserService { void insertUser(User user); void deleteUser(Integer id); int updateUser(User user); int updateUserById(String name, String id); User selectUserById(Integer id); User selectUserByName(String username); Iterator<User> selectUserAll(Integer pageNum, Integer pageSize); }
Code in TestSpringDataJpaApplication.java
The TestSpringDataJpaApplication.java file is used to launch and configure a Spring Boot application.
To configure the TestSpringDataJpaApplication.java file, perform the following steps:
Define classes and interfaces.
Declare that the current file contains the following classes:
SpringApplicationclass: launches a Spring Boot application.@SpringBootApplicationannotation: marks a class as the entry class of a Spring Boot application.
The sample code is as follows:
import org.springframework.boot.SpringApplication; import org.springframework.boot.autoconfigure.SpringBootApplication;Define the
TestSpringDataJpaApplicationclass.Use the
@SpringBootApplicationannotation to mark this class as the entry class of a Spring Boot application, and call theSpringApplication.runmethod in themainmethod to launch the application.The sample code is as follows:
@SpringBootApplication public class TestSpringDataJpaApplication { public static void main(String[] args) { SpringApplication.run(TestSpringDataJpaApplication.class, args); } }
Code in TestSpringDataJpaApplicationTests.java
The TestSpringDataJpaApplicationTests.java file is used to launch and configure a test Spring Boot application.
To configure the TestSpringDataJpaApplicationTests.java file, perform the following steps:
Reference other classes and interfaces.
Declare that the current file contains the following classes:
Userclass: used for operating and processing user objects in the service class.UserServiceclass: injects methods defined in the service class to other classes and calls these methods.@Testannotation: marks a test method.Autowiredannotation: automatically injects dependent objects.@SpringBootTestannotation: marks a test class for an Spring Boot application.Iteratorclass: traverses a collection.
The sample code is as follows:
import com.oceanbase.testspringdatajpa.entity.User; import com.oceanbase.testspringdatajpa.service.UserService; import org.junit.jupiter.api.Test; import org.springframework.beans.factory.annotation.Autowired; import org.springframework.boot.test.context.SpringBootTest; import java.util.Iterator;Define the
UserServicemethod.This method tests various methods in the
UserServiceservice of the Spring Boot application. The method injects theUserServicedependency to call various methods to test the user data insert, delete, update, and query operations, and prints results.Use the
@Autowiredannotation to automatically inject the implementation class of theUserServiceinterface to theuserServicevariable.The sample code is as follows:
@Autowired private UserService userService;Use the
contextLoadsmethod for testing.Insert user data.
Use the
forloop and call theinsertUsermethod ofuserServiceto insert 10 user data records.The sample code is as follows:
for (int i = 1; i <= 10; i++) { userService.insertUser(new User(i, "insert" + i)); }Delete user data.
Call the
deleteUsermethod ofuserServiceto delete the user data record with ID1.The sample code is as follows:
userService.deleteUser(1);Modify user data.
Call the
updateUsermethod ofuserServiceto update the user data record with ID2.The sample code is as follows:
userService.updateUser(new User(2, "update"));Query user data.
- Call the
selectUserByIdmethod ofuserServiceto query user data by user ID, and assign the result to theuservariable. Print theuserobject. - Call the
selectUserByNamemethod ofuserServiceto query user data by user name, and assign the result to theuserByNamevariable. Print theuserByNameobject.
The sample code is as follows:
User user = userService.selectUserById(2); System.out.println("user = " + user); User userByName = userService.selectUserByName("insert"); System.out.println("userByName = " + userByName);- Call the
Query user data by pagination.
Call the
selectUserAllmethod ofuserServiceto query all user data by pagination, and assign the results to theuserIteratorvariable. Use theforEachRemainingmethod to traverse theuserIteratorvariable and print each user object.The sample code is as follows:
Iterator<User> userIterator = userService.selectUserAll(0, 5); userIterator.forEachRemaining(System.out::println);
Complete code examples
<?xml version="1.0" encoding="UTF-8"?>
<project xmlns="http://maven.apache.org/POM/4.0.0" xmlns:xsi="http://www.w3.org/2001/XMLSchema-instance"
xsi:schemaLocation="http://maven.apache.org/POM/4.0.0 https://maven.apache.org/xsd/maven-4.0.0.xsd">
<modelVersion>4.0.0</modelVersion>
<parent>
<groupId>org.springframework.boot</groupId>
<artifactId>spring-boot-starter-parent</artifactId>
<version>2.7.0</version>
<relativePath/> <!-- lookup parent from repository -->
</parent>
<groupId>com.oceanbase</groupId>
<artifactId>java-oceanbase-springdatajpa</artifactId>
<version>0.0.1-SNAPSHOT</version>
<name>java-oceanbase-springdatajpa</name>
<description>Demo project for Spring Boot</description>
<properties>
<java.version>1.8</java.version>
</properties>
<dependencies>
<dependency>
<groupId>org.springframework.boot</groupId>
<artifactId>spring-boot-starter-data-jpa</artifactId>
</dependency>
<dependency>
<groupId>org.springframework.boot</groupId>
<artifactId>spring-boot-starter-web</artifactId>
</dependency>
<dependency>
<groupId>com.alibaba</groupId>
<artifactId>druid</artifactId>
<version>1.2.8</version>
</dependency>
<dependency>
<groupId>com.oceanbase</groupId>
<artifactId>oceanbase-client</artifactId>
<version>2.4.2</version>
</dependency>
<dependency>
<groupId>org.springframework.boot</groupId>
<artifactId>spring-boot-starter-test</artifactId>
<scope>test</scope>
</dependency>
</dependencies>
<build>
<plugins>
<plugin>
<groupId>org.springframework.boot</groupId>
<artifactId>spring-boot-maven-plugin</artifactId>
<configuration>
<excludes>
<exclude>
<groupId>org.projectlombok</groupId>
<artifactId>lombok</artifactId>
</exclude>
</excludes>
</configuration>
</plugin>
</plugins>
</build>
</project>
server:
servlet:
context-path: /testspringdatajpa
port: 8890
spring:
datasource:
driver-class-name: com.oceanbase.jdbc.Driver
url: jdbc:oceanbase://host:port/schema_name?characterEncoding=utf-8&useSSL=false&serverTimezone=GMT%2B8
username: user_name
password: ******
type: com.alibaba.druid.pool.DruidDataSource
jpa:
hibernate:
ddl-auto: update
show-sql: true
format-sql: true
open-in-view: false
package com.oceanbase.testspringdatajpa.dao;
import com.oceanbase.testspringdatajpa.entity.User;
import org.springframework.data.jpa.repository.JpaRepository;
import org.springframework.data.jpa.repository.Modifying;
import org.springframework.data.jpa.repository.Query;
import org.springframework.data.repository.query.Param;
import org.springframework.stereotype.Repository;
@Repository("userRepository")
public interface UserRepository extends JpaRepository<User, Integer> {
//Custom repository handwritten SQL, placeholder value transfer form
@Query(value = "update test_springdatajpa_2 set username=?1 where id=?2", nativeQuery = true)
@Modifying
int updateById(String name, String id);
//SPEL expression, hql syntax
@Query("SELECT u FROM User u WHERE u.username = :username")
User findUser(@Param("username") String username);//Mapping parameter username to database field username
}
package com.oceanbase.testspringdatajpa.entity;
import javax.persistence.*;
@Entity
@Table(name = "test_springdatajpa_2")
public class User {
@Id
@GeneratedValue(strategy = GenerationType.TABLE)
@Column(name = "id", nullable = false)
private Integer id;
@Column(name = "username")
private String username;
public User() {
}
public User(Integer id, String username) {
this.id = id;
this.username = username;
}
public Integer getId() {
return id;
}
public void setId(Integer id) {
this.id = id;
}
public String getUsername() {
return username;
}
public void setUsername(String username) {
this.username = username;
}
@Override
public String toString() {
return "User{" +
"id=" + id +
", username='" + username + '\'' +
'}';
}
}
package com.oceanbase.testspringdatajpa.service.impl;
import com.oceanbase.testspringdatajpa.dao.UserRepository;
import com.oceanbase.testspringdatajpa.entity.User;
import com.oceanbase.testspringdatajpa.service.UserService;
import org.springframework.beans.factory.annotation.Autowired;
import org.springframework.data.domain.Page;
import org.springframework.data.domain.PageRequest;
import org.springframework.data.domain.Pageable;
import org.springframework.data.domain.Sort;
import org.springframework.stereotype.Service;
import org.springframework.transaction.annotation.Transactional;
import java.util.Iterator;
import java.util.Optional;
@Transactional
@Service("userService")
public class UserServiceImpl implements UserService {
private final UserRepository userRepository;
@Autowired
public UserServiceImpl(UserRepository userRepository) {
this.userRepository = userRepository;
}
//insert
@Override
public void insertUser(User user) { userRepository.save(user); }
//delete
@Override
public void deleteUser(Integer id) {
if (!userRepository.existsById(id)) {
return;
}
}
//update
@Override
public int updateUser(User user) {
userRepository.save(user);
return 1;
}
//update based on name and id
@Override
public int updateUserById(String name, String id) {
return userRepository.updateById(name, id);
}
// select one user
@Override
public User selectUserById(Integer id) {
Optional<User> optional = userRepository.findById(id);
User user = optional.orElse(null);
return user;
}
//query user based on username
@Override
public User selectUserByName(String username) {
return userRepository.findUser(username);
}
@Override
public Iterator<User> selectUserAll(Integer pageNum, Integer pageSize) {
//By passing parameters to this method, physical pagination can be achieved, which is very simple.
Sort sort = Sort.by(Sort.Direction.ASC, "id");
Pageable pageable = PageRequest.of(pageNum, pageSize, sort);
Page<User> users = userRepository.findAll(pageable);
Iterator<User> userIterator = users.iterator();
return userIterator;
}
}
package com.oceanbase.testspringdatajpa.service;
import com.oceanbase.testspringdatajpa.entity.User;
import java.util.Iterator;
public interface UserService {
//insert
void insertUser(User user);
//delete
void deleteUser(Integer id);
//update
int updateUser(User user);
//customize SQL and modify name based on id
int updateUserById(String name, String id);
//select one user
User selectUserById(Integer id);
//customize SQL to query users based on username
User selectUserByName(String username);
//query all users
Iterator<User> selectUserAll(Integer pageNum, Integer pageSize);
}
package com.oceanbase.testspringdatajpa;
import org.springframework.boot.SpringApplication;
import org.springframework.boot.autoconfigure.SpringBootApplication;
@SpringBootApplication
public class TestSpringDataJpaApplication {
public static void main(String[] args) {
SpringApplication.run(TestSpringDataJpaApplication.class, args);
}
}
package com.oceanbase.testspringdatajpa;
import com.oceanbase.testspringdatajpa.entity.User;
import com.oceanbase.testspringdatajpa.service.UserService;
import org.junit.jupiter.api.Test;
import org.springframework.beans.factory.annotation.Autowired;
import org.springframework.boot.test.context.SpringBootTest;
import java.util.Iterator;
@SpringBootTest
class TestSpringDataJpaApplicationTests {
@Autowired
private UserService userService;
@Test
void contextLoads() {
//insert
for (int i = 1; i <= 10; i++) {
userService.insertUser(new User(i, "insert" + i));
}
//delete
userService.deleteUser(1);
//update
userService.updateUser(new User(2, "update"));
//selectUserById
User user = userService.selectUserById(2);
System.out.println("user = " + user);
//selectUserByName
User userByName = userService.selectUserByName("insert");
System.out.println("userByName = " + userByName);
//query all users
Iterator<User> userIterator = userService.selectUserAll(0, 5);
userIterator.forEachRemaining(System.out::println);
}
}
References
For more information about OceanBase Connector/J, see OceanBase Connector/J.